Overview
Finalsite Enrollment supports an extremely flexible payment plan system that can be customized to suit your school's needs.
In this article
- Payment Plans for Billing schools vs. those without our billing module
- Payment Plan Columns and Actions
- Setting up Payment Plans
- Payment Plan Schedules
- How to Set Up Specific Plans
Payment Plans for Billing schools vs. those without our billing module
Payment Plans and Payment Schedules are available on contracts for schools with and without our Billing Module. However, there are some important differences for our Billing Customers, which include:
- All payment plans are based on Net Tuition by default.
- All payment plans must have a schedule. An error will display on the payment plans page if a schedule is missing.
- Please note: The due date of payment plan schedules is based on the Billing Date.Click here to learn more.
- Multiple payment plan schedules can be set up within a single payment plan to support mid-year enrollment and rolling enrollment.
Payment Plan Columns and Actions
Within Settings-->Financial-->Payment Plans, you can view/manage the following:
-
Term/School Year Picker: Select the term/school year you wish to view data for from the drop-down menu.
-
Add a new payment plan: This option allows you to create a new payment plan.
-
Active?: This indicates if the payment plan is an available option on the contract/registration form.
-
Canonical Name: This is the name of the payment plan used on the back end of the system.
-
Default?: This indicates if a payment plan option is selected by default on the contract.
-
No. of payments: The number of payments assigned to the payment plan, which can range from 1 payment up to 12 payments.
- You can also select the Due Immediately option from this dropdown. When selected, it means that payments would be due at the time of contract signing. In other words, when a family is completing their contract, if they were to opt for the plan that was "Due Immediately", they would be prompted to pay their tuition right then and there. Please note: if you are utilizing this option, the 'Collect Deposit' box needs to be checked off within your Deposit page (even if you do not charge a deposit fee).
-
Has Associated Fee: This means there is a fee or discount enabled within the plan.
-
Has Schedule: This indicates whether or not you have a payment schedule set up. If there is no schedule set up within the plan, a red triangle will show in this column. IMPORTANT: Each payment plan must have a schedule set up for billing to work.
-
Last Edit: The date the last edit was made.
-
Edit History: Click on the 'view recent changes' link to see details of up to the last 5 dates changes were made to the payment plan.
-
Edit: Click here to edit the details of the payment plan.
-
Delete: Click here to delete the payment plan.
Ledger Lock
The Ledger Lock feature lets you secure your financial records by setting a locked date. Once enabled, it prevents any alterations to the ledger entries dated on or before the set date. Ledger Lock is set up on your Billing Setup page (Settings > Financial > Billing Setup).
Here's how the Ledger Lock feature impacts the Payment Plans:
- If a payment plan includes a locked month, the plan will not show up as an option on contracts.
- In addition, a flag will appear in the Has Schedule column of this page to let you know that the plan will not appear on contracts due to locked dates.
- Flagged plans can still be edited.
Read more about Ledger Lock and how it affects other areas of your site in our Settings: Billing Setup Page article.
Setting up Payment Plans
To build a new plan, select 'Add a new Payment Plan'.
To edit an existing plan, 'Edit' on the right side of the page.
Once you select, one of these, the 'Edit Payment Plan' window will open. Within this window, you can set or update the following details:
-
Name: The canonical name of the payment plan.
- This name is internal only and is never displayed to parents.
- Once you set a canonical name (when building a new payment plan from scratch) it is frozen and can not be altered at any later point in time. The canonical name is used for business rules, so the system keeps this name for life to ensure no changes can be made that would break the rule.
- If you are editing an existing plan, the canonical name will be greyed out, as seen below.
- Number of payments: This is the number of payments within the plan.
Payment Plan Schedules
Payment Plan Schedules are used to create billing installments on contract submission. Each schedule allows you to set the number of payments, the percentage due for each payment, and the months that they are due.
The due date of any schedule/plan is determined on the Billing setup page (Settings --> Financial--> Billing Setup), or within the individual payer's record. Click here to learn more.
-
Add New Schedule: This allows you to add a new payment plan schedule with a start month/year and to set the percentage amount due per payment. We support multiple schedules to support mid-year enrollment and rolling enrollment.
-
Multiple Schedules: To enroll kids mid-year or after the start date of your payment plans, you can add multiple schedules for any of your plans that have more than one payment. For example, if you have a 10 month plan, you can setup a schedule for 9 months, 8 months, 7 months, etc. Just click on 'add new schedule' and set up the start months later in the cycle. Applicants that enroll past the start date of the 10-month plan can still select this plan later on in the cycle and their payments will adjust automatically.
-
-
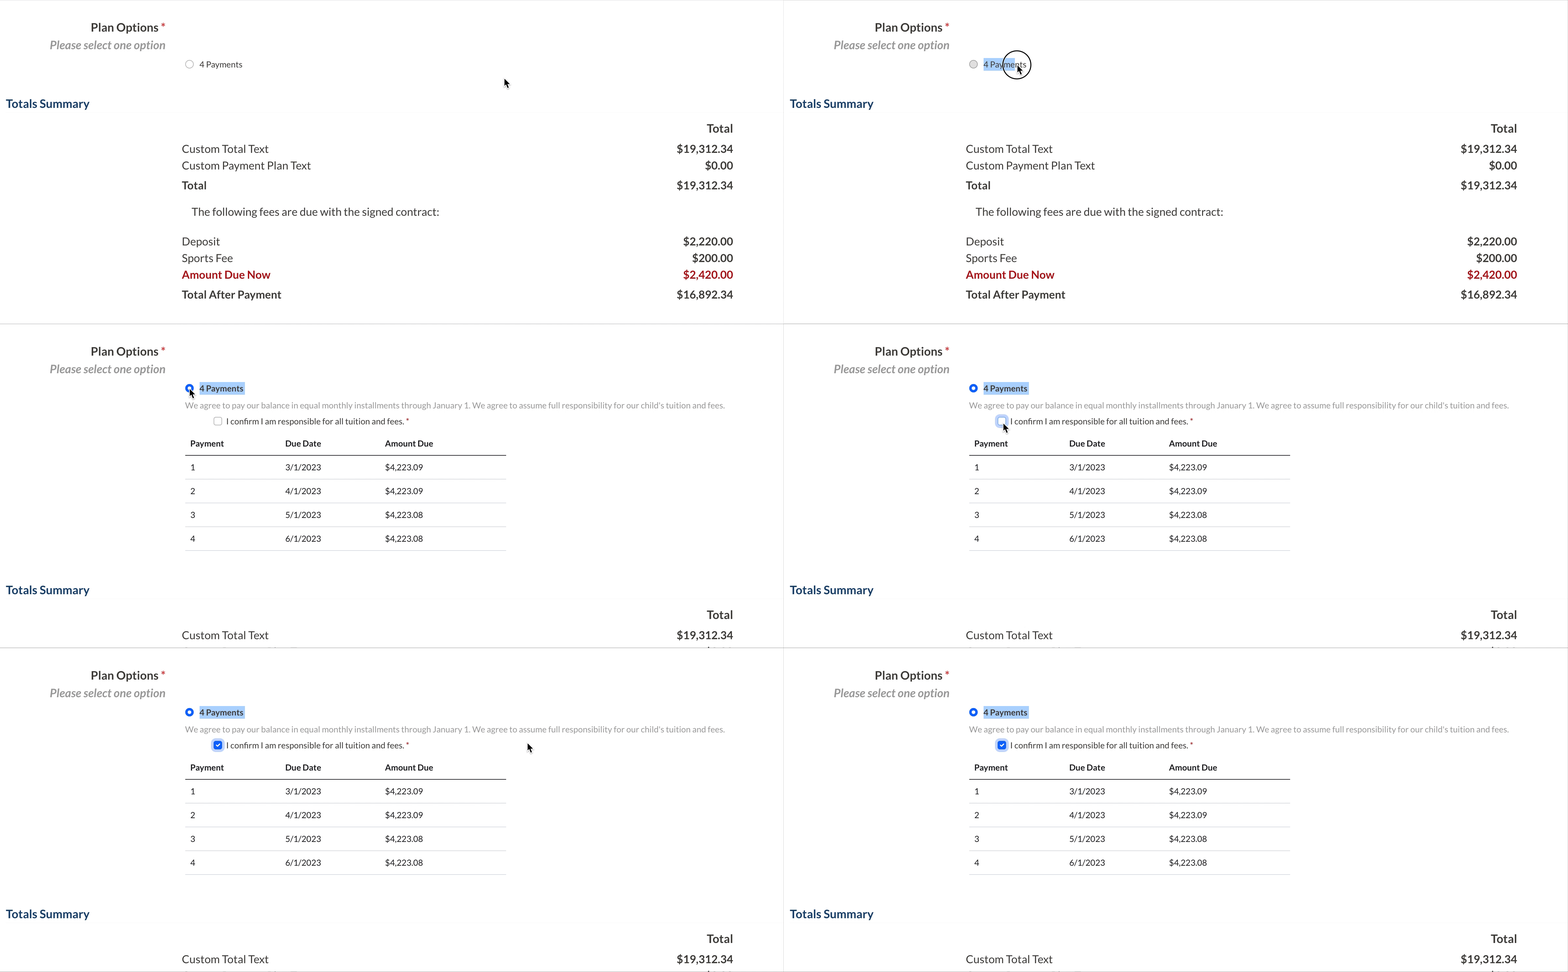
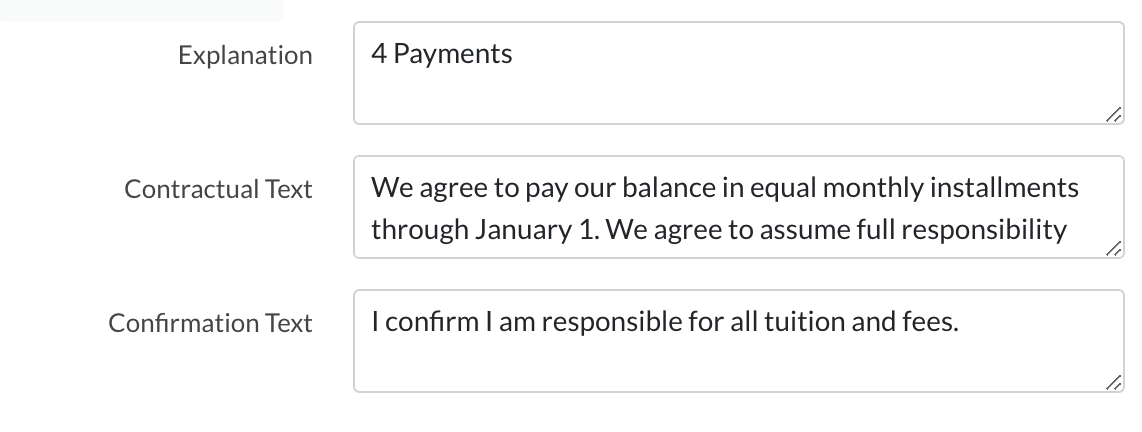
Explanation: This is the text the parent sees on the contract while selecting and reviewing payment plan options. The explanation text is like the parent-facing title of the plan.
-
Contractual Text: This text shows when a parent clicks to select a plan. It displays as grey text under the explanation. This is typically used for a declaration of payment such as "I/We agree to pay our balance in 'x' installments by 'x' date."
-
Confirmation Text: This text will show next to a required checkbox within the contract underneath the contractual text. If using Confirmation Text, the parent will be required to mark the box as complete before proceeding.
Internal View when editing the plan language:
What the above looks like on the contract:
-
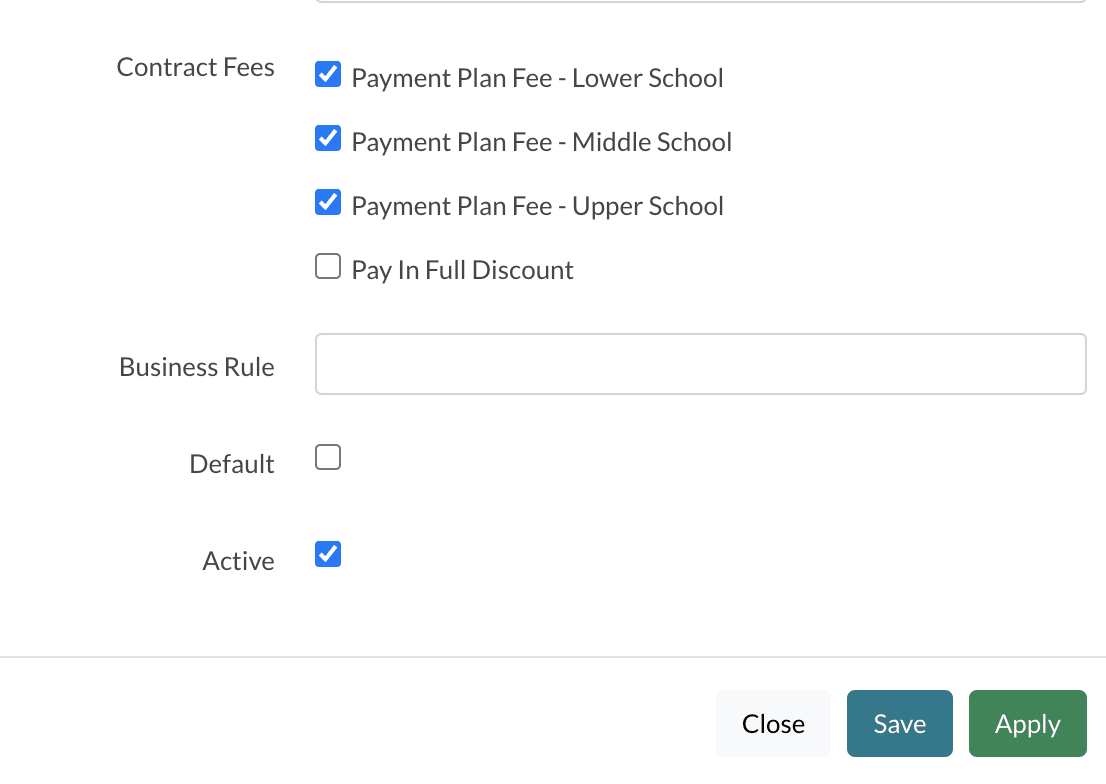
Contract Fees (optional): This is an optional amount charged or discounted if this particular payment plan option is selected.
-
The fee is defined on the Contract Fee page and can be a fixed amount or percentage due.
-
The payment plan fee is defined on a per-plan basis.
-
-
Business Rule (optional): Business rules can be used to define whether or not the payment plan is offered to parents on the contract.
-
For example, some schools only allow payment plans for domestic students or students receiving financial aid.
-
Adding a business rule is something you have access to manage on your end if you know how to write liquid, however, our team is happy to help. Contact support if you need assistance adding or writing a rule.
-
-
Default: The default option defines whether this option is selected by default when a parent views a contract.
-
Active: This indicates if this payment plan is active.
-
Save: Click here to save your changes and exit this screen.
-
Apply: Click here to apply your changes and refresh the edit window.
How to Edit a Schedule
Click on the pencil along the right to edit the schedule details. You can also delete a payment plan schedule by clicking on the trashcan.
Within the edit view you can manage the following:
-
Number of payments: The number of payments assigned to the plan.
-
Schedule: Set each payment's start month, year, and percentage amount. Once you set the first schedule, the remaining schedules will auto-fill. You can always overwrite and personalize any of the schedule details as needed for your process.
-
Percent: The percent of each payment is automatically calculated when you select the number of payments. You can, however, set percentages manually by clicking in the box. When setting percentages manually, they must equal 100% for the schedule to work. You will see a warning message if they don't add up to 100%.
-
How to Set Up Specific Plans
Payment Plans can be setup in different ways, based upon the needs of your school. This section will review the different payment plan types and how to set them up.
Pay In Full Plan
This payment plan allows tuition and additional fees to be due at the time of signing
the contract. First, you will need to create a new payment plan and name it. On the second field for "Number of Payments" choose "Due Immediately". Type in an explanation and fill out any other fields that you would like your payers to see when choosing this plan. Then select if you would want this plan to be active or not and then hit save.
On the contract, if someone chooses this plan, they will not see a deposit line item, like they would on any other payment plan. Instead, they will see their "Total After Payment" amount shown as $0. Important Note: This payment plan does not work if you do not collect a deposit.
Non-Cascading (One Schedule) Payment Plan
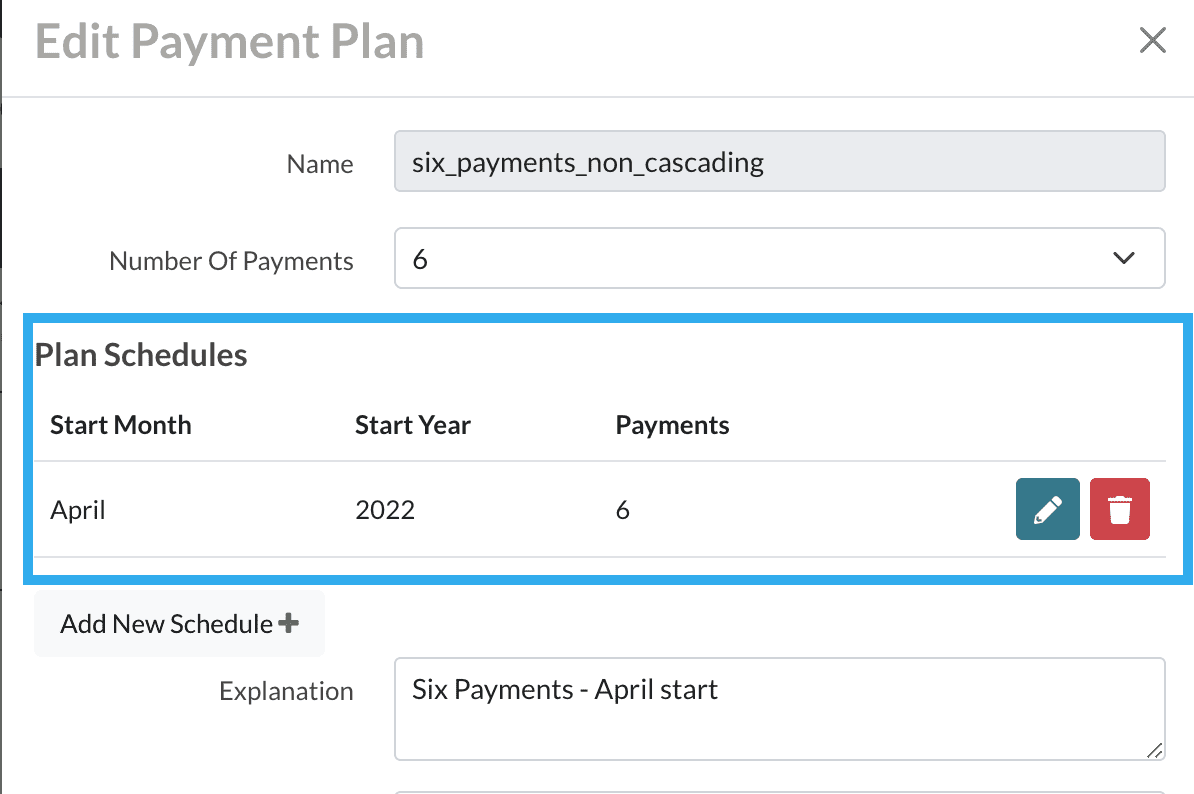
A non-cascading payment plan is a payment plan that only contains one schedule. This is beneficial when you don’t want the contract to auto-adjust to the current month. For example, when you need to update a payment plan’s past charge schedule, you would select a non-cascading plan when managing the contract regeneration.
Setting up a non-cascading payment plan will follow the same workflow as described above with other payment plans. However, with this type of plan, you will only have one Plan Schedule, as pictured below.
- Pro Tip: Include the word ‘non_cascading’ when naming the payment plan to help you distinguish between this plan and any plans that you have with cascading schedules
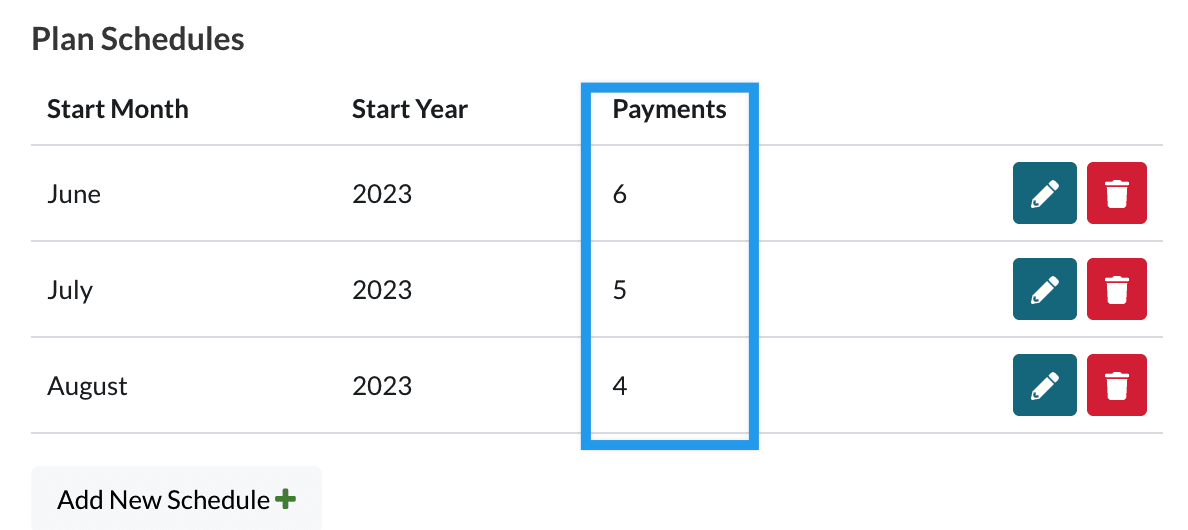
Creating multiple schedules within a payment plan allows your plans to adjust automatically based on when the parent completes their contract.
For example, if you have a 6-payment plan that starts in June, but then you accept a new student sometime in July, with a cascading payment plan set up, the parent could see their first payment as due in August (rather than in June).
Here are some variations of cascading payment plans:
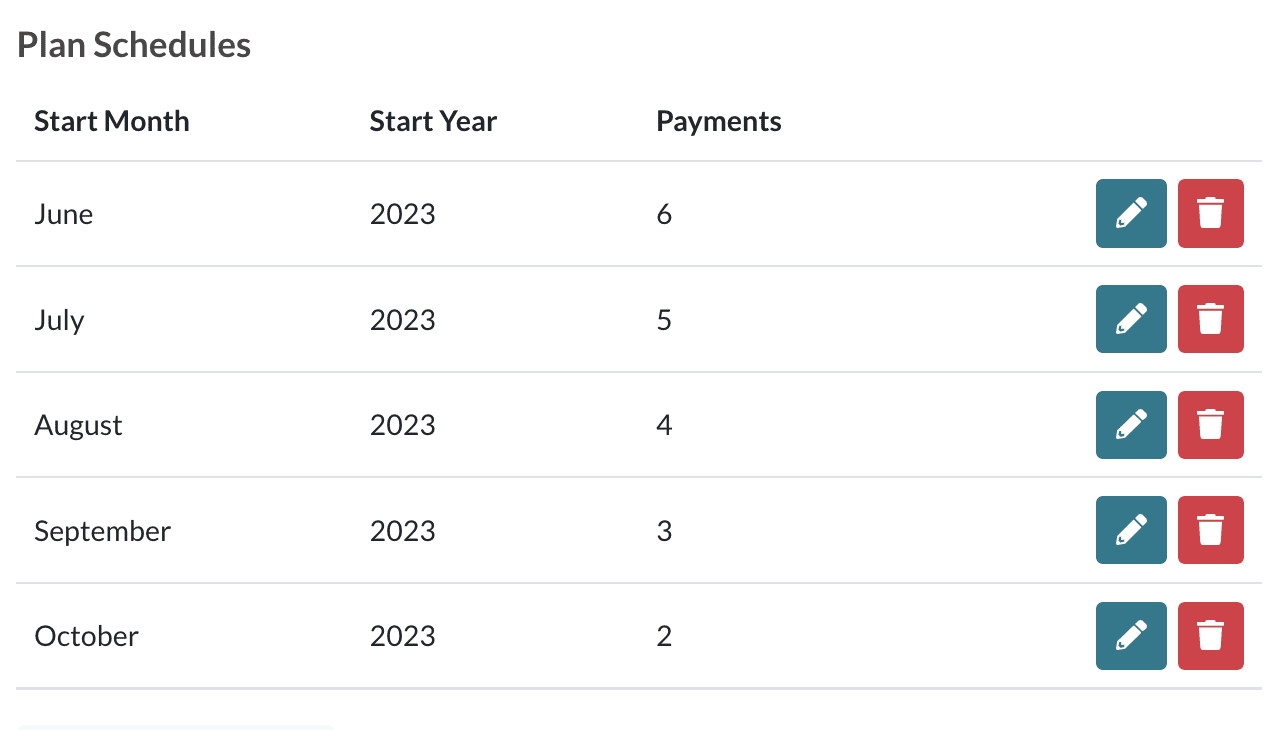
- A multi-payment plan that tapers
- For example:
- First schedule: 6 Payments > starts in June
- Second schedule: 5 Payments > starts in July
- Third schedule: 4 Payments > starts in August
- etc.
- For example:
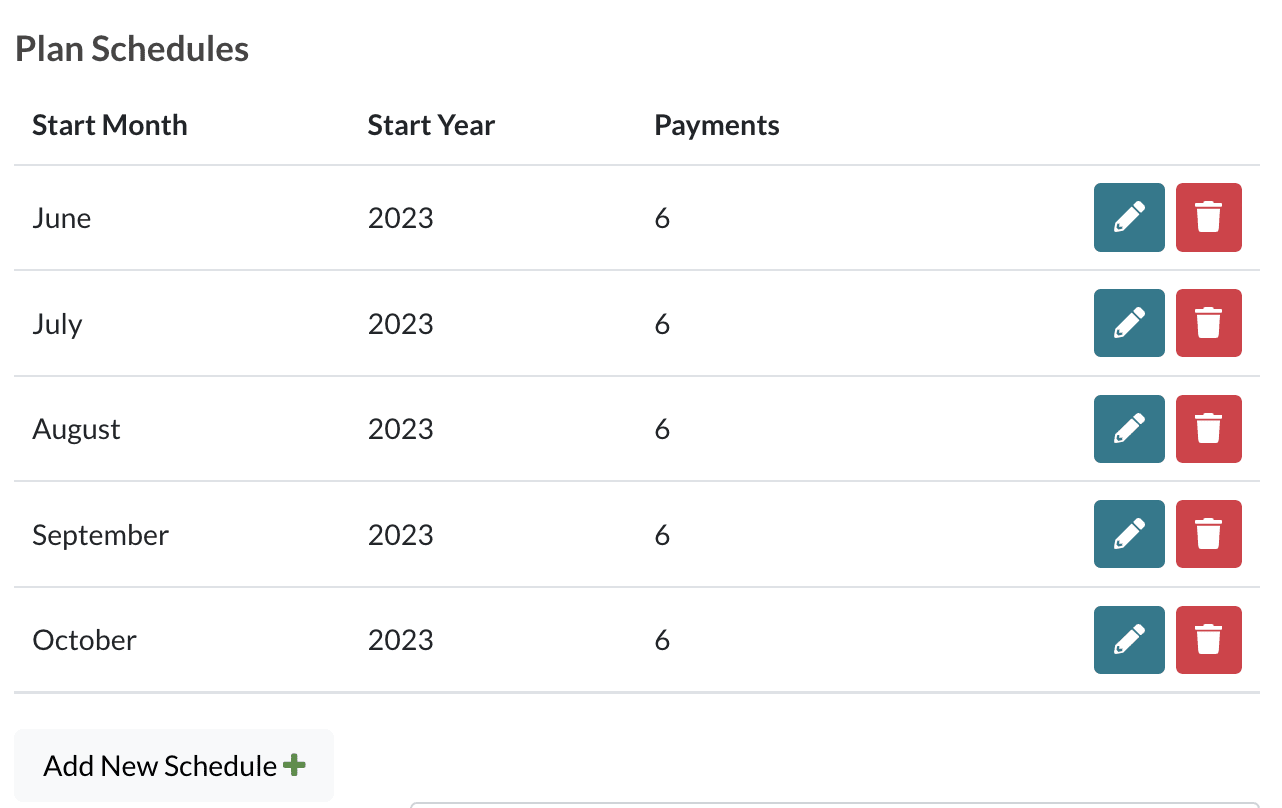
- A multi-payment plan that has the same number of payments in each schedule
- For example:
- First schedule: 6 Payments > Starts in June
- Second schedule: 6 Payments > Starts in July
- Third schedule: 6 Payments > Starts in August
- etc.
- For example:


Comments
0 comments
Article is closed for comments.