Overview
To get started with Finalsite Enrollment Billing, you'll need to define some important criteria for all of your collections and reporting. These criteria are located within Settings > Financial > Billing Setup.
Who has access to this page?
Types: System Admin and Admins
Permissions: Financial
In this article
- Billing Setup
- Revenue Recognition
- Late Fee Setup
- Ledger Lock
- Autopay Setup
- Email Notification Settings
Billing Setup
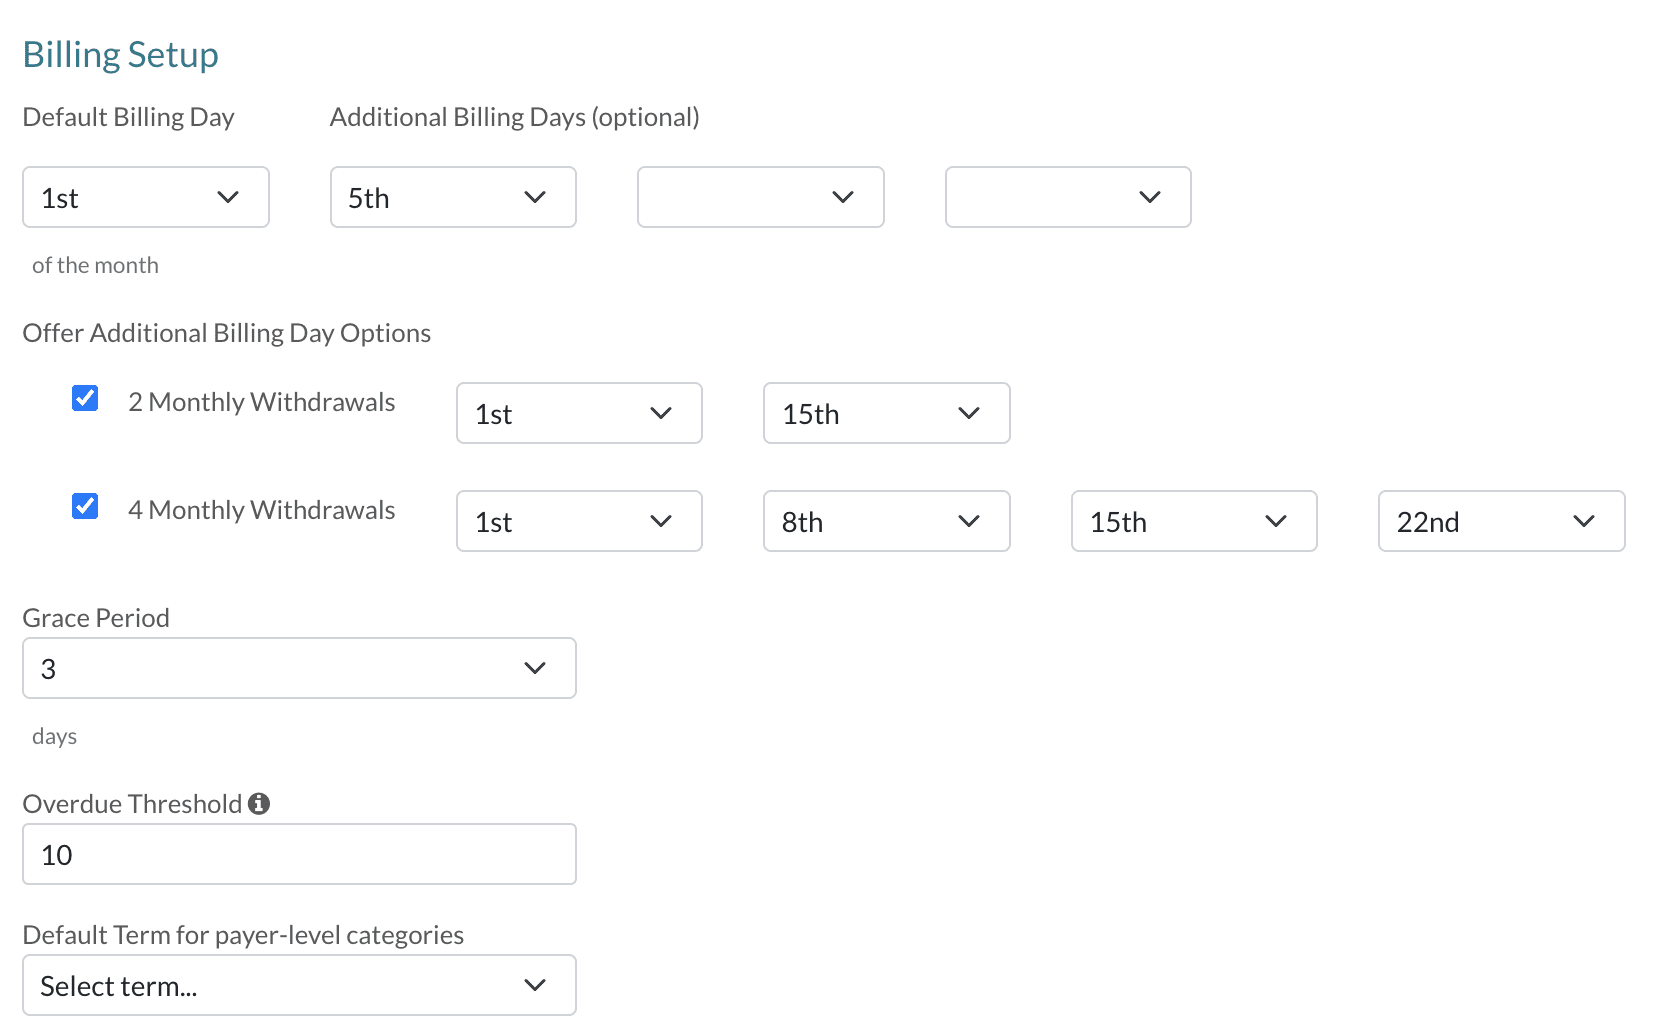
Within the first section of the page, labeled Billing Setup, you'll be able to set the following:
- Default Billing Day
- Additional Billing Days
- Multiple Autopay withdrawal days (Offer Additional Billing Day Options)
- Grace Period
- Overdue Threshold
- Default term for payer-level categories
Default Billing Day
The Default Billing Day is the date that will be initially set as the Billing Date for all payers. If no changes are made to a payer's billing day(s), this will be their billing date each month. This is a global setting which means that, when it's set, it updates the default date for all payers who do not already have a custom Billing Date set.
When custom billing dates are set for payers, the global billing date does not apply to them, and updating the global date does not change that payer's billing date settings.
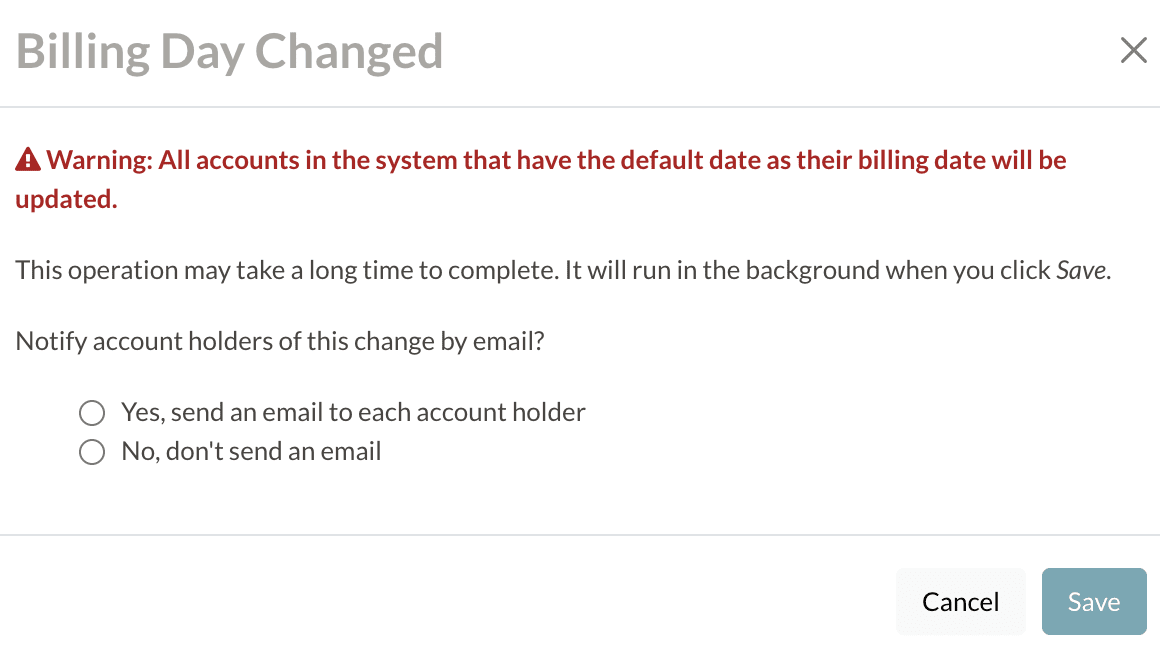
When you adjust the Default Billing Day, you will see the following confirmation pop-up box which will ask you whether or not you'd like to email families to notify them of the change.
- If you opt to email families, they will be sent the Billing Day Changed email.
- Only the accounts that have the Default Billing Day set as their date will receive the message because changing the Default Billing Date has no impact on accounts with custom billing date(s). You can read more about that email in our Billing Communications article.
Last Day Option
Setting the Billing Day to "Last Day" will make the last day of the month the billing day. So, whether that falls on the 28th, 30th, or 31st, the Billing Day would be whatever the last day of the month is.
The Billing Day drives a few important behaviors of your billing cycle:
-
Within the contract, payment plan schedules will only reflect the Default Billing Day.
-
Any custom billing day(s) will be reflected on the payer ledger and within billing statements.
-
-
For those with Autopay enabled:
- Outstanding balances are charged to payers on their Autopay Day(s). If they have no custom autopay days set up, their balance will automatically be charged on the Default Billing Day.
Additional Billing Days (optional)
*You can only use Additional Billing Days when Autopay is enabled.
Next to setting the Default Billing Day, you have the option to set Additional Billing Days.
These are the options that payers can choose to change their billing date to if you have enabled the Additional Billing Days option under the Autopay Setup section (see below).
In other words:
- If you want to give parents the option to change their billing date:
1. Enable the Additional Billing Days option under Parent Facing Additional Payment Options.
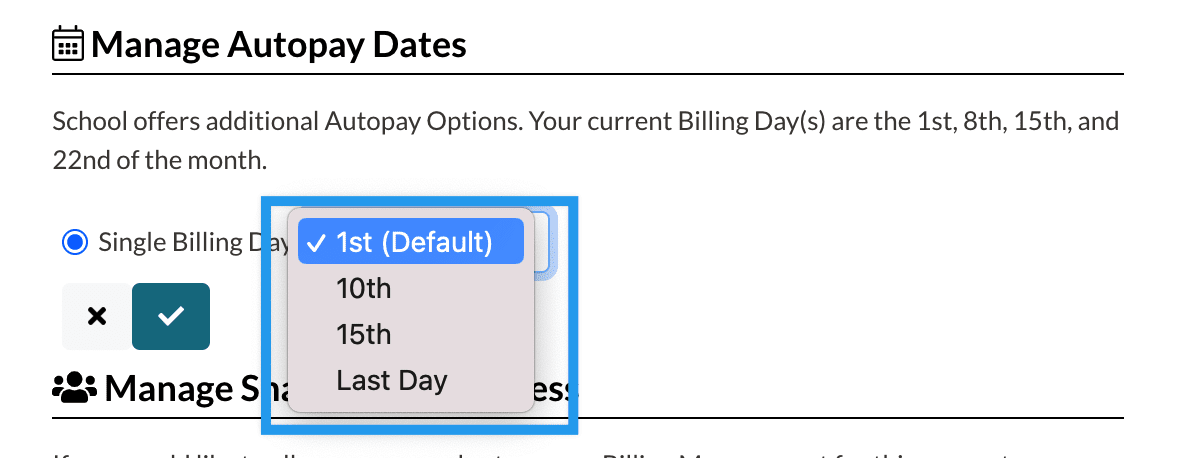
2. Choose the dates you would like for parents to have the option to select within the Additional Billing Days dropdown menus pictured above. - Once saved, whatever dates you selected will be available for parents to select when managing their Autopay. Example:
Additional Notes:
- You can add up to 3 additional dates for parents to choose from as their billing dates. The parent will see these options (along with the Default Billing Day) when opting to change their autopay date in their parent portal.
- You don't have to select dates in all 3 dropdown menus. If you just want to give the parent 1 additional option, for example, you can leave the other dropdown menus blank.
For example:
- If changing or adding Additional Billing Days, you must select the Save button on the Billing Setup page for the changes to take effect.
- You, as an admin, are not limited to these options. Within a parent record, on their Billing > Overview Tab, you can still select to change a payer's Billing date to any date in the month.
Multiple Autopay withdrawal days (Offer Additional Billing Day Options)
*You can only use Additional Billing Day Options when Autopay is enabled.
This section contains two options:
- 2 Monthly Withdrawals
- 4 Monthly Withdrawals
Enabling either of these options allows you to set parents up with multiple autopay withdrawals per month.
Once you select an option, you must set the autopay dates by selecting them in the dropdown menus and save your change with the Save button. Please see the Important Notes section for things to keep in mind.
Important Notes:
- Enabling these here only enables them as options on your side (parent records), i.e. it doesn't grant parents the option to make that change in their portal. To make these options parent-facing, they must be enabled under the Autopay Setup section.
- Read more about what enabling this for parents means within the Parent Facing Additional Payment Options section below.
- Read more about what enabling this for parents means within the Parent Facing Additional Payment Options section below.
- You must select dates that are at least 7 days apart. If you try to set dates closer than that, you will see an error message when attempting to save.
- If a parent opts to switch from a single autopay day to multiple autopay days after the family's first billing charge of the month has passed, the change will not take effect until the following month.
- For example: The Jenkins family has a single billing day each month (the 10th) and they are set up for autopay. Every month on the 10th, they are automatically charged their balance. Then, one month on the 14th, they decide to switch from single autopay to multiple autopay. Because their billing charge date (the 10th) has already passed, their new multiple autopay schedule will not take effect until the following month.
Custom Billing Day Per Payer
You can set a custom billing day(s) per payer within the payer record in the billing Overview tab. When set, the custom day will ignore the Default Billing Day when Autopay is processed and when ledger items are assessed to billing statements.
Please refer to our Contact Record: Billing Tab article for more in-depth information regarding setting custom days for payers within their records.
Grace Period
The Grace Period indicates the number of days after the due date when an account is overdue.
- The overdue flag will not be set for billing accounts unless the threshold amount has been met or exceeded and the grace period has expired.
- Grace Period and Threshold Amount settings are optional. Accounts are considered overdue based on these settings only if they're configured on your site. If they are not configured, an account will be considered overdue if they have an outstanding balance after their Billing Date has passed.
- For those with multiple autopay days per month, the Grace period is counted after the last autopay withdrawal date of the month.
- If you need to apply a late fee, you can do so manually within the contact record or you may enable automatic late fee assessment within the billing setup page.
- Late fees are not automatically set or turned on by default. If your school would like to automate late fees, you can turn them on within the billing setup page. Read more in the Late Fee section below.
Overdue Threshold
The Overdue Threshold is the minimum balance amount set for an account to be considered overdue after the Billing Day, or after the Grace Period, if one is set.
For those with multiple autopay withdrawal dates, the Billing Day is the last autopay withdrawal date in the month.
If you hover over the "i" you will see the following helper text:
Example: The first day after the Billing Day or the first day after the Grace Period expires, the account will be flagged as overdue as long as the overdue threshold amount has been met or exceeded.
Important Notes:
- Overdue flag: This amount controls the overdue flag in the Billing Accounts Page and in the Payer Records. Unless the threshold has been reached, the billing accounts will not have the 'overdue' flag set.
- Email Notifications: The automatic overdue emails that are sent out will be turned off for a payer if their current balance is less than the overdue threshold the moment they become overdue. However, if the threshold amount has been met, the overdue email will be sent.
Example:
-
I have a balance of $5 due 11/1 and I do not pay. On 11/2 I should be overdue (if there's no grace period). However, there's an overdue threshold of $10 set, which means my account isn't yet considered overdue. I won't receive the overdue email as the payer, and my account won't have the overdue flag on the Admin side of the record or the Billing Accounts page.
- Next month, if I owe $105 on 12/1 ($100 for December plus the $5 I never paid in November), and I still don't pay, the amount that my account is overdue by is now $110, which is above the $10 threshold. This means my account will now be considered overdue, and I will receive the overdue email as a payer. In addition, the Billing Accounts page and the Payer record will be flagged as overdue for Admins.
- If enabled, this is also when an automatic late fee would be applied to the ledger.
- In this example, only a threshold is set up. When Grace Periods are also configured, the system first waits a set amount of time before marking an account as overdue.
Default term for payer-level categories
This dropdown sets the default term for payer (or account-level) categories.
- All auto-assigned payer-level fees (like late fees or NSF fees) will automatically have this term set for them.
- If you are manually adding a payer-level fee, you can select a term to apply it to. If you don't select one, it will auto-set to the term set here.
Important
You must update this every year. If you do not set the term here, the system defaults to your Enrollment year. That means when payer-level charges (like late fees) are posted to a ledger, the system will assign the fee to whatever term you have set as your enrollment year (unless you set the term here.)
We recommend updating the term after the last autopay date for the current term has passed or when your fiscal year ends.
Revenue Recognition
Within the Billing tab, you have a Revenue Recognition Report to track what financial line items you booked for the year, and when you expect to receive it.
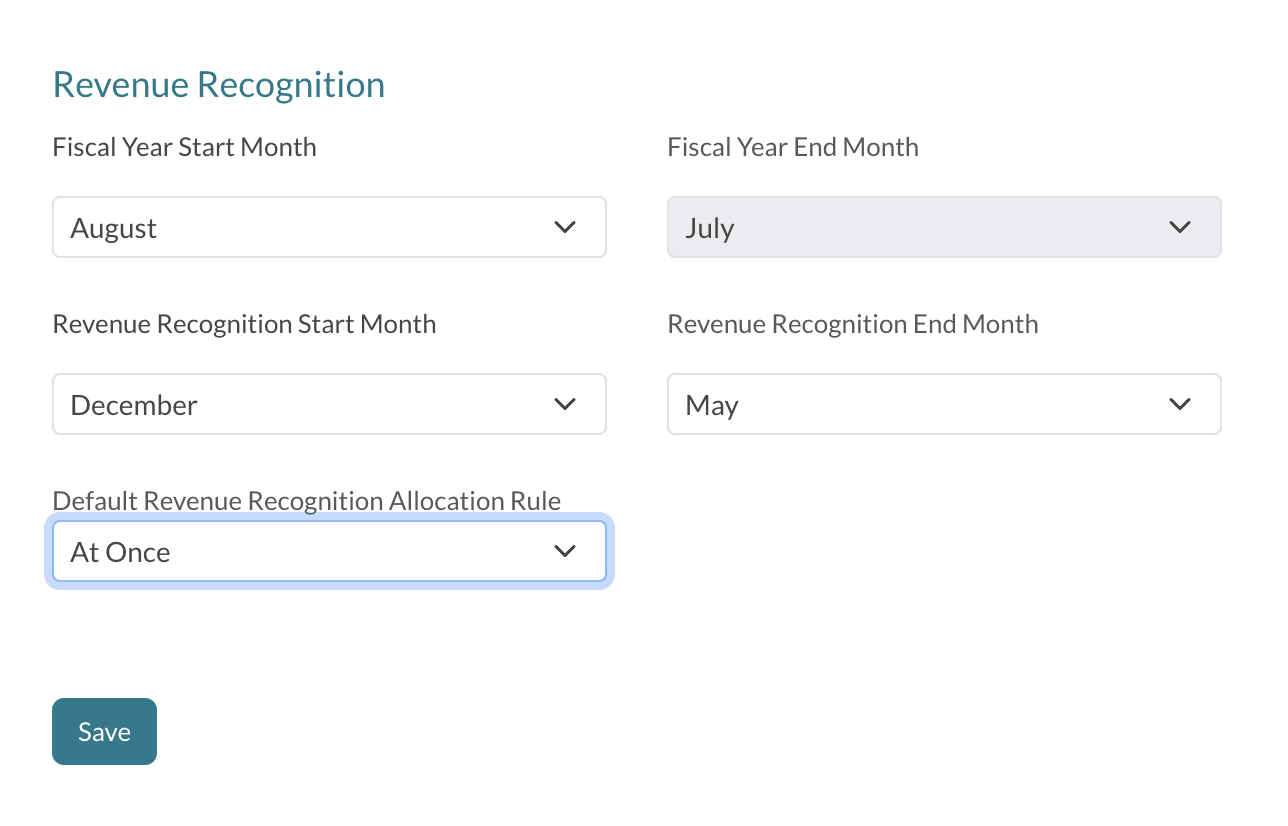
In your Billing Setup page, you'll need to set some global parameters such as the start and end months and a default revenue recognition allocation rule. This will act as a default for all of your Billing Categories. However, if you need to define different recognition periods or allocation rules per billing category, you can do so within Settings >Financial >Billing Categories.
Setting the Global Recognition Periods
Set both the Fiscal Year and Revenue Recognition start/end months so that the system can correctly calculate data around expected income and expenses throughout the year.
Fiscal Year Start/End Months
Set the start and end dates for your fiscal year here.
The fiscal start and end months define the 12-month period your school uses to track and manage its finances. This period is called the fiscal year, and it doesn’t have to align with the calendar year (January to December).
The fiscal year period must be 12 months. When you select the start month, the end month is automatically set 12 months afterward.
Revenue Recognition Start/End Month
Revenue Recognition periods are when amounts will be recognized.
Your revenue recognition start and end months define the specific time frame when tuition or other payments are officially recorded as income.
For example, if a family pays tuition in July for the upcoming school year, the revenue recognition start month might be September (when the school year begins), and the end month might be June (when the school year concludes).
Good to know
- Revenue Recognition start and end months must fall within the fiscal year's start and end months.
- Revenue Recognition start and end months will apply to all billing categories unless custom parameters have been set for individual billing categories.
Changing the Revenue Recognition period on the Billing Setup page automatically updates all Revenue Recognition periods on the Billing Category page. If you edit these here, you'll see a pop-up asking you to confirm. You can also select to customize the Revenue Recognition start/end months per billing category. Read more about that here: Billing Categories
Default Revenue Recognition Allocation Rule
Allocation is how the amounts will be recognized and are defined as follows:
At Once
With At Once, the revenue will be posted in full (at one time) in the month that it's recognized in.
- Outside of the recognition period: Anything outside of the recognition period will be posted in full in the first month of the recognition period.
- Reversals: Anything reversed on an account will be recorded (in full) in the month that the reverse occurs.
Equal Spread
With Equal Spread, revenue is spread over the recognition period equally, regardless of when it is added.
- Outside of the recognition period: The revenue is spread equally across the recognition period.
- Reversals: Reversed amounts are equally spread over the full recognition period regardless of whether or not they occur during the recognition period.
Spread with Catchup
With Spread with Catchup, when revenue is added, the amount for all previous recognition period months is lumped into the month the revenue is recognized and the remaining amount is then distributed evenly over the remaining months.
- Outside of the recognition period: Any revenue added outside of the recognition period is spread equally among the recognition months.
- Reversals: When revenue is reversed, the amount for all previous recognition months is combined and posted in the month the reversal takes place and the remaining amount is spread across the remaining months in the recognition period.
Example: If your school's revenue recognition period is July to June, and a $2400 contract is signed in October, $800 of revenue will be recognized in October. The remaining $1600 will then be evenly distributed across the subsequent eight months, November through June ($1600 / 8 months = $200 per month).
Remaining Spread
With Remaining Spread, the revenue is spread evenly among the remaining months of the recognition period starting in the month that the revenue was recognized in.
-
Outside of the recognition period: If the revenue is added outside of the recognition period, the revenue will be spread over the recognition period equally ( in other words, it will work just like the Equal Spread option.)
- Reversals: Revenue that is reversed is spread evenly across the remaining months of the recognition period starting with the month that the revenue was recognized in.
Example: If your school's revenue recognition period is July to June, and a $1200 contract is signed in April, the $1200 will be recognized across the remaining three months: April, May, and June. This means each of those months will record $400 in revenue ($1200 / 3 months = $400 per month).
Late Fee Setup
Late Fees for billing accounts are not automatically set or turned on by default. If your school would like to automate late fees, you can turn them on within the billing setup page.
Reminders
- Late fees will be applied according to the grace period and/or overdue threshold amount if either is set.
- In addition, once enabled, late fees will only apply moving forward, they will not be added to any amount that was considered overdue before enabling Automatic Late Fees within your site.
- For those with multiple autopay withdrawal dates per month, the Billing Day is considered the last autopay withdrawal date of the month. Therefore, the system processes Late Fees based on that day with consideration of whatever Grace period and Threshold you may have set.
-
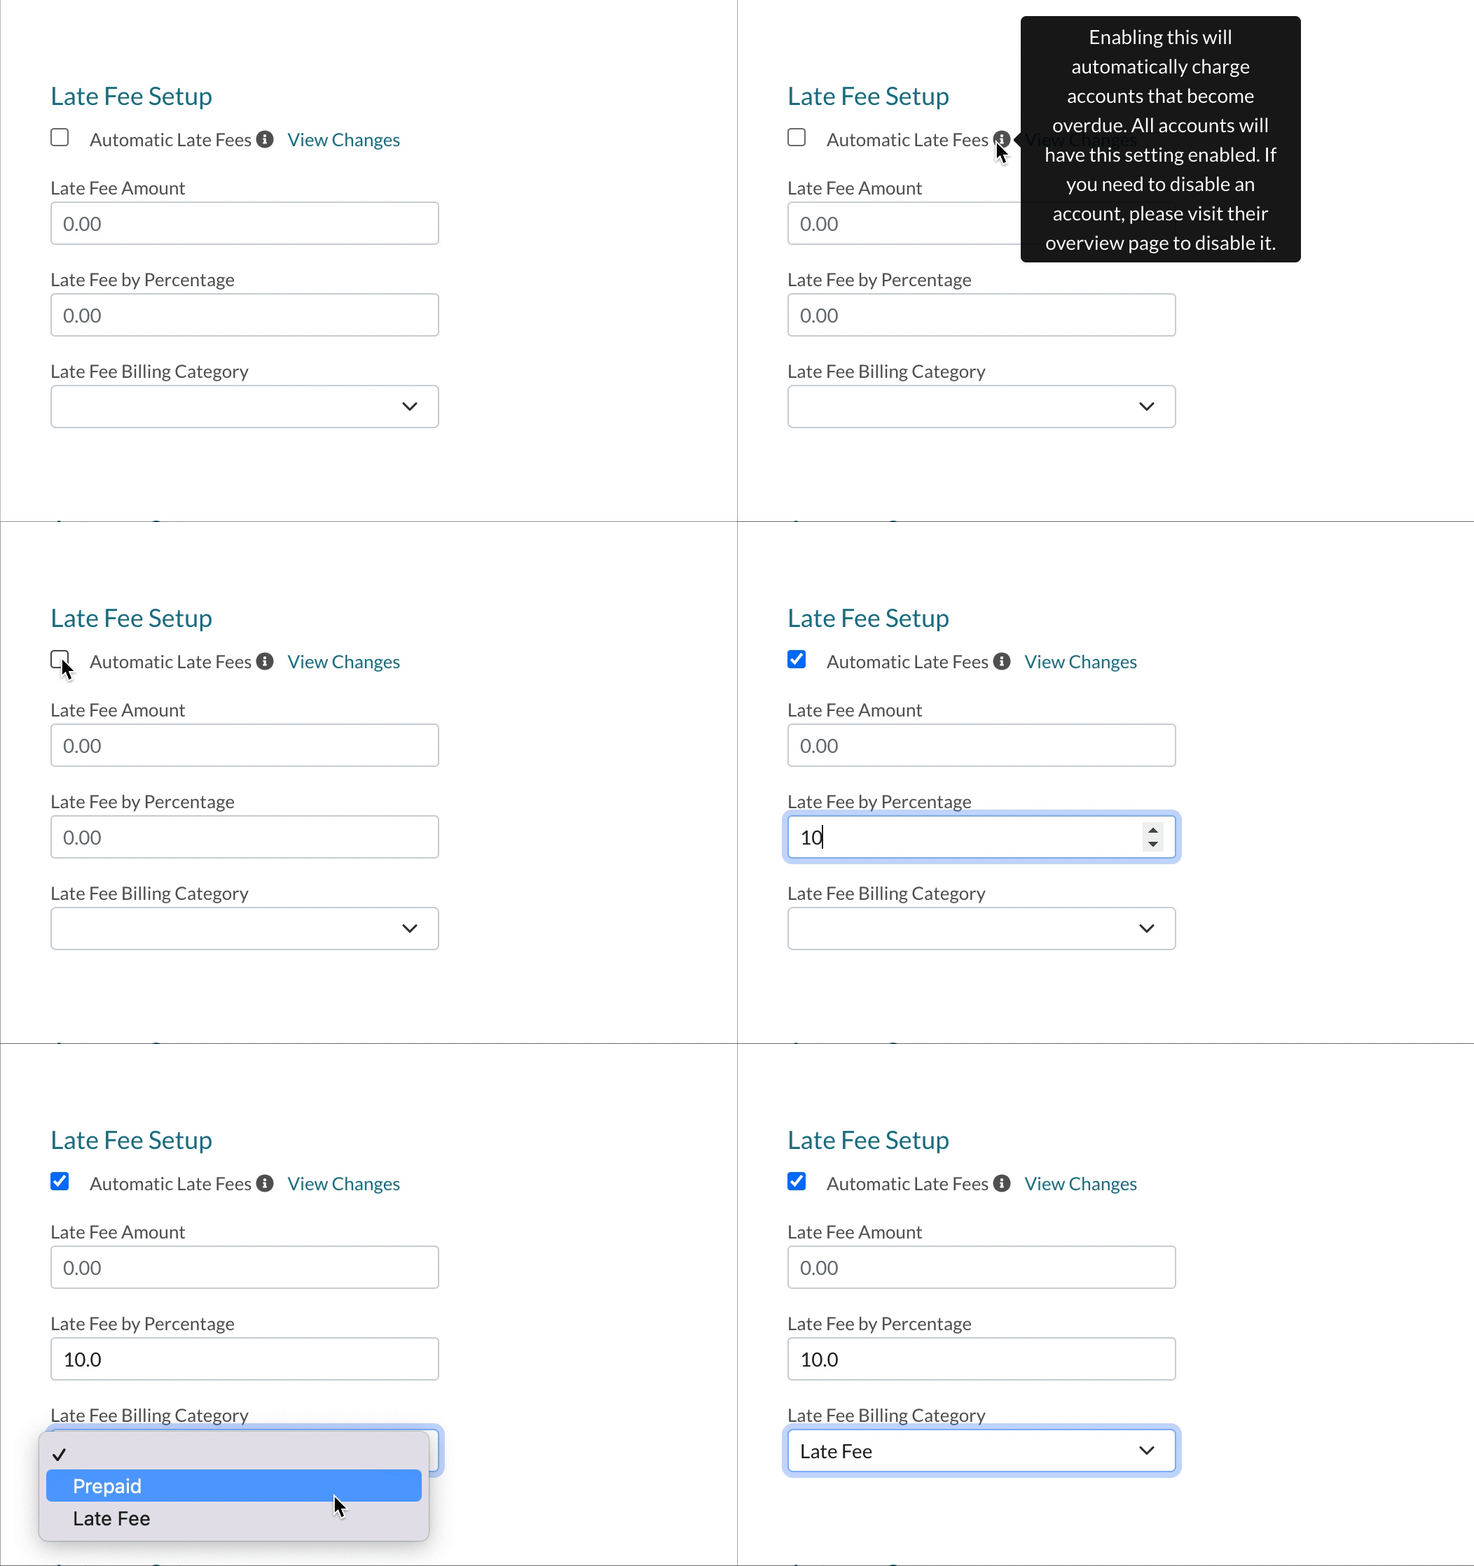
Automatic Late Fees: Within the Late Fee Setup section, you can check the box to automatically apply late fees If you hover over the "i" you will see additional information.
- Automatic Late fee charges are recurring, meaning they will continue to be charged every month that the account remains overdue.
- Late fees can be disabled on an individual basis within the Overview tab of the billing account record.
-
Late Fee Amount: You can set a custom amount for all late fees.
- You can set late fee amounts as a flat rate, a percentage, or both a flat rate and a percentage. For example, if you'd like to set a flat $10 charge plus a 1% charge for all overdue accounts, this can be supported by adding both a flat 'Late Fee Amount' and a 'Late Fee by Percentage'.
- If you opt to charge both a flat rate and a percentage, the system will first calculate the percentage and then add the flat rate on top of that.
- You can set late fee amounts as a flat rate, a percentage, or both a flat rate and a percentage. For example, if you'd like to set a flat $10 charge plus a 1% charge for all overdue accounts, this can be supported by adding both a flat 'Late Fee Amount' and a 'Late Fee by Percentage'.
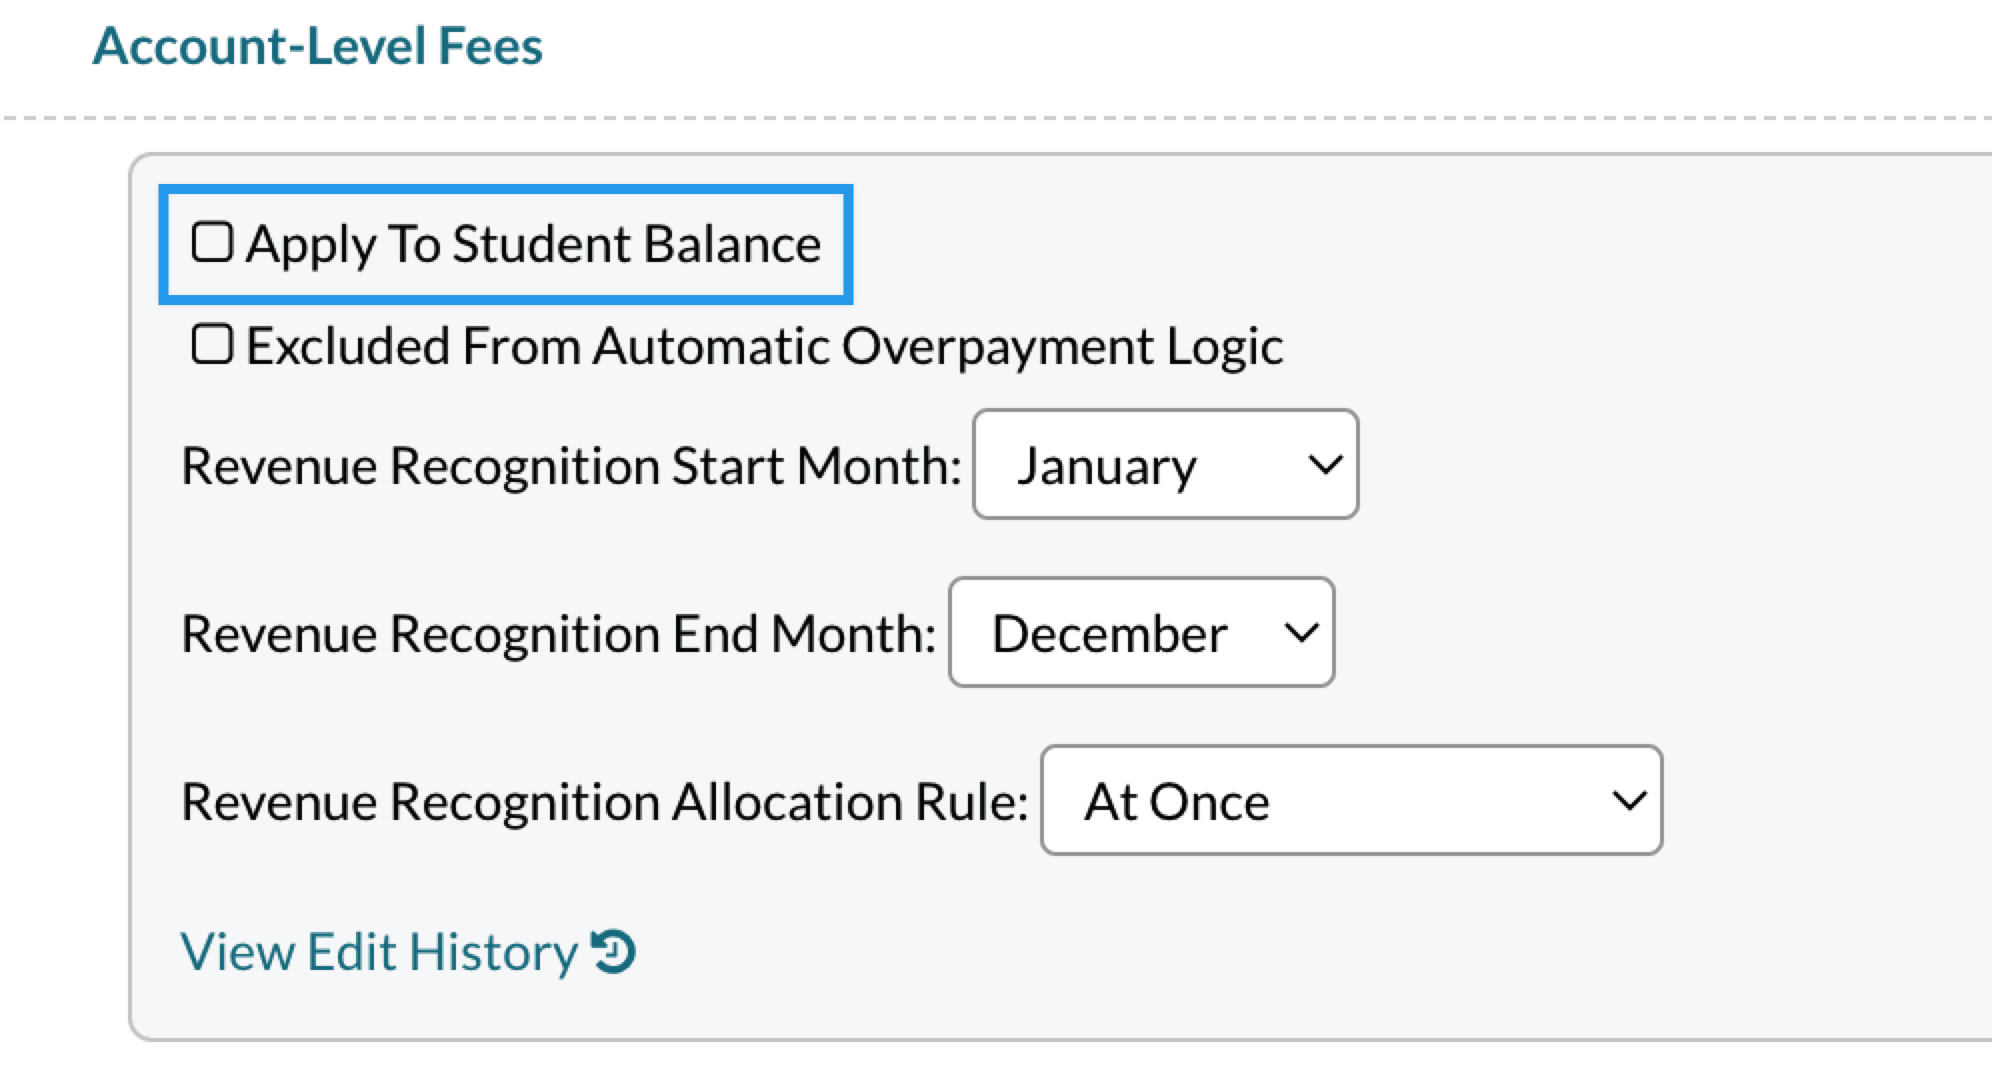
- Late Fee Billing Category: You MUST have a Parent Fees Billing Category setup within your Settings >Financial >Billing Categories page. This billing category must have the "apply to student balance" option unchecked.
A couple of additional notes:
- Remember to save your changes by clicking the 'Save' button near the bottom of the page.
- Late fees are applied according to the grace period and/or overdue threshold amount if either of these is set.
- When applicable, Late Fees are only charged once per month (even for accounts set up with multiple Autopay dates).
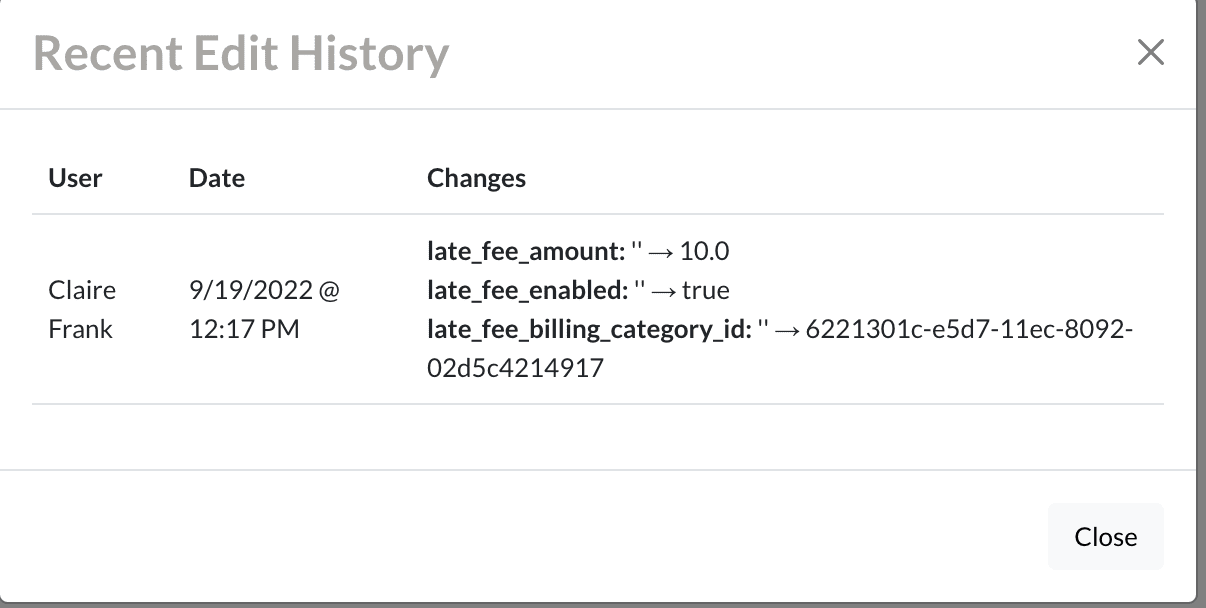
- You will also have the option to select 'View Changes' next to the Automatic Late Fees checkbox, which will give you an audit log of the adjustments to this setting.
Parent Fees Billing Category
When setting up late fees, you must have a Parent Fees billing category setup within Settings > Financial > Billing Categories page. This billing category must have the "apply to student balance" option unchecked as displayed in the example below.
Ledger Lock
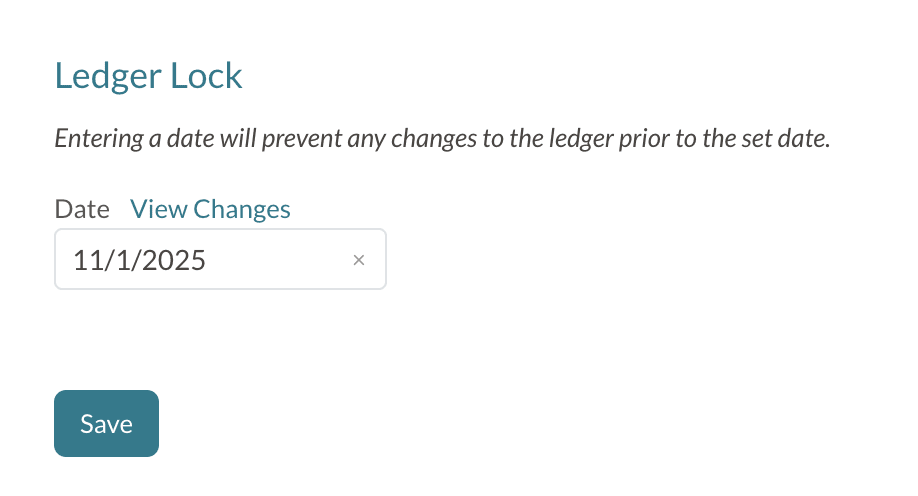
The Ledger Lock lets you secure your financial records by setting a locked date. Once enabled, it prevents any alterations to the ledger entries dated on before the set date.
For example, if you set the Ledger Lock to 11/1/2025, no ledger items can be added or changed on 11/1/2025 and all dates prior to that.
Here's a list of what the Ledger Lock impacts:
Ledger
-
Delete and Edit buttons are not available for payments or charges with locked dates.
-
Adding charges, credits, or payments to the ledger is blocked for the locked dates.
- In the Rearrange Installments tool, you won’t be able to rearrange installments for any months within the locked range.
- Note: The rearrange button will be available but when processing the adjustment, you’ll have to select a post date outside of the locked range.
- Note: The rearrange button will be available but when processing the adjustment, you’ll have to select a post date outside of the locked range.
-
Contract Submission (pay at once payment plans): If a contract is submitted during the locked time frame, ledger items will post starting on the 1st billing date after the locked period.
- For example: The current date in this example: 08/01/2024 and Ledger Lock date: 10/1/2024
- A contract is submitted on the current date (which is in the locked period), here's what to expect:
- Only payment plans that don't have dates within the locked range will appear as options.
- If selecting a pay-at-once option, the charge will post as due on the 1st billing date after the ledger lock period, which, in this example would be 11/1/2024.
- A contract is submitted on the current date (which is in the locked period), here's what to expect:
- For example: The current date in this example: 08/01/2024 and Ledger Lock date: 10/1/2024
Payment Plans
- If a payment plan includes a locked month, the plan will not show up as an option on contracts.
- In addition, a flag will appear on the payment plans page in the Has Schedule column to let you know that the plan will not appear on contracts due to locked dates.
- Flagged plans can still be edited.
- The payment plans setup page is found under Settings > Financial > Payment Plans.
Refunds and Failed Payments
-
Refunds: If the original date is within the locked range, the refund will be posted to the ledger with the current date listed instead of the original payment date.
- Failed Payments: If the original date is within the locked range, both the Chargeback and NSF fee will be posted to the ledger with the current date listed instead of the original payment date.
Billing Reports
- You are blocked from adding charges or credits in the locked period in the Accounts, Students, and AR Aging reports.
Autopay Setup and Parent-Facing Options
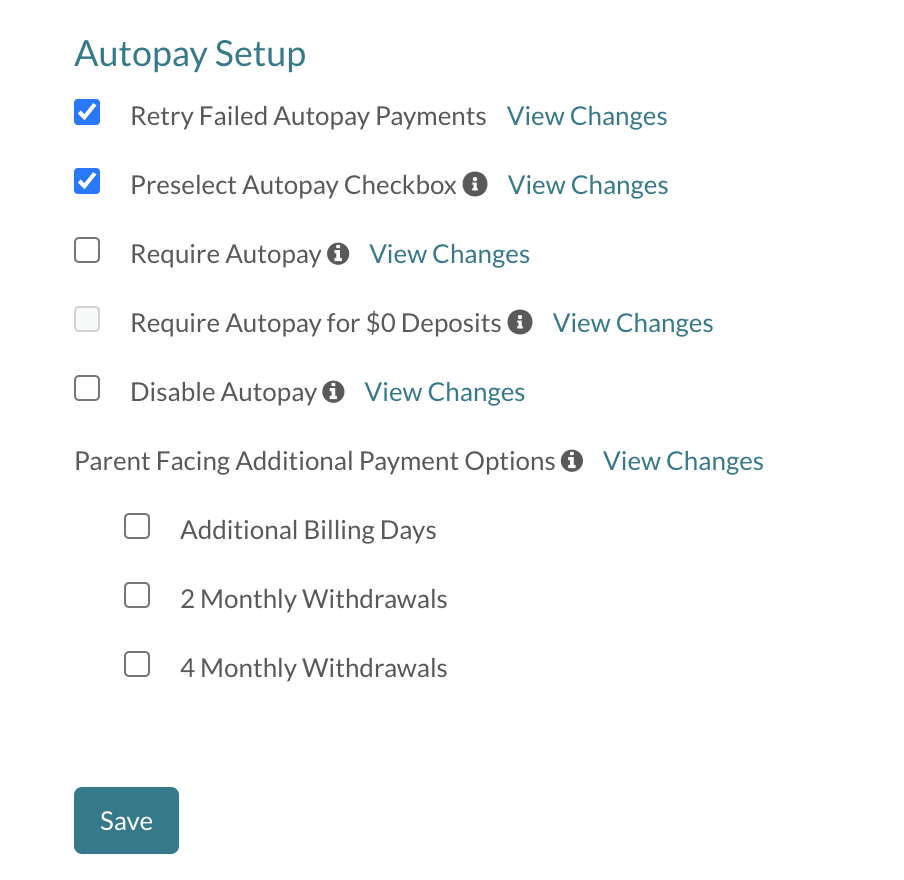
Autopay is an option that enables automatic withdrawals for payers. Within the Autopay setup section, you can enable, require, or disable Autopay. In addition, you can set how much autonomy you'd like to give to payers for changing and enabling different autopay options in their Parent Portal. Read on to learn more.
Autopay Setup
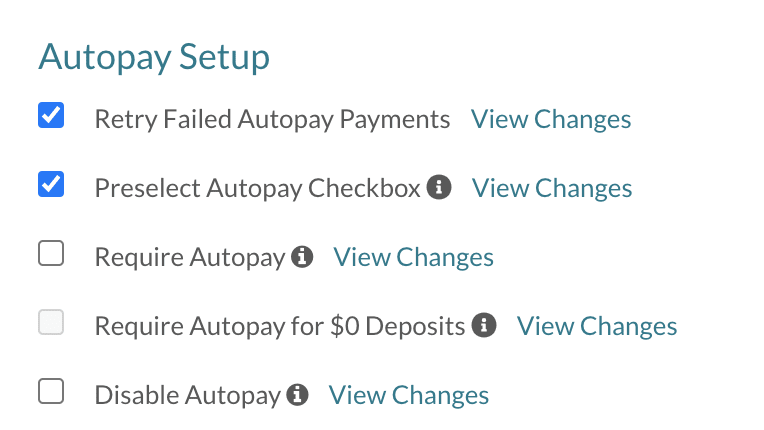
- Retry Failed Autopay Payments: Enabling this allows the system to re-attempt to charge most failed payments. In other words, if a payer has autopay enabled and their payment fails, the system will retry charging them one more time. You can read more about this feature in our Retry Failed Autopay Payments article.
-
Preselect Autopay Checkbox: Enabling this setting requires users to specifically opt out of autopay when making a payment. Disabling this setting requires users to manually opt-in to autopay by clicking the checkbox when making a payment. Users who have already selected an autopay status will not be affected.
-
Require Autopay: Enabling this setting will require payers to enroll in autopay when making a payment. It will also turn on autopay for anyone who has saved a payment method in their account.
-
Require Autopay for $0 Deposits: Enabling this setting requires users to enroll in Autopay, even if their contract has no deposit or other fees collected at signing. Please note that to save this selection, you need to have Autopay enabled. If you try to save it without Autopay, you'll see an error message.
- A Few additional notes on this feature:
-
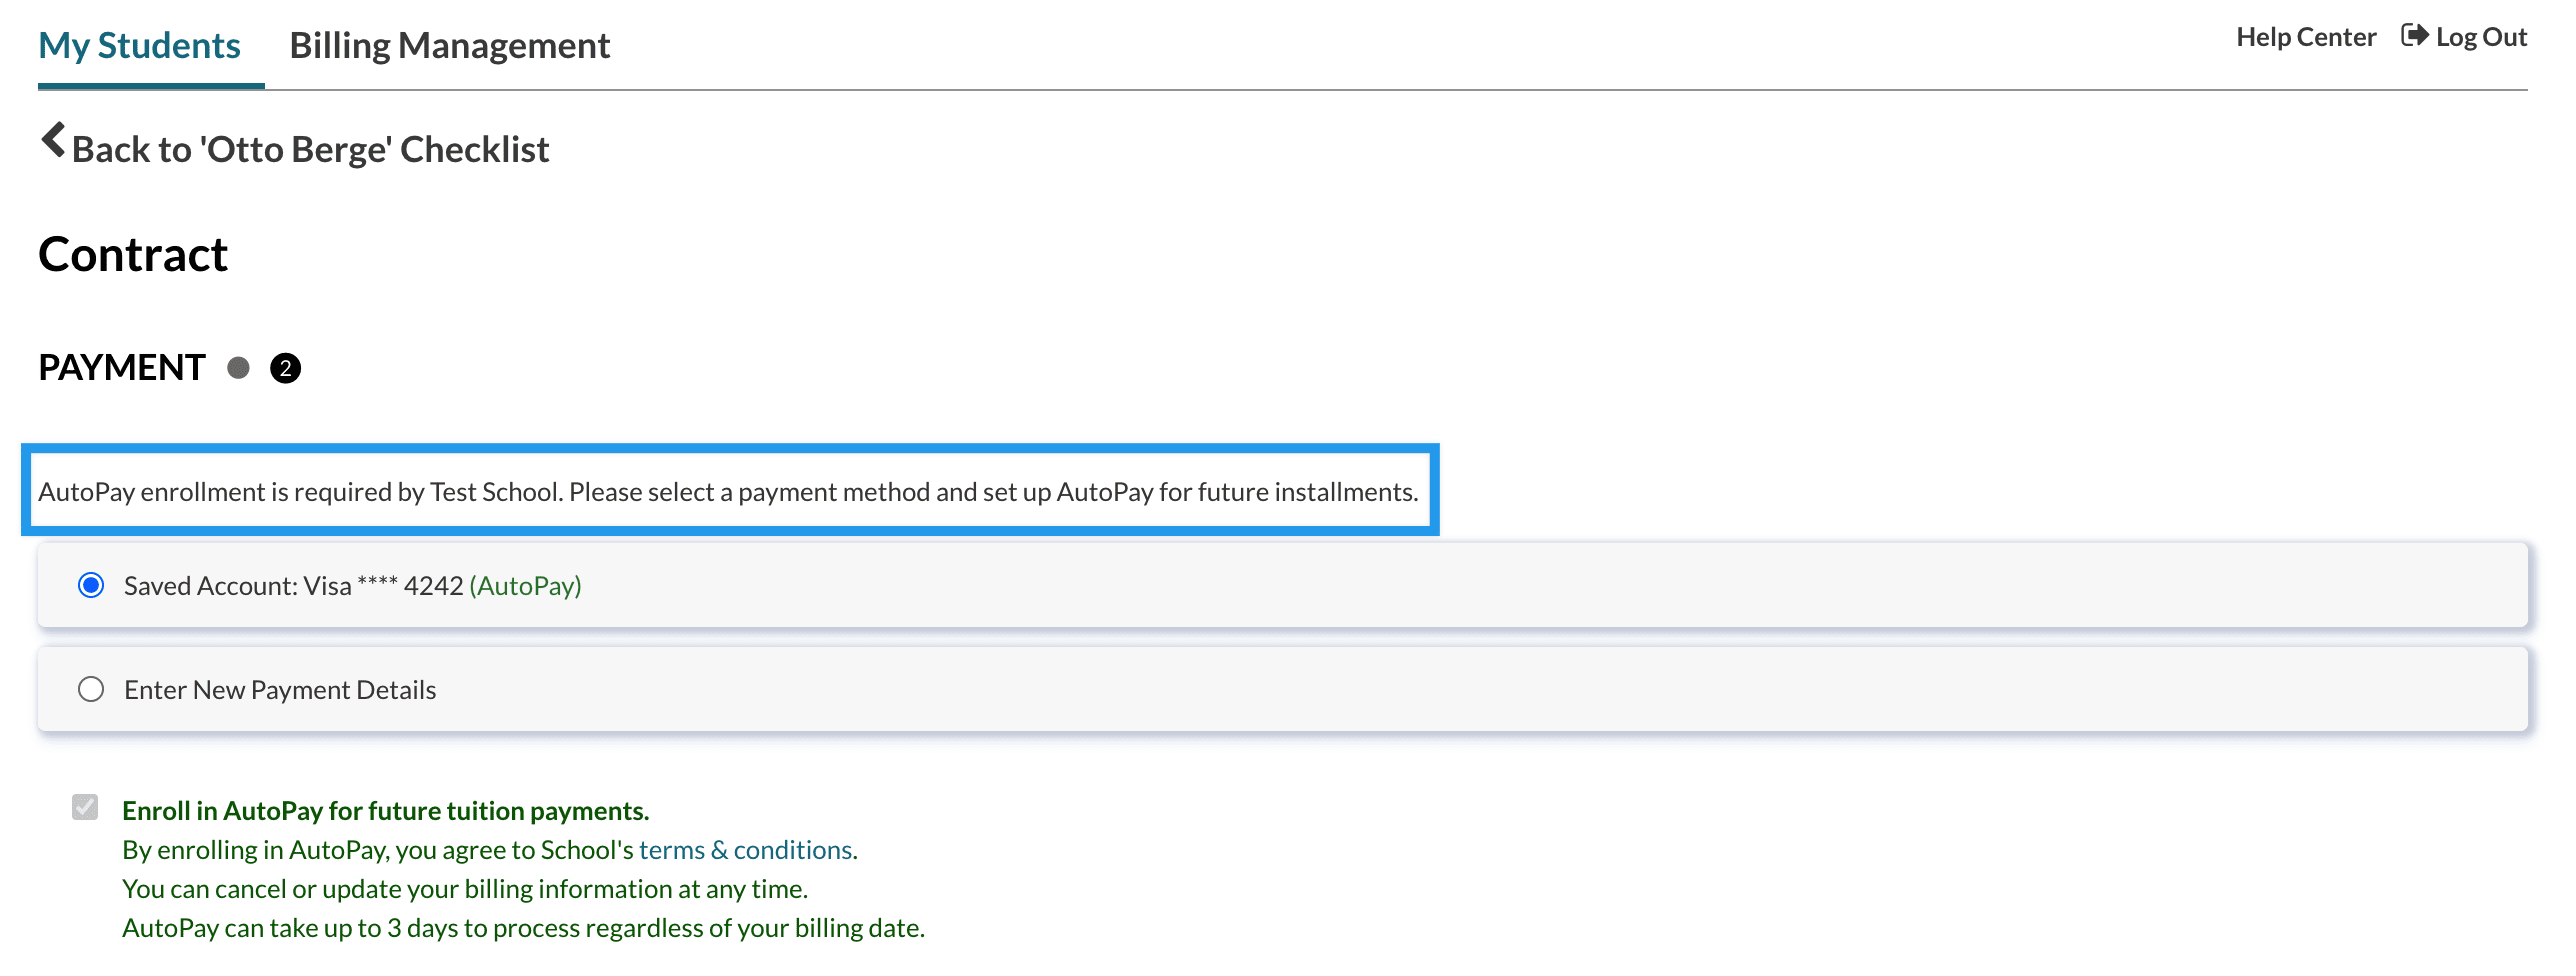
When the contract is submitted by a parent, the payment screen will show a message at the top, stating: AutoPay enrollment is required by {Your School Name}. Please select a payment method and set up AutoPay for future installments.
-
This payment screen will show up, even if there's no deposit required, but no payment will be actually processed in this case. The page will only serve to save the parent's autopay details.
-
- A Few additional notes on this feature:
Here is an example of what the messaging on the Payment screen looks like. Please note that a blue box has been added to the image to highlight the text area.
-
Disable Autopay: Enabling this setting will remove the ability for a payer to enroll in autopay. It will also turn off autopay for anyone who currently has autopay enabled.
To enable one of these settings, check the box and click Save at the bottom of the page. A window will pop up asking you to confirm your choice.
If your school has Autopay set as required and you manually disable it for any one of your parents, Autopay can only be re-enabled for that parent if either:
- You re-enable it on the Admin side (by clicking the ‘Enable Autopay’ link on the parent’s Billing > Overview tab.)
- Or, the parent adds a new payment profile within their Billing Management tab. This new profile will give them the option to enroll in Autopay again.
- Notes on this process:
- When the parent adds a new payment method and selects to Enroll in Autopay, the selection they make is locked in ( the ‘Enroll in Autopay’ checkbox can not be unchecked).
- The parent can refresh their page or click back to get out of making this selection or they can proceed to finalize enrolling in Autopay.
- Notes on this process:
Parent Facing Additional Payment Options
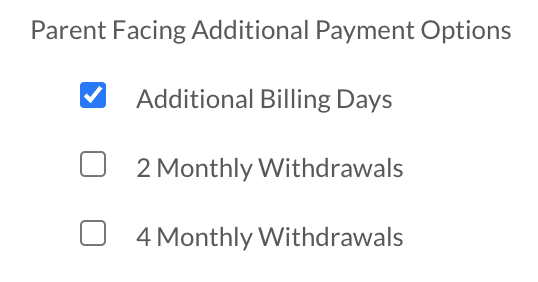
The Parent Facing Additional Payment Options allow you to enable autopay processing options for parents to choose on their end, within the Parent Portal.
Autopay must be enabled to utilize any of these options.
-
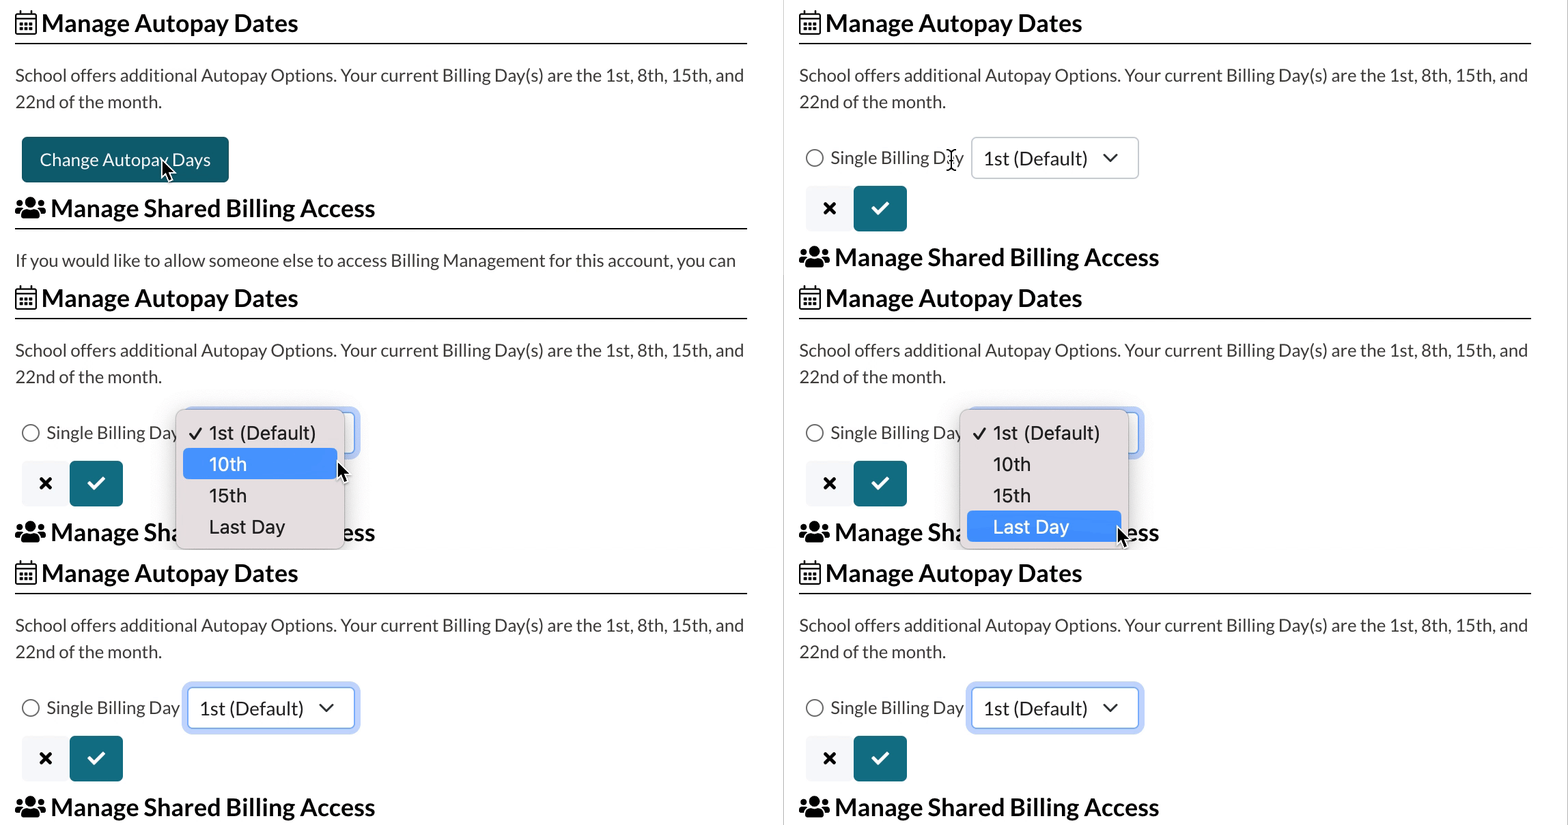
Additional Billing Days: When this is enabled, payers can select their own Billing Date.
- The options payers have on their end are determined by the dates you have selected in the Billing Setup Section.
- For example, If this is your setup:
Parents would see this in their parent portal (Billing Management tab)
-
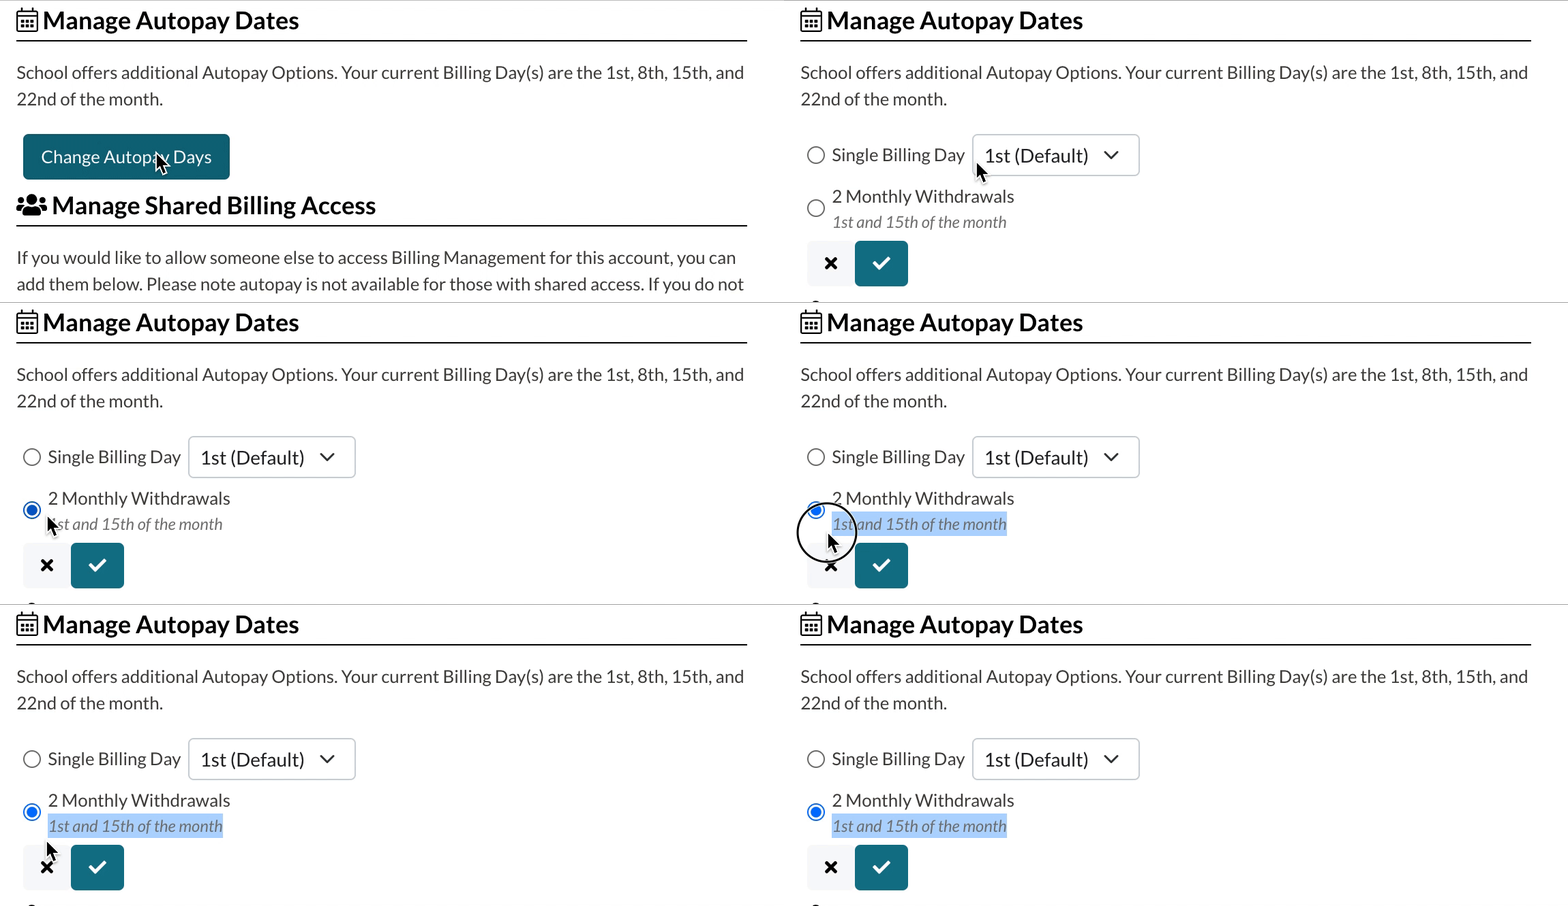
2 Monthly Withdrawals and 4 Monthly Withdrawals: When enabled, Payers can select to have autopay withdrawn twice a month (2 Monthly Withdrawals) or four times a month (4 Monthly Withdrawals).
- Payers can not choose the dates of the withdrawals on their end. The dates you set within the Billing Setup section are the dates that parents see when making their selections.
-
Example using 2 Monthly Withdrawals.
Parents would see this in their parent portal (Billing Management tab)
Keep in Mind
- Remember to save your changes by clicking Save anytime you adjust these settings.
- When none of these parent-facing options are enabled, the payer will not see the Manage Autopay section on their end. They will still see their Autopay dates listed but they will not have the option to make any changes on their end.
Parent view with one or more parent-facing options enabled (note the Manage Autopay section)
Parent view when none of the parent-facing options are enabled (note the Manage Autopay section is no longer there but the Autopay dates are still displayed)
Additional notes regarding Autopay:
Regardless of these settings, you can turn autopay on or off for individual payers within the Overview tab of the payer's contact record at any time.
To see these options, click on an account you want to change and click on their Billing submenu. If that payer has a saved payment method on their account, you can turn on autopay for that account. If they do not have a saved payment method, they won’t have autopay enabled, but it will force them to enroll the next time they make a payment.
Clicking on ‘View Changes’ for either of these two settings will pull up an audit history, showing you exactly when the setting was activated or deactivated, and by which user on your site as shown below.
Email Notification Settings
Within Settings > Communications > Email Templates > Billing, you have a list of automated and customizable emails that are sent based upon different triggers in the Billing workflow.
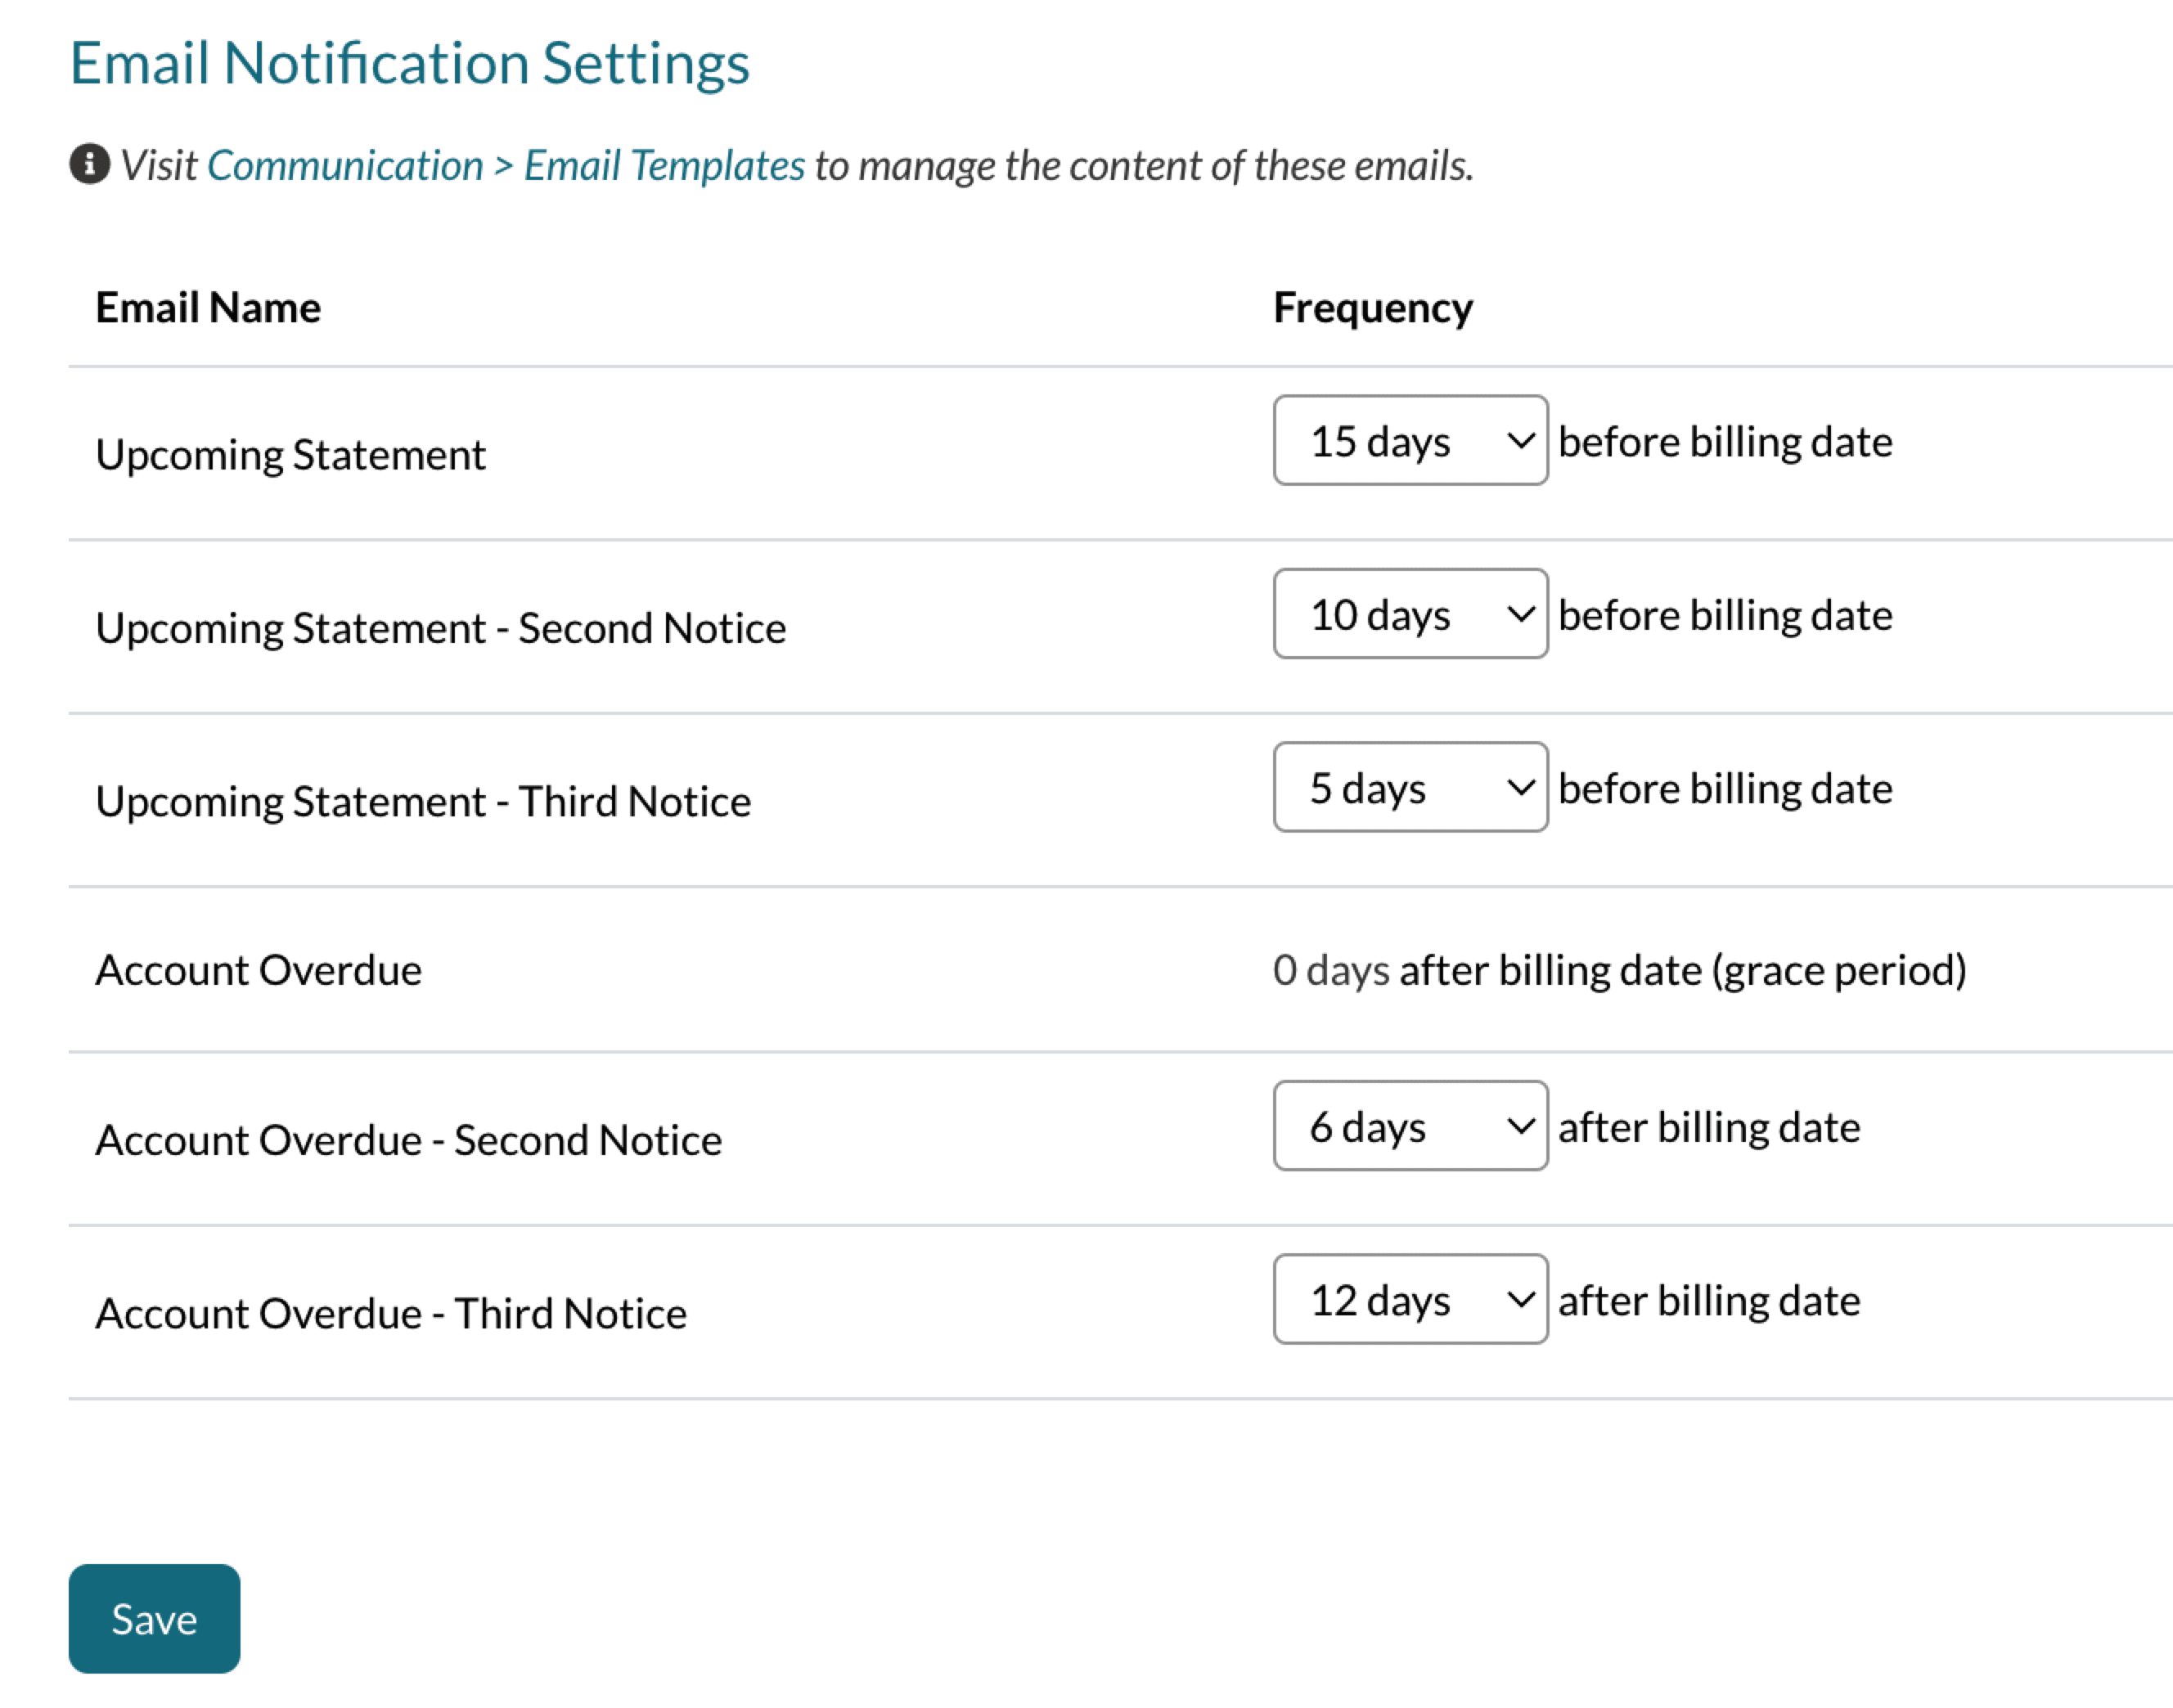
You can customize the timing of these emails, disable them, and/or send additional email notifications for the Upcoming Statement and the Account Overdue email. There's a link to these Billing email templates within the description as displayed below.
Email Notification Descriptions
Each of these emails, except for the Account Overdue email, can be disabled or have a custom number of days set for their delivery.
Once you customize the frequency of each email notification you would like to send, click Save at the bottom of the page to set your changes.
Best Practice: For the second and third notice emails, edit the subject line of the email to indicate whether it's the second or third notice. You can edit the emails within Settings > Communication > Email Templates > Billing Emails.
-
Upcoming Statement: The system default is to send the Upcoming Statement email 10 days before the Billing Date that's set within this page, or according to a custom billing date if one is set. However, you can customize the timing of this email to be sent sooner or later, as preferred.
-
Upcoming Statement - Second Notice: This is a 2nd email notification that will be sent to notify the parent/payer that their payment is approaching. This is also sent according to the global billing date or an individual billing date if one is set.
-
Upcoming Statement - Third Notice: This is a 3rd email notification that will be sent to notify the parent/payer that their payment is approaching. This is also sent according to the global billing date or an individual billing date if one is set.
-
Account Overdue: This email is sent 1 day after the billing day if no grace period is set. If there's no grace period, the frequency will say "0 days after billing date (grace period)." In the screenshot above, there's a 3-day grace period set, so the Account Overdue email will be sent 3 days after the billing date.
-
Account Overdue - Second Notice: This is a 2nd email notification that will be sent to notify the parent/payer that their account is overdue.
-
Account Overdue - Third Notice: This is a 3rd email notification that will be sent to notify the parent/payer that their account is overdue.
The Cycle of Notification Emails
Email Notification Parameters
When setting up the schedule for your billing email notifications, please keep in mind the following parameters.
Error message:
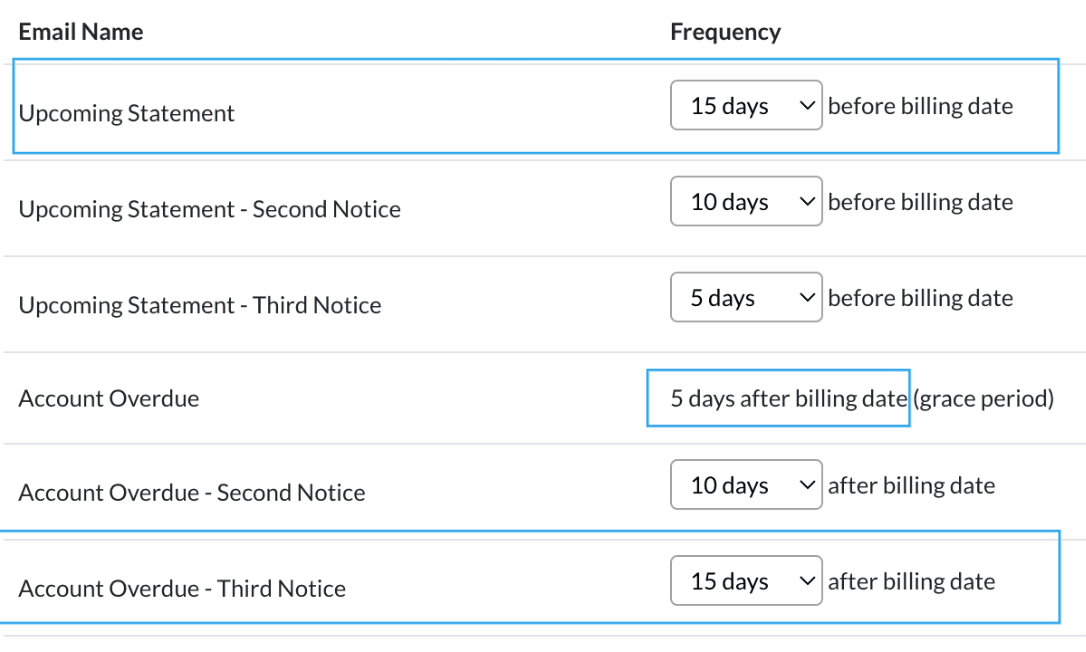
Upcoming Statement and Account Overdue notifications can't overlap.
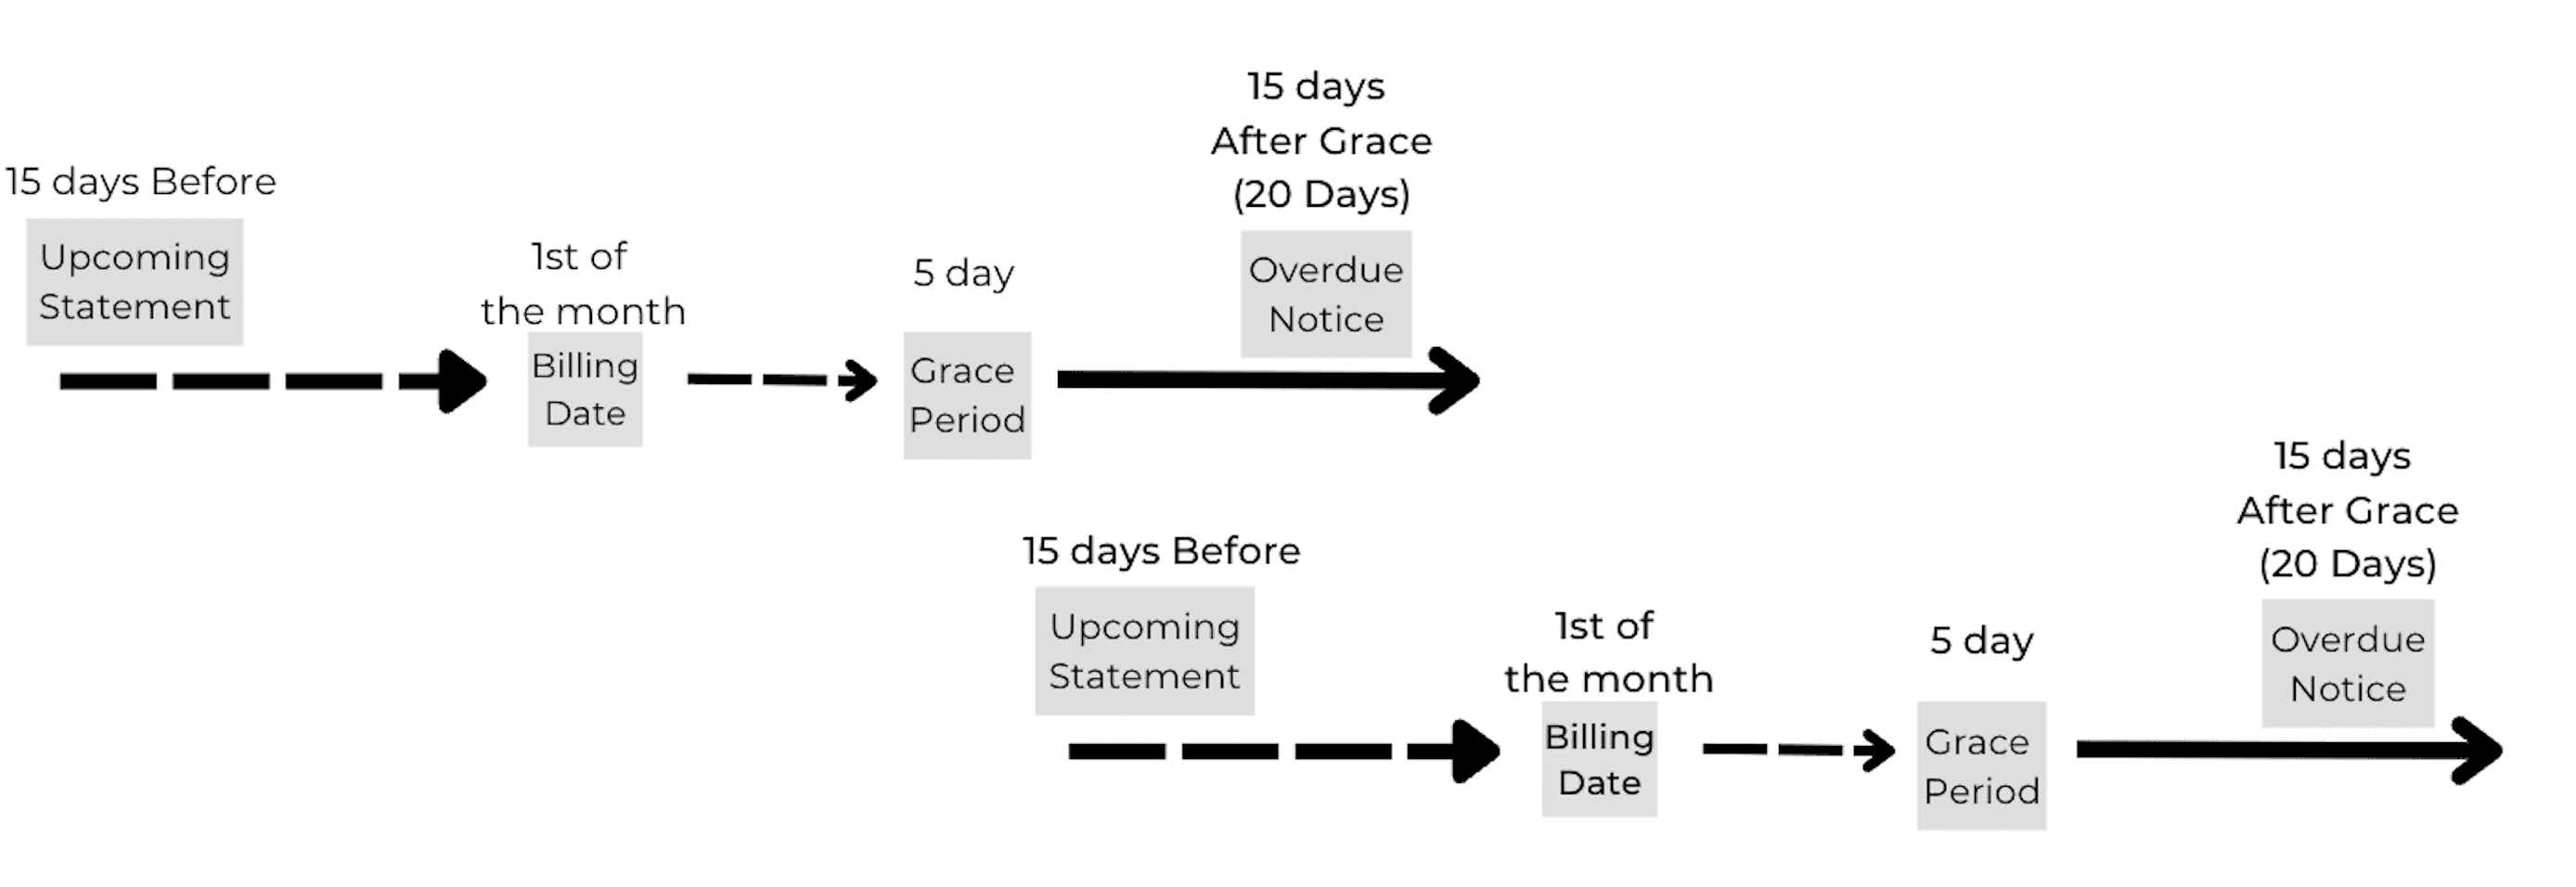
The notifications are designed so that the Statement emails are sent before the Billing Date and Account Overdue emails after the Billing Date. The cycle refreshes every month. If you schedule an overdue email to overlap with the upcoming month's schedule, you'll receive this error.
For example: In this image, the Account Overdue - Third Notice is slated to go out on the 20th of the month (15 days after the billing day + 5-day grace period) while the Upcoming Statement email would be sent on the 15th. The third overdue email overlaps with the previous month's schedule. This is not allowed by the system.
Illustration of the overlapping notification schedule described above.
Error Message(s):
Upcoming Statement - Second Notice must be after "Upcoming Statement"
Upcoming Statement - Third Notice must be after "Upcoming Statement - Second Notice"
Account Overdue - Second Notice must be after "Account Overdue"
Account Overdue - Third Notice must be after "Account Overdue - Second Notice"
You can not set any of the notifications for Overdue and Statement emails to be sent before the preceding one.
You must set the Statement emails in descending order.
For example:
You must set the Overdue emails in ascending order.
For example:
Error Message:
Upcoming Statement must be greater than 2.
The first Upcoming Statement email must be set to go out more than 2 days before the Billing Date. If you try to set it to either 1 or 2, the system will throw this error. This is because of the automated Upcoming Payment email the system sends out 2 days before the payment is due.
Additional Resources
- Office Hours & Past Session Recordings
- Click here to learn about payment plans and schedules, which are based on the billing date.
- Click here to learn how to set a custom billing day per payer.
- Autopay Best Practices
- Billing Communications
- Revenue Recognition Report











Comments
0 comments
Article is closed for comments.