Overview
With Document Request Forms (aka Checklist Item Request Forms), parents or admins can submit a request to a contact at another school/organization/contact and allow them to upload transcripts, medical records or other relevant documents directly into Finalsite Enrollment.
This article will explain how to create a Document Request Form and attach it to your student checklist, so that you can start electronically collecting documents for applying families.
How-To: Create a Document Request Form
Creating and configuring this new type of form is simple. First, navigate to 'Settings' - 'Forms' - 'Checklist Item Request Forms' in your Finalsite Enrollment site. Click on the green Add Form button to get started. If you need an overview of creating online forms in Finalsite Enrollment, click here.
Once you have created your form, you need to add at least one File Upload type field to the form, in order to allow the request recipient to upload documents. Add a field to the form and select the field type of File Upload Field. All file upload fields support uploading multiple files.
You can also select a Checklist Item to Complete Upon Upload in the event that you want the upload of a file to mark another checklist item as complete. This is optional and will only work with File Upload type checklist items.
You can also include additional fields on the form if you would like to collect any other information from the recipient of the request. Fields will pre-populate information from the student’s record, so be careful which fields you put on the form, especially those that are not read-only.
Like Recommendation Forms, field data collected on the Document Request Form will not write through to the contact in the system, and you will not be able to search on them or pull them in a report later. However, information from those fields can be bulk exported in a Form Export.
Please Note: File Upload Fields can only be used on AdHoc Forms (Custom Admissions/Enrollment Forms), Document Request Forms, and Teacher Recommendation Forms. Since files have to be uploaded to an already completed contact, you cannot collect them on the application.
Best Practice for Records Release Forms
We do not currently have a way for a parent to complete/sign a form and then send that signed form to a previous school requesting records. The best way is to have 2 separate checklist items as follows:
-
Parent signs a release of records form
-
Parent then sends the records request to the previous school. If they require parent consent, the admin can provide them with the pdf version of item #1 with the parents signature.
How-To: Configure Checklist for a Document Request Form
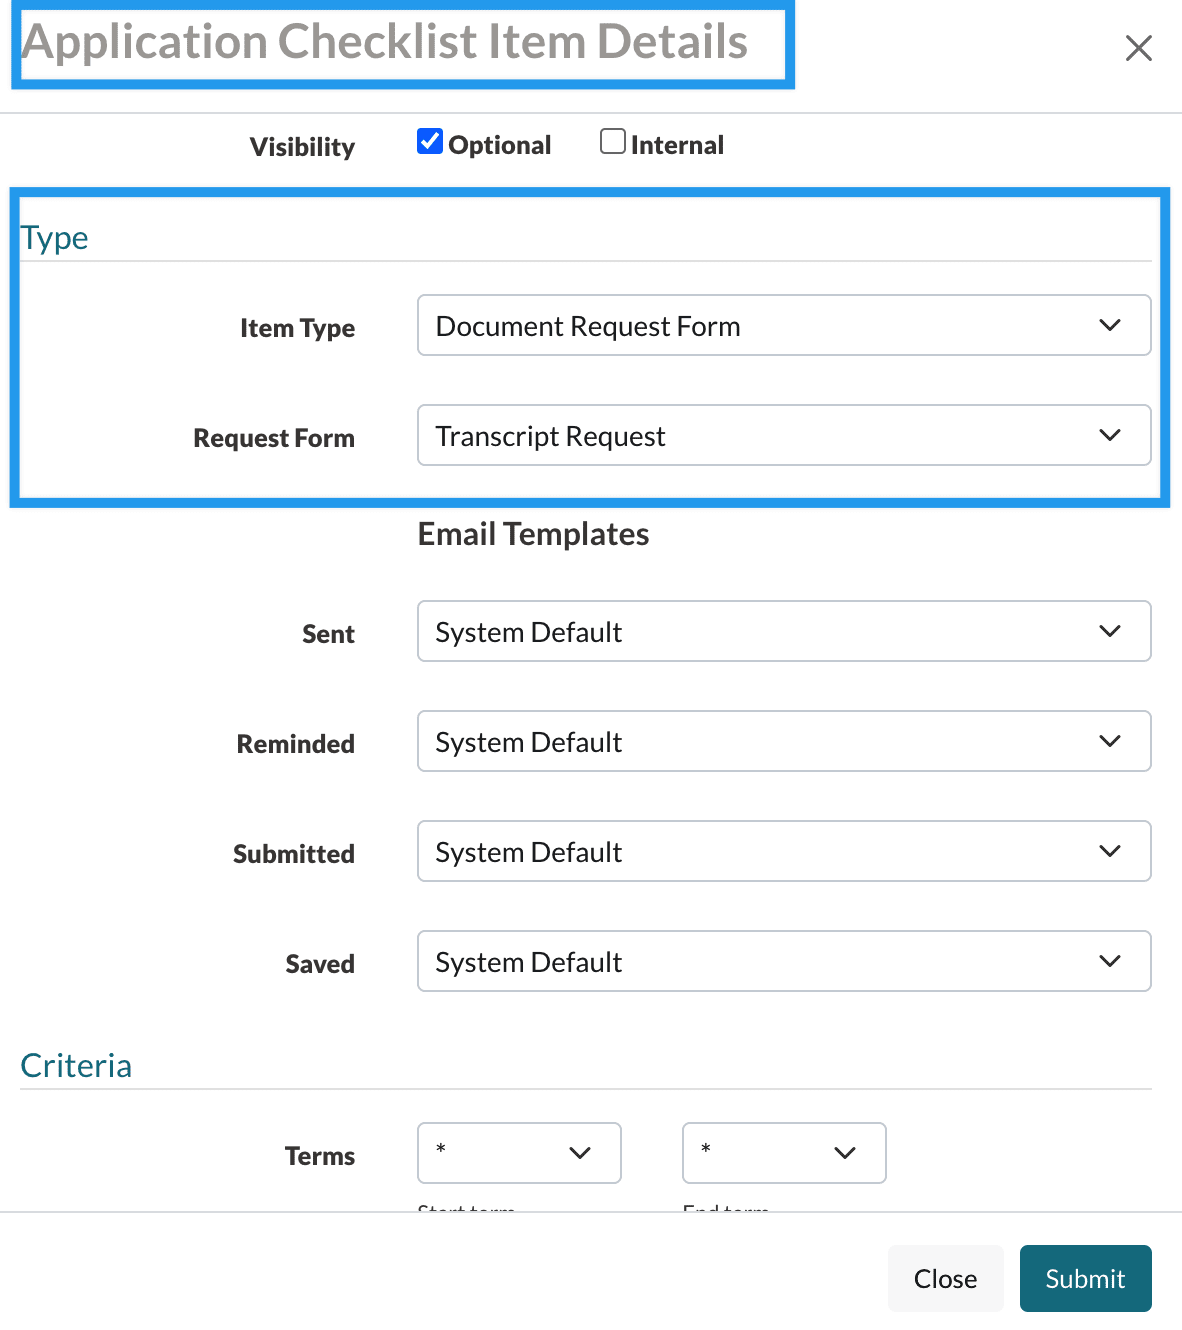
Once you have at least one Document Request Form published on the site, you can add the associated checklist item to an Admissions or Enrollment checklist. To do this, navigate to 'Settings' - 'Checklists' - 'Checklist Type of your Choice' and click the plus sign in the upper left to Add a new checklist item.
Select the Item Type of 'Document Request Form', and then select the form you just created from the drop-down list below.
Please note
- Even if the checklist item is parent-facing, the submitted form and any documents that the receiver uploads are only visible to the admin, not the parent.
- If you would like to set further restrictions on who at your school can see the data submitted in the checklist item, you can apply granular-level permissions to it. Granular Permissions are permissions that you can attach to checklist items (and/or email templates) to designate which Admins can/can't interact with them. Read more about this in our article, Granular Permissions for Emails and Checklists.
In the checklist item details, you can also select any custom email templates you have created to use for the different stages of the process (i.e. Sent, Reminded, Submitted, and Saved), or you can just use the System Defaults which you can find and customize under the email templates page:
-
Document Request Completed
-
Document Request Reminder
-
Document Request Saved
-
Document Request Sent
Merge Token Note
Please don't edit the built-in merge token you see in these emails: {{checklist_request.request_link}}
This merge token is specific to the communication and will bring the recipient right to the form itself. This is important because you don't want to accidentally insert a merge token that takes them to the student checklist instead.
As with your other checklist items, you can also configure custom criteria to determine which students have this item on their checklist. Click here to learn more.
After you have added the form to the checklist, the request can be sent from the admin or parent portal side, just like with recommendation forms.


Comments
0 comments
Article is closed for comments.