
Automated Communication Plans (ACPs) trigger emails or admin reminders in response to actions in the system, like a student moving into a new status or a checklist item being completed. They eliminate routine outreach and keep families progressing through admissions or enrollment with timely information. This article covers how to build the triggers, additional criteria, actions, and date/time settings that make up each ACP step.
💡Quick Answers
- Where do I build ACPs? Settings > Communication > Communication Plan. The setup is split into four tabs: Lead, Inquiry, Admissions, and Enrollment.
- What can trigger an ACP step? A specific checklist item being completed, or a contact moving into a specific status. Triggers are single-select, so an ACP can be based on one or the other but not both.
- Can I add filters on top of the trigger? Yes, with Additional Criteria. It works like the search builder (Field + Operator + Value, with AND/OR), so you can target subgroups like international students or families who requested financial aid. Text fields cannot be used as criteria.
- What actions can an ACP take? Send an email (to parents, consultants, financially responsible payers, or internal Finalsite Enrollment users) or create a Reminder assigned to a team member.
- When can the action fire? Immediately, N Days After Trigger (up to 90 days, with a specific send time), or On Date (a specific date and time). For the latter two, the trigger and all criteria must still be true at send time, or the action is skipped.
- Why didn't my ACP fire even though I set it up? Common reasons: (1) the student was already in the target status before the ACP was activated; ACPs only trigger the first time a student enters a status, not on re-entry. (2) For Enrollment ACPs triggered by Enrollment in Progress, the ACP must be active before rollover. (3) The trigger condition was no longer true at the scheduled send time.
- Where do sent ACP emails get logged? In Settings > Communication > Sent Emails (or Failed Emails for failures), and on each contact record under Recent Activity.
In this Article
Create & Edit ACP Steps
Automated Communication Plans can be accessed by navigating to Settings > Communication > Communication Plan in Finalsite Enrollment.
On the setup page, communication plan steps are broken down into four different tabs: Lead, Inquiry, Admissions, and Enrollment. Click on any of the tabs to add or edit communication plan steps for that stage of the process.
Click on the green +Add a New Step button to start creating a new step in your communication plan. To edit existing communication plan steps, click on the blue pencil icon to the right of the step. You can also activate/deactivate plan steps by checking the box in the Active column, or delete steps altogether by clicking the red X button.
Adding a new step or editing an existing step will bring up the Edit Plan Step window. This is where you will set up the specifics for each of your communication plan steps.
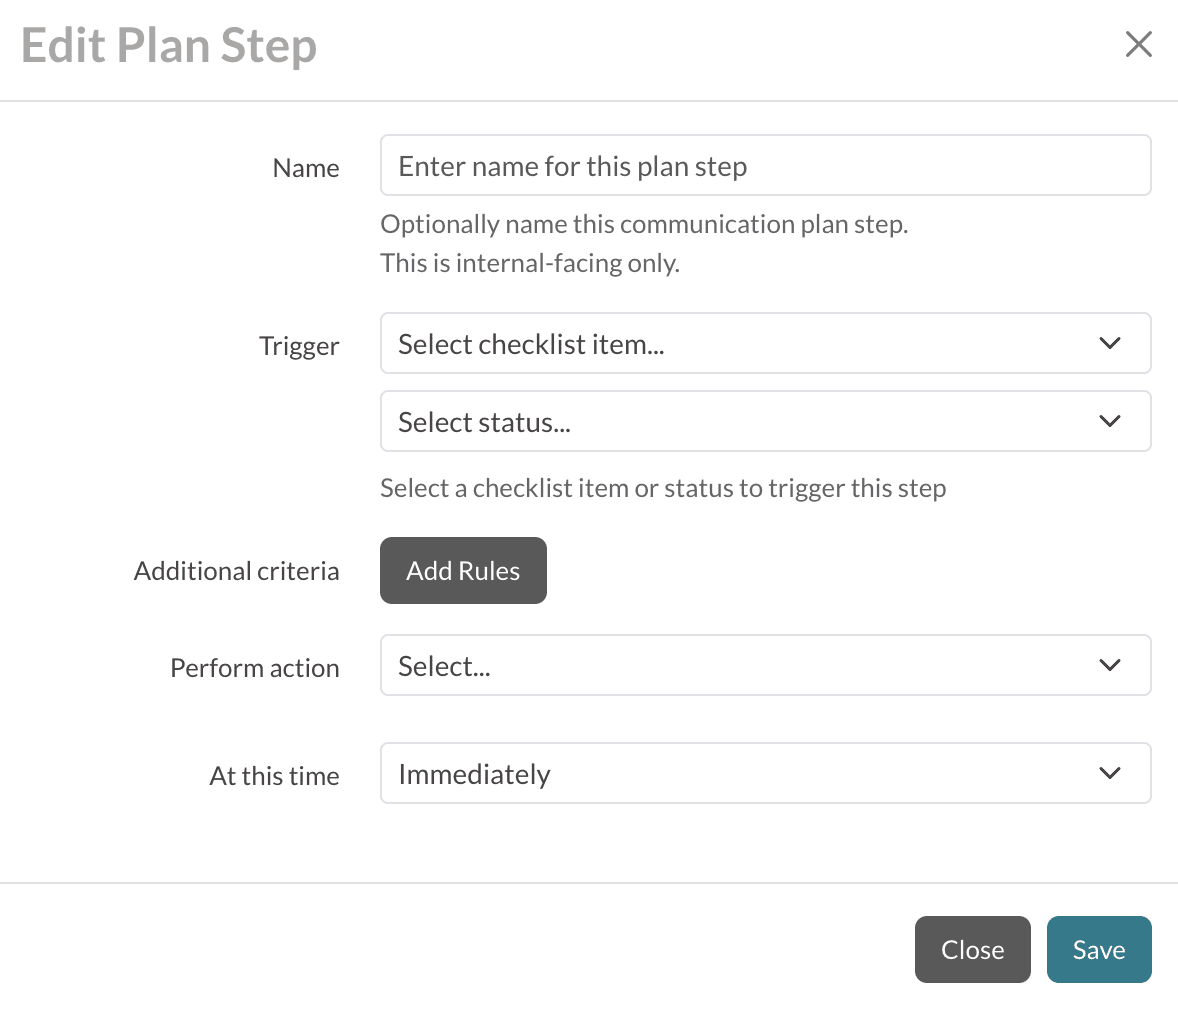
Within the Edit Plan Step window, you can configure the following options:
Please note: With the exception of the Additional Criteria, all of the options are single-select. This means you cannot, for example, choose a checklist item and a status as your trigger.
Name Your Plans
A name is required for any new communication plan step. The name helps you distinguish between steps in the list of all plan steps. For example, you might use a name like "New Applicant - Soccer Interest" or "Transcript Follow-Up Reminder."
These names are only visible to your internal team on the Communication Plan setup page. They will not be visible to parents or students.
Names can be changed at any point by using the Edit button (blue pencil icon) next to the communication plan step.
⚠️ Important Note: Required Name Field
ACPs created before the name field became required that do not have a name will continue to work, but you will be required to provide a name the next time you edit them.
Triggers
Select one of the following triggers to cause your action to take place:
- Checklist Item: Based on a specific checklist item being completed. (Available on the Inquiry, Admissions, and Enrollment tabs.)
- Status: Based on a contact moving into a specific status. (Available on the Inquiry, Admissions, and Enrollment tabs.)
- Lead: On the Lead tab, the trigger is preset to "lead" and cannot be changed. This step will fire when a contact enters the Lead status. Additional Criteria still work the same as on the other tabs.
If you are unable to find the checklist item or status you want, ensure that you are in the appropriate tab. For example, if you are looking for an Inquiry checklist item or Inquiry status, make sure you are in the Inquiry tab within the Communication Plan setup page.
⚠️ Important Note: Leads
Lead ACPs only trigger when the lead is first created, not on subsequent updates. Lead ACPs are also evaluated based on the lead's state at arrival. For example, you can have one ACP for Active leads and another for Progressed leads, but an ACP will not fire if an existing lead starts as Active and later becomes Progressed.
Additional Criteria (optional)
This is where you can get more specific with your communication plan steps and specify any additional criteria (i.e. field values) that must be met in order for your communication plan to trigger. For example, if a student selected 'Yes' to being an international student or requesting financial aid.
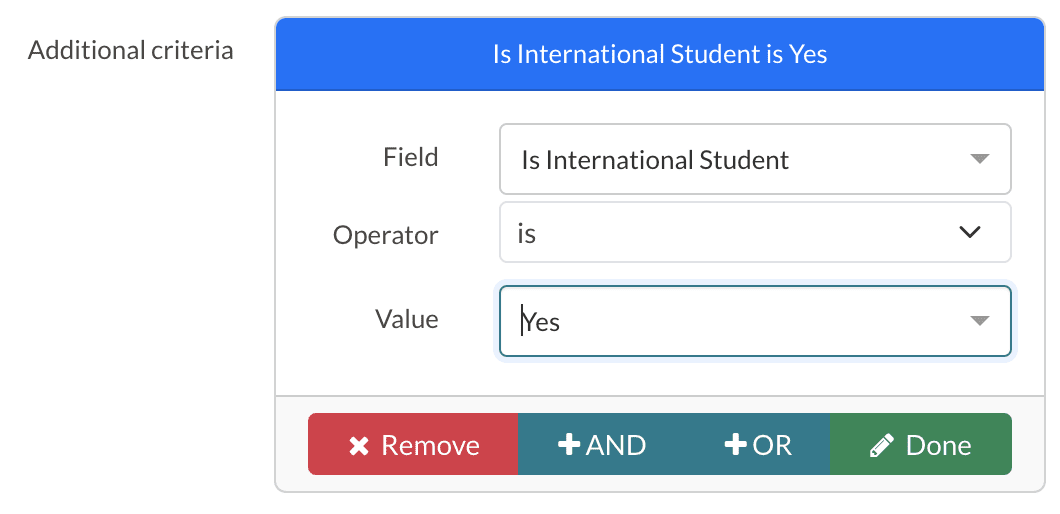
Additional Criteria works the same way as the search builder in Finalsite Enrollment, where you select a field, an operator, and a value. Fields are listed in the drop-down menu by their Display Name.
You will set the following options:
- Field: This is a container of data, such as grade or academic interest. Please note that text fields are not available to be used as criteria.
- Operator: This is the connector or function that denotes a logical operation. These include: is, is not, starts with, ends with, is not blank, is blank.
- Value: This is the data that is contained within the field. Examples: For the field 'Is International Student', the values could be yes or no. For the field 'Athletic Interest' the values could be soccer, football, tennis, etc.
- Action: You can click on Remove to delete the additional criteria or Done to save the criteria. You can also add 'AND' / 'OR' statements the same way you would in search.

Remember to click the green Done button after setting your additional criteria!
Actions
Select one of the following actions to take place when the trigger/additional criteria is met:
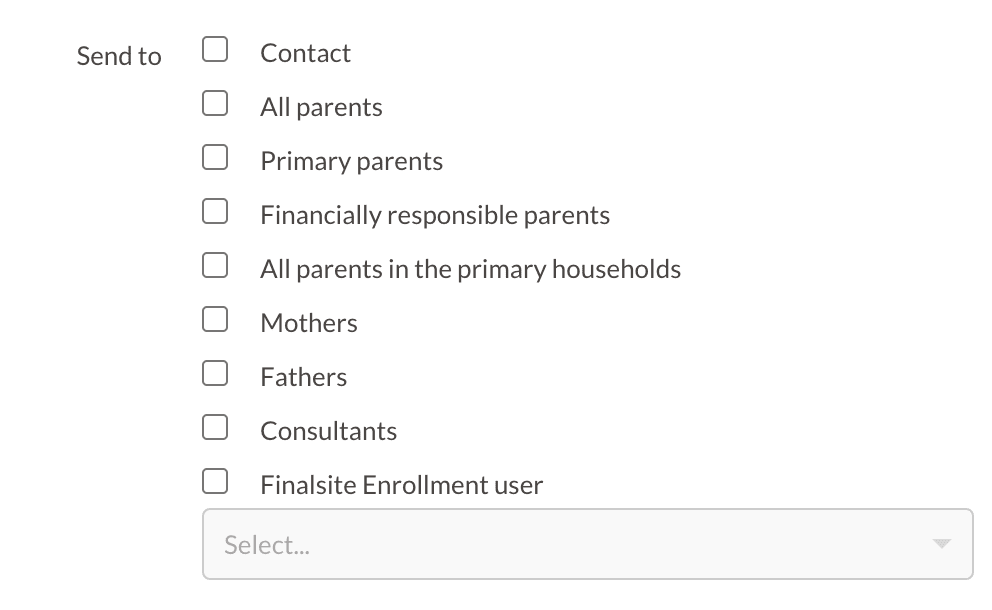
- Send Email to contacts (e.g. parents) or internal users in your Finalsite Enrollment site. All ACP emails get logged in both the Sent Emails (or Failed Emails when applicable) page and within individual contact records under Recent Activity.
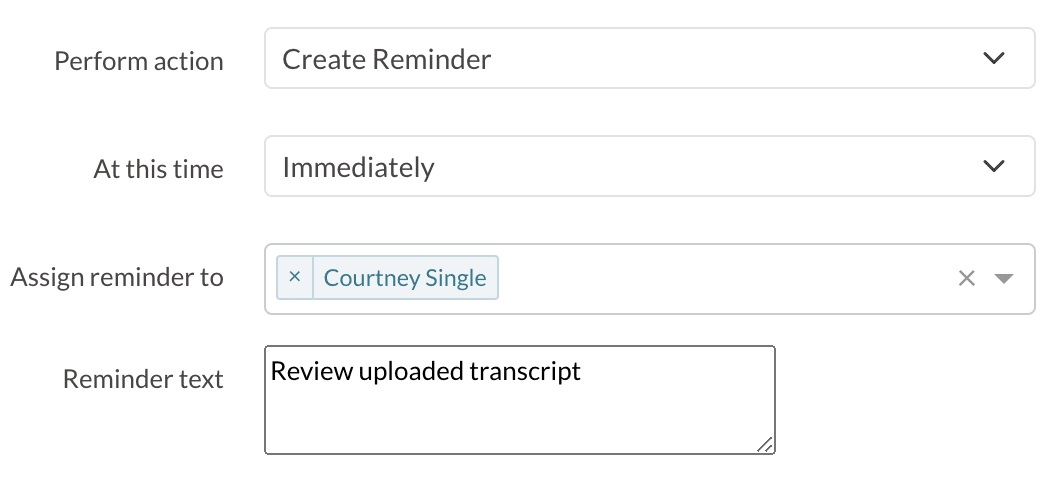
- Create Reminder assigned to an internal user in your Finalsite Enrollment site.
Depending on which of these two actions you select for your communication plan step, your additional options will be slightly different.
Sending Emails
You will select who you want to send the email to, such as all parents, primary parents, consultants, etc. You can also send internal emails to members of your team by choosing the 'Finalsite Enrollment User' option (please note: they must have an Admin Portal Account in the site). This is a multi-select field, so you can pick more than one of the options if you like.
You will also select the Email Template that you want to send out. Templates cannot be edited within the Communication Plan setup page, so you will want to make sure that you have made any needed edits beforehand from 'Settings' - 'Communication' - 'Email Templates'.
Creating Reminders
You will select which member of your internal team will get the reminder assigned (please note: they must have an Admin Portal Account in the site). You will also have a blank text box to input the Reminder Text you want to show for that team member.
Date/Time Settings
For both emails and reminders, you will have a few different options for when you want to send the communication. Under the 'At this time' menu, you can choose from:
- Immediately: Sends email / creates reminder as soon as a student meets the trigger / additional criteria.
- N Days After Trigger*: Sends email / creates reminder a specified number of days after the student meets the trigger / additional criteria. You will also set a specific Time that the communication will go out on that day. The maximum number of days supported for this option is 90.
- On Date*: Sends email / creates reminder on a specific date. You will also set a specific Time that the communication will go out on that day.
*PLEASE NOTE: The trigger and any additional criteria must be true at the time that the action (email/reminder) is performed, so keep this in mind when setting up 'N Days After Trigger' or 'On Date' type communication plan steps. Read the below section on Scheduled ACPs for more information.
Understand Scheduled ACPs
Please take note of the following important details regarding scheduling communication plan steps, and when they will send or not send.
The trigger and any additional criteria must be true at the time that the action (email/reminder) is performed.
The trigger (checklist item complete or status change) AND all additional criteria (e.g. a certain sports interest, or being an international student) must be true at the same time for the action (email or reminder) to happen.
- For 'Immediate' Emails/Reminders: If you have an immediate trigger for a student entering a status or completing a checklist item, but the additional criteria field(s) is not set until a few days later, that email/reminder will not go out, as it is already past the time of the scheduled action.
- For 'N Days After Trigger' or 'On Date' Emails/Reminders: If you have an action scheduled for a future date and a student's trigger or additional criteria field(s) change prior to the scheduled date, this could result in an action being performed or not, depending on if all criteria are now met or not.
This behavior helps ensure that the most relevant communications are going out to your applying/enrolling families and your internal team at all times. Consider the following cases:
- Applicant moves to a new status and the communication plan for the previous status no longer applies.
- Student data is updated that makes certain communications or information no longer relevant.
Example of ACP Behavior
As an example of the above, imagine that you have a communication plan step that says send an email five days later to all students who become applicants and who answered 'Yes' to a Financial Aid Interest field
- Scenario A - The above rule is true upon becoming an applicant and indicating an interest in financial aid through a form, and five days later it is still true. Result: email is sent.
- Scenario B - The above rule is true upon becoming an applicant, but before the five days have elapsed, the Financial Aid Interest field is changed to 'No'. Result: email is not sent.
- Scenario C - At the time the student became an applicant, there was no indication of Financial Aid Interest so the field was blank. However, prior to the five days elapsing, an admin updated the Financial Aid Interest for the student to 'Yes'. Result: email is sent.
- Scenario D - Although the student still has the Financial Aid Interest field set to 'Yes', prior to the five days elapsing they are moved out of the Applicant status into a different status. Result: email is not sent.
Comments
0 comments
Article is closed for comments.