
The Dual Signature feature lets one parent or guardian sign a contract and then invite a second signer to log in, review the terms, and add their signature. It is more common with split families or in jurisdictions where both financially responsible parties must sign a legal document. Each signer needs a unique Parent Portal account with a different email address, and the deposit cannot be paid until both signatures are captured.
💡Quick Answers
- How does the dual signature workflow run? Parent A logs in, signs, and is prompted to invite a co-signer. Parent B receives an email, signs in or creates an account, reviews the contract, and signs. Either parent can then pay the deposit. The contract moves through Pending, Generated, Pending Signatures, Payment Pending, then Submitted.
- Can both signers share one Parent Portal account? No. Each signer must have a unique Parent Portal account with a different email address.
- How do I see who has signed and who hasn't? On the contact record, click View Signers next to the Contract checklist item. You can also see this from Enrollment > Students in Enrollment by clicking the Pending Signature or Pending Payment status.
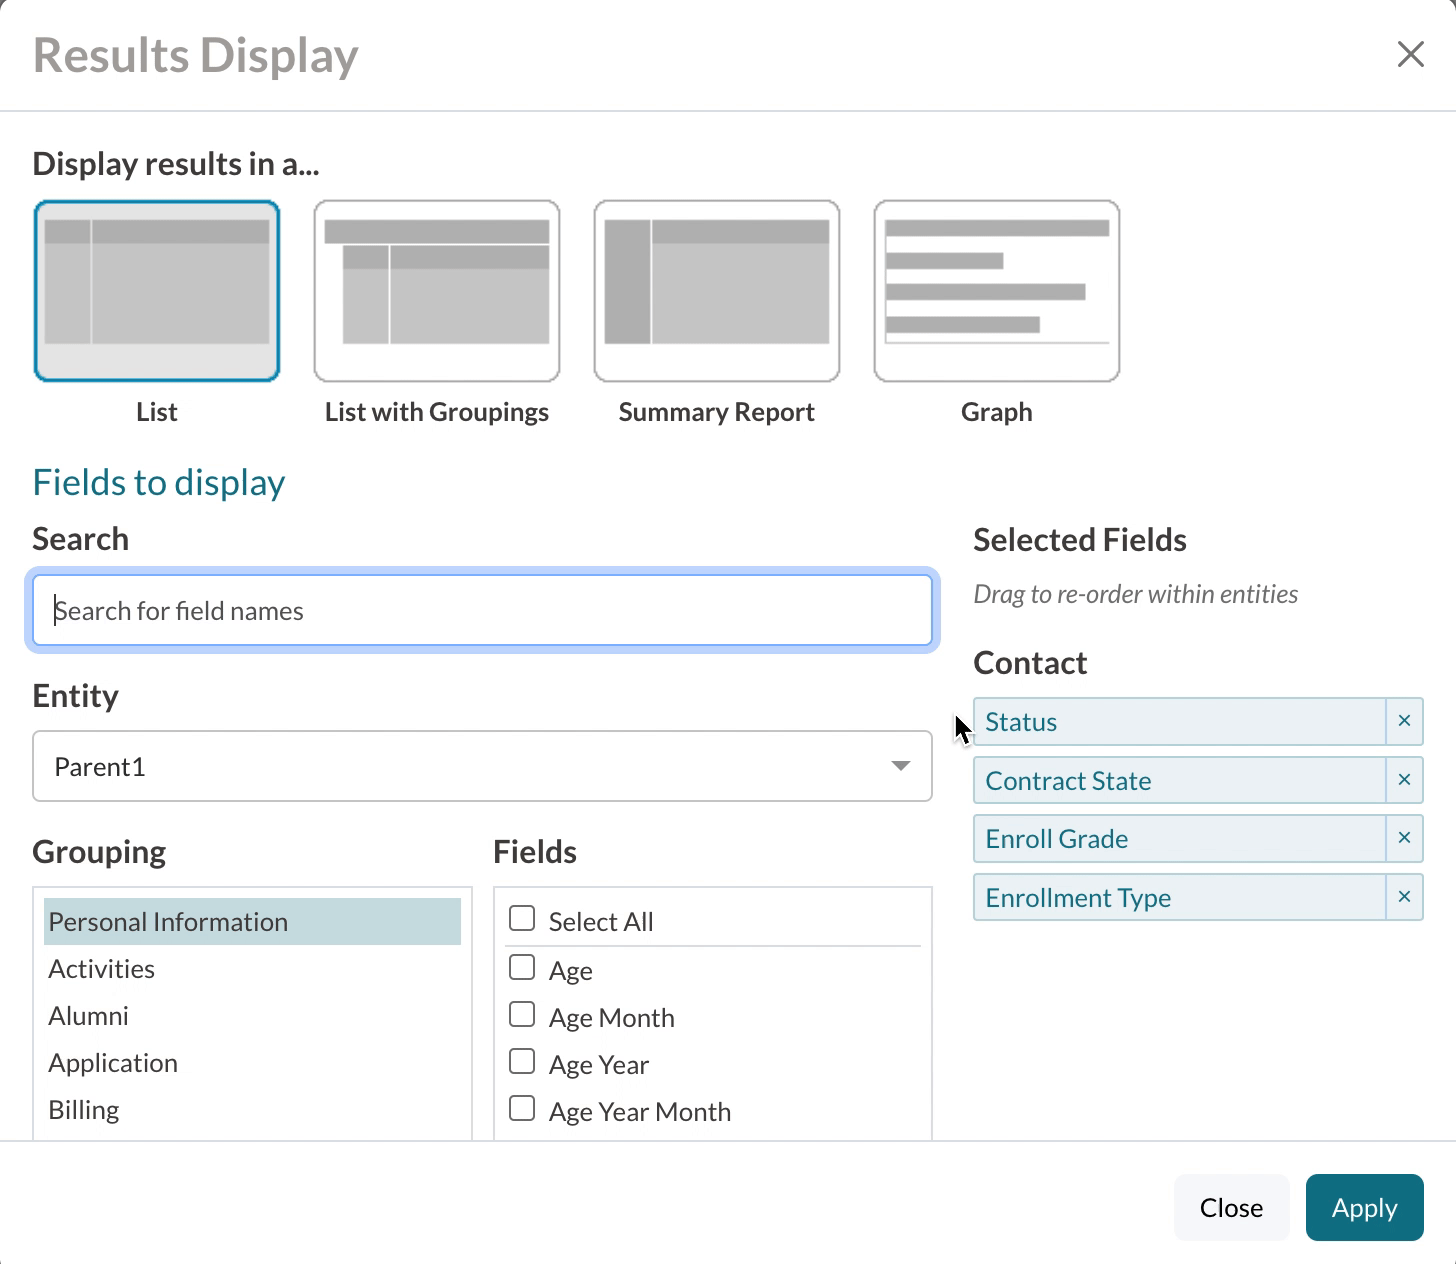
- How do I turn dual signatures on for a contract? Add an AdditionalSignature field (usually contract_signature_2) to the Contract form alongside the standard Signature field. To toggle dual signature per-student, add a Boolean yes/no field on the form that the Additional Signature depends on. Support can help with the form setup.
- What if I change a student's dual signature setting after the contract was generated? You must regenerate the contract for the change to take effect.
- How do I spot families likely to hit a dual-signature problem? Build a search of your enrolling students and use Change Display/Columns to add Name and Portal Email for Parents 1-4. Look for families using the same login email or missing one. Update emails on the Parent Portal Accounts page (which triggers a verification email and, for Billing schools, removes saved payment methods).
In this article
- Understand the Dual Signature workflow
- Set up Dual Signatures on the contract
- Example of the parent process
- Troubleshooting issues
- Countersign contracts
Understand the Dual Signature workflow
Overview of the process
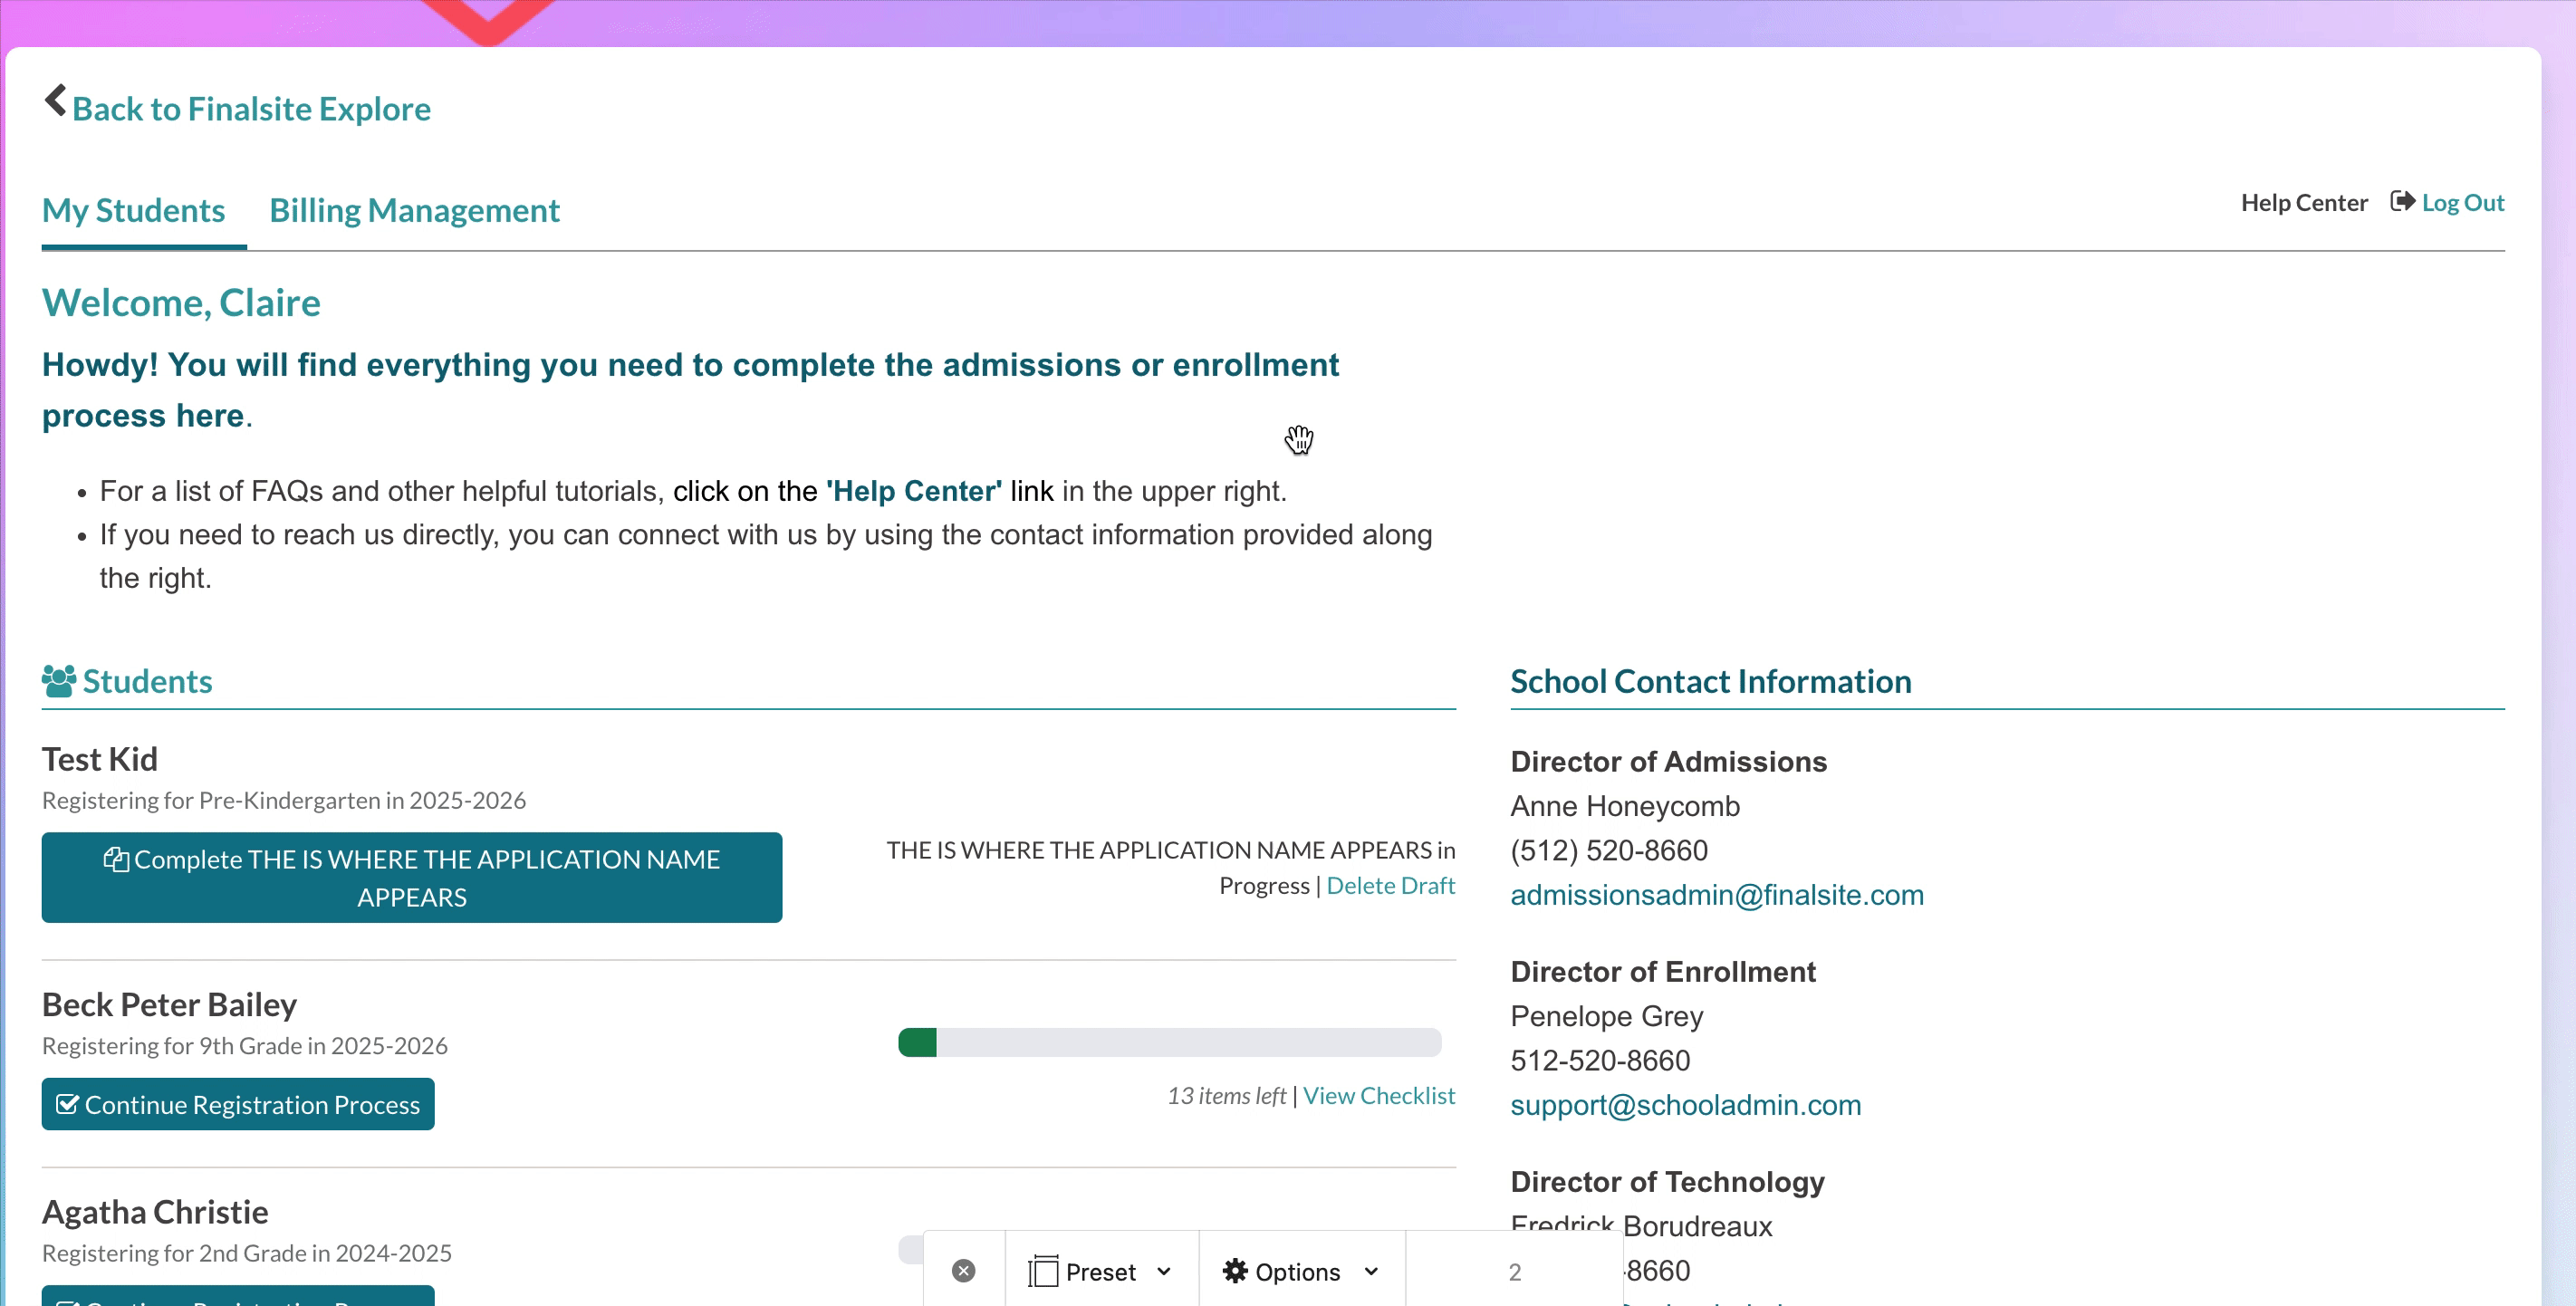
- The first parent/guardian logs into the Parent Portal and signs the enrollment contract. Once they have signed, there will be a prompt that allows them to invite another parent/guardian associated with that student or a non-household member to co-sign the document.
- The co-signer will then receive an email to sign in to an existing Parent Portal account or create a new one with unique information.
- The same email address/account cannot be used for both signers. Two distinct Parent Portal accounts with different email addresses need to be used for dual signatures.
- Either party can pay the deposit; however, the deposit can only be paid after both parties sign the contract. The reason for this is that if the first party signs the document and pays the deposit, but the second party rejects the contract, this poses an issue. The parents should be under the impression that the contract is not valid until both signatures have been applied and the deposit has been paid.
- See the "Understand the parent process" section below for a full walkthrough of the parent experience with dual signature contracts.
View signers
The contract lifecycle for dual signatures is as follows: Pending > Generated > Pending Signatures > Payment Pending > Submitted. Admins can see who signed the contract when it's in a Pending Signatures or Pending Payment status. This is helpful with dual signatures when the admin wants to see who signed the contract first, so they can follow up with the other parent/guardian.
This information is visible on the contact record under the Contract checklist item by clicking View Signers, and on the Students in Enrollment list page (Enrollment > Students in Enrollment) by clicking on the Pending Signature or Pending Payment contract status.
Set up Dual Signatures on the contract
Step 1: Add an Additional Signature field to the Contract
To set up the dual signature feature, you will need to add an Additional Signature field (usually contract_signature_2) to your contract form in addition to the standard Signature field. If you need help, Support can assist in setting up dual signatures on your contract.
Step 2: Add a Boolean (yes/no) field that triggers the second signature
You may also want to have a Boolean (yes/no) field on your contract for the second signature to be dependent on. This way, you can set the field to have a default value of Yes on the form, so that dual signature is turned on for all families unless you manually switch it off for a student before generating their contract.
⚠️ Important Note
If you change the value in the dual signature trigger field to No for a student after their contract is generated with a default value of Yes, you must regenerate the contract so that only one signature field displays.
If you would rather default to only requiring a single signature, but have the option to require dual signatures for some students, set the default value to No on the form and then manually set the custom dual signature field to Yes from a student's contact record.
Example of the parent process
- Parent/Guardian A completes the Contract/Registration Form, making sure to fill out all required fields. Within the Electronic Signature section, (1) Parent/Guardian A signs the document, and (2) is notified that an additional signature is required. Once they sign, they’ll (3) click Next or Submit.
2. Parent/Guardian A is presented with a page to invite another person to co-sign the document. Parent A can select a co-signer by clicking on the Send Invite button. The second signer will receive an email with instructions to log in (or create an account if they don't have one already) and sign the document. Parent A will also see the date and time they signed the document.
3. Parent/Guardian A will be prompted to confirm sending an invite to the selected co-signer and click the Send button to continue.
4. Parent/Guardian A will see a confirmation message in green at the top of the page, letting them know their invite has been sent.
If the parent/guardian clicks on the blue View Invite button, they can see the details of who was invited to sign the document. In the View Invite window, they can also click on the blue Resend Invite link to resend the link to the second parent/guardian.
5. Now that Parent A has invited a co-signer, they see the following options listed for the Contract/Registration Form within the Parent Portal checklist:
- Review and Sign Document: Clicking on this button navigates to the beginning of the document for the co-signer to review and sign it. The co-signer cannot make any changes to the document since it was already signed by Parent/Guardian A.
- Invite Another Signer: This will bring the parent/guardian to the Additional Signatures screen, where they can review the current signers, see what invites were sent, and send new invites.
6. Parent/Guardian B then receives the email with instructions to sign the document, similar to the example shown below.
7. Parent/Guardian B will log into the Parent Portal with their own unique username and password, review the document, and sign it. Since the document was previously signed by Parent A, Parent B cannot make any edits to the document, and all fields will be read-only.
8. Once both parents/guardians have signed the contract, either parent/guardian can pay the deposit. Within the Parent checklist, each Parent/Guardian will see a Pay Deposit button, which will take them to the Deposit page.
9. Once either Parent/Guardian pays the Deposit, they’ll submit the Contract/Registration Form, and it will now be marked as complete on the checklist. No changes can be made unless it is regenerated by the school.
Troubleshooting issues
Verifying which parents do not have a unique email address tied to their account
All parents must have a unique email address attached to their Parent Portal account for the contract to accept a second signature. Verifying whether any of your parents do not have a unique email address tied to their account can help you avoid issues when it comes time to sign contracts.
- To verify Parent Portal emails, start by building a search for your students in Enrollment.
- In the search, use the Change Display/Columns menu to pull in the Name and Portal Email for Parents 1-4.
- Once your search is built, look through the results to see whether any of your families are using the same login or if a parent is missing a login email for their portal account.
You may wish to contact those families before sending out contracts to ensure that they have the correct email setup so as not to delay the contract process.
How to update the email tied to a Parent's Portal account
Updates to the email address tied to the parent's Portal login must be done on the Parent Portal Accounts page (Settings > Portal > Parent Portal Accounts). This is the only place on your end that will allow you to adjust the email that the parent logs into their account with.
- Navigate to the Parent Portal Accounts page (Settings > Portal > Parent Portal Accounts)
- Search for the parent by name or email address under Filter Options.
- Select the Edit option next to the account.
- Enter the new email address.
- Click Submit.
This will send a verification email to the parent. The email will include a link that they must select in order to verify their account.
Important Billing Note
When a parent's Portal email address is updated, all saved payment methods associated with that parent will be removed. If you update the email address for a parent with an existing billing account ledger, you should contact them and request that they log in with their new email and add their payment method back.
Updating or adding a payment method:
Parents who use the Billing module will need to log in to the Parent Portal, navigate to the Billing Management tab, and select Update Payment Details to re-enter their payment details.
Additional resource:
- Parents have access to videos through the parent-facing help center. The video Add or Update Payment Info walks through how to add or update a payment method in their billing management tab. Feel free to share the link to this video directly with them.
Countersign contracts
If you would like to add the signature of a representative from your school, along with the parent/guardian signatures, consider enabling our Contract Countersign feature. This allows you to add an electronic signature or an image of somebody's signature (e.g. your Head of School or Principal) to enrollment contracts after they've been signed by all required parents/guardians.
Learn more:
- Countersignatures on Contracts: Setup Process
- Countersignatures on Contracts: Admin Experience
- Countersignatures on Contracts: Parent Experience
Comments
0 comments
Article is closed for comments.