
Use Billing Import to bulk-add charges, credits, or payments to parent ledgers from a CSV file. You build the file by exporting a search of relevant students as a Billing Import Template, then fill in the required IMPORT columns (billing category, billing type, amount, posted date, description). Imported items cannot be edited or deleted in bulk, so the Validate Only option is essential before submitting a real import.
💡Quick Answers
- How do I get the import template? Search & Reports > build a search of your target students (typically enrolled students), then Export menu > Export as a Billing Import Template. The file pre-fills with CHILD and BILLING_ACCOUNT identifier fields you must not modify.
- Which IMPORT fields do I have to fill in? IMPORT.billing_category (must exactly match a category name from your setup page, case-sensitive), IMPORT.billing_type (charge, credit, or payment), IMPORT.amount (no $ sign; use a negative for credits, payments, and reversed charges), IMPORT.posted_date (in your school's locale format), and IMPORT.description.
- When do I use a negative amount? For credits, payments, or reversed charges (negative charge). Regular charges and reversed payments/credits use positive amounts.
- What does Posted Date control? It's the date the line item appears on the ledger, not necessarily the billing date. A charge posted Jan 5 with a parent whose next billing date is Feb 2 is not owed until Feb 2. Date format must match your school's locale (MM/DD/YYYY for US, DD/MM/YYYY for Canada) or the import fails.
- How do I import the file? Billing > Import > Import Billing Transactions button. Choose your CSV, add a description, optionally check Validate Only to test without writing data, then Submit Import. Click View on the row to see errors or success details.
- My import failed with "the posting date is invalid." What's wrong? The IMPORT.posted_date isn't in your school's locale date format. Use MM/DD/YYYY (US) or DD/MM/YYYY (Canada), with the year defaulting to 'yy', for every row. Run Validate Only first to catch it before writing data.
- My import failed on the billing category. What's wrong? IMPORT.billing_category must match a category name from your Billing Categories page exactly, including capitalization (it's case-sensitive). Correct the value to match and re-validate.
- Heads up: imports cannot be edited or deleted in bulk. To fix an incorrect import, you have two options: delete each charge manually on the parent ledger, or import a second file with negative charges to zero out the originals (both the wrong and reversing entries will appear on the ledger). Validate Only first to avoid this.
In this Article
Export as a Billing Template
Create a Search
To get started, you'll need an export file to record all of the financial data you need to import. Within the 'Search & Reports' page, you can create a search of your currently enrolled students similar to the example below. Please note, some schools use a status of 'Enrollment in Progress' with 'completed checklist item (s)' criteria of contract and deposit if they have additional items that need to be completed on the checklist before the automated status change to enrolled. Otherwise, you can simply use the status of 'enrolled.'
Export as a Billing Import Template
Then click on Export > Export as a Billing Import Template.
Billing Import Template Fields
Fields that are Pre-Filled by the System
The Billing import template includes 'child' and 'billing contact/account' fields that are pre-filled as explained below.
Please Note
The id fields (child id and billing account id) are required for a successful import. Please do not remove those when editing the import file.
- CHILD.id
- CHILD.first_name
- CHILD.middle_name
- CHILD.last_name
- CHILD.grade: The current grade that the child is enrolling in.
- CHILD.school_year: The current term that the child is enrolling in.
- BILLING_CONTACT.payment_plan: The payment plan selected in the child's submitted contract.
- BILLING_ACCOUNT.id
-
BILLING_ACCOUNT.split: The financial split percentage for the billing account/payer.
- Please note: You can not utilize this column to edit the percentage of financial split.
- BILLING_ACCOUNT.first_name
- BILLING_ACCOUNT.middle_name
- BILLING_ACCOUNT.last_name
- BILLING_ACCOUNT.next_account_billing_date: This date is based on the student’s billing date and is auto-filled. It should not be edited.
Fields that are required
Certain fields are required on the import template. The import will not be possible without adding data to these fields.
- IMPORT.billing_category: Type in the billing category name you want the charge/credit/payment assigned. IMPORTANT: Billing categories are case-sensitive and need to match the exact capitalization in your billing categories setup page.
- IMPORT.billing_type: Indicate if this is a charge, credit, or payment.
- IMPORT.amount: Type in the dollar amount of the line item. The $ sign does not need to be included. Credits and payments need to have a negative (-) sign in front of the amount to be credited.
A couple notes: Spreading Charges Across Payment Plans and Affect on Financial Split
Financial Split
Adding an amount to one or both of a student's parents does not affect or change their percentage of financial split.
Spreading Charges Across Payment Plans
Please note that you can't spread charges across a payment plan after importing. If you need to accomplish this, you'll need to have multiple, separate charges added to the import template, each with its own specific posting date.
For Example, you have a $1k charge that needs to be spread across 10 months ($100 per month for 10 months). In order to do this, add 10, separate charges of $100 to the import template, each with a specific posting date.
-
IMPORT.posted_date: Posted Date is the date the charge will apply and display on the ledger. Please note, this isn't necessarily the same as the billing date, which is the payer's due date.
- For example, If I add a posting date of 1/5 (January 5th), and the payer's next billing date is February 2nd, this payer won't be making any payments until 2/2. This means the payer doesn't owe anything on January 3rd, nor are they overdue on the 3rd since the posted date is after the January billing date and before the February billing date.
- Important Note: The date MUST follow the same format that your school is set up to be. E.g. If your school is located in Canada, the date format would be DD/MM/YYYY as opposed to the American date format, which is MM/DD/YYYY. By default, the year will be in the 'yy' format.
- If you skip this step, your import/validation will fail with an error that the posting date is invalid.
- IMPORT.description: Provide a description of the line item for your ledger.
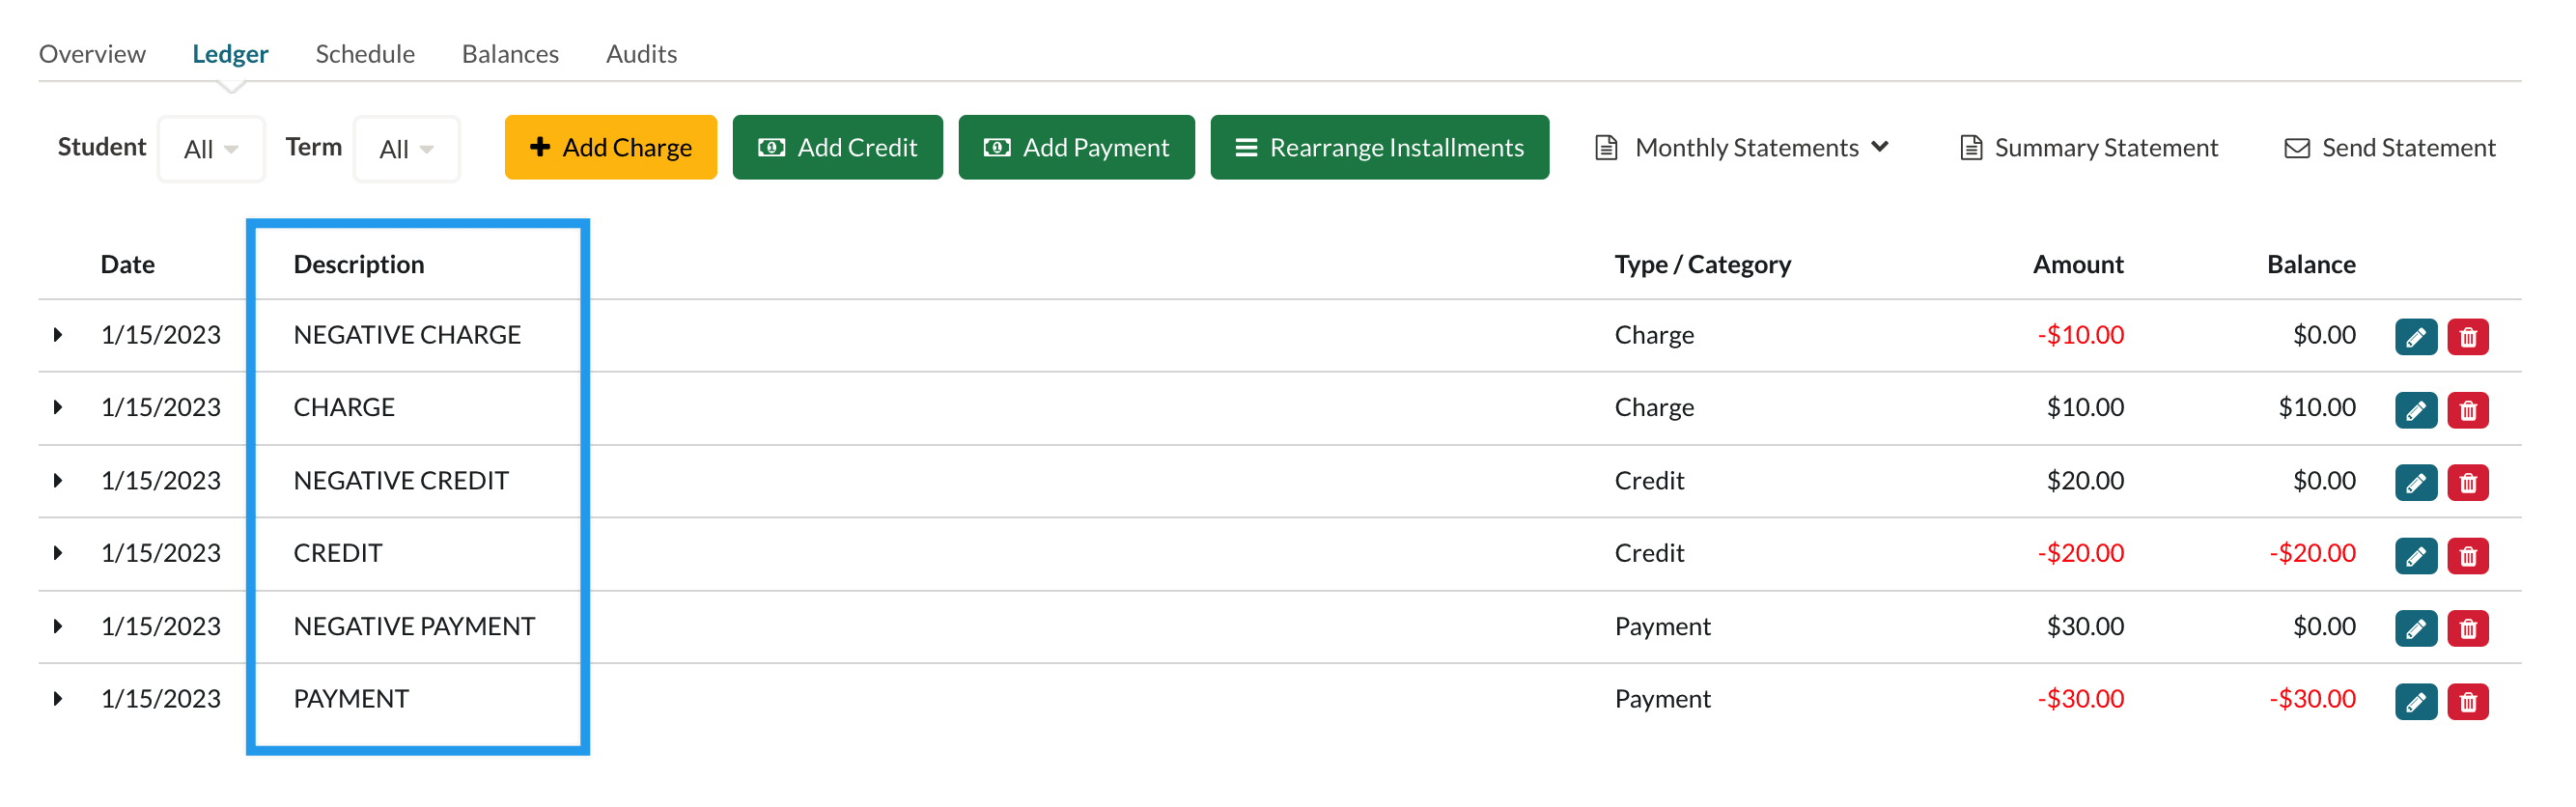
- Reversing a charge (negative charge)
- Adding a payment
- Adding a credit
Example Import file snippet, demonstrating how to add each type of update:

Example Ledger showing the result of the import:
Import a file
Please Use Caution When Importing
Before importing please note that you can not delete or change imported charges/payments/credits in bulk. Fixing incorrect imports requires either:
- Manual deletion of every incorrect charge/credit/payment individually via the parent's ledger.
- Or, uploading another template with a negative charge to zero out the incorrect charges.
- Additional note on this option: The parent ledger will show both the original (incorrect) charge and the negative charge used to zero it out.
To import a .csv file, click on 'Billing' > 'Import.' Then click on the blue 'Import Billing Transactions' button in the upper left. If you ever need to refresh the list, click on 'Reload.'
Next, you'll need to choose the file for import and set a few criteria.
- Choose file: Click here to upload the .csv file from your computer.
- Description: Type a description of the line items you're importing
- Validate Only?: Check this box if you prefer to test the file before importing.
- Submit Import: This button will either submit the validation if this option was checked or it will run the import process.
Once you submit the import/validation, you'll see the following columns:
- User: The email address of the user that imported the file or that ran the validation.
- Date/Time: The date and time that the file was imported or that the validation was run.
- Duration: The amount of time it took for the file to import or for the validation to run.
- Description: This is the description you define for the import file.
- Uploaded File: Displays the name of the .csv file you import/validate
- Import Status: Indicates if the import/validation succeeded or failed.
- View: You'll see different messaging based on the success or failure of a validation/import.
A failed import/validation will display a list of errors.
If the import file is validated successfully, you will see a confirmation message as shown below.
If the import succeeded and the ledger entries were created, you will see the details of the imported data per billing account as shown below.
You can now see all of the imported transactions reflected in the associated account ledgers. For this example, the book fee we imported is now the most recent transaction that was added to the ledger based on the date.
Common Export Errors
If an import or validation fails, click View on the row to see the list of errors. The most common causes:
- "The posting date is invalid." The IMPORT.posted_date is missing or not in your school's locale format. Use MM/DD/YYYY for US sites or DD/MM/YYYY for Canadian sites (the year defaults to 'yy'). Every row must have a valid posted date.
- Billing category doesn't match. IMPORT.billing_category is case-sensitive and must match a category name on your Billing Categories page exactly.
- A required field is blank. IMPORT.billing_category, IMPORT.billing_type (charge, credit, or payment), IMPORT.amount, IMPORT.posted_date, and IMPORT.description must all be filled in.
- A pre-filled ID was changed or removed. Do not edit or delete CHILD.id or BILLING_ACCOUNT.id; they are required to match each line to the right record.
- Wrong sign on the amount. Use a negative amount for credits, payments, and reversed charges; use a positive amount for regular charges and reversed payments/credits.
Always run Validate Only before a real import. Imported charges, credits, and payments cannot be edited or deleted in bulk, so validating first is the easiest way to catch these errors safely.
Comments
0 comments
Article is closed for comments.