Overview
Tags are a way to organize all of your communication templates and saved searches for easy sorting and visibility.
Within this article
- Tag Examples
- Creating and Editing Tags
- Adding Tags to Communication Templates
- Adding Tags to Saved Searches
- Filter Options and Bulk Actions
Tag Examples
Tags are completely customizable and defined by the needs of your school. To get you started, some example tags could include, but aren't limited to:
- Workflow Area: Inquiry, Events, Admissions, Enrollment, Billing, etc
- Admin Name: This may be useful for anyone managing manual communications or identifying a pre-built email template with an Admin's signature and information.
- Grade or School Level: This may be useful for grade-specific communications or searches.
- Interest-Based Tags: This is useful for organizing academic or athletic-specific communications/searches.
- Automated Communication Plan Tag (Pro Users only): For schools with Finalsite Enrollment Pro, you have automated communication plans (ACPs). You can create a tag called 'Admissions ACP' to easily locate the email templates tied to an automated communication plan.
Creating and Editing Tags
Create a new Tag
- Navigate to Settings > General > Tags
- Select Add a new Tag.
- Within the Add Tag dialogue box, enter the name of the new tag.
- Click Save.
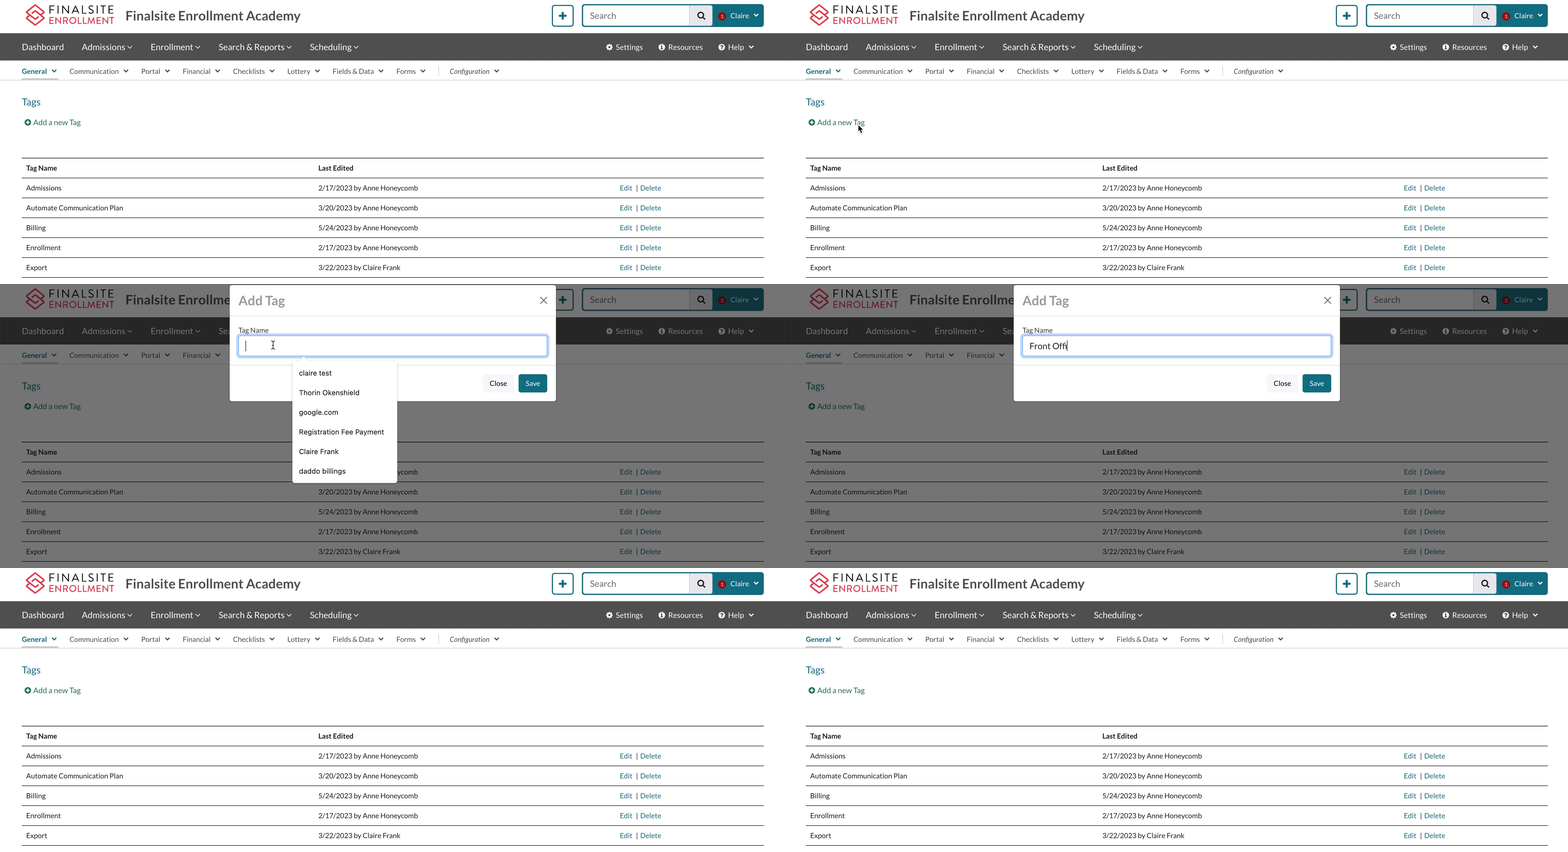
Edit or Delete a Tag
On the right side of the page, you will see the option to Edit or Delete your tag.
- Edit: This will allow you to edit the tag name.
- Delete: This will allow you to delete the tag.
- If you select to delete a tag that is in use in other templates or searches, the system will warn you, letting you know it will be removed from all of the templates or searches it is used on.
Additional Notes:
- You can not create duplicate names.
- When a tag name has already been created, the system will display an error if you try to create a tag with the same name.
- When a tag name has already been created, the system will display an error if you try to create a tag with the same name.
Adding Tags to Communication Templates
Tags can be added to any custom template within the following pages:
- Custom Email Templates
- Settings > Communication > Email Templates > Custom Email Templates
- Letter Templates
- Settings > Communication > Letter Templates
- Label Templates
- Settings > Communication > Label Templates
- Text Message Templates
- Settings > Communication > Text Message Templates
Within these pages, tags can be added by either editing an existing template or adding a new one.
Adding a Tag to a New Template
- Start by selecting the Add a new template link at the top of the template page.
- Within the Edit Template dialogue box, you can select one or more tags.
- Click Save when you are done creating the template.
Depending on which template page you are on (email, letter, etc), the experience will look slightly different. This is an example of adding a tag to a custom email template.
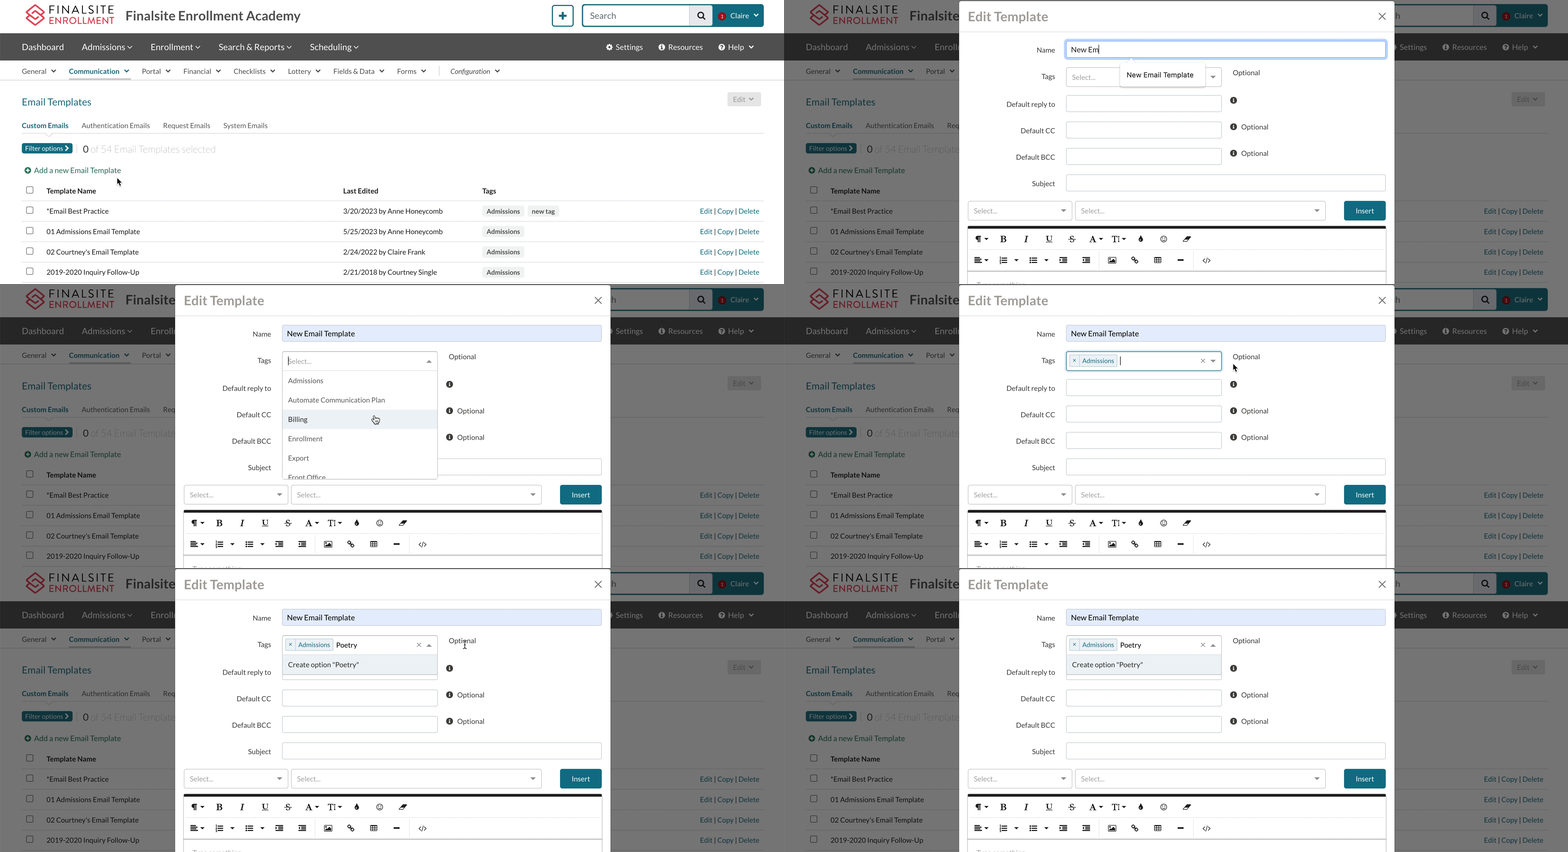
Add or Edit a Tag on an Existing Template
You can add or edit a tag to an existing template through the 'Edit' link on the right side of the template page.
- Select Edit.
- Within the Edit Template dialogue box, you can either add a new tag to the template or click the x next to the tag name to remove a tag from the template.
- Click Save when you are done editing.
This experience will look slightly different based on which template page you are adjusting (letter, email, etc.). Below is an example of how this will look within the Custom Email Templates page.
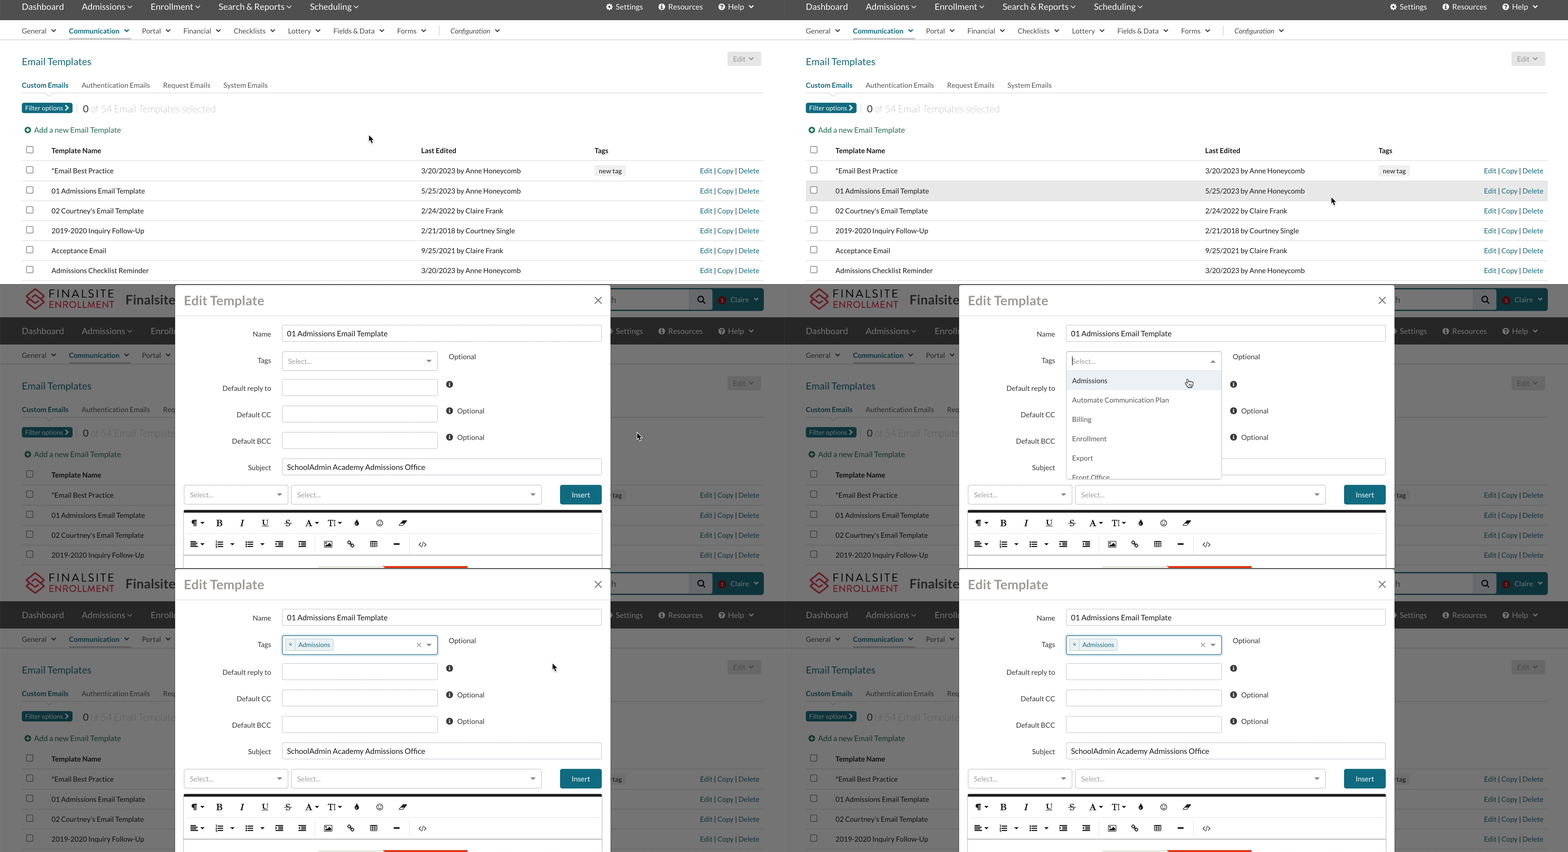
Additional notes
- You can also create tags in bulk directly on the template page. Read the Updating Tags in Bulk Section below for the steps.
- Tags can not be added to any system templates, only custom templates.
- You can add multiple tags to each template.
Adding Tags to Saved Searches
Search tags are useful to organize your list of saved searches. Tags can be added to searches within:
- The Search page when creating a new search (Search & Reports > Search).
- The Saved Searches page (Search & Reports > Saved Searches).
Adding a tag to a new search
When creating a new search and saving it, you have the option to tag the saved search.
Within Search & Reports > Search:
- Create a new search.
- Select Save.
- Within the Save Current Search dialogue box:
- Name the Search.
- Select one or more tags to apply, or, type in a new tag name to create a new tag.
- Set the search as Private or Shared.
- Click Save when you are done.
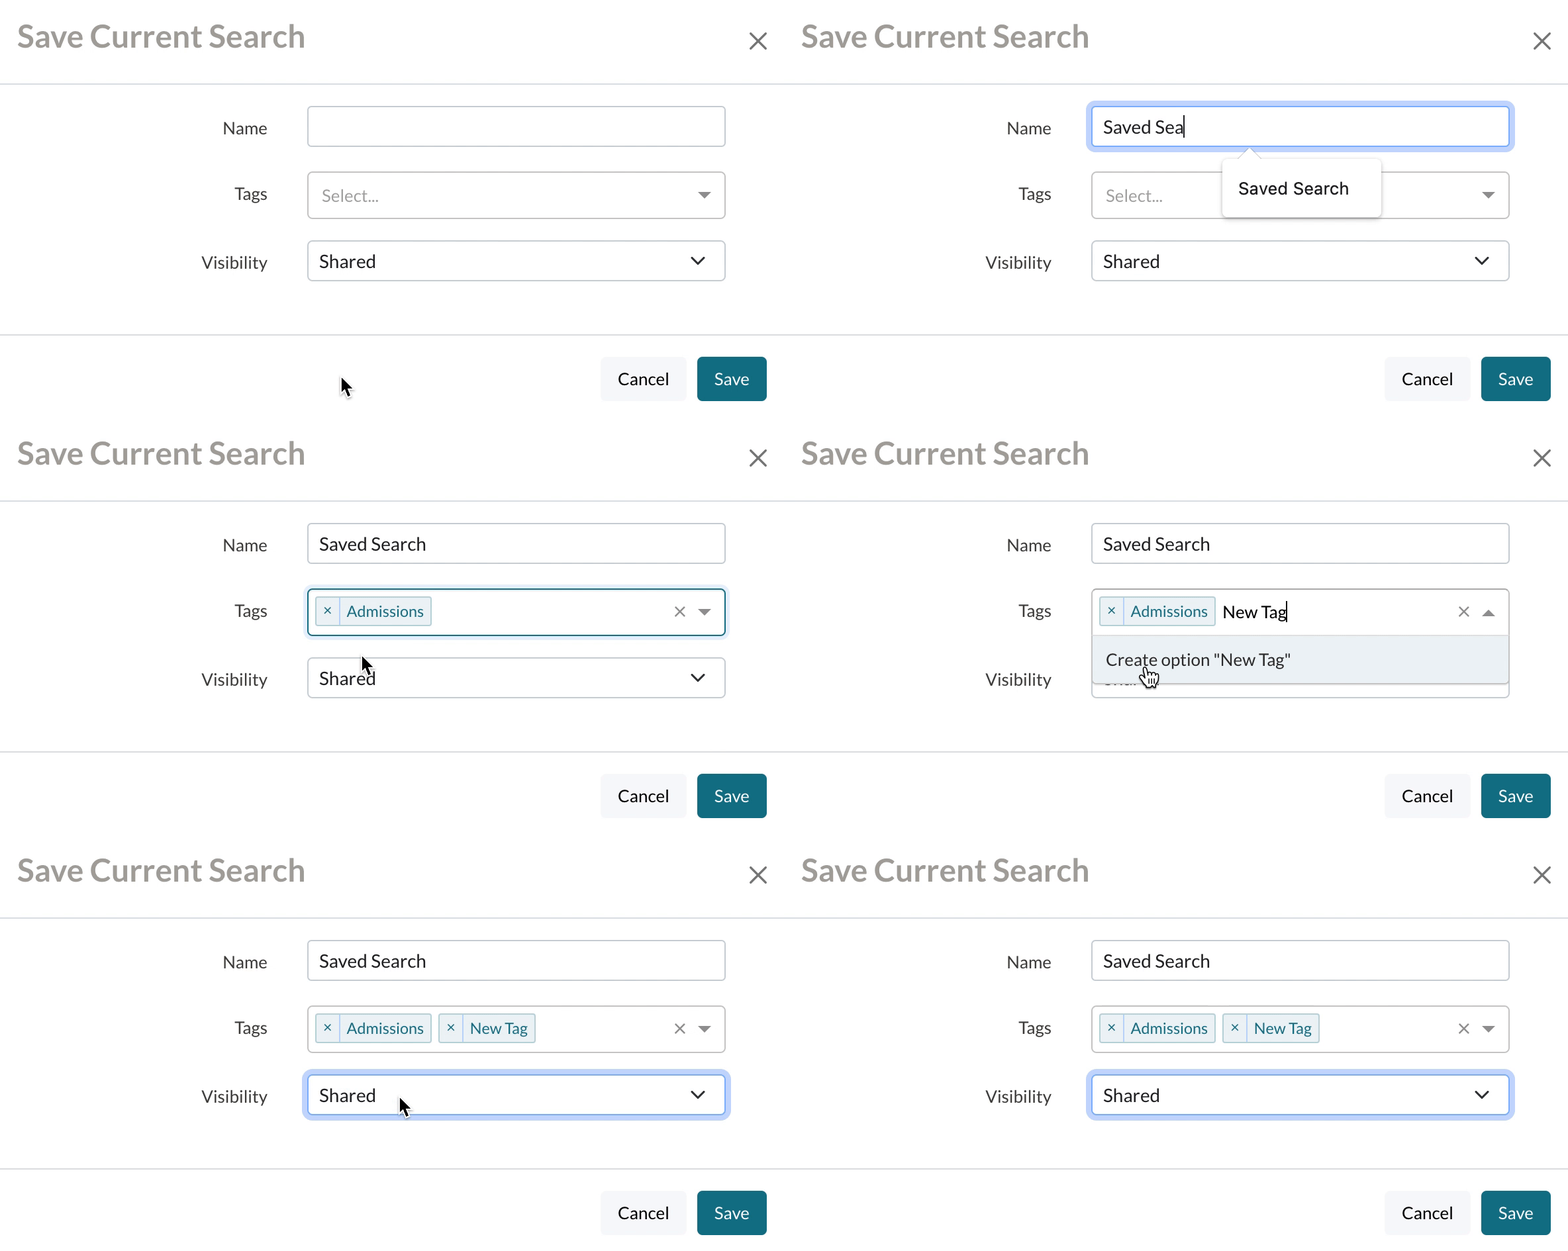
Adding a tag to a saved search
Within your saved searches page you can add tags to searches individually or in bulk.
Within Search & Reports > Saved Searches:
- Select Edit within a search row.
- Within the Save Current Search dialogue box, you can:
- Edit the name of a search.
- Select one or more tags, or create a new one.
- Update the visibility.
- Update the search owner.
- Select to either Update the search or Save it as new to maintain your update.
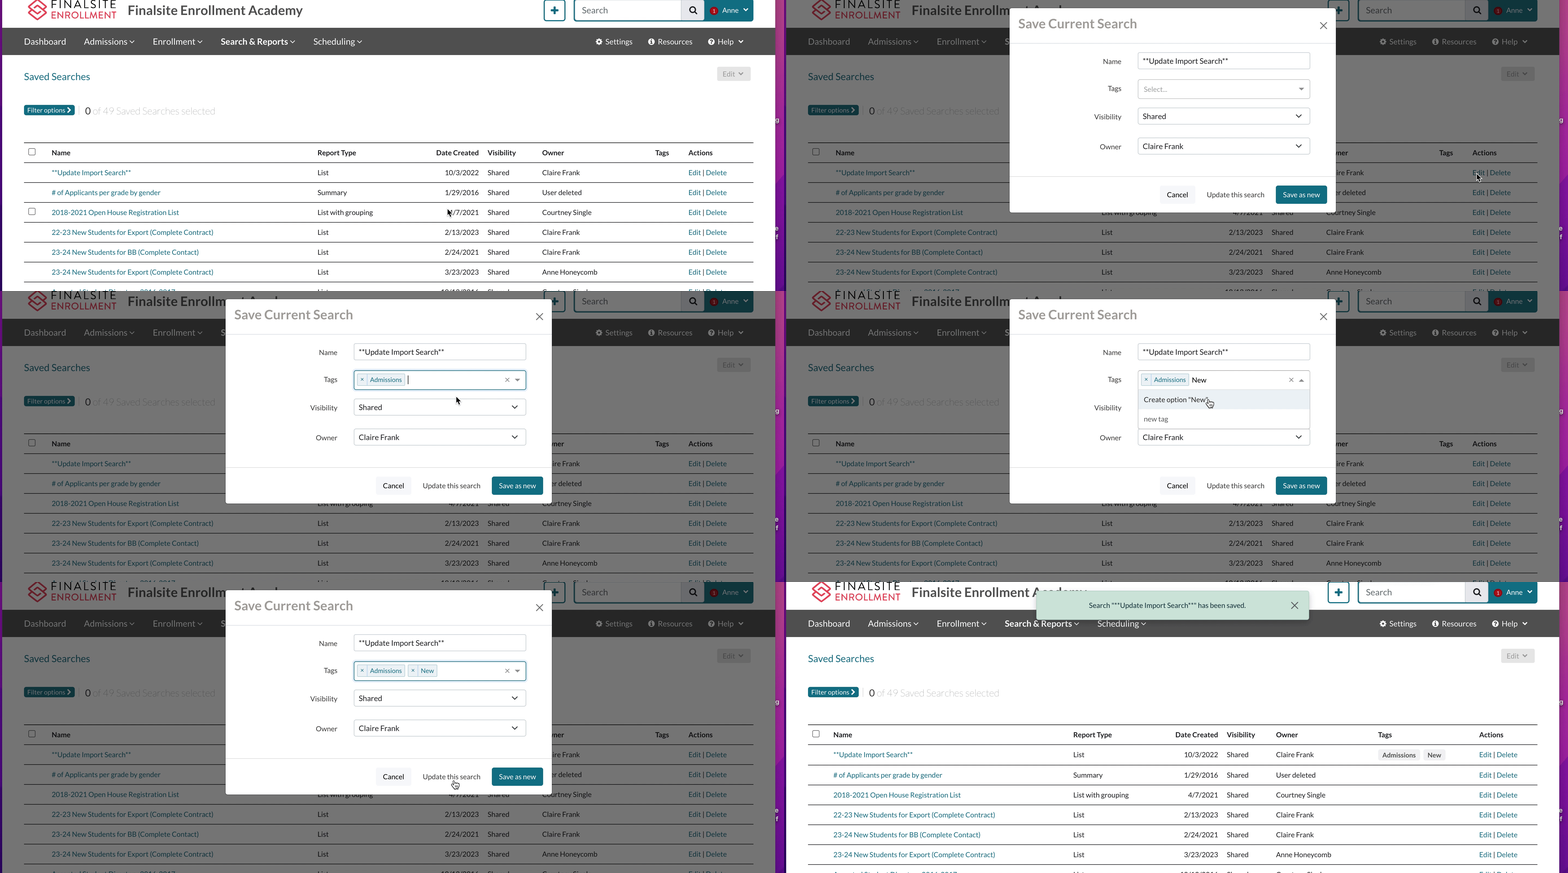
To learn how to add Tags in bulk to saved searches, read below within Updating Tags in Bulk.
Filter Options and Bulk Actions
Filter Options for Tags
On any of the template pages or within the Saved Searches page, you can use the Filter Options dropdown to filter the results to only display the templates/searches with the tags you would like to see.
- You can filter by more than one tag at once.
- You can also filter by Blank to see any custom template that doesn’t yet have a tag.
- Using Filter by Name allows you to search for templates based on their name (not tag name but rather the name you assigned to the template when setting it up).
This experience will look slightly different based on which page you are filtering. Below is an example of how this will look within the Custom Email Templates page.

Updating Tags in Bulk
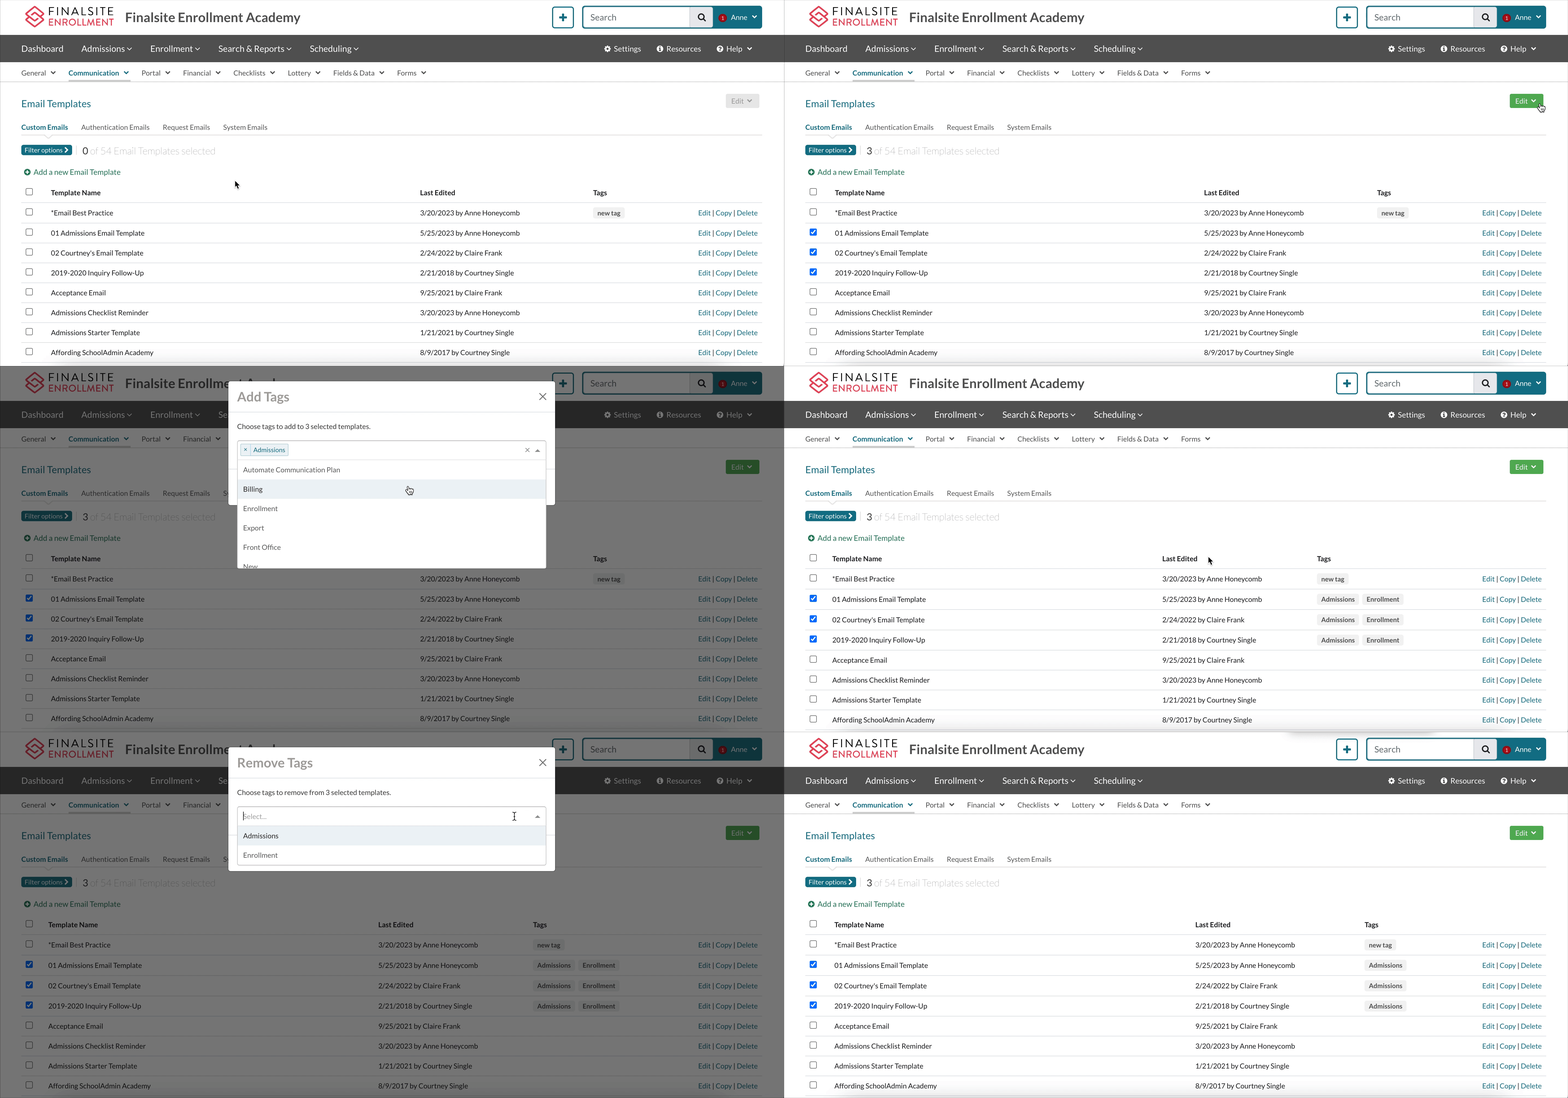
Selecting multiple templates or saved searches at once allows you to add or remove tags in bulk through the edit menu.
Add
- Select multiple templates or saved searches.
- Select Edit.
- To add tags in bulk, select Add Tags.
- Type or select the tag name.
- You may also type in a new tag name to create a new one.
- Select Add.
Remove
- Select multiple templates or saved searches.
- Select Edit.
- To remove tags in bulk select Remove Tags.
- Type or select the tag name.
- Select Remove.
Below is an example GIF of adding and removing a tag in bulk, including how you can create a new tag and apply it in bulk directly on the page. This is an example using the Custom Email Templates page.


Comments
0 comments
Article is closed for comments.