Overview
Letter Templates allow you to create and save pre-written letters that can be generated in bulk (from list pages/search and reports) or for individual students (from the contact record).
You can access the Letter Templates setup page by navigating to Settings > Communication > Letter Templates.
This article will cover how to create new letter templates or edit existing ones. Click here to learn how to generate letters to print for your students.
Common Letter Template Uses
-
Decision Letters: Letter templates are most often used for decision letters after your review process is complete.
-
Financial Aid / Scholarship Awards: Letter templates can be used to send out award letters for financial aid or scholarships that the student will be receiving.
-
Review Committee Read Sheet Summary: You can use a letter template to create a summary sheet for any candidates in review. Click here to learn how!
-
Printable Copy of Emails: Emails can be copied and pasted into a letter template if you need a printable PDF version either for your records or for prospective families. Some schools send decision emails out to notify families of their decisions and follow them with a printed version that is mailed home.
-
Billing Statement (for Billing Module only): Customize the billing statement that is automatically sent to financially responsible contacts to include your school banner, additional merge fields, etc. Click here to learn about the automated billing emails that link to the 'Billing Statement' letter template.
How-To: Create or Edit a Letter Template
You can access and manage all of your letter templates from Settings > Communication > Letter Templates.

On this page, you will see a list of all of your existing letter templates with the option to take the following actions:
Please note: System default templates like the Billing and Tax Statements cannot be copied or deleted.
-
Create a new letter template: Click on the 'Add a new Letter Template' button above your list of templates.
-
Copy an existing letter template: Click on the 'Copy' button to the right of the template you want to copy. This will open the template editor with a copy of the existing template. You can then make changes and input a name to save it as a new template. This is also useful if you want to save a default letter template containing your school's logo/header and any signature blocks so that you can always copy from it for new templates.
-
Edit or delete an existing letter template: Click on the 'Edit' or 'Delete' button to the right of the template you want to edit or delete.
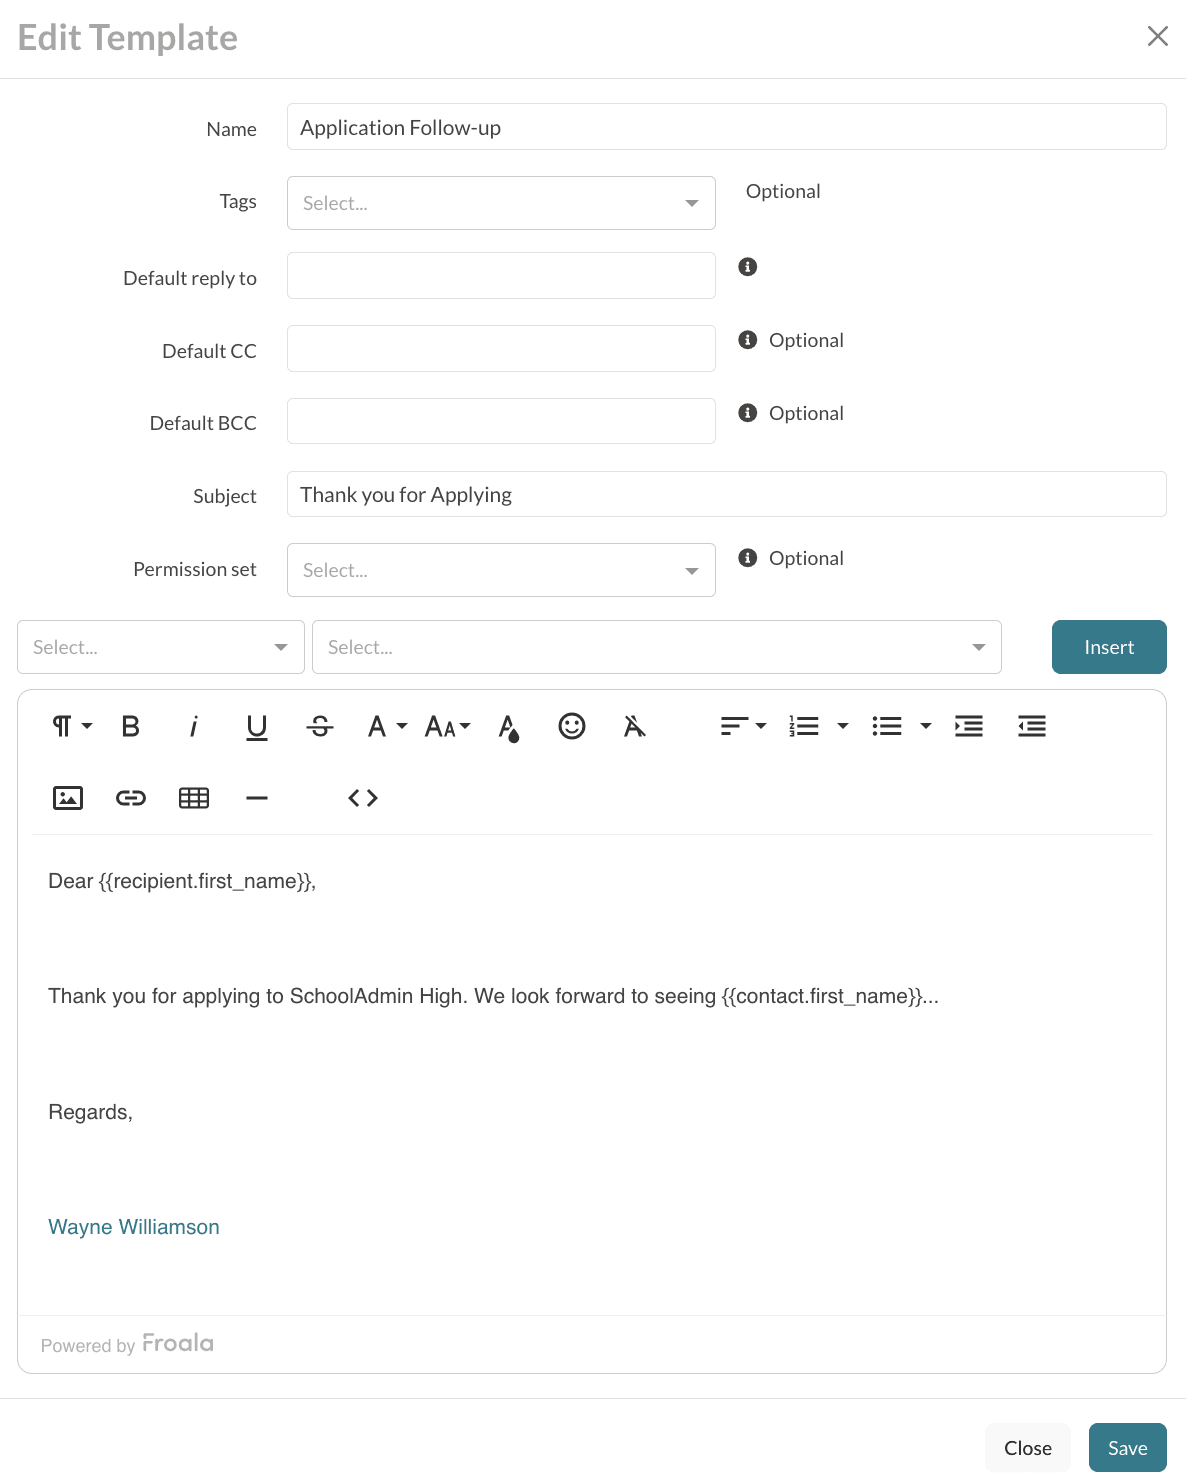
Adding, editing, or copying a letter template will bring up the 'Edit Template' window.
Within this window, you have access to the following options:
-
Name: Set a name for or rename the template. This is the name that you will see in your list of letter templates. They are organized alphabetically.
-
Tag your template. Within the 'Tags' field, you can create or select a tag to attach to the template. Tags are an internal-only way of organizing your communication templates.
- Please note: System default templates like the Billing and Tax Statements can not be tagged.
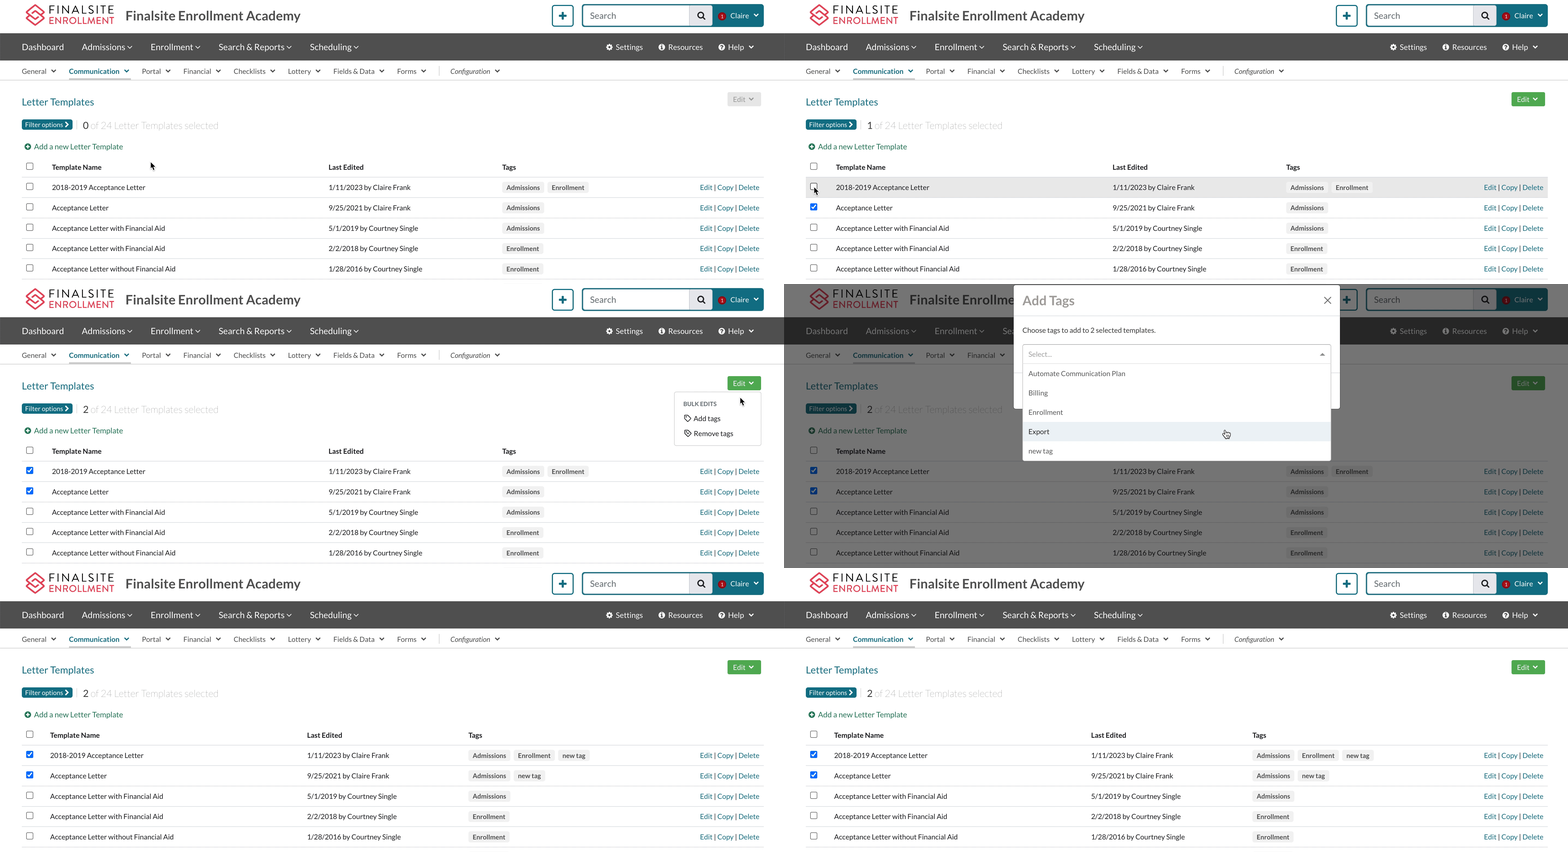
- You can add and remove tags in bulk within this page via the edit menu.
- You must select one or more templates before the 'Edit' menu becomes available.
- You can read more about how to manage tags here.
-
Margins: Set the desired margins, in inches, for your letter.
-
Compose your letter: You can type directly into the text box or use the merge token picker to pull in dynamic data from the system. You also have access to the full range of formatting options, such as adding bold text or images. Click here to learn more about the Template Editor options!
Please note: The recipient category of merge fields does not work in letters because only a single PDF is generated. However, you can still populate a parent's name in a letter template by using a merge field such as {{contact.parent1.name}}. Click here for more information.
-
Close: This will close the window without saving your changes.
-
Save: This will save your changes. Be sure to click this button when you create your template or make your desired edits! Unsaved templates or changes cannot be recovered.
Unlike email templates, letter templates cannot be changed on the fly while generating them for students. Letter templates can ONLY be edited under Settings > Communication > Letter Templates, so if you need to make changes, you will need to do so from this page before starting the process of generating the letters for students.
Filter Options and Edit Menu
Filter Options
Within the Letter Template page, you can use the filter options to search for specific tags or filter the page by letter template name.
- You can also filter by Blank to see any custom template that doesn’t yet have a tag.
- Reminder: You can only add Tags to custom Letter Templates.
- Using Filter by Name allows you to search for templates based on their name.

Edit
You can use the Edit Menu to add or delete tags in bulk.
- You must select one or more tags before the edit menu becomes available.

How-To: Add a Page Break for Printing
If you need an intentional printing page break to your letters, open the template, switch to code view (the </> icon in the toolbar), and add this line within the opening paragraph tag where the print page break should occur:
style="page-break-before: always"
For example, your coding might look something like this:
<p style="page-break-before: always;">This is an example of a paragraph.</p>
How-To: Reference Additional Parents or Households
If you need to pull information for PARENT3, PARENT4, or HOUSEHOLD2 into a letter template, you can do so using merge fields/tokens with the following formats:
-
For PARENT3: {{contact.parent3.FieldName}}
-
Example: {{contact.parent3.first_name}} to pull the first name of the student's PARENT3.
-
-
For PARENT4: {{contact.parent4.FieldName}}
-
Example: {{contact.parent4.phone_1_number}} to pull the number from the phone_1 field for the student's PARENT4.
-
-
For HOUSEHOLD2: {{contact.household2.FieldName}}
-
Example: {{contact.household2.address_address_1}} to pull the Address 1 line from the address field for the student's HOUSEHOLD2.
-


Comments
0 comments
Article is closed for comments.