
The Duplicate Check & Merge tool (Settings > Fields & Data > Duplicate Check and Merge) lets you manually merge any two contacts by their Finalsite Enrollment IDs, even when they don't appear on the Duplicate Contact Matching page. Use this for one-off merges that the automatic system didn't surface. For bulk merging of strong or herculean matches, use the Duplicate Contact Matching page instead.
Who can access this feature?
Admin Account Types: System Admin & Admin
Permissions: Data
💡Quick Answers
- Who can access this tool? System Admins and Admins with the Data permission.
- Where do I find a contact's ID? Open the contact record. The ID is in the URL, after /contacts/ (a long hyphen-separated string). Copy that exact string with no extra characters or slashes.
- What's the merge process? Enter the First Record ID (this contact's data wins on conflicts), then the Second Record ID. Click Dupe Check to compare side by side, then Merge to finalize. The action is irreversible.
- What does the First Record ID win actually mean? Where fields conflict, the first record's value is kept. Where the second record has data the first doesn't, it carries over to the merged record. Related contacts from both combine. Merging never deletes data.
- Why did my merge fail? Common reasons: one of the contacts has a Billing Account (see Billing: Merge or Delete Contacts with Billing Accounts), conflicting auto-generated ID fields (remove the ID from one record and retry), or the records need to be swapped (try reversing the order).
- What does 'Could Not Dupe Match Those Two Objects' mean? The system can't find one of the IDs. Verify both IDs are correct, make sure you copied only the ID (no URL prefix, no trailing slash), and confirm both contacts still exist.
In this article
Merging with the Duplicate Check & Merge Tool
Follow the steps below to merge duplicate contact records in Finalsite Enrollment. Note: Once records are merged, the process is permanent and cannot be undone.
Step 1: Locate Contact IDs
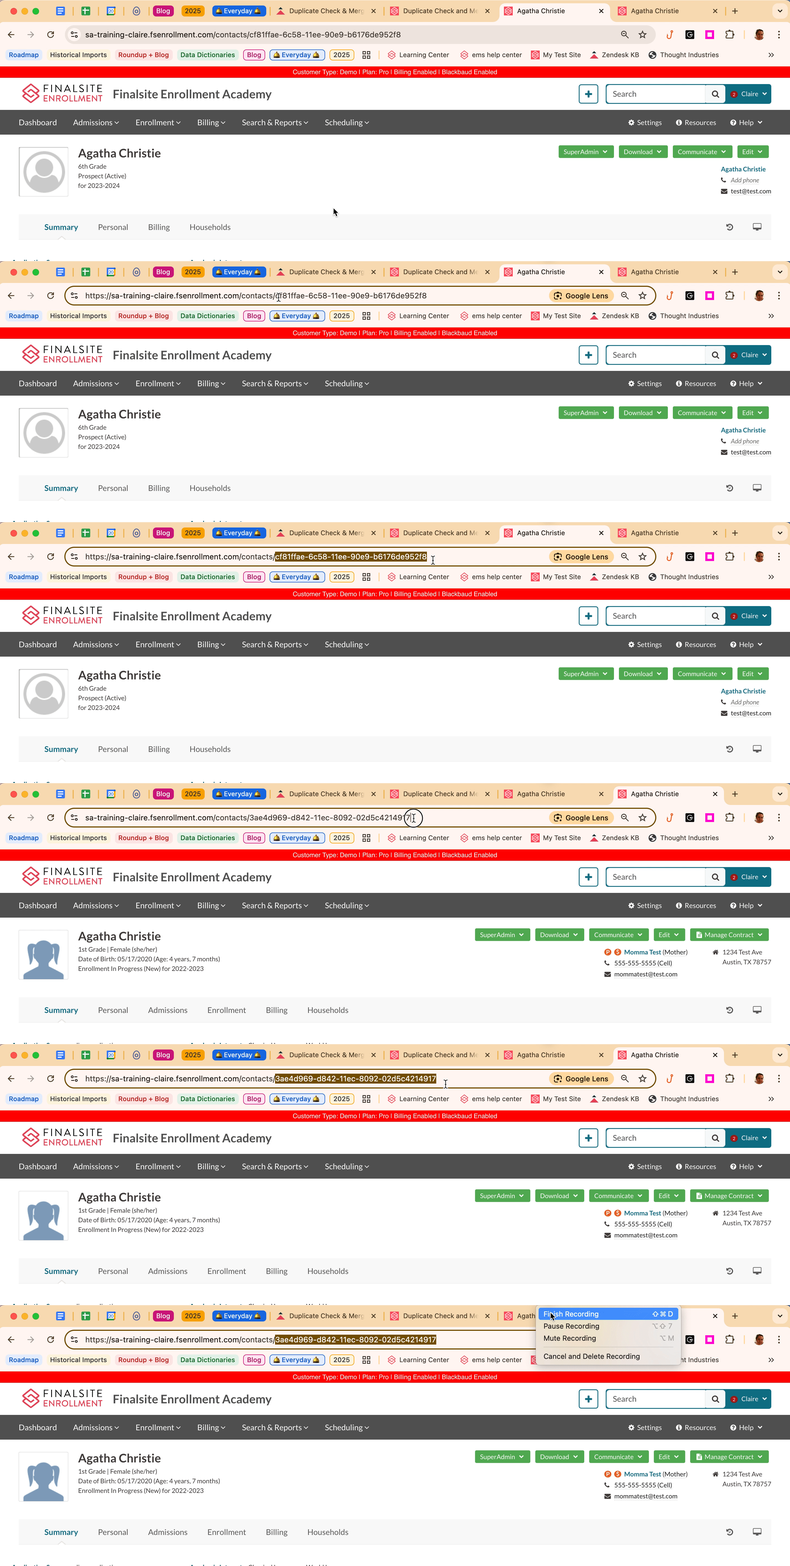
To merge two records, you must first identify each contact’s unique Finalsite Enrollment ID.
- Open the contact record for the first duplicate.
- Locate the ID in the URL of the contact’s page. The ID appears after contacts/.
- Repeat this process for the second duplicate record.
Step 2: Enter Contact IDs
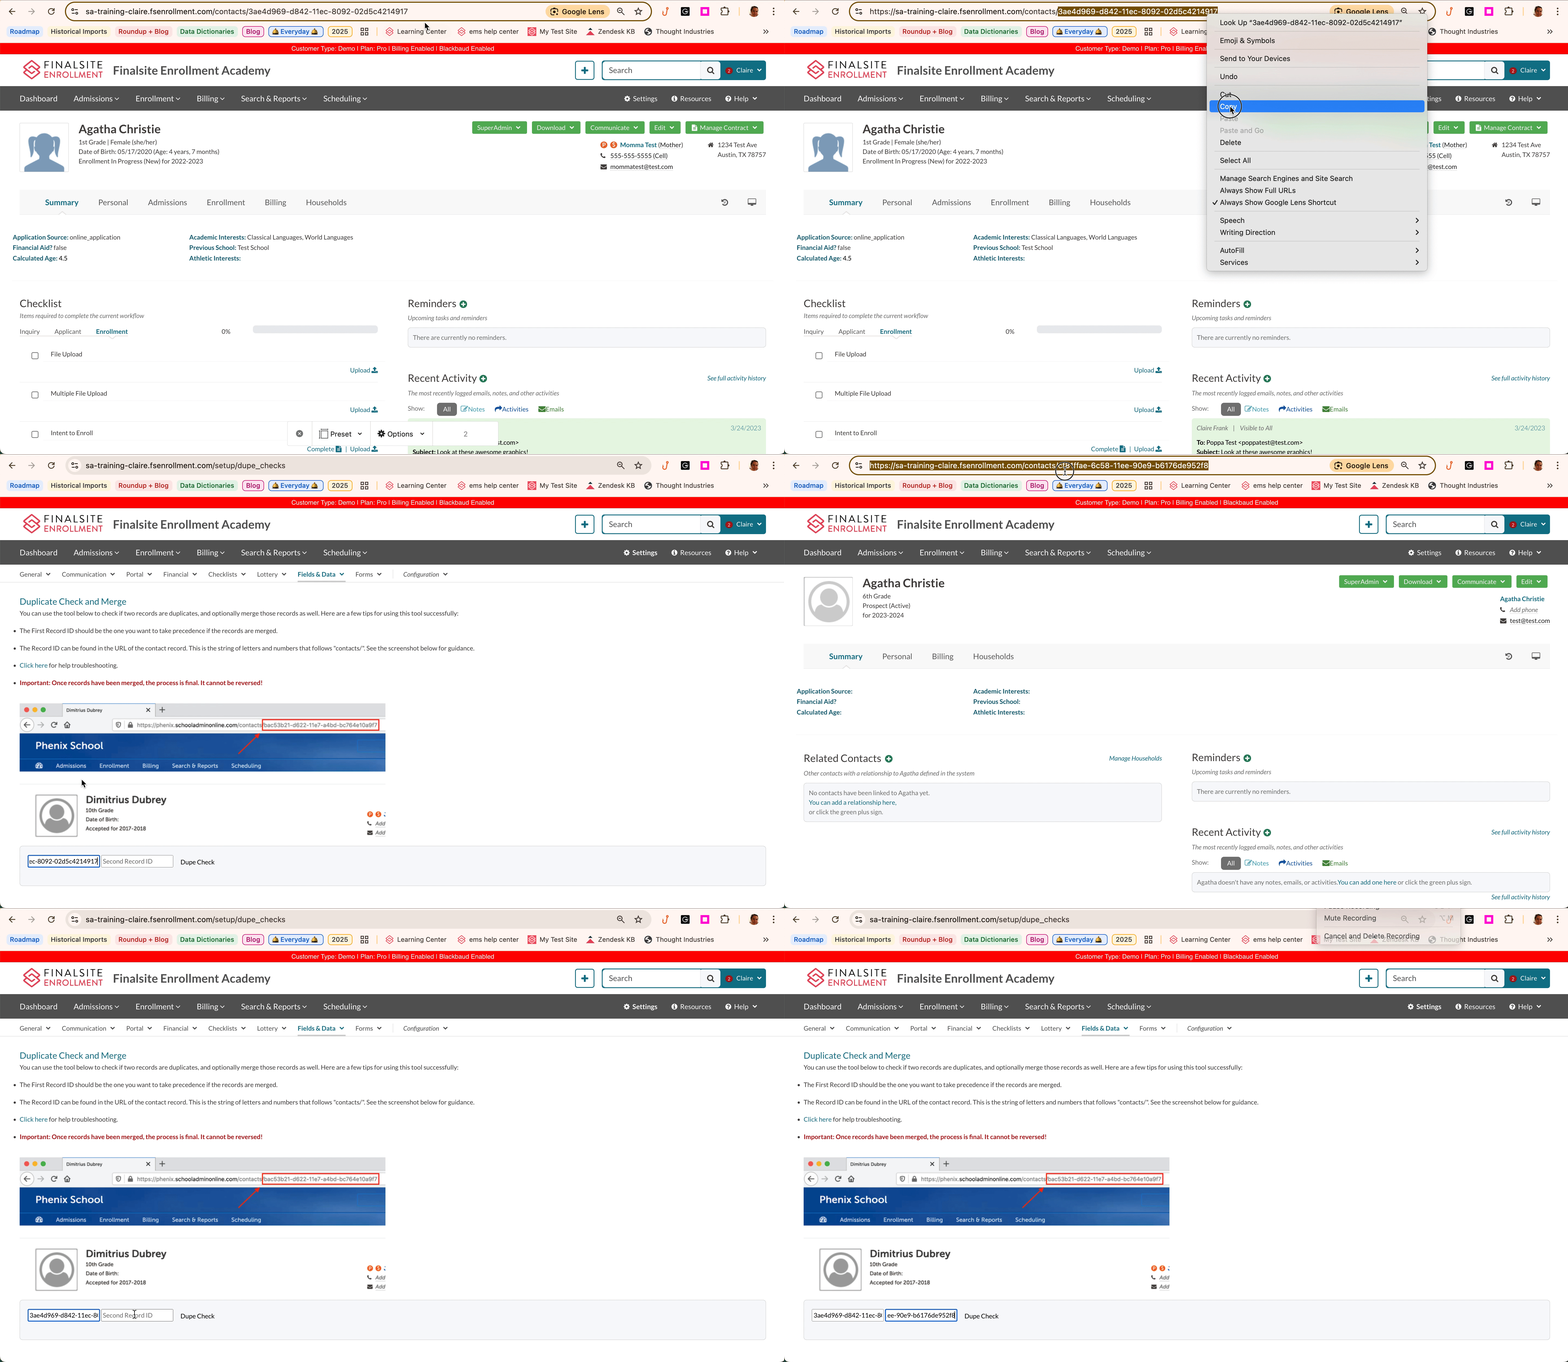
- Navigate to the Duplicate Check & Match page.
- In the First Record ID field, enter the ID of the contact that should take priority. This contact’s data will override any conflicting fields.
- In the Second Record ID field, enter the ID of the duplicate contact.
Step 3: Verify Records
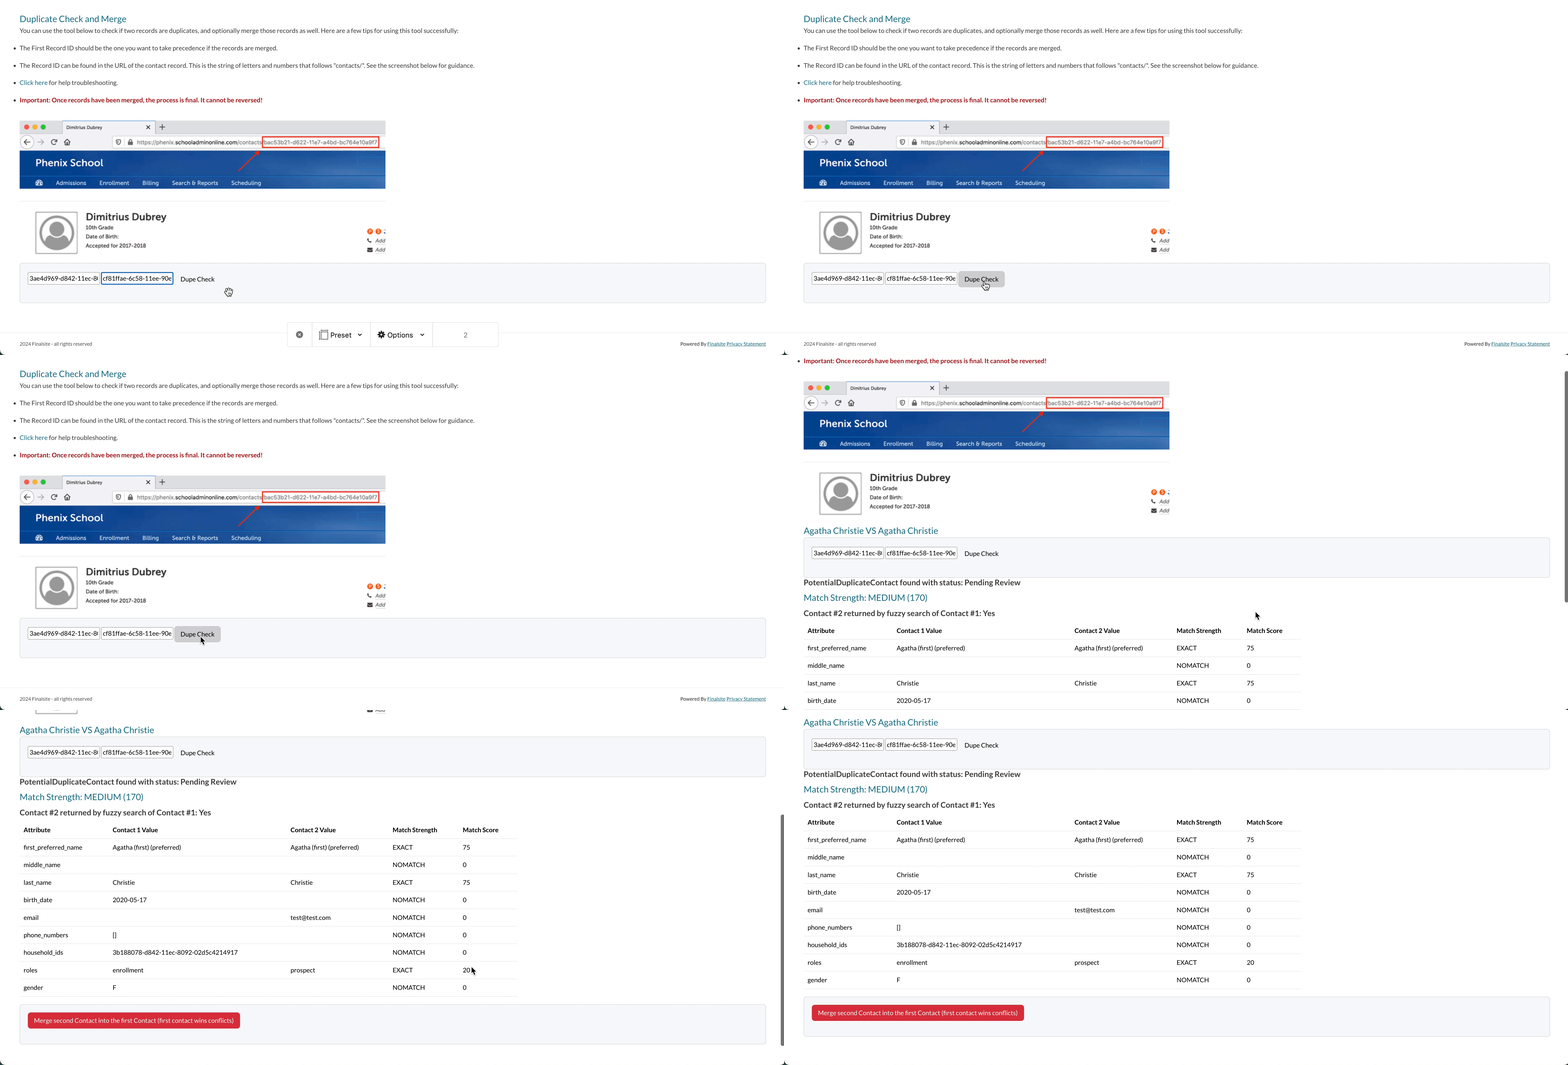
- Click the Dupe Check button. A side-by-side comparison of key information, such as name, birth date, and contact details, will appear.
- Review the comparison carefully to confirm you are merging the correct records.
Step 4: Complete the Merge
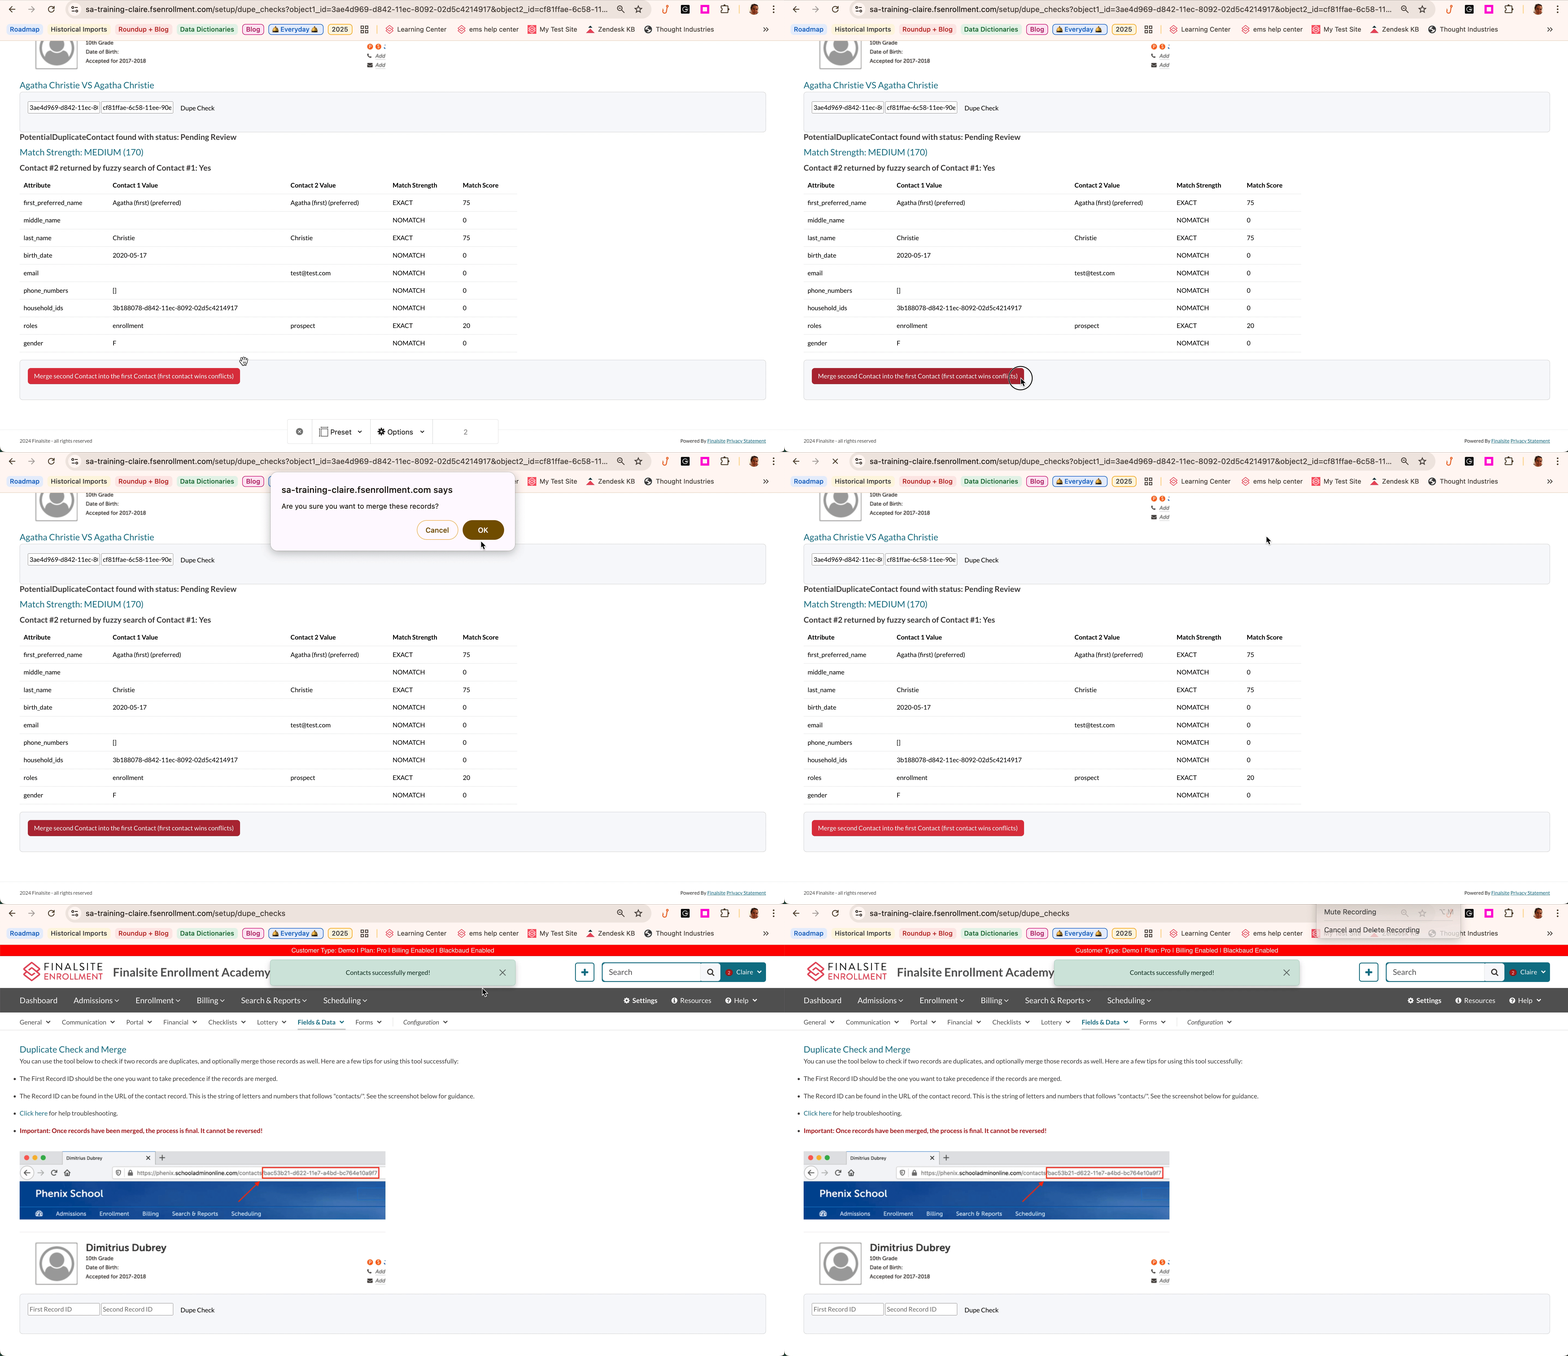
- Once verified, click the Merge button to finalize the process. Caution: Verify all details before proceeding. This action is irreversible.
- The duplicate records will be combined into a single record using the data from the First Record ID contact in cases of conflict.
Match Strength Reference
Use the chart below to interpret match scores:
- 0-124: Unknown (unlikely to be duplicates)
- 125-149: Weak match
- 150-224: Medium match
- 225-300: Strong match (likely duplicates)
- 301+: Herculean match (almost certain duplicates)
Troubleshooting
This guide addresses common issues when merging duplicate contacts and provides step-by-step solutions. If these steps do not resolve your issue, contact Support for further assistance.
Merge Fails After Clicking “Merge”
If the merge process fails, it may be due to one of the following reasons:
Billing Accounts
Contacts with associated Billing Accounts require additional checks and steps before merging.
- Action: Refer to the Billing: How-to Merge or Delete Contacts with Billing Accounts article for detailed instructions.
Conflicting ID Fields
If your system uses auto-generated ID fields (e.g., IDs from your SIS or integrations), duplicate contacts may have conflicting IDs.
- Action: Remove the ID from one of the records, then attempt the merge again.
Switch Record Order
Sometimes, reversing the order of the contact IDs resolves the issue.
- Action: Swap the First Record ID and Second Record ID and try merging again.
“Could Not Dupe Match Those Two Objects” Error
This error occurs when the system cannot locate one or both contact IDs entered into the tool.
Resolution Steps
- Verify IDs: Ensure both contact IDs are correct.
-
Check Formatting: Enter only the contact ID without additional characters. Examples:
- Correct: 81f56326-14f4-11e9-86f2-bc764e10a9f7
-
Incorrect:
- contacts/81f56326-14f4-11e9-86f2-bc764e10a9f7
- 81f56326-14f4-11e9-86f2-bc764e10a9f7/
- http://yourschool.schooladminonline.com/contacts/81f56326-14f4-11e9-86f2-bc764e10a9f7
- Ensure Existence: Confirm both contact records still exist in the system.
Match Strength is “Unknown” or “Weak”
The system calculates match strength based on weighted fields like name and birthdate. Even slight discrepancies in these fields can result in a lower match score.
Resolution Steps
- Confirm Duplicates: Review the details to ensure the contacts are true duplicates, not separate individuals with similar information.
- Proceed with Merge: If confirmed as duplicates, you can merge them regardless of the match strength.
Comments
0 comments
Article is closed for comments.