Overview
Many elements of the Billing Process can be handled between the student contact record and the parent/guardian contact records. Financial responsibility and splits can be managed in the student record, whereas ledger history, adding fees, and credits are handled in the parent record.
How-To: Use the Billing Tab on the Student Record
When you are viewing a specific student's contact record within Finalsite Enrollment, you can access their Billing tab by clicking on it from the list of tabs at the top of the page.
Please note: Your tabs may differ from what is displayed above, based on the modules you are using.
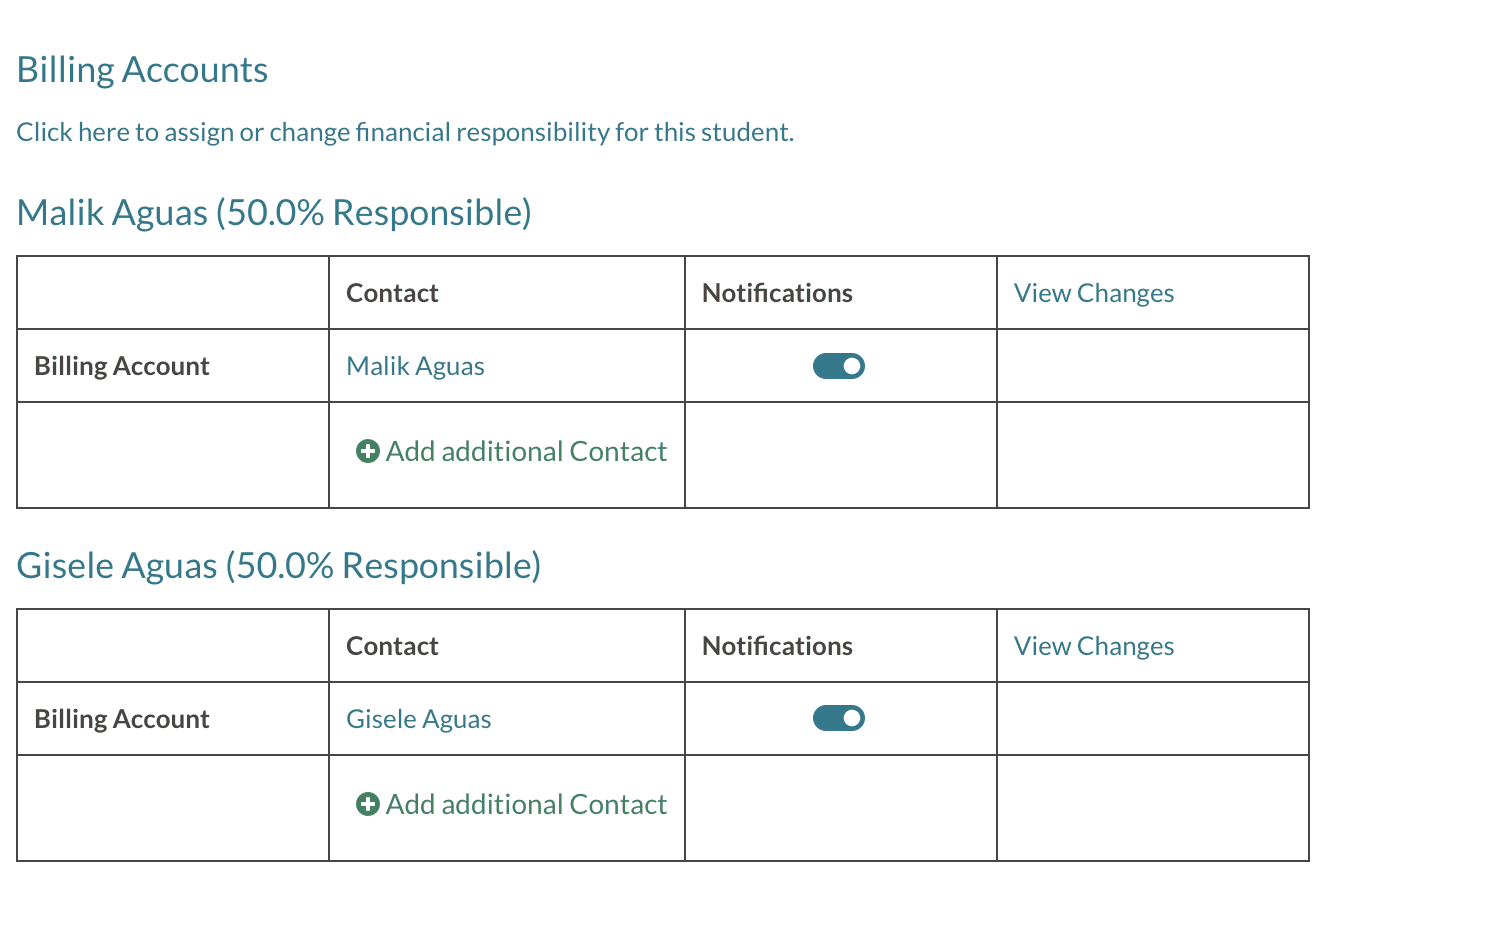
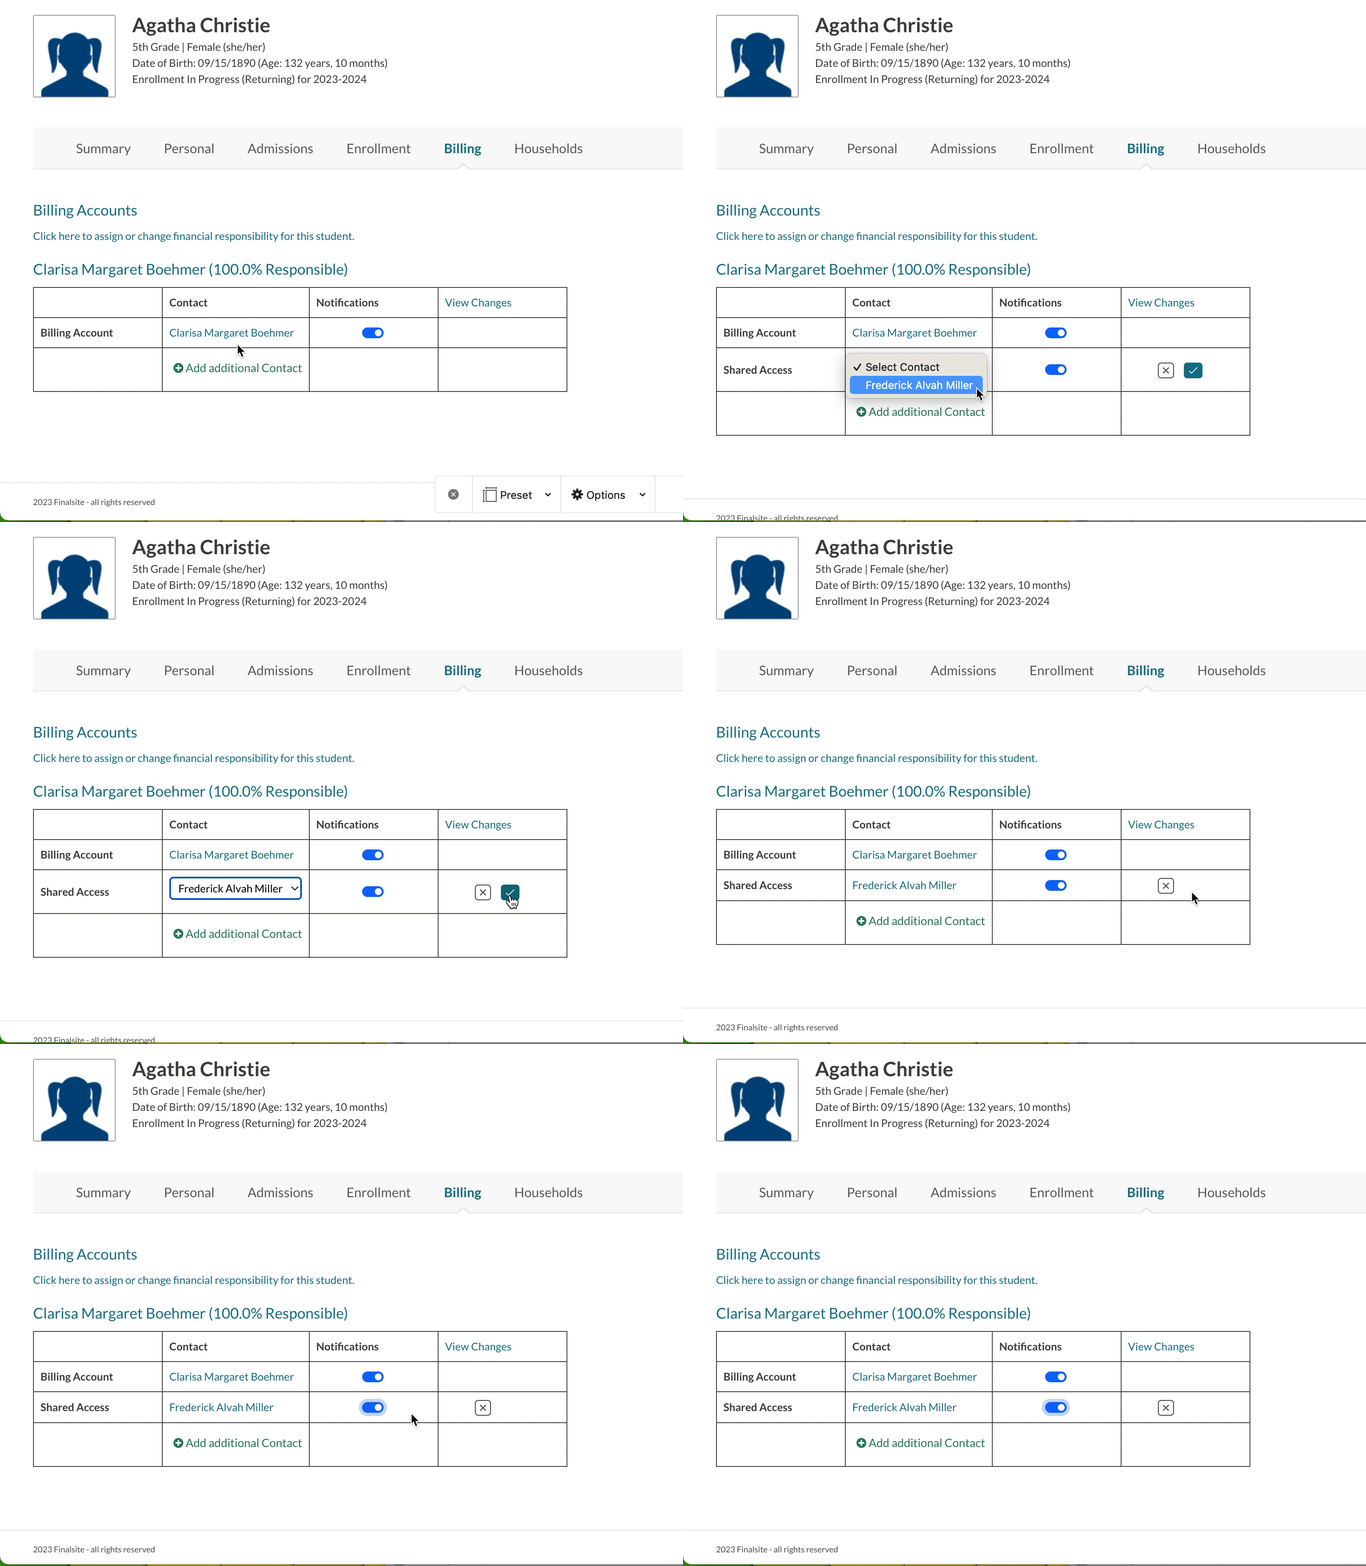
Within the Billing tab in the student record, you will see a list of financially responsible parents/guardians and their percentage splits. Here, you can add additional contacts for Shared Billing access, which you can read about here. You can also click on any of the parent/guardian names to quickly jump to the Billing tab in their contact record.
Notifications for Contacts with Shared Access
When adding a contact with Shared Access, notifications are automatically turned on (as long as the contact has an email address associated with their account.) To disable notifications, toggle them off in the Notification column.
- If notifications are on, the contact will receive all billing communications.
- If notifications are off, the contact will receive no billing communications.
- The parents/guardians can not enable or disable billing communications on their end. (Only admins have the ability to toggle on/off communications for parents with shared billing access.)
- Read more about communications within our Billing Communications article.
How-To: Use the Billing Tab on the Parent/Guardian Record
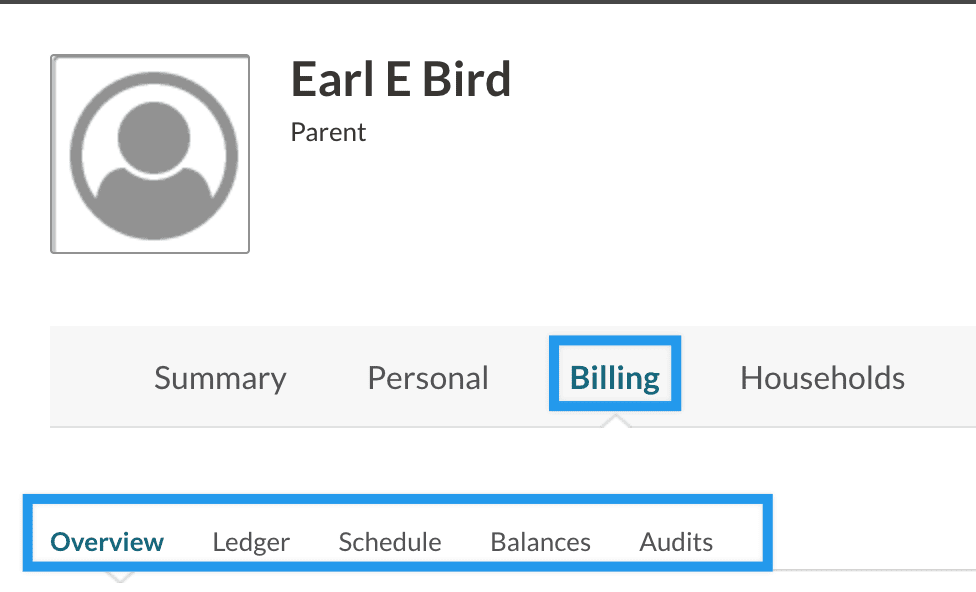
On the parent's record, you can click on the 'Billing' tab which is comprised of five sub-tabs (Overview, Ledger, Schedule, Balances, and Audits), explained in more detail below.
Overview Tab
The layout of the Overview Tab varies based on whether or not you are offering Autopay as an option to families.
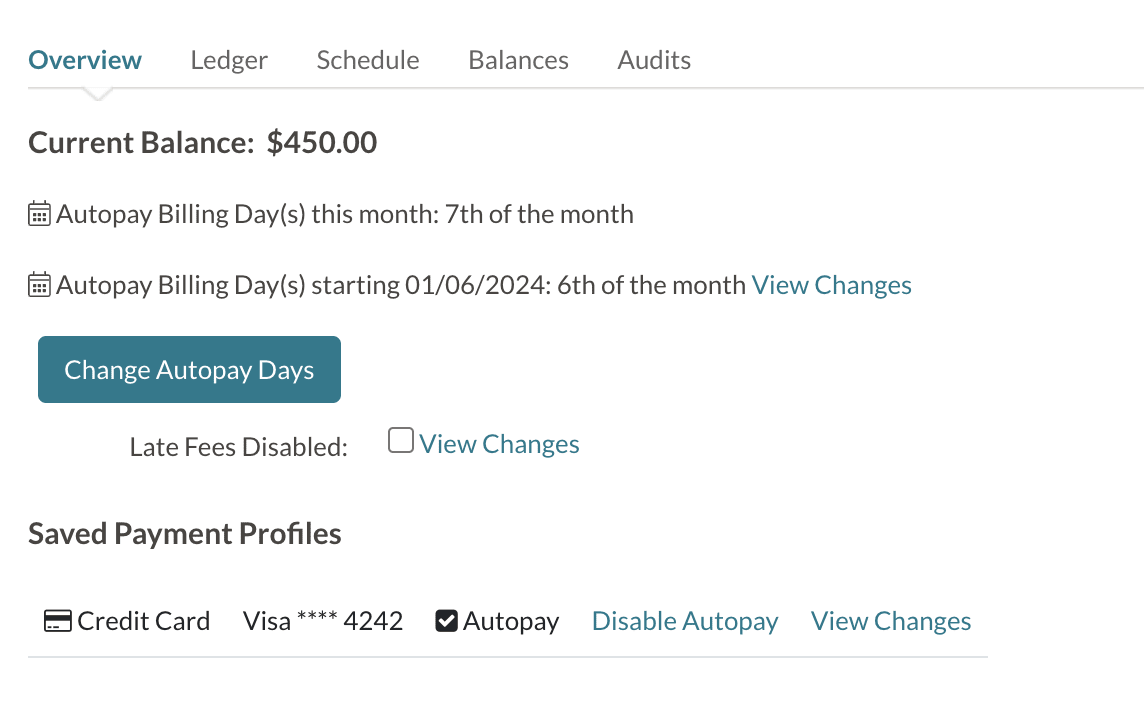
Overview Tab for Schools Offering Autopay
If your school offers Autopay to parents, the Billing Overview Tab of a payer record will look something like this:
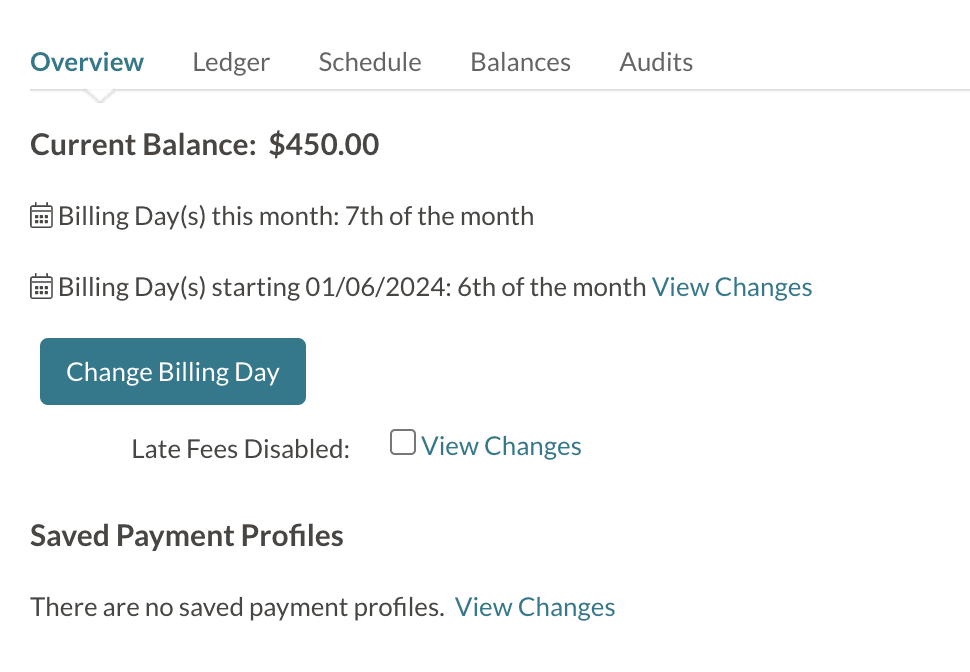
Overview Tab for Schools that have disabled Autopay
If your school has disabled Autopay or a payer is not signed up for Autopay, the Overview tab will look more like this:
Overview Tab Options and Info
-
Current Balance: The current dollar amount balance for the parent you're currently viewing.
-
Billing Day(s) or Autopay Billing Day(s): The current billing day for the parent and (optionally) change it using the drop-down menu.
- Change Billing Day(s) or Change Autopay Day(s): When selected, allows you to change the payer's billing days.
-
Late Fees Disabled: If you have enabled Automatica Late Fees under Settings -- Financial -- Billing Setup, you will see the option under the Overview tab to disable Late Fees for a particular parent. You can also view a history of all individual late fee changes by clicking on 'View Changes.'
- Please note: You can enable or disable Automatic Late fees and their settings on your Billing Setup page.
-
Saved Payment Profiles: Displays information about the payer's saved payment profile (if they have one saved).
- Includes the option to enable or disable autopay for the individual payer.
- View Changes allows you to view a log of the changes made to the payer's payment profile.
If your school has Autopay set as required and you manually disable it for any one of your parents, Autopay can only be re-enabled for that parent if either:
- You re-enable it on the Admin side (by clicking the ‘Enable Autopay’ link on the parent’s Billing > Overview tab.)
- The parent adds a new payment profile within their Billing Management tab. This new profile will give them the option to enroll in Autopay again.
- Notes on this process:
- When the parent adds a new payment method and selects to Enroll in Autopay, the selection they make is locked in ( the ‘Enroll in Autopay’ checkbox can not be unchecked).
- The parent can refresh their page or click back to get out of making this selection or they can proceed to finalize enrolling in Autopay.
- Notes on this process:
Ledger
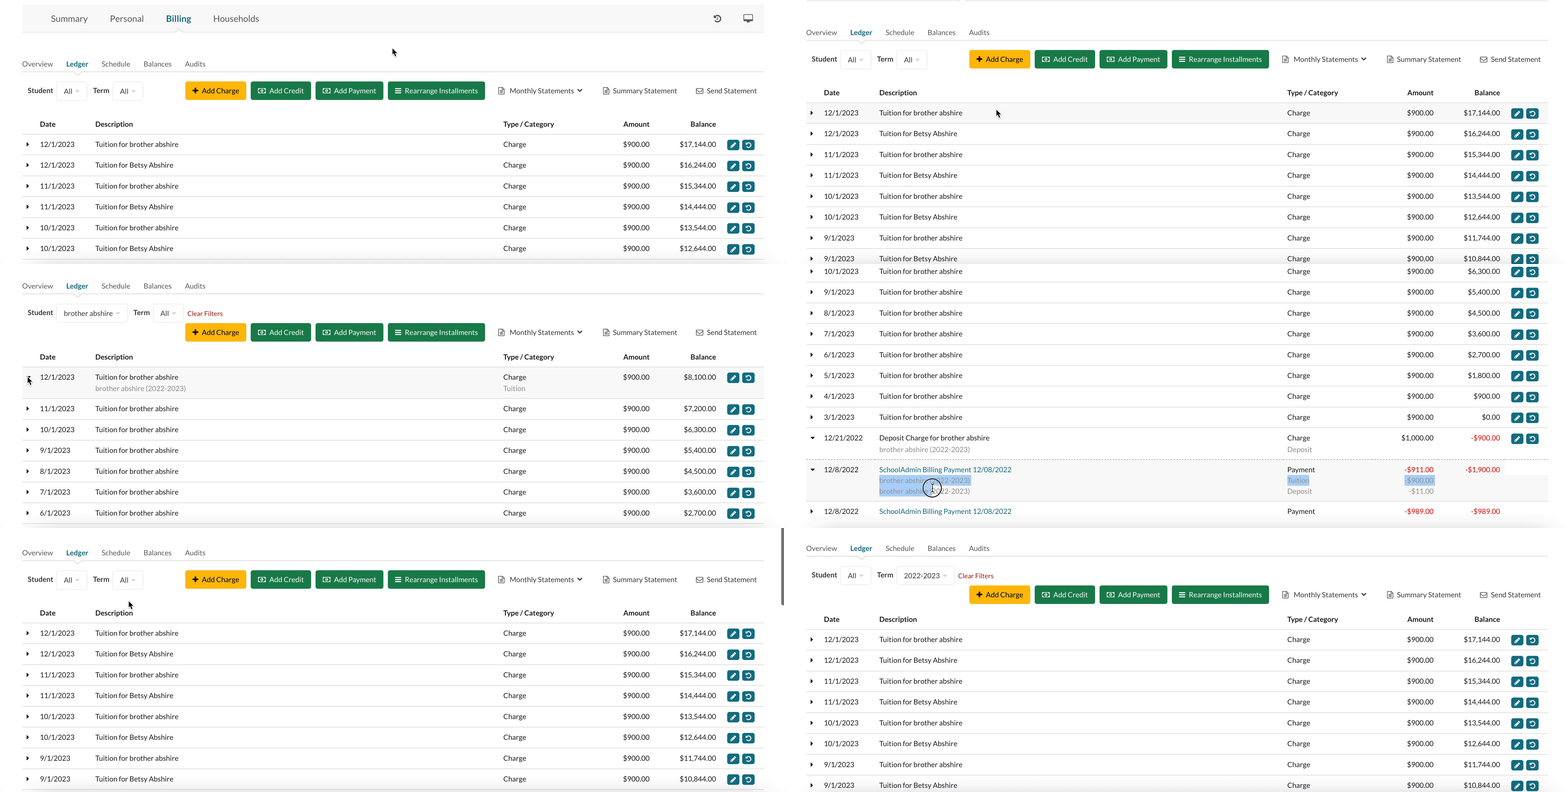
Within the Ledger tab, you can see a record of each financial transaction and any upcoming amounts that will be due. You'll also see the payer's Billing Day(s) and Autopay Billing Day(s) listed above the ledger, as highlighted in the image below.
The columns in this tab are as follows:
-
Date: The date that a charge, credit, or payment is due or was added.
-
Description: A brief description of the charge/credit/payment.
-
Type/Category: The billing category of the charge/credit/payment.
-
Amount: The amount of the charge/credit/payment.
-
Balance: Remaining balance for the parent.
On the Ledger, there will be a dotted line, as shown below, that will move up on the billing day to divide past amounts and current amounts due.
Ledger Lock
The Ledger Lock feature lets you secure your financial records by setting a locked date. Once enabled, it prevents any alterations to the ledger entries dated on or before the set date. Ledger Lock is set up on your Billing Setup page (Settings > Financial > Billing Setup).
Here's how the Ledger Lock feature impacts the ledger:
-
Delete and Edit buttons are not available for payments or charges with locked dates.
-
Adding charges, credits, or payments to the ledger is blocked for the locked dates.
- In the Rearrange Installments tool, you won’t be able to rearrange installments for any months within the locked range. Note: The rearrange button will be available but when processing the adjustment, you’ll have to select a post date outside of the locked range.
- Refunds and Failed Payments: If the original date is within the locked range, the refund or failed payment will be posted to the ledger with the current date instead of the original payment date.
Read more about Ledger Lock and how it affects other areas of your site in our Settings: Billing Setup Page article.
Ledger Tab Action Buttons
Student and Term Filters
The 'Student Filter' and the 'Term Filter' allow you to filter the ledger based on your selection.
Student Filter Options:
- All: shows all students (default).
- None: shows account level fees/payments.
- A list of all students that the payer is responsible for. Selecting one of the student names will filter the ledger to only show that student's ledger items including all charges, credits, and payments assigned to them.
Term Filter Options:
- All: shows all students (default).
- None: shows account level fees/payments.
- A list of all terms represented on the ledger. Filtering by a specific term will narrow the ledger results to show only the ledger items within that term.
Additional notes:
- This is only available on the admin side, it is not parent-facing.
- The ledger will default to show all students/terms.
- When a payment is made for multiple students and you filter by one student on the ledger, the system will only show the portion of the payment associated with the student you filtered by.
Add a Charge
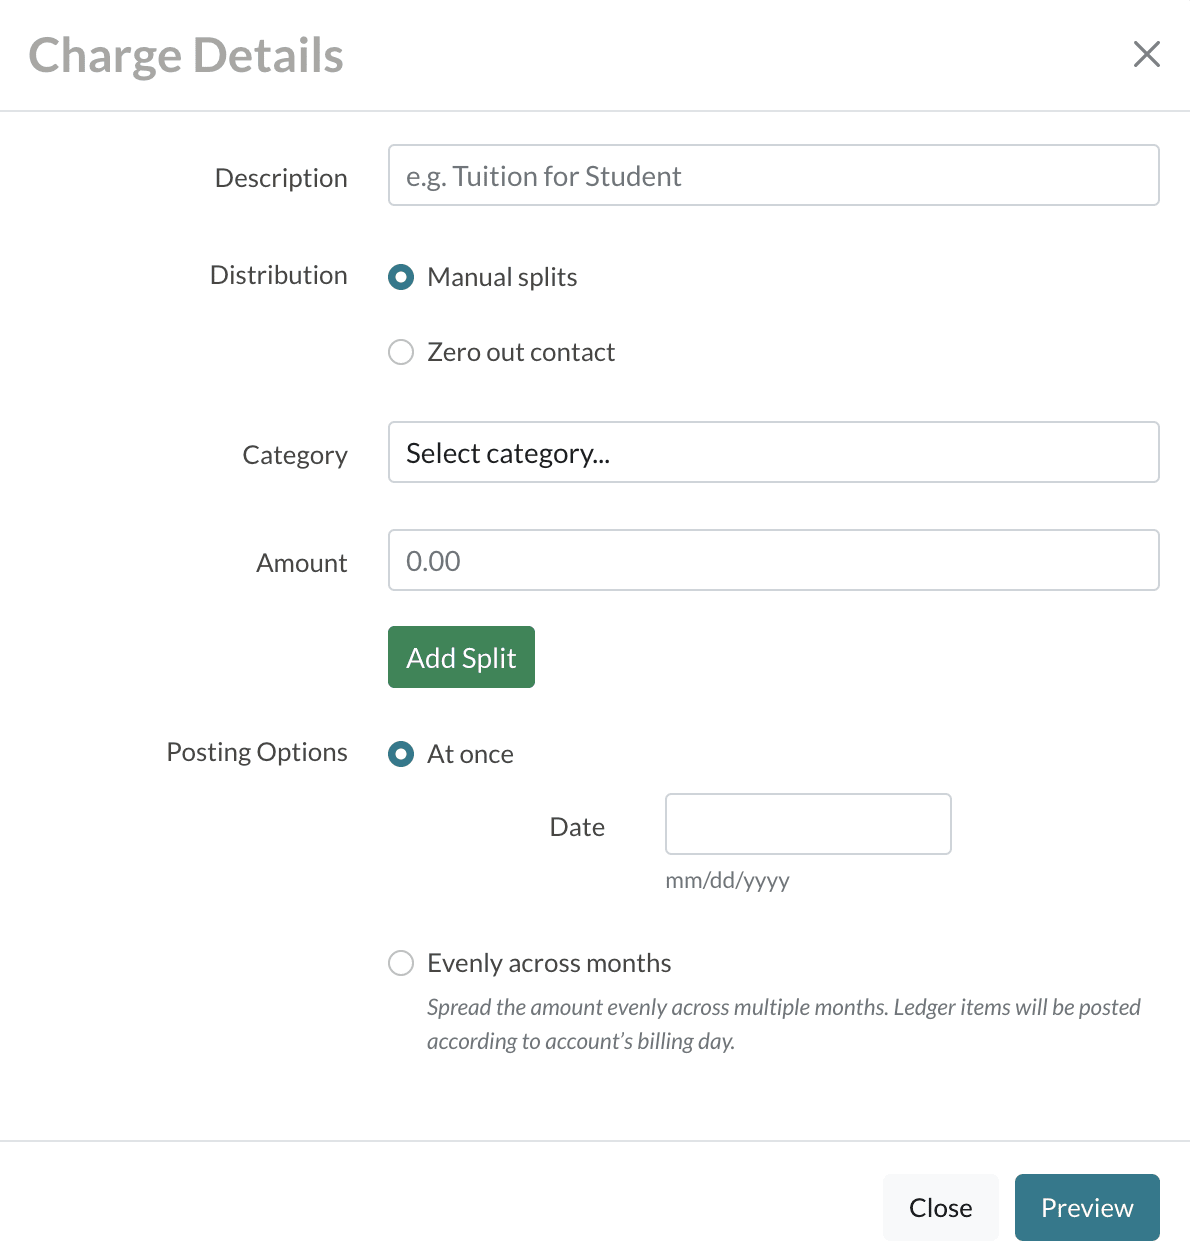
The 'Add Charge' button allows you to add a charge or fee for which the parent/guardian is responsible. Click here to learn more about adding charges to the ledger.
Add a Credit
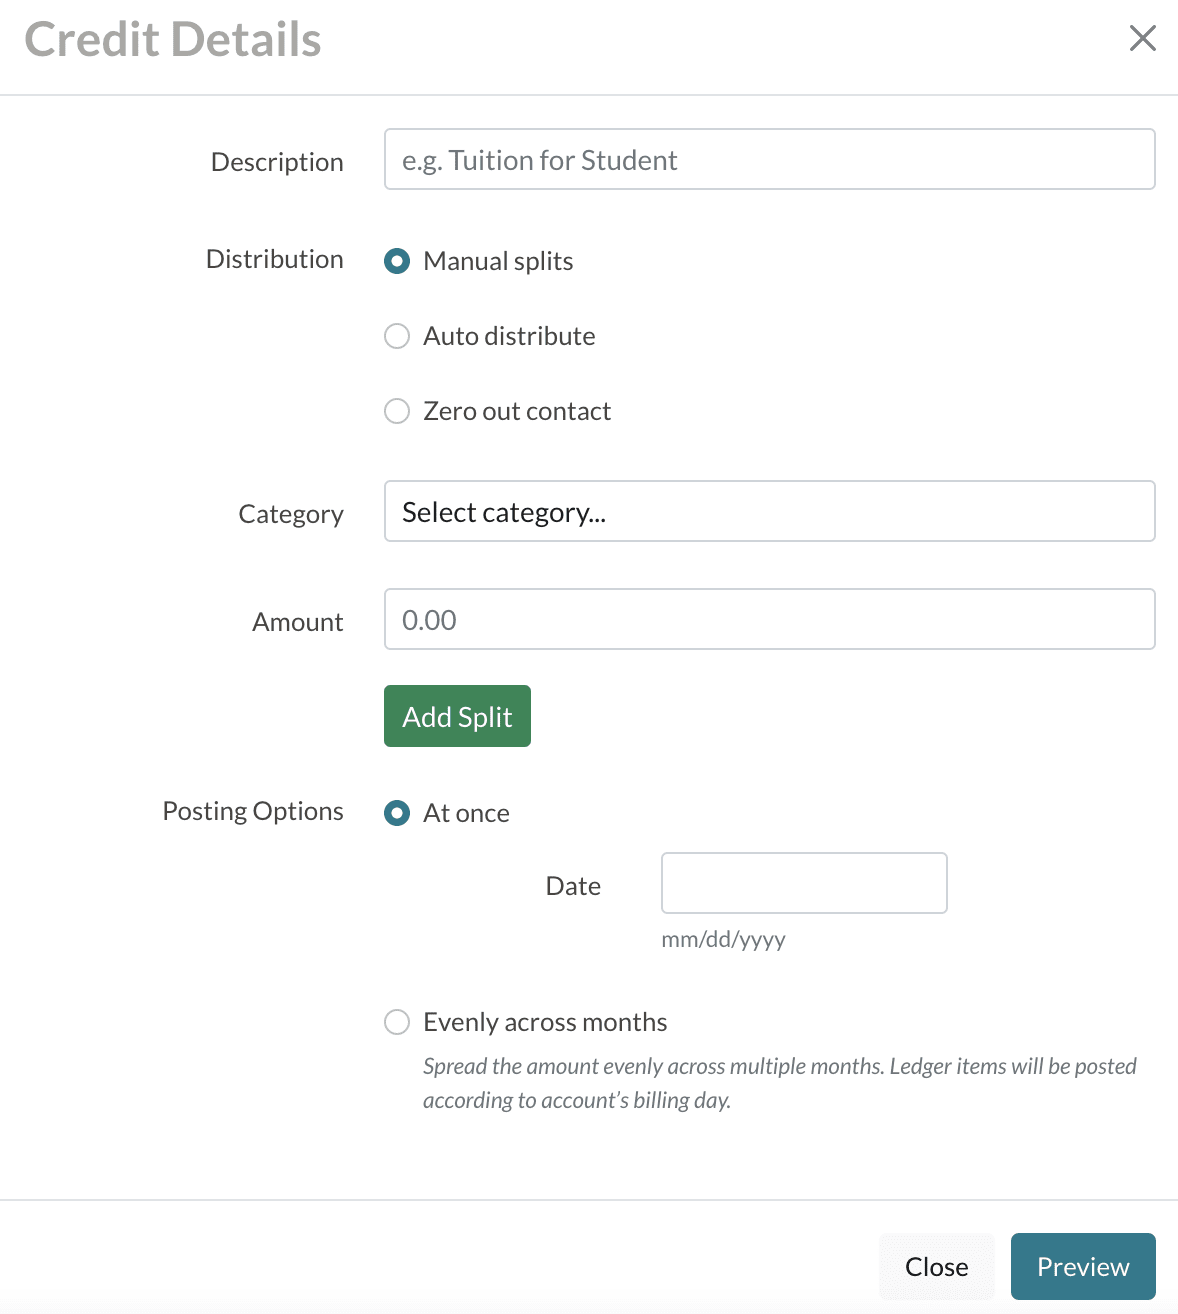
The 'Add Credit' button allows you to add a credit to the parent/guardian's account. Click here for more details on how to add credits.
Add a Payment
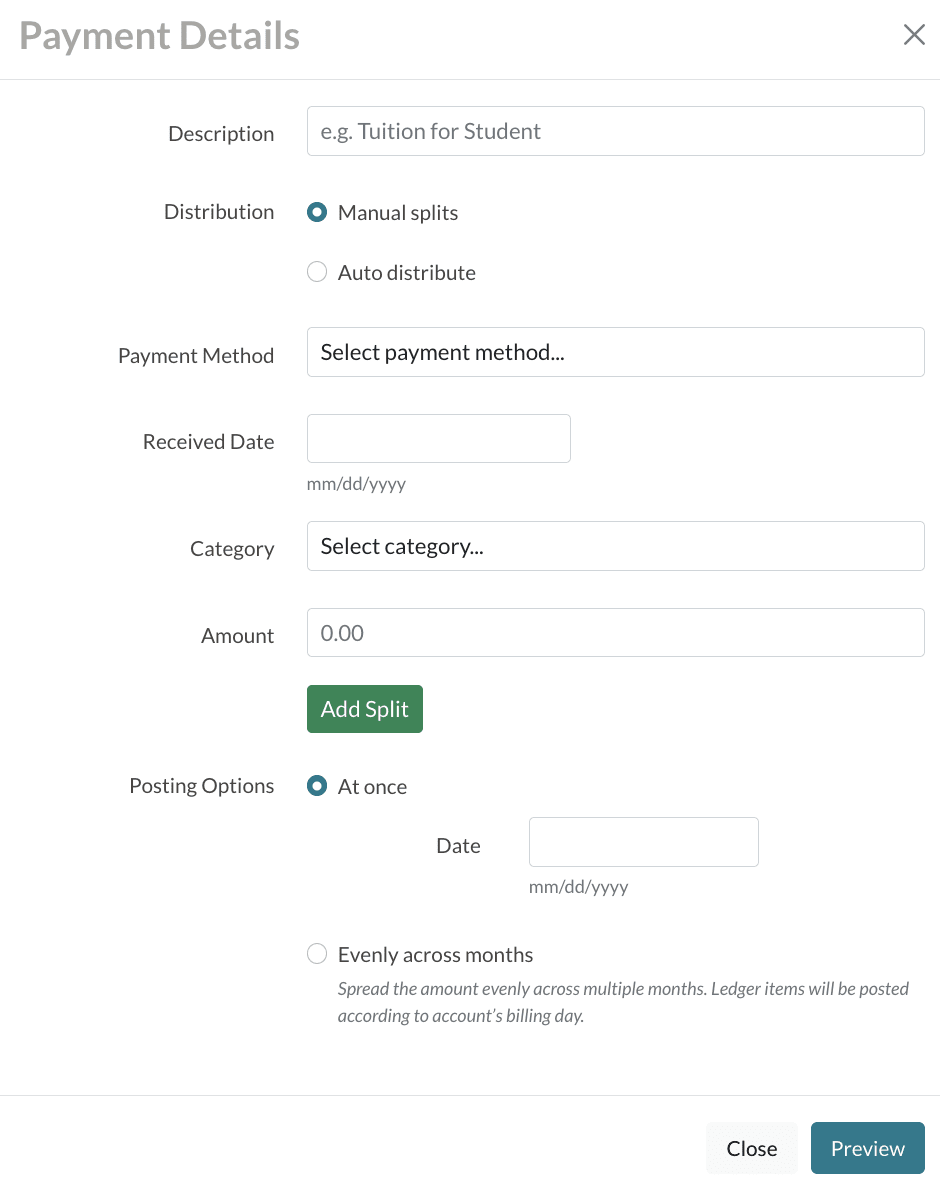
The 'Add Payment' button allows you to add an ad-hoc payment amount or additional payment amount at any point in the billing cycle such as paper check payments, early payments (before a charge is posted), additional payments, an ad-hoc book fee, etc. Click here to learn more about how to manage manually added payments.
Rearrange Installments
The 'Rearrange Installments' button allows you to edit the current contract payment plan. Click here to learn more!
--
Monthly Statements, Summary Statement, and Send Statement
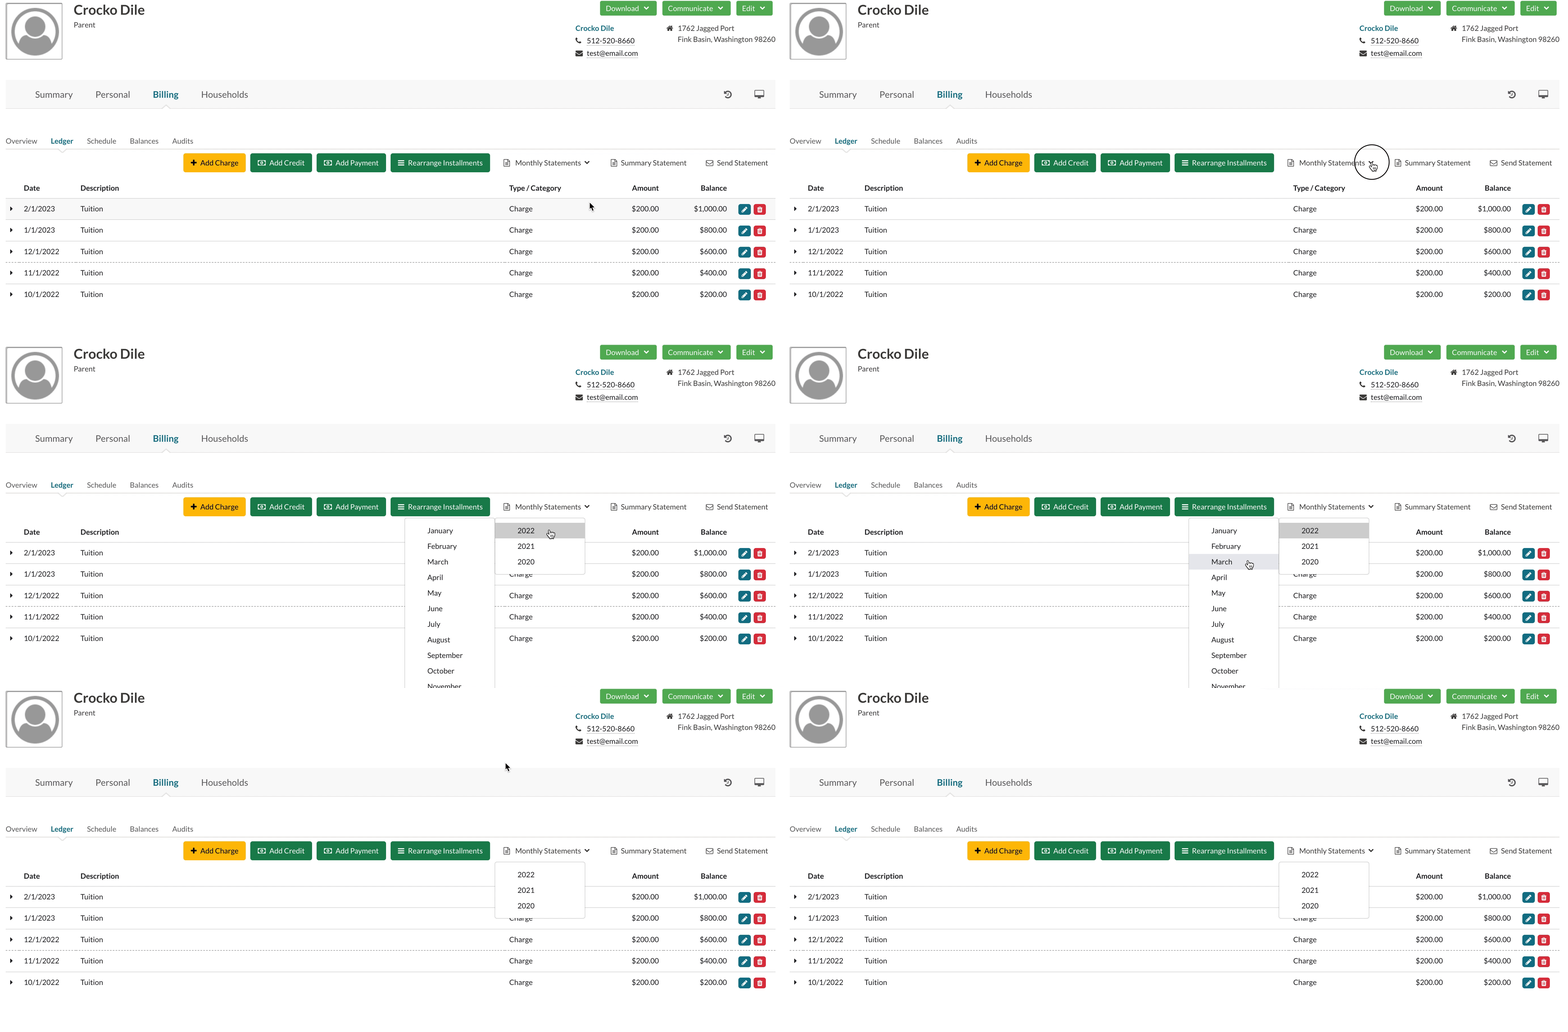
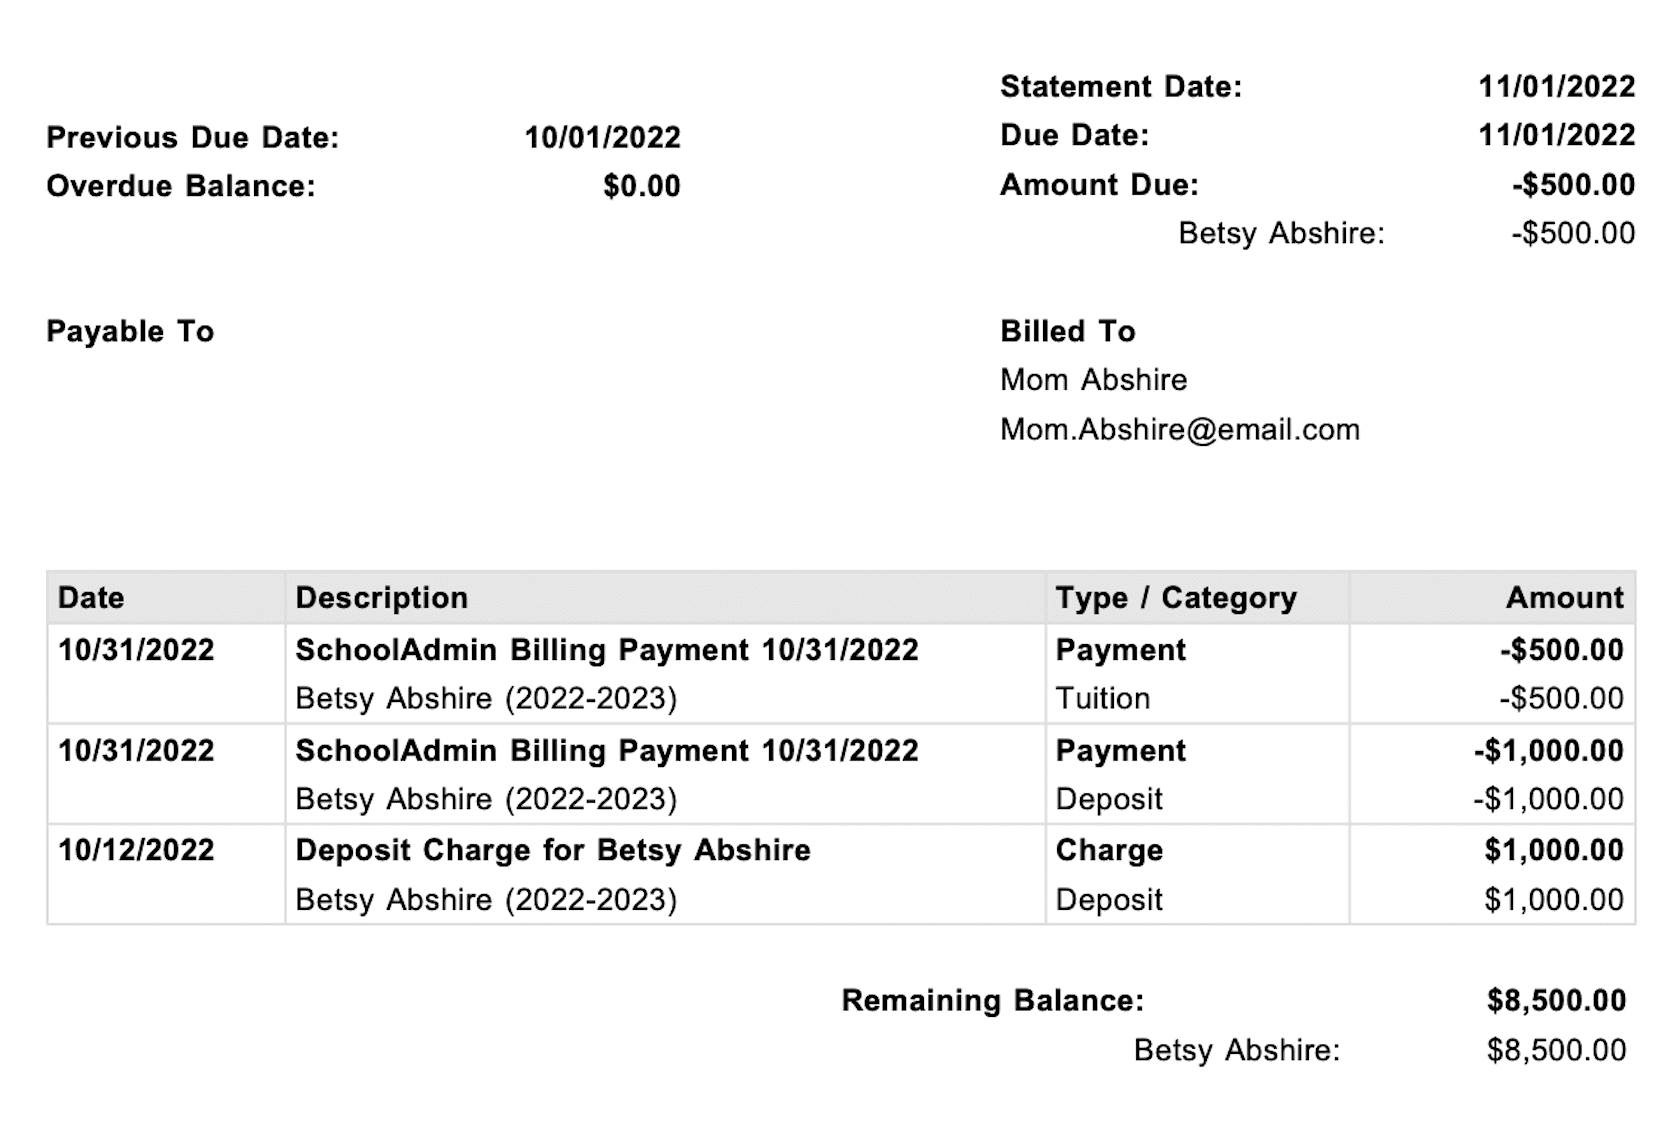
Monthly Statements: Clicking the 'Monthly Statements' dropdown will allow you to select and download statements by month within the current year or previous years.
An example image of a Monthly Statement:
Summary Statement: Selecting 'Summary Statement' will open a PDF statement of all ledger activity up to the current month.
Example GIF of a Summary Statement:
Send Statement: The 'Send Statement' button can be used to send an updated statement directly to the parent/guardian via email. You will be asked to confirm this action after clicking the button.
Schedule
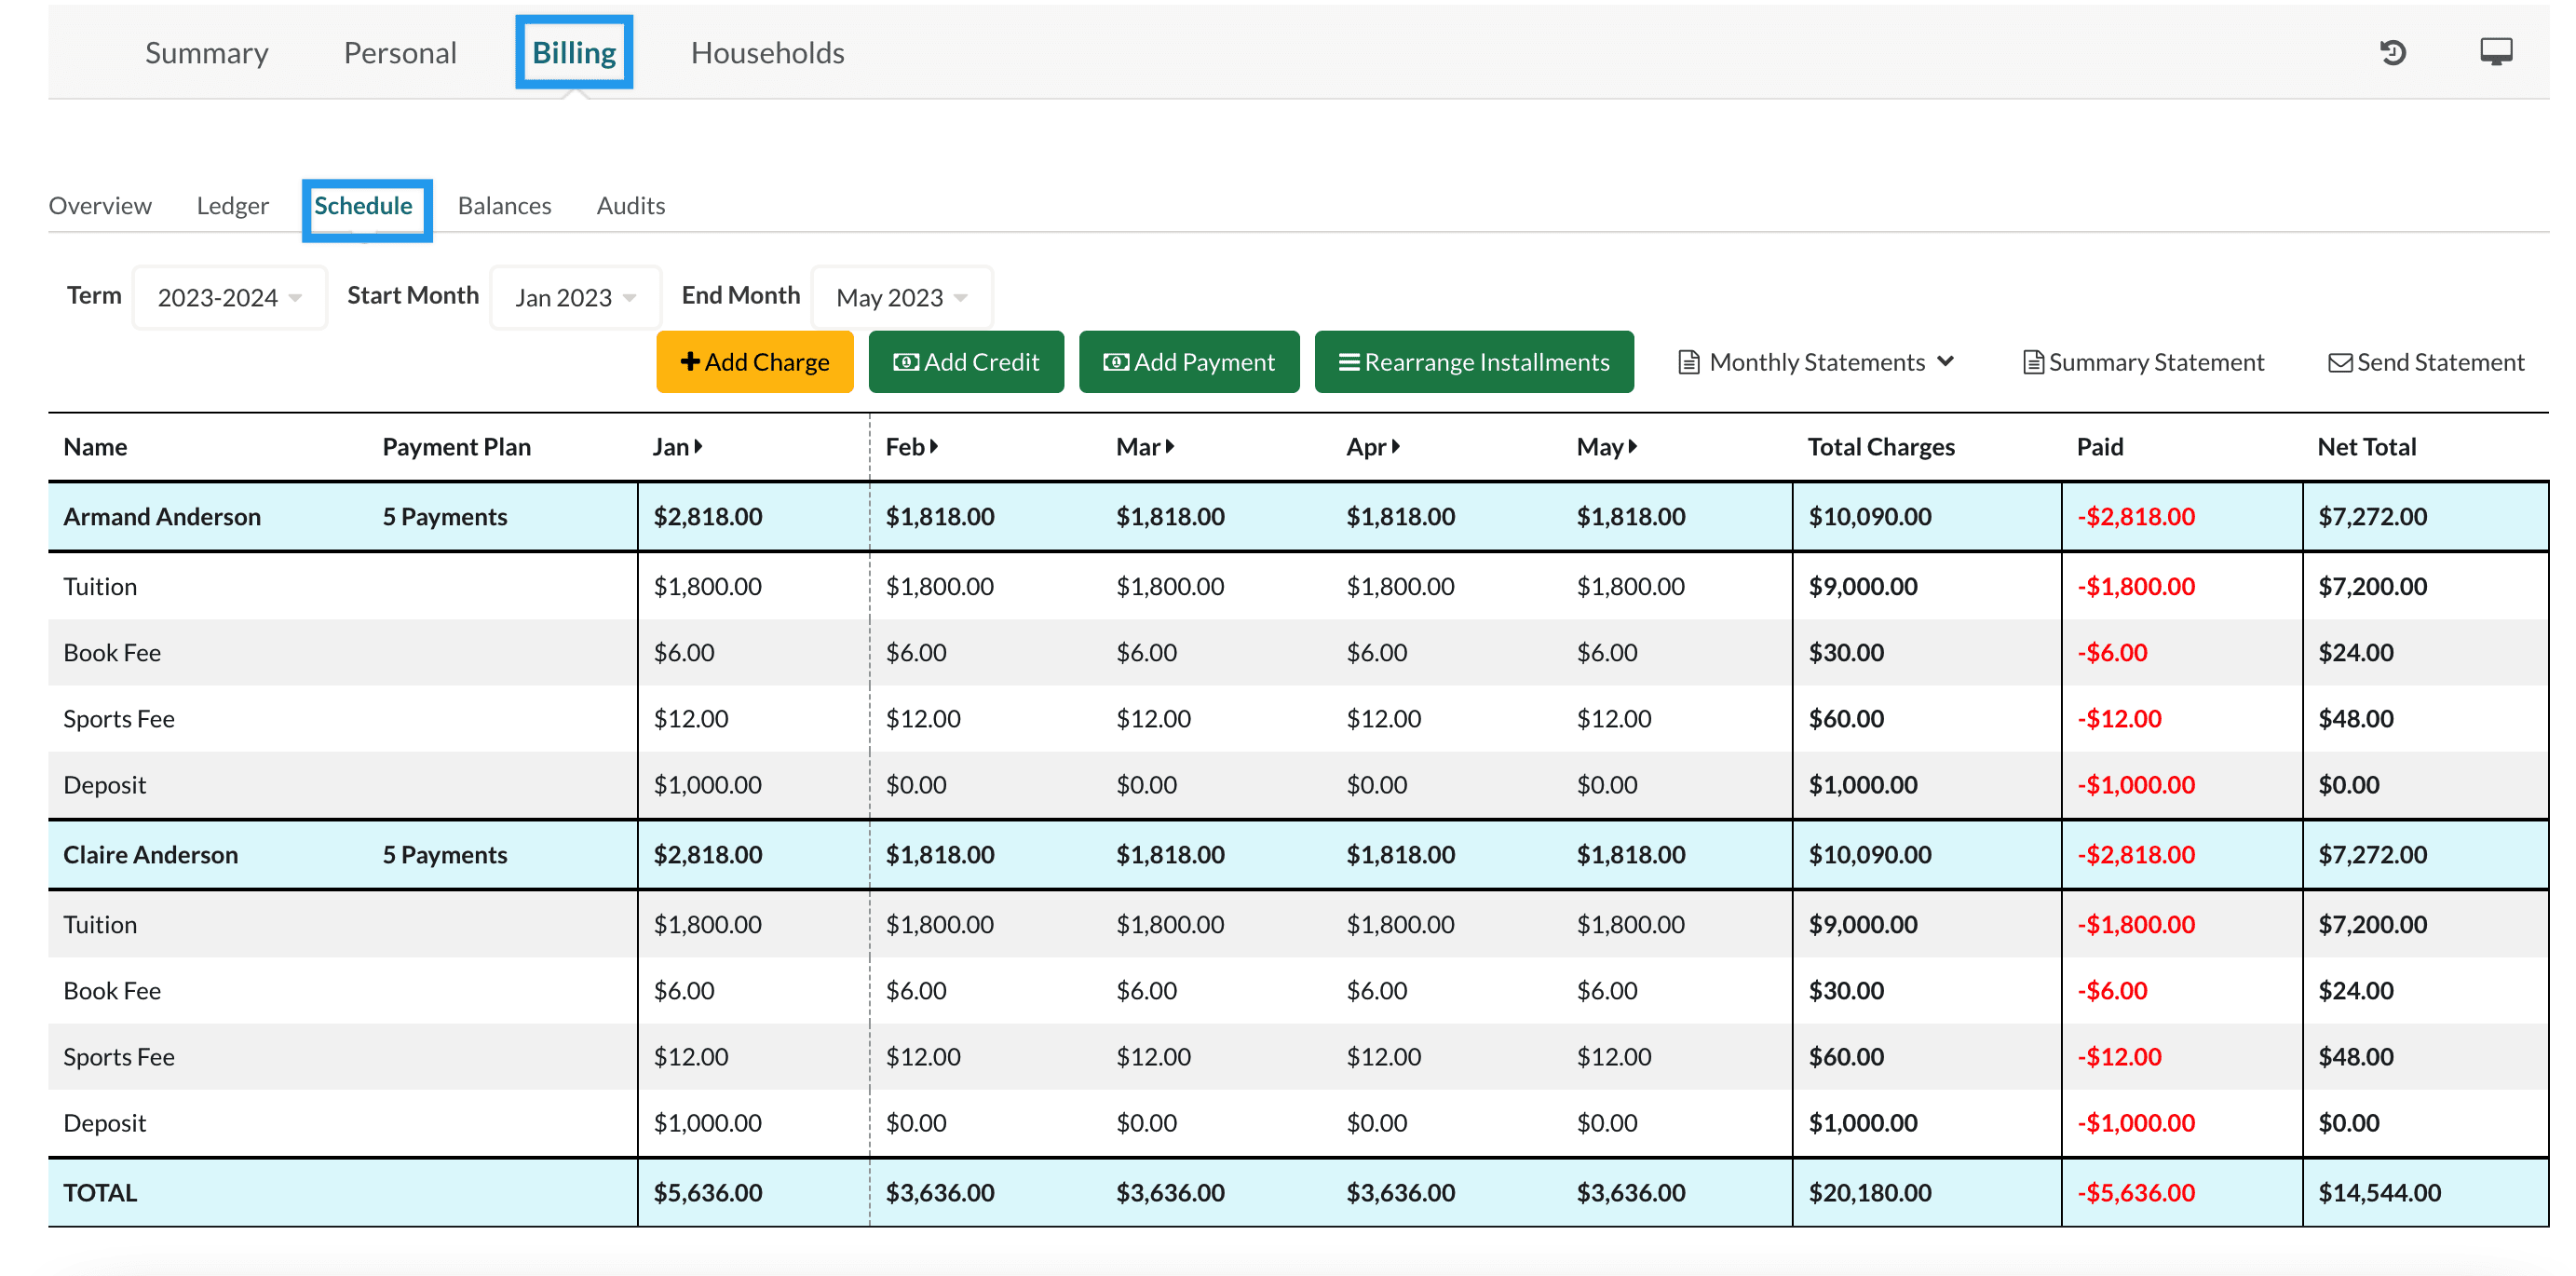
The Schedule ledger offers a way to view the ledger in a monthly and filterable format. You can filter the view by Term, Start Month, and End Month. Each month's column lists the amount owed for that month by category.
The schedule will list all students separately. In addition, if there is an account-level charge (such as a late fee or an NSF fee), the ledger will also list the parent/payer in a row along with their charges by category and when they are owed.
You can read more about the Schedule Ledger here.
Balances Tab
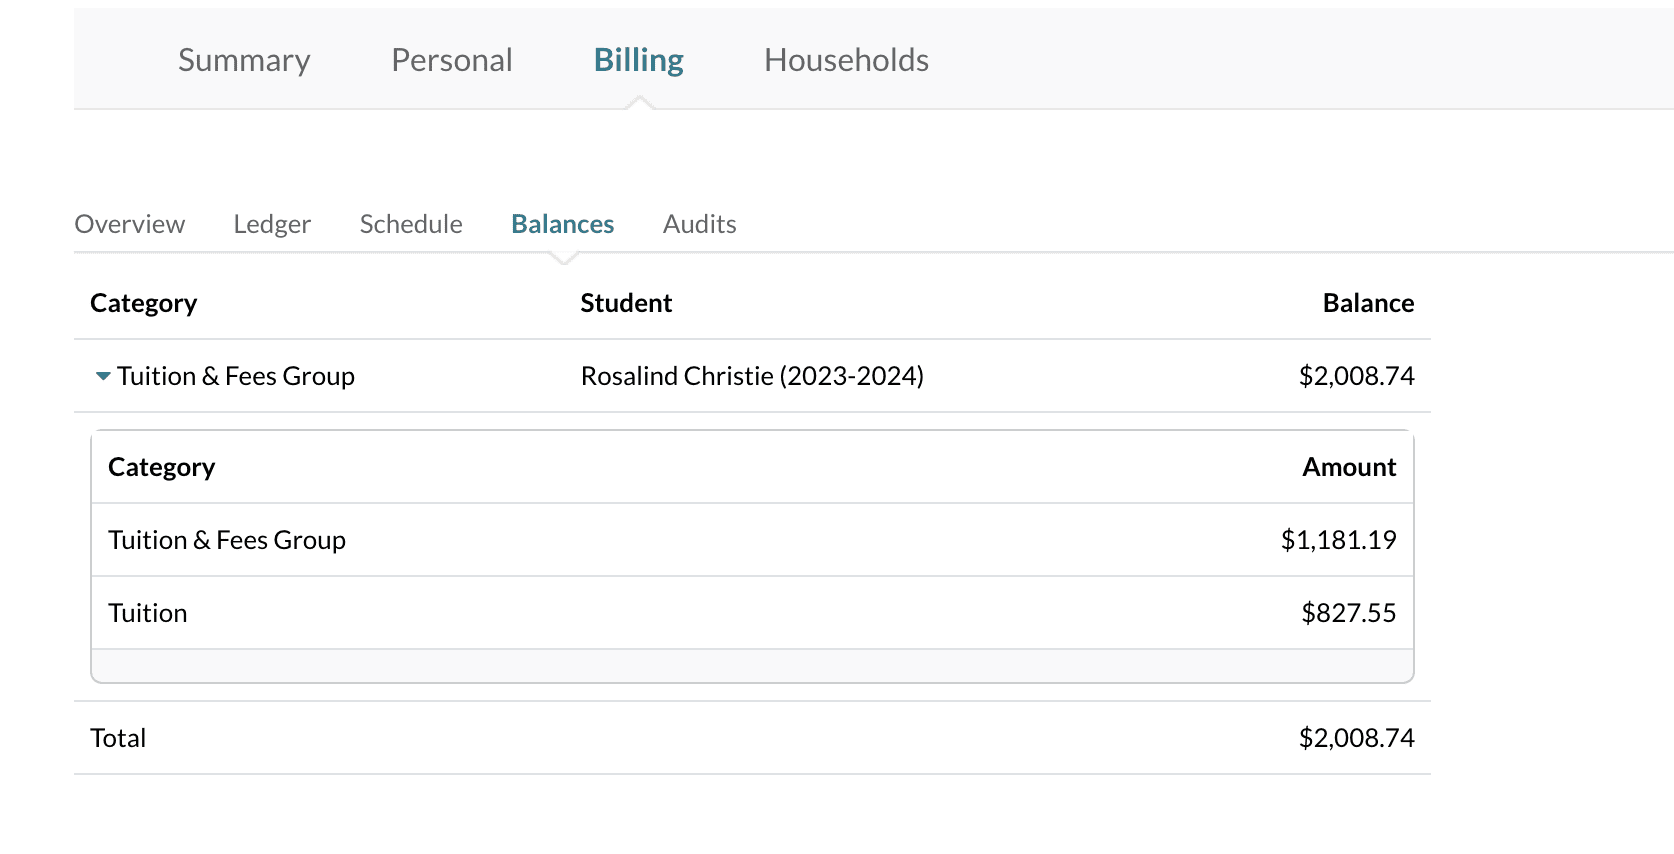
The Balances tab displays what's currently owed or credited in all billing categories, the students associated with each category, and the remaining balances.
Audits Tab
The Audits tab shows a collection of all pre-posted (future payments) AND current charges, credits, and changes that are recorded on the Ledger. This includes both automated and manual charges/payments/adjustments.
Within this tab, you can see the following columns:
-
Date: The date that the charge/credit/adjustment was made.
-
Description: The description of the financial line item.
-
Type/Category: The Billing Type/Category of the financial line item.
-
Amount: The dollar amount of the charge/credit/adjustment.
-
Created On: The date a charge/credit/adjustment was created.
-
Created By: For all pre-posted amounts, this column will display the email address of the parent/guardian that submits the contract. Manual payments will display the email address of the payer. For any changes made to the account, this column will display the email address of the Admin who made those changes internally. A payment made via autopay will have no email address displayed.
-
Deleted On: The date a financial line item was deleted in the Ledger. IMPORTANT: If you delete a financial line item in the 'Ledger' tab, the old line item will be removed from the ledger but will show up as a deleted item in the 'Audits' tab. If you modify a financial line item, the old item will be deleted from the Ledger and be recorded as deleted in the 'Audits' tab, and the modified financial line item will display in the 'Audits' tab and the ledger.
-
Deleted By: The name of the user that deleted the financial line item.
Did you know?
You can restore a deleted ledger item by clicking the reverse icon within the Audits tab. Only manually added ledger items can be deleted, and therefore, restored. Read more about this in our How-To Reverse a Deleted Ledger Item article.
Additional Resources
- Office Hours & Past Session Recordings
- Contact Record Overview
- Billing Onboarding
- Parent Billing Workflow







Comments
0 comments
Article is closed for comments.