Overview
Label templates are traditionally used for mailings; however, they can also be used to create name tags for any events you have or create folder labels for any hard-copy documents you are keeping for students. In this article, we will discuss how to create new label templates, manage your existing ones, and generate labels for students.
How-To: Create & Manage Label Templates
You can access and manage your label templates by navigating to Settings > Communication > Label Templates on your site.
On this page, you will see a list of all of your existing label templates with the following options:
-
Create a new label template: Click on the 'Add a new Label Template' button above your list of templates.
-
Copy an existing label template: Click on the 'Copy' button to the right of the template you want to copy. This will open the template editor with a copy of the existing template. You can then make changes and input a name to save it as a new template.
-
Edit or delete an existing label template: Click on the 'Edit' or 'Delete' button to the right of the template you want to edit or delete.

Choosing to add, edit, or copy a label template will bring up the 'Edit Template' window.
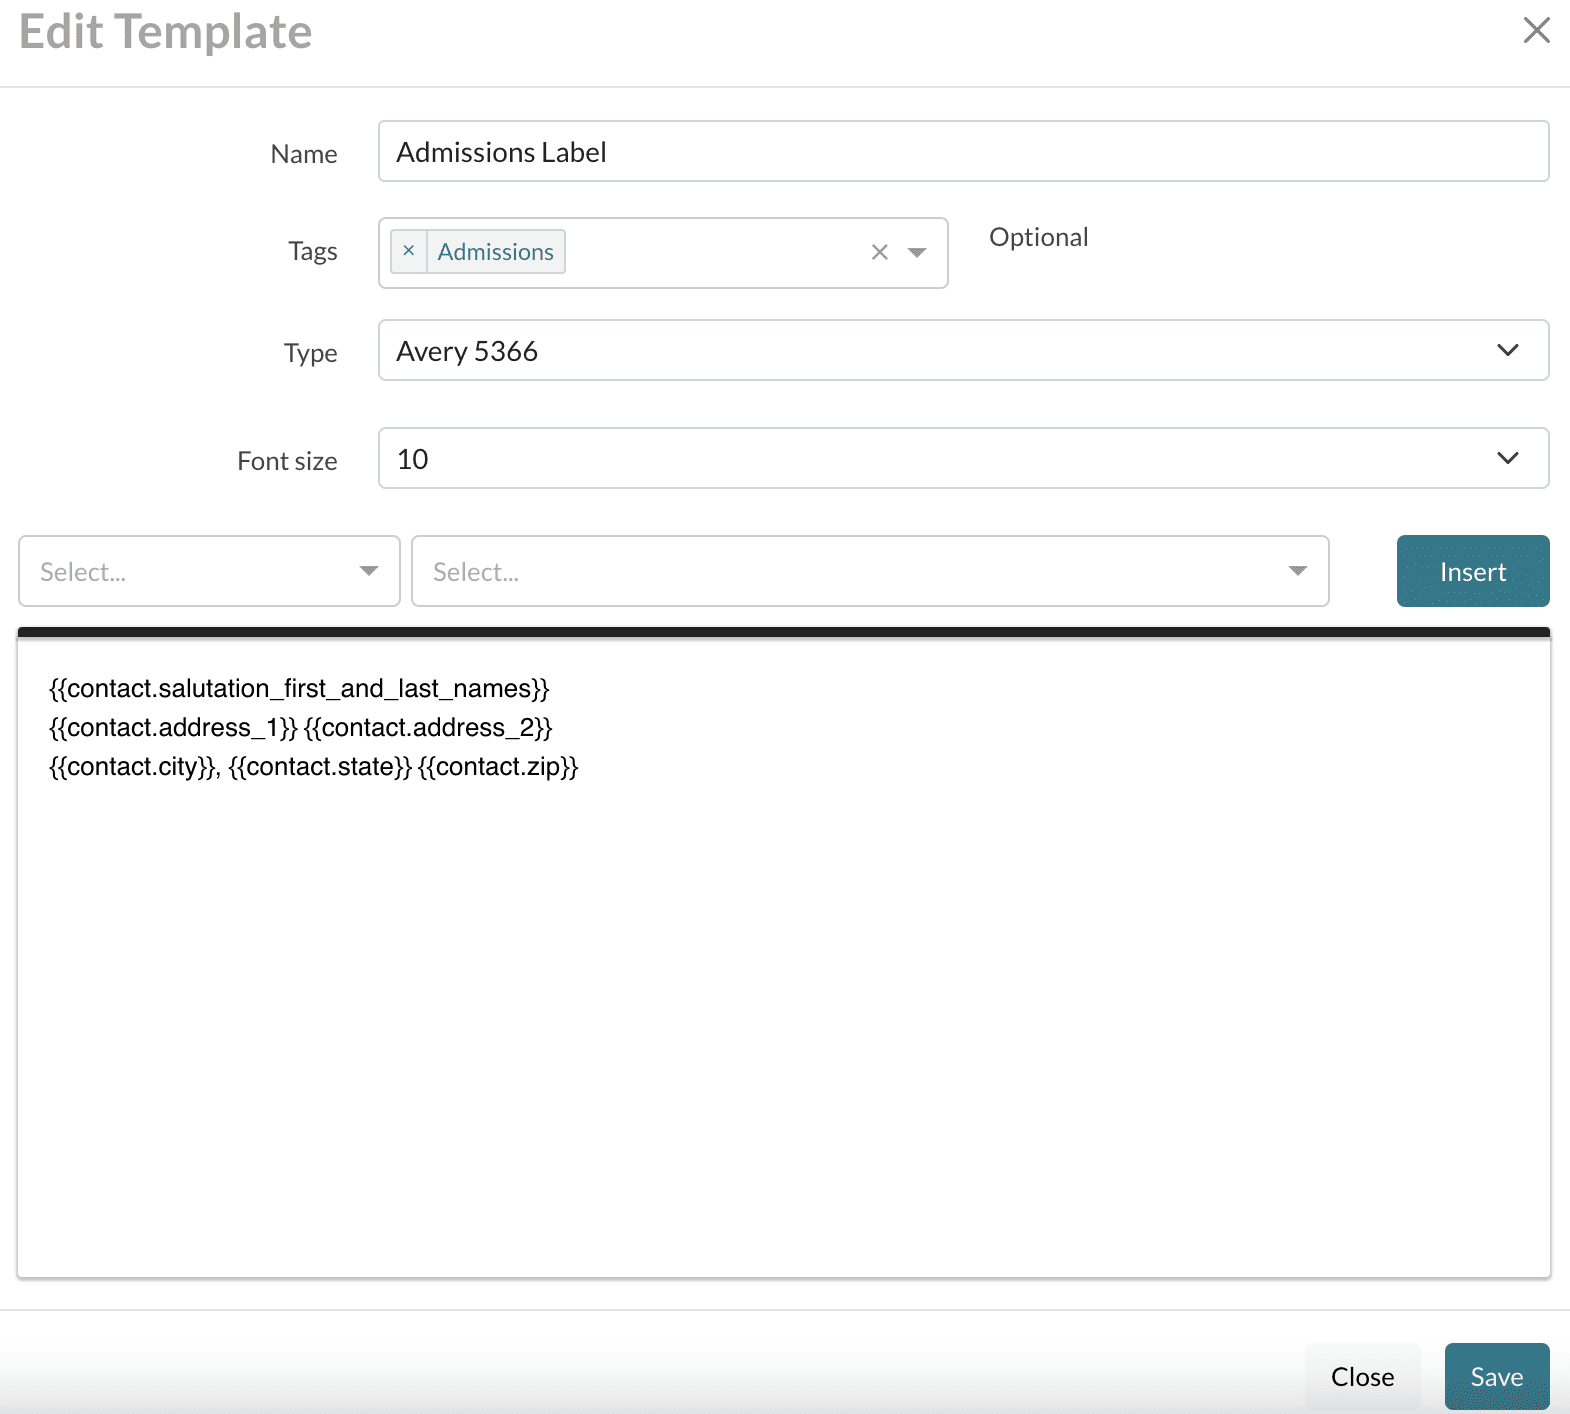
Within this window, you have access to the following options:
-
Name: Set a name for or rename the template. This is the name that you will see in your list of label templates. They are organized alphabetically.
-
Tag your template. Within the 'Tags' field, you can create or select a tag to attach to the template. Tags are an internal-only way of organizing your communication templates.
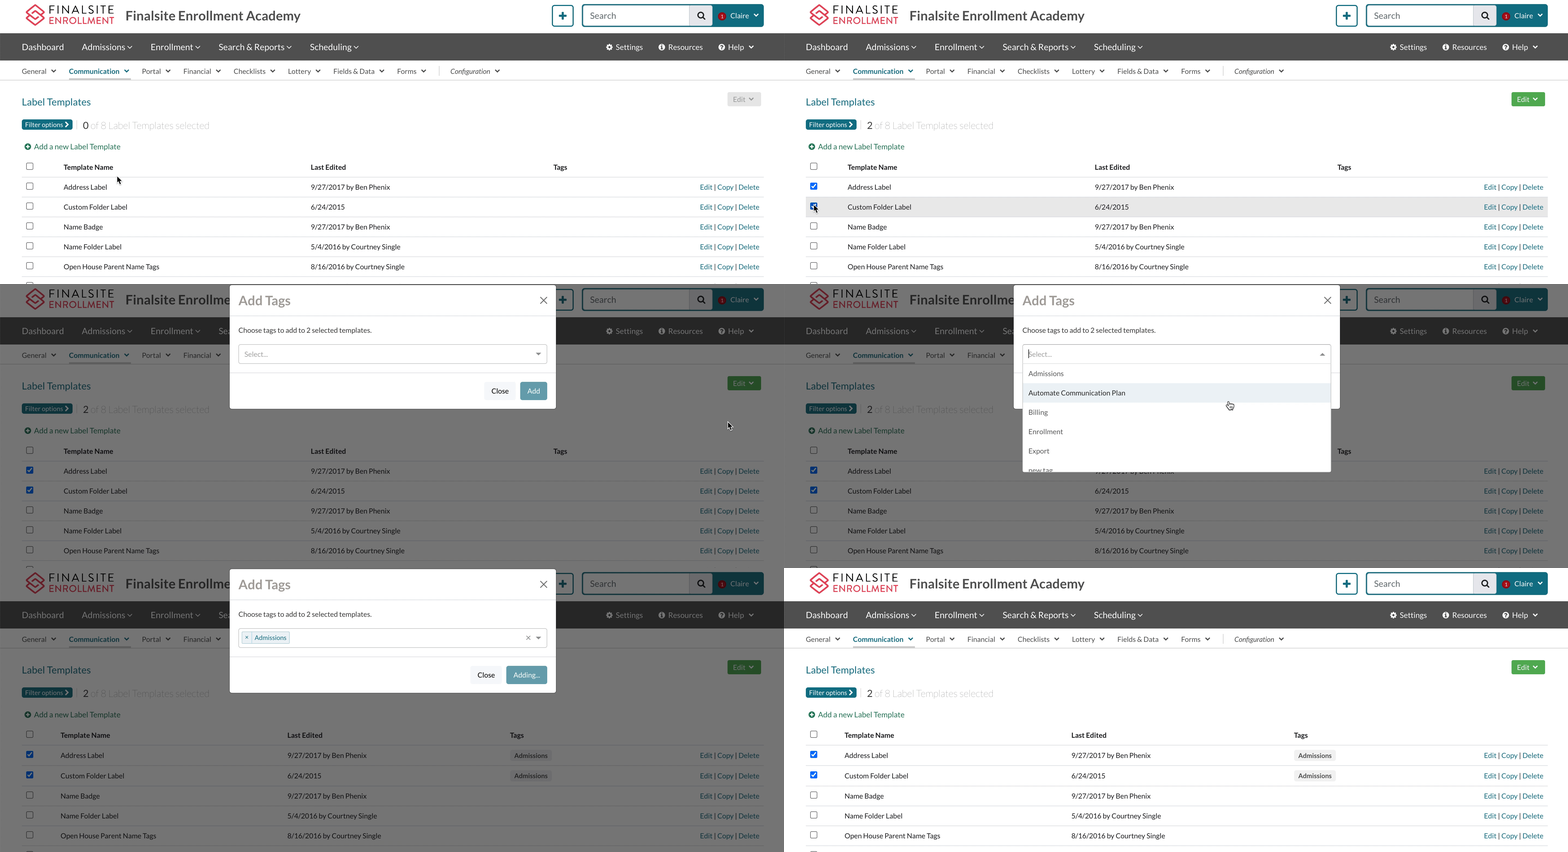
- You can also add and remove tags in bulk within this page via the edit menu.
- You must select one or more templates before the 'Edit' menu becomes available.
- You can read more about how to manage tags here.
- You can also add and remove tags in bulk within this page via the edit menu.
-
Type: Set the type of labels that you will be printing on after generation. Please refer to the chart at the bottom of this article for additional information on label types.
-
Font size: Set the default size of the font for this label template. This can be adjusted on the fly when you generate your labels.
-
Add text and data from the system: You can type directly into the text box or use the merge token picker to pull in dynamic data from the system. To learn about which types of merge tokens work in label templates, click here.
-
Close: This will close the window without saving your changes.
-
Save: This will save your changes. Be sure to click this button when you are done creating your template or making your desired edits! Unsaved templates or changes cannot be recovered.
Please note: We do not currently support image placement in labels. If you need an image on your labels (e.g. a school logo), we recommend pre-printing the image on the label before generating the PDF of labels in Finalsite Enrollment.
Filter Options and Edit Menu
Filter Options
Within the Label Templates page, you can use the Filter Options to search for by tags or filter the page by label template name.
- You can also filter by 'Blank' to see any custom template that doesn’t yet have a tag.
- Using Filter by Name allows you to search for templates based on their name.

Edit
You can use the Edit Menu to add or delete tags in bulk.
- You must select one or more tags before the edit menu becomes available.
Parent Name Tags
Since label templates do not have the recipient category, they cannot be used to populate parent names in labels. However, if you want to build parent name tags, you can use any of the following options:
-
Manually type in the following merge field to display Parent 1's name: {{contact.parent1.name}}.
-
The same format can be followed for parents 2-4, and name subfields are available to you as well (e.g. first_name).
-
-
Use the Merge Field Picker or type in any of the contact.salutation merge fields, e.g. {{contact.salutation_first_and_last_names}}.
-
Note: If no parent names are found, this will pull in the default salutation as configured under Basic Setup.
-
-
Pull in the student's name with labels that say "Parents of {{contact.first_name}} {{contact.last_name}}".
How-To: Generate Labels
You can generate labels in bulk from a list page/search, or a student's contact record.
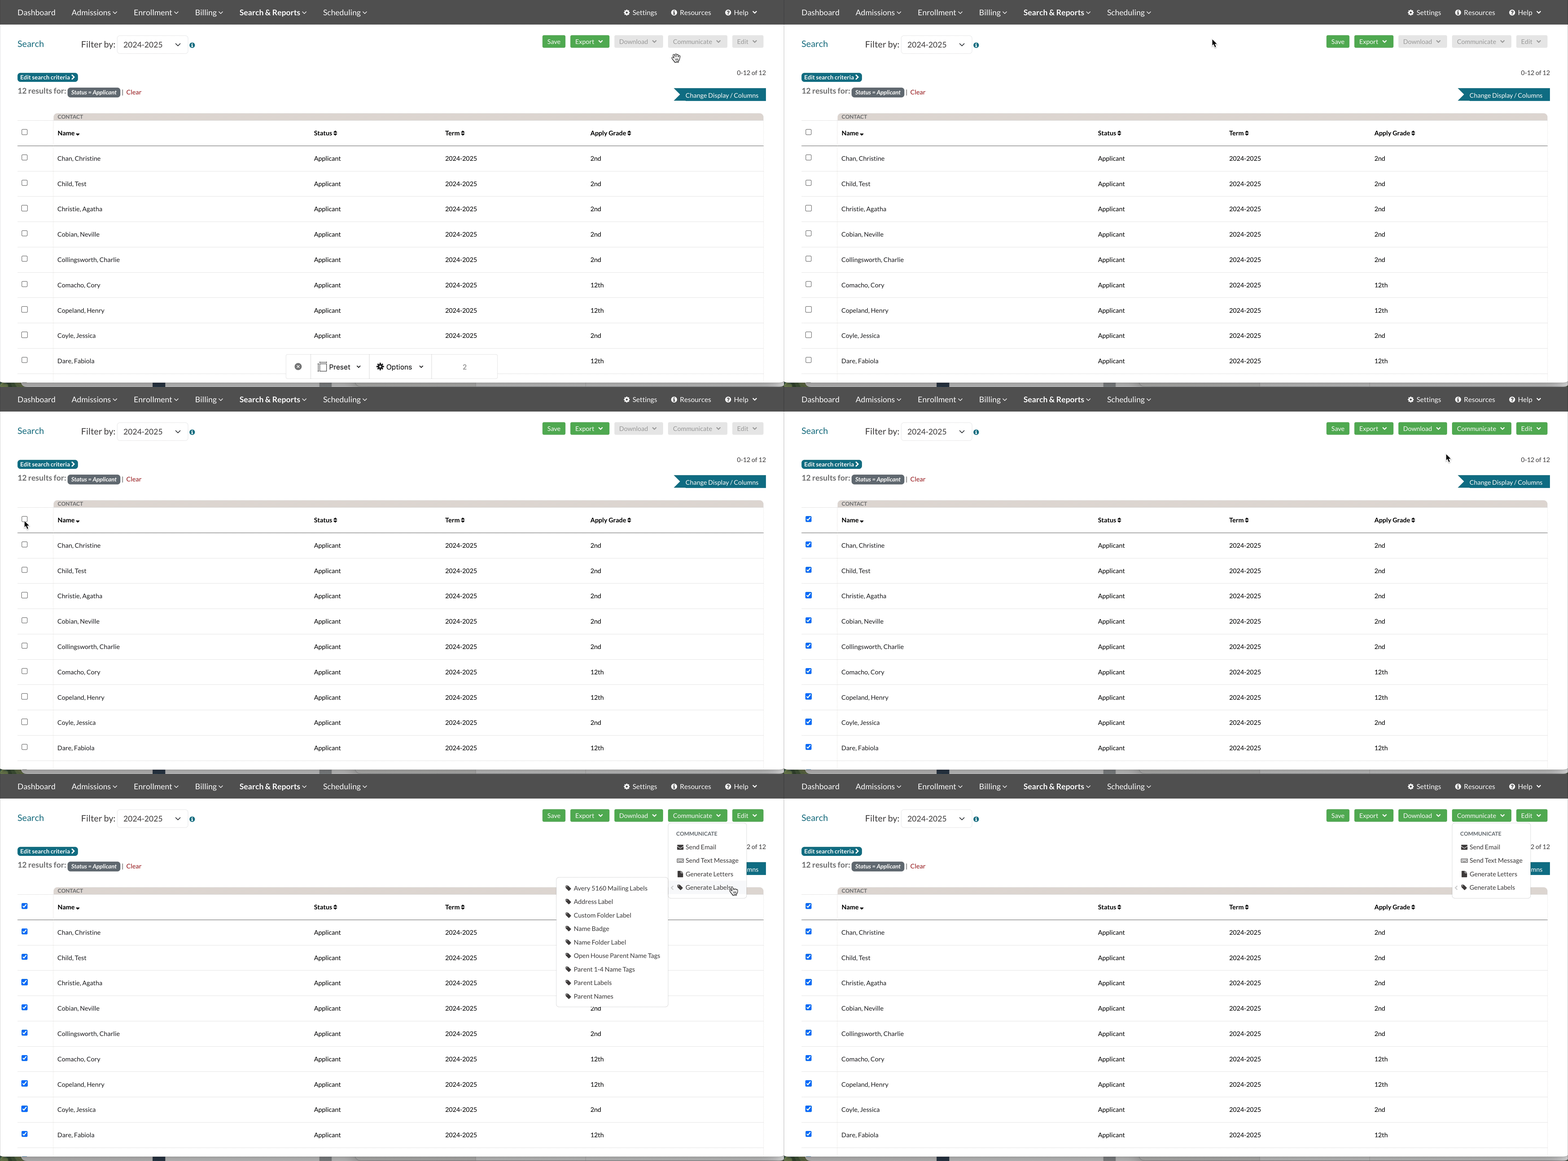
If you are generating labels from a search or list page, you'll first need to select one or more students before the Communicate menu becomes available.
Once you select your students, click on the Communicate menu and select Generate Labels. Then, pick your desired label template from the list of options.
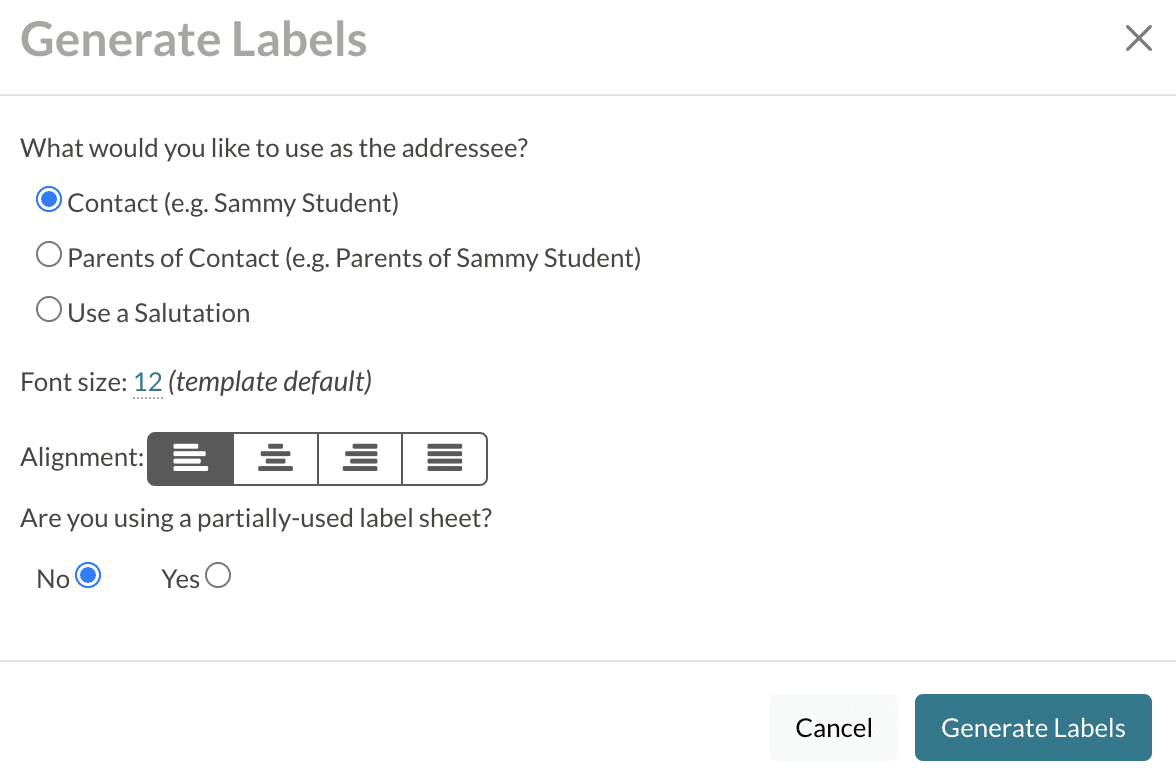
After choosing your label template, the Generate Labels window will appear, and you can set the options available for that template before generating a PDF to print. Read below for a description of all of these options.
-
Addressee: Set the addressee to be either the contact (student), or their parents, or choose a predefined salutation.
Please note: The addressee option will only display for mailing label templates.
-
Font size: Set the font size for your labels. This will pull in the default font size set on the template, but you can click on the number to change it.
-
Alignment: Set the alignment for your labels (i.e. left, center, right, or justified).
-
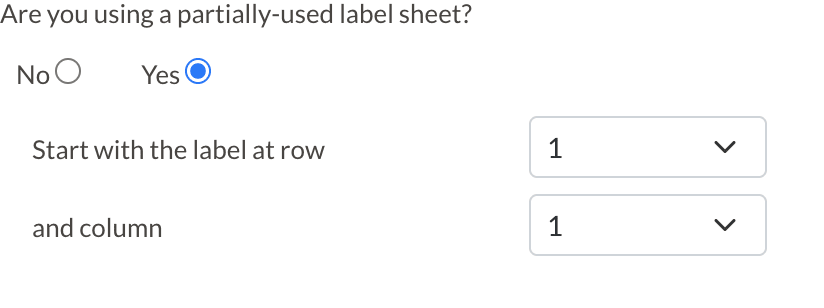
Using Partially-Used Label Sheet: Set this to 'Yes' if you want to print to a partially used label sheet. Selecting 'Yes' will allow you to set the row and column on the sheet where you want your labels to start.
-
Cancel: To cancel the label generation and exit out of the window.
-
Generate Labels: When you click this button, the system will automatically download a PDF document of the labels to your computer.
Printing Generated Labels
Once you have successfully generated the labels and have the file downloaded onto your computer, follow these steps to print your labels:
-
Open the downloaded file in a PDF viewer such as Preview (Apple computers) or Adobe (Windows computers).
-
Check the file to make sure the font size is appropriate for the data printed (e.g. long names wrapping to a new line, city/state/zip wrapping to a second line).
-
Before printing, make sure you have selected the “Actual Size” or “100% scale” option. Do not choose Scale to Fit, Fill Entire Page, or Fit.
-
Print a test page. Some label templates are sensitive to which way is up when the page is inserted into the printer.
-
Print the full file of labels.
How-To: Reference Additional Parents or Households
If you need to pull information for PARENT3, PARENT4, or HOUSEHOLD2 into a label template, you can do so using merge fields/tokens with the following formats:
-
For PARENT3: {{contact.parent3.FieldName}}
-
Example: {{contact.parent3.first_name}} to pull the first name of the student's PARENT3.
-
-
For PARENT4: {{contact.parent4.FieldName}}
-
Example: {{contact.parent4.phone_1_number}} to pull the number from the phone_1 field for the student's PARENT4.
-
-
For HOUSEHOLD2: {{contact.household2.FieldName}}
-
Example: {{contact.household2.address_address_1}} to pull the Address 1 line from the address field for the student's HOUSEHOLD2.
-
Supported Label Types
Below is a matrix of supported label templates along with usage information. Click here to access this information in a downloadable image.
Please note: The size information below is displayed in inches, height x width.
Label Template |
Sizing |
Compatible Label Styles |
|
Avery® 5160 Common Usage: |
Size: 1 x 2 - 5/8 Recommended Font Size: 9pt or 10pt for a 3-line label. Do not use larger than 11pt or the city/state/zip will wrap. |
5160, 5260, 5520, 5620, 5630, 5660, 5810, 5960, 6240, 6241, 6970, 8160, 8215, 8250, 8460, 8620, 8660, 8810, 8860, 8920, 15160, 15510, 15660, 16460, 18160, 18260, 18660, 22837, 28660, 32660, 38260, 45160, 48160, 48260, 48360, 48460, 48860, 48960, 55160, 55260, 55360, 58160, 58260, 58660, 75160, 80509, 85560, 88560, 95915. |
|
Avery® 5366 Common Usage: Name Tag |
Size: 2/3 x 3 - 7/16 Recommended Font Size: 14pt to 16pt. Do not use more than 18pt or the name is likely to wrap. |
5029, 5268, 5366, 5368, 5378, 5566, 6505, 8066, 8478, 8590, 15266, 45366, 48266, 48366, 75366. |
|
Avery® 5384 Common Usage: Name Tag or Large Mailing Label |
Size: 3 x 4 Recommended Font Size: If the full name is on one line only, 16pt. If first and last names are split between two lines, 24pt or 28pt. |
5384, 5392, 5393, 74459, 74536, 74540, 74541, 78617, 78619. |
|
Avery® 5395 Common Usage: Name Tag or Large Mailing Label |
Size: 3.375 x 2.3125 Recommended Font Size: If the full name is on one line only, 16pt. If first and last names are split between two lines, 24pt or 28pt. |
5395, 8395, 15395, 25395, 42395, 45395, 48395, 85395, 88395. |
|
Avery® 5961 Common Usage: Address Label or Large File Folder Label |
Size: 1 x 4 Recommended Font Size: For address, 9pt or 10pt for a 3-line label. Do not use larger than 11pt or the city/state/zip will wrap. |
5161, 5261, 5961, 8161, 8461, 5661, 18661, 15661. |
|
Avery® 5163 Common Usage: Name Tag or Large Mailing Label |
Size: 2 x 4 Recommended Font Size: 12pt or 14pt for a 3-line label. Do not use larger than 16pt or the parent name or city/state/zip will likely wrap. |
5163, 5263, 5663, 5963, 8163, 8253, 8363, 8463, 8563, 8663, 8923, 15163, 15563, 15663, 18163, 18663, 18863, 28663, 38363, 38863, 48163, 48263, 48363, 48463, 48863, 55163, 55263, 55363, 55463, 58163, 58263, 85563, 95910, 95945. |
|
Avery® 5162 Common Usage: |
Size: 1-1/3 x 4 Recommended Font Size: 9pt or 10pt for a 3-line label. Do not use larger than 11pt or larger or the city/state/zip will wrap. |
5162, 5262, 5662, 5962, 8162, 8252, 8462, 8662, 15162, 15662, 18162, 18262, 18662, 48462, 48862, 88662, 95662. |

Comments
0 comments
Article is closed for comments.