
The Inquiry Checklist is an internal-only nurturing tool; parents never see it because Parent Portal accounts aren't created until the application stage. Use it to dynamically tailor outreach steps to each prospective student based on grade, interests, or other inquiry-form responses.
💡Quick Answers
- Who can see the Inquiry Checklist? Admins only. Parents don't have a Parent Portal account at the inquiry stage, so they never see this checklist. It exists purely as an internal workflow tool.
- How do I make a checklist item show only for certain grades? Settings > Checklists > Inquiry > Edit the item, then under Criteria select the grades. Only students who inquired for those grades will have the item on their (internal) checklist.
- How do I create a checklist item that triggers off something other than grade, like an interest area or international status? Use a Business Rule. The field is greyed out on your end; contact Support and tell them which field should drive the item.
- What's the catch with business rules? You can only trigger items off data you're already collecting. If you don't ask whether a student is international on the inquiry form, you can't trigger a checklist item based on it. Audit your inquiry form first.
- How can I scale my inquiry workflow even further? Pair the checklist with Automated Communication Plans; they fire emails based on status changes or checklist completion, so manual checklist items handle the human-touch tasks while ACPs handle the templated touchpoints.
- Where can I find past years' inquiry forms or uploads if they don't show in the current checklist? On the contact record, under Form and Document Submission History. The checklist itself only shows the current year.
Overview
The Inquiry Checklist is a powerful internal* tool for managing outreach to prospective students.
*Reminder: Because Parent Portal accounts aren't created until the application stage, parents don't see this internal checklist. It's an internal-only tool that you can use to bolster your nurturing efforts.
In this article
- Tailoring Your Outreach Plan with Dynamic Checklist Items
- Grade-Specific Criteria
- Custom Rules (with Finalsite Enrollment Support)
- Example Dynamic Checklist Items
- Best Practices for Inquiry Checklists
- Key Inquiry Nurturing Toolkit
Tailoring Your Outreach Plan with Dynamic Checklist Items
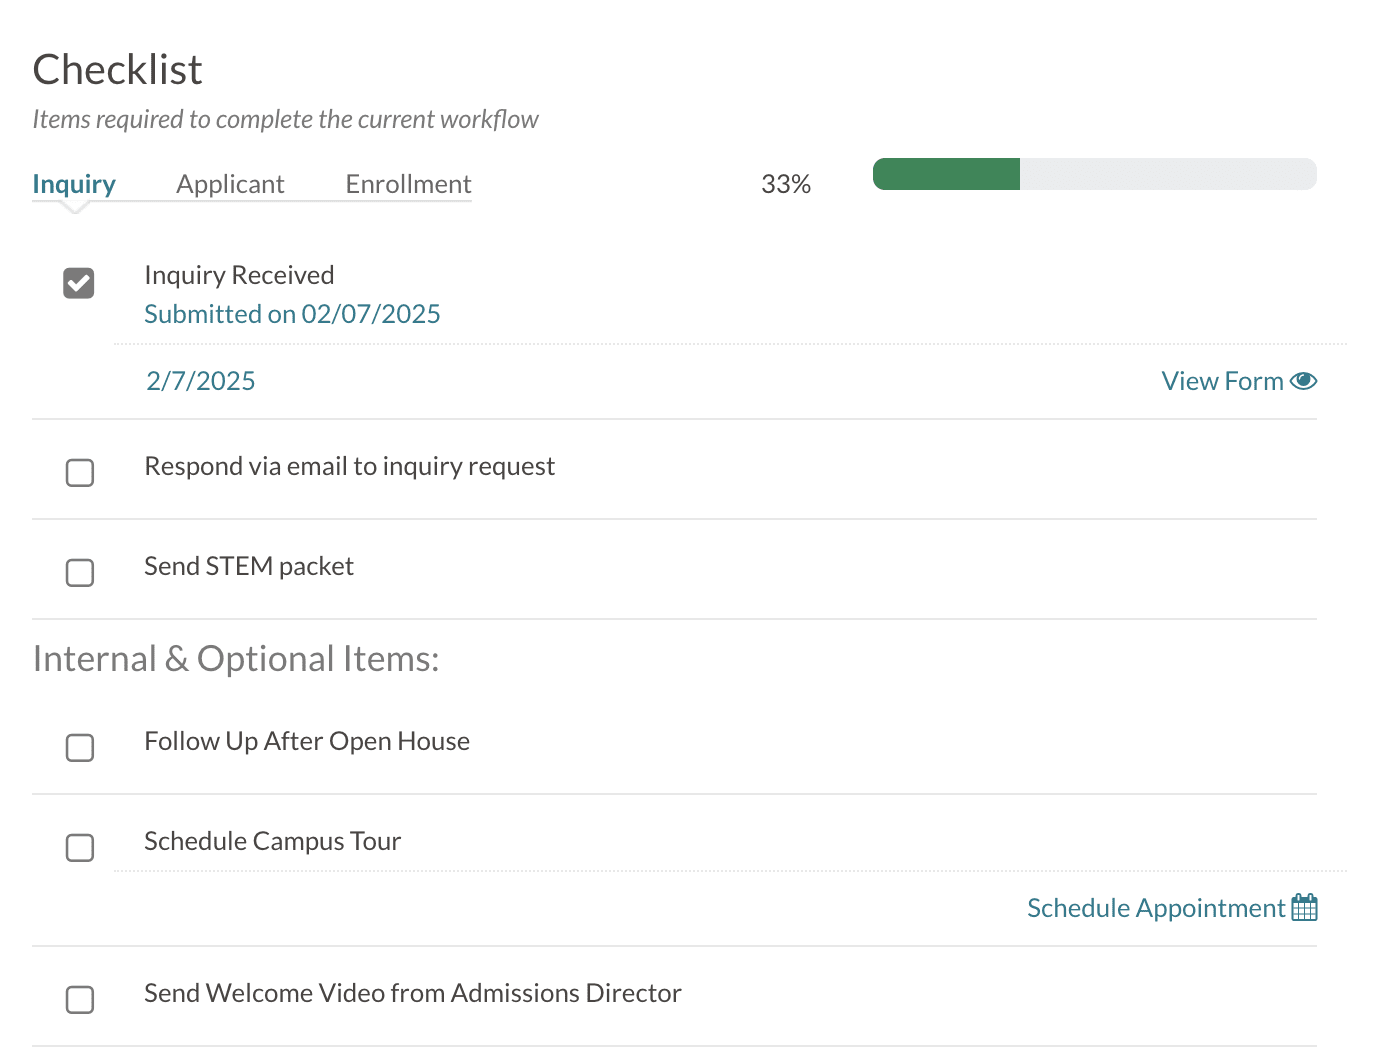
One of the superpowers of the Inquiry checklist lies in its flexibility to dynamically adapt on a student-by-student basis. You can set up the Inquiry Checklist so that the items that appear for each student are relevant to their specific needs and interests.
The same applies to your Admissions and Enrollment checklists. They can be tailored to meet your needs in the same way!
Here are a couple of ways that you can utilize this capability:
Grade-Specific Criteria
Within Checklist Settings, you can define the criteria for checklist items based on the student's intended grade level. This ensures you're sharing age-appropriate information and experiences.
For example, if you have a Shadow Day event that's specific to 1st-5th grades, you can set a rule on your checklist item to only show this nurturing step for students who've expressed interest in one of those grades.
How to
- Open Settings > Checklist > Inquiry
- Select Edit next to the item that you'd like to set to show for a specific grade group.
- In the Criteria section, select the grades that you want the checklist item to appear for.
- Select Submit to save.
Result: Only students who inquire for one of the grades you selected will have that checklist item appear in their (internal) Inquiry checklist.
Custom Rules (with Finalsite Enrollment Support)
Other than the student's grade, there may be other criteria like you'd like to show/hide a checklist item based on. For example, if you need to check that a specific Viewbook goes out to your International Inquiries, you'd need to utilize the "Business Rule" section of the checklist item settings to accomplish that.
This feature is locked on your end. (You will see it greyed out.) Our Support team can help you configure rules that trigger specific checklist items based on student demographics, program interests, or other criteria. Just reach out and let us know who you need to siphon that item to show for and we'll make it happen.
Keep in mind
Of course, setting up a rule to show one of your checklist items based on information about the student depends on whether or not you have already collected that information about the student in the first place.
For example, if you haven't yet asked the students within the Inquiry form whether or not they are internationally based, then you wouldn't be able to set a checklist item to show based on whether or not they are international students.
So, just keep in mind, you are limited to the information you are collecting. Just take a look at your Inquiry form. If you are asking about it there, you can most likely set up a rule on a checklist item based on it.
Example Dynamic Checklist Items
Here are some common examples of checklist items that can be set up to internally tailor your connections with families.
Respond via Phone or Email to Parent Inquiry Question
You can include a question in your inquiry form that asks parents if they prefer for you to reach back out to them via phone or email.
Then, within your Inquiry checklist, you can add a checklist item for both scenarios, and our Support team can add a rule to the items so that, based on which selection a parent made in the form, the corresponding checklist item will appear in the internal inquiry checklist.
Send “Affording Our School” Email
Including a request for information about Financial Aid is a common addition to the call to action section of your inquiry form. Make the most of this request by setting up a checklist item and having our Support team include a rule that tells the item to only show up if the family has requested information about your aid options.
Send STEM Packet
You may also be asking for specific student interests within your inquiry form. If so, you can make the most of this by setting up a checklist item specific to the student's interest.
For example, let's say you include STEM in the list of academic interests you ask families about in the Inquiry form. If a family were to select STEM, set up an inquiry checklist item and have our team add a rule to make the item show up based on this selection.
Schedule Campus Tour
Connecting calendars to your inquiry checklist is crucial. Any event sign-up that you are adding to your Inquiry form should be included in your internal Inquiry checklist so that you can easily view and manage the student's sign-up on your end right from the checklist.
Read about that here: Linking Calendars to Checklist Items
Send Welcome Video from Admissions Director
Using the checklist as a reminder to complete essential nurturing tasks that aren't automated is a great way to keep your workflow efficient. For example, if you need to track sending a warm welcome video from your admissions director to prospective families, use the inquiry checklist to make sure that this step is not missed.
Follow-Up After Open House
On a similar note, if you want to make sure that you are following up with families after an event like an open house, include that as an action step on your Inquiry checklist to help remind you to follow up.
Taking it further
Take your inquiry workflow to the next level by combining the power of the Inquiry checklist with our Automated Communication Plan feature.
These Automated Communication Plans allow you to automate the sending of emails or internal reminders based on criteria like the student entering a status or a checklist item being completed.
Read about utilizing these more in our Inquiry & Admissions Automated Communication Plans (ACPs) article.
Best Practices for Inquiry Checklists
Here are our recommended best practices to keep in mind when setting up your inquiry checklist:
Detailed Item Names
Be specific and descriptive when naming your checklist items. Instead of "Tour," use "Invite to Lower School Campus Tour."
This clarity makes reporting and tracking much easier. You'll quickly understand which actions have been completed and which haven't, preventing confusion and ensuring follow-through.
Events in the Checklist
Link calendar events to invitation or event-related checklist items to streamline scheduling.
When speaking with a family, you'll have a "Schedule Appointment" option directly within the checklist item. Select an available time slot, and the system can automatically send confirmation and reminder emails to the family based on your calendar settings.
Read about that here: Linking Calendars to Checklist Items
Internal Communication Mapping
Map out the communication workflow that your families will be part of and make sure your whole team is aware of which communications go out and when they go out across all departments. This will help you be clear and prevent overlapping and overwhelming prospective families with too many communications at once.
Focus on Touchpoints
Design your checklist to include all the key touchpoints you want to make with prospective families to encourage them to apply.
Did you know?
You can use Granular Permissions to hide checklist data based on the permission level of the individual user. Adding these permissions allows you to control who can see/edit/view the item and the data related to the item.
To learn more about Granular Permissions, please refer to our Granular Permissions for Email and Checklists article.
Key Inquiry Nurturing Toolkit
As you build out your inquiry checklist and consider your overall inquiry workflow, keep the following points in mind.
Inquiry Checklists are Internal Only
The Inquiry Checklist is exclusively for internal team use. Parents do not have access to it.
Inquiry Form Checklist Item
The "Inquiry Form" checklist item automatically brings the submitted form into the checklist for easy viewing.
User Notifications
Set up email notifications for new inquiries in your user settings to stay informed of new submissions. Alternatively, rely on the Admissions > Inquiries tab for a less cluttered inbox.
Viewing Past Forms
While the current year's forms are visible in the checklist, past years' forms and file uploads can be found in the Form and Document Submission history section of the contact record.
Creating Inquiries Internally
You can manually create inquiries within EMS using the "+" quick action menu. Note that the thank you landing page and automated inquiry thank you email are not triggered when creating inquiries this way (though event emails are still sent).
Managing Event Attendance
You can mark event attendance directly on the checklist or in bulk using registration reports and saved searches.
Bulk Actions
Use saved searches and filters to identify groups of inquiries based on checklist item completion or other criteria, and then perform bulk actions like sending emails.
Rule-Based Items
Use rules to dynamically add checklist items based on student responses on the inquiry form. This ensures targeted follow-up. (Remember, our team can help you add "business rules" on our end.)
Communication Plans
Leverage communication plans to automate outreach based on inquiry status or checklist item completion. Be mindful of email timing to avoid overwhelming families with too many messages at once. Communication plans are stage-specific (inquiry vs. application), so plan accordingly.
By mastering the Inquiry Checklist and following these best practices, you can transform your outreach process, build stronger relationships with prospective students, and ultimately drive enrollment success.
Comments
0 comments
Please sign in to leave a comment.