Payers have the option to dispute a payment directly to their bank or card merchant. Continue reading to learn more about the process of disputes and where/how they can be managed within your site.
Payments Dispute Fee
The chargeback/dispute fee for Payments in both the US and Canada is $15.
Who has access to the Disputes page?
Types: Only System Admin
Permissions: Financial
In this Article
Process
The Disputes page is located under Settings > Financial > Disputes.
This page is only visible to System Admins and Admins with Financial permissions enabled. Click here to learn more about these permissions.
*Please note that all emails displayed in images and GIFs are for training purposes only and should not be used for any communication purposes.*
Important: Some banks do not offer the option to contest a disputed payment. In those cases, the dispute is immediately lost. When this happens:
- You will still have access to the data of the dispute on your Disputes page.
- You will not have access to the 'Counter Dispute' or 'Accept Dispute' buttons.
- You will still receive an email notifying you of the closure of the dispute.
Read more about Lost disputes in the section below: Lost Disputes
Within the Disputes page, you'll see the following:
- Dispute ID: Each dispute is given a unique ID.
- Order ID: The Order ID refers to the specific disputed transaction on the Payment History page. It's a clickable link that will navigate you to the Payment History page, where the data of the disputed payment will be displayed.
- Transaction Reference: Each transaction has a unique ID. This number will be the transaction ID of the original payment.
- Customer Name: Name of the customer who initiated the dispute. The names are hyperlinked and clicking a name will navigate you to the Billing tab of the Payer's record.
- Customer Email: Email of the customer who initiated the dispute. This will be the email they used to create their portal account.
-
Status: The status that the dispute is currently in. Statuses include:
- Won: The dispute has been won by the school. In this case, the money is returned.
-
Lost: The dispute has been awarded to the payer who initiated it. The amount of the lost dispute will be withheld from your payout on the first of the next month unless the dispute clears within the last two weeks of the month, in which case, the chargeback will occur on the first of the following month.
- For example: If the dispute is lost on October 5th, the chargeback would occur on November 1st. However, if it is lost on October 20th, the chargeback would occur on December 1st.
- Needs Response: The dispute is awaiting either your submission of evidence to counter the dispute or for you to accept the dispute (read more on this below).
- Under Review: The evidence has been submitted and is being reviewed.
- Reason: The reason the payer selected when initiating the dispute. Please note, the 'reasons' list differs slightly across credit card companies. The full list of reasons can be found here. The most common reasons you may see are Duplicate, Fraudulent, Product Not Acceptable, and General, but any of the reasons listed can be valid.
- Amount: The amount of the disputed transaction.
- Evidence Due By: The date the evidence must be submitted.
Dispute Management Options
On the far right side of the page, you will see the following Dispute options:
Show
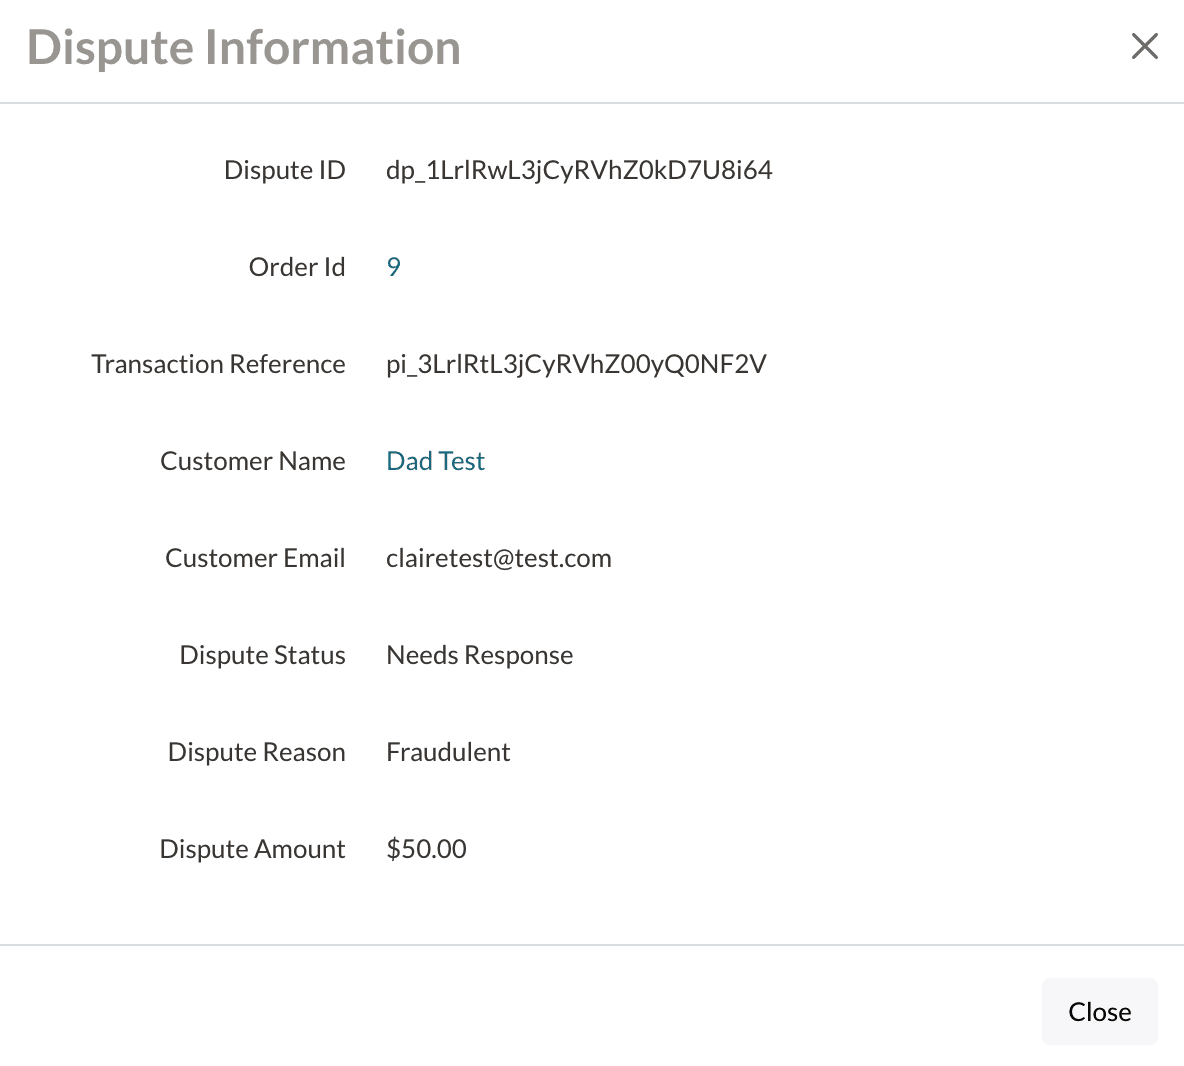
Selecting Show will open the Dispute Information dialogue box. This box will display the same breakdown of information provided in the columns.
Counter Dispute
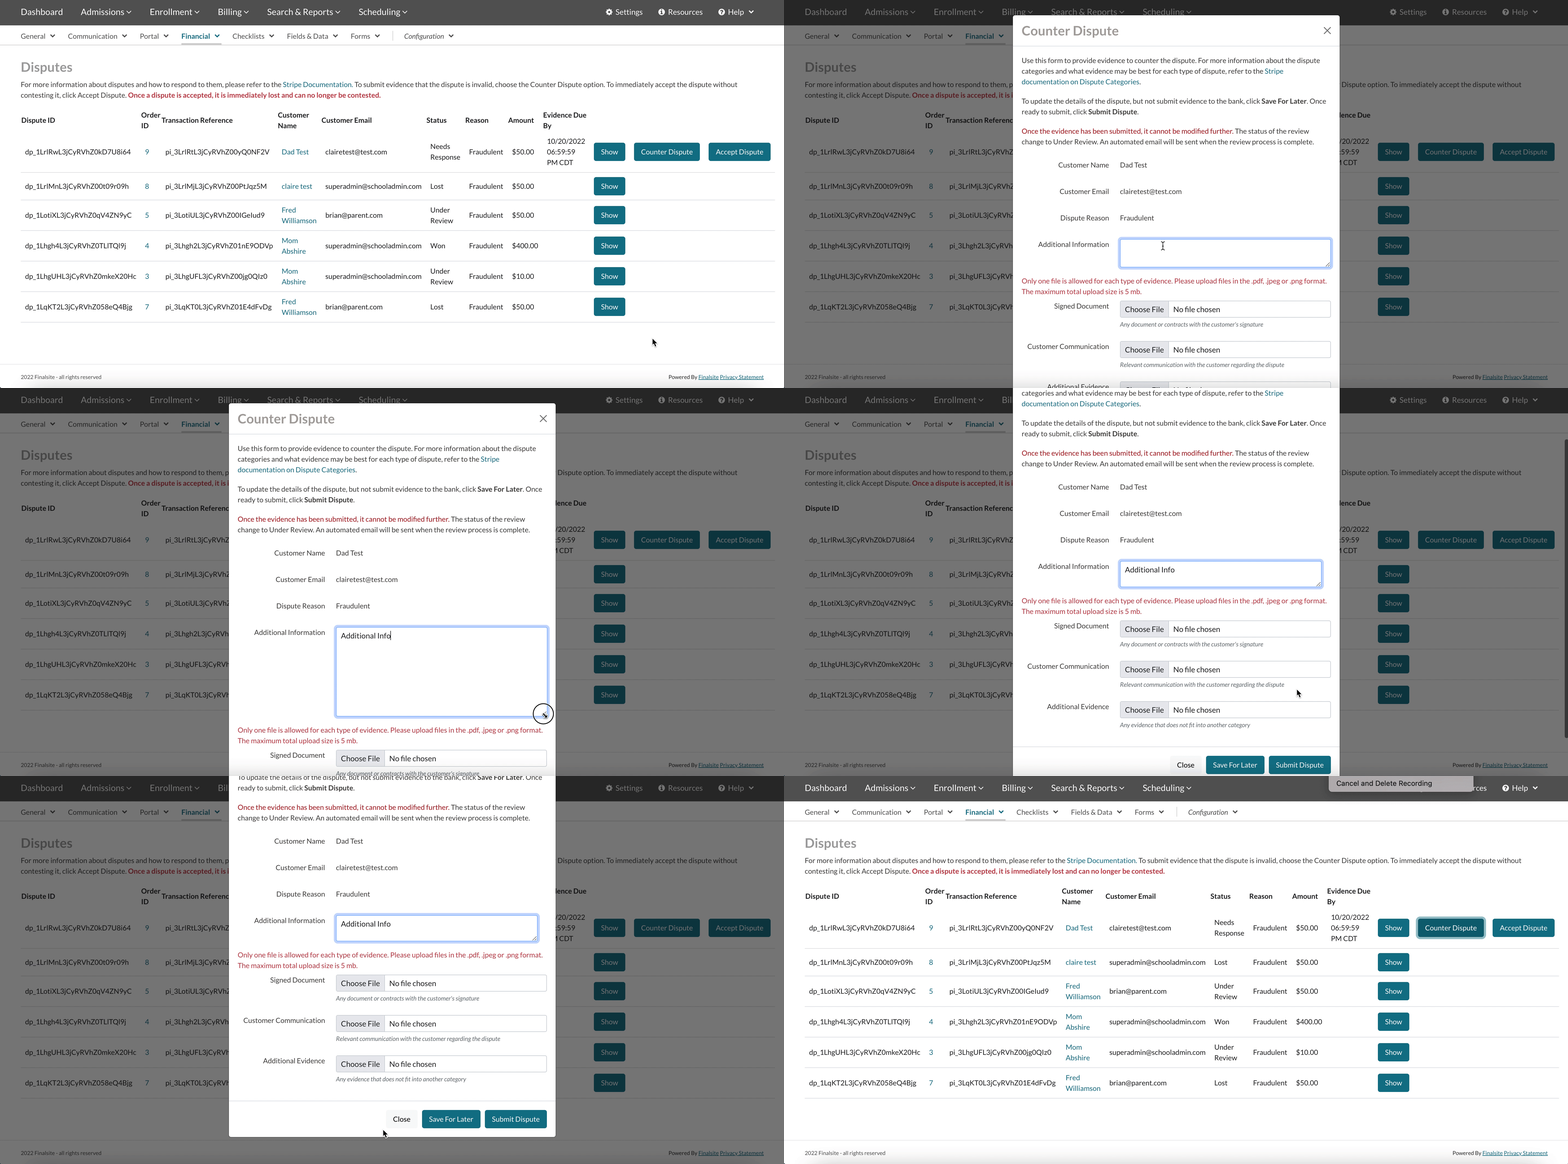
Selecting Counter Dispute will open a new window with an evidence form so you can provide details to counter the dispute.
The form will display the payer's Name, Email, and Dispute Reason followed by:
- An Additional Information text box. Here you can enter any text you deem pertinent to prove why the transaction was legitimate. The box can be expanded by dragging out the bottom right corner.
- Three file upload buttons:
- Signed Document: Any signed documents agreeing to payment (such as a contract or application).
- Customer Communication: Any communication-based evidence (such as emails).
- Additional Evidence: Anything additional you deem useful to prove the validity of the charge.
At the bottom of the form, you will have the option to:
- Close: This will not save any submitted evidence.
- Save for Later: This will keep your progress saved while you gather more evidence.
- Submit Dispute: This is final. It will submit all evidence and can not be undone or added to later.
Important notes:
- All disputes have a response deadline. You must submit evidence before or by the deadline listed on the disputes page to counter the dispute.
- Once a dispute counter has been submitted, you cannot modify any of the details of the counter.
Accept Dispute
By selecting Accept Dispute, the dispute will be automatically closed in the payer's favor. The status of the dispute will change to Lost and (at a later date) a chargeback will occur on your account to account for the lost dispute. Please note: Once a dispute is accepted, it is immediately lost and can no longer be contested.
Communication Notifications
Dispute notifications are automatically sent by email to whoever is set up as a System Admin. You can read more about Admin roles here.
2 types of emails are sent regarding disputes:
- New Dispute Created: Whenever a new dispute is created, you will receive an email to alert you. The subject of the email will contain the text "New Dispute Created" and the body of the email will contain a link to your Disputes page.
- Dispute Updated: You will also receive an email whenever dispute status changes occur. This includes whether the dispute is Won, Lost, Needs Response, or Under Review. The subject line of this email will contain the text "Dispute Updated" and the body of the email will contain a link to your Disputes page.
Both of these emails will be trackable within Finalsite Enrollment under Settings > Communication > Sent Emails.
Lost Disputes
When it comes to financial transactions, disputes are an inevitable occurrence. Whether due to misunderstanding or genuine disagreement, disputes can lead to complications, especially when they result in a loss.
Understanding how to manage lost disputes is crucial for maintaining financial integrity and ensuring smooth operations with families
Very Important
Our team is not able to reverse or modify a Lost dispute. Once a dispute is lost, it becomes irrevocable within Finalsite Enrollment. While you retain the autonomy to manage the dispute with the family's account as you see fit, it's important to note that neither you nor our team can alter the outcome of a lost dispute within our system.
Understanding a Lost Dispute
When a dispute is labeled as "Lost," it signifies that the issuing bank (the parent's bank) has sided with the parent.
When a dispute is lost:
- You will still have access to the data of the dispute on your Disputes page.
- You will not have access to the 'Counter Dispute' or 'Accept Dispute' buttons.
- You will still receive an email notifying you of the closure of the dispute.
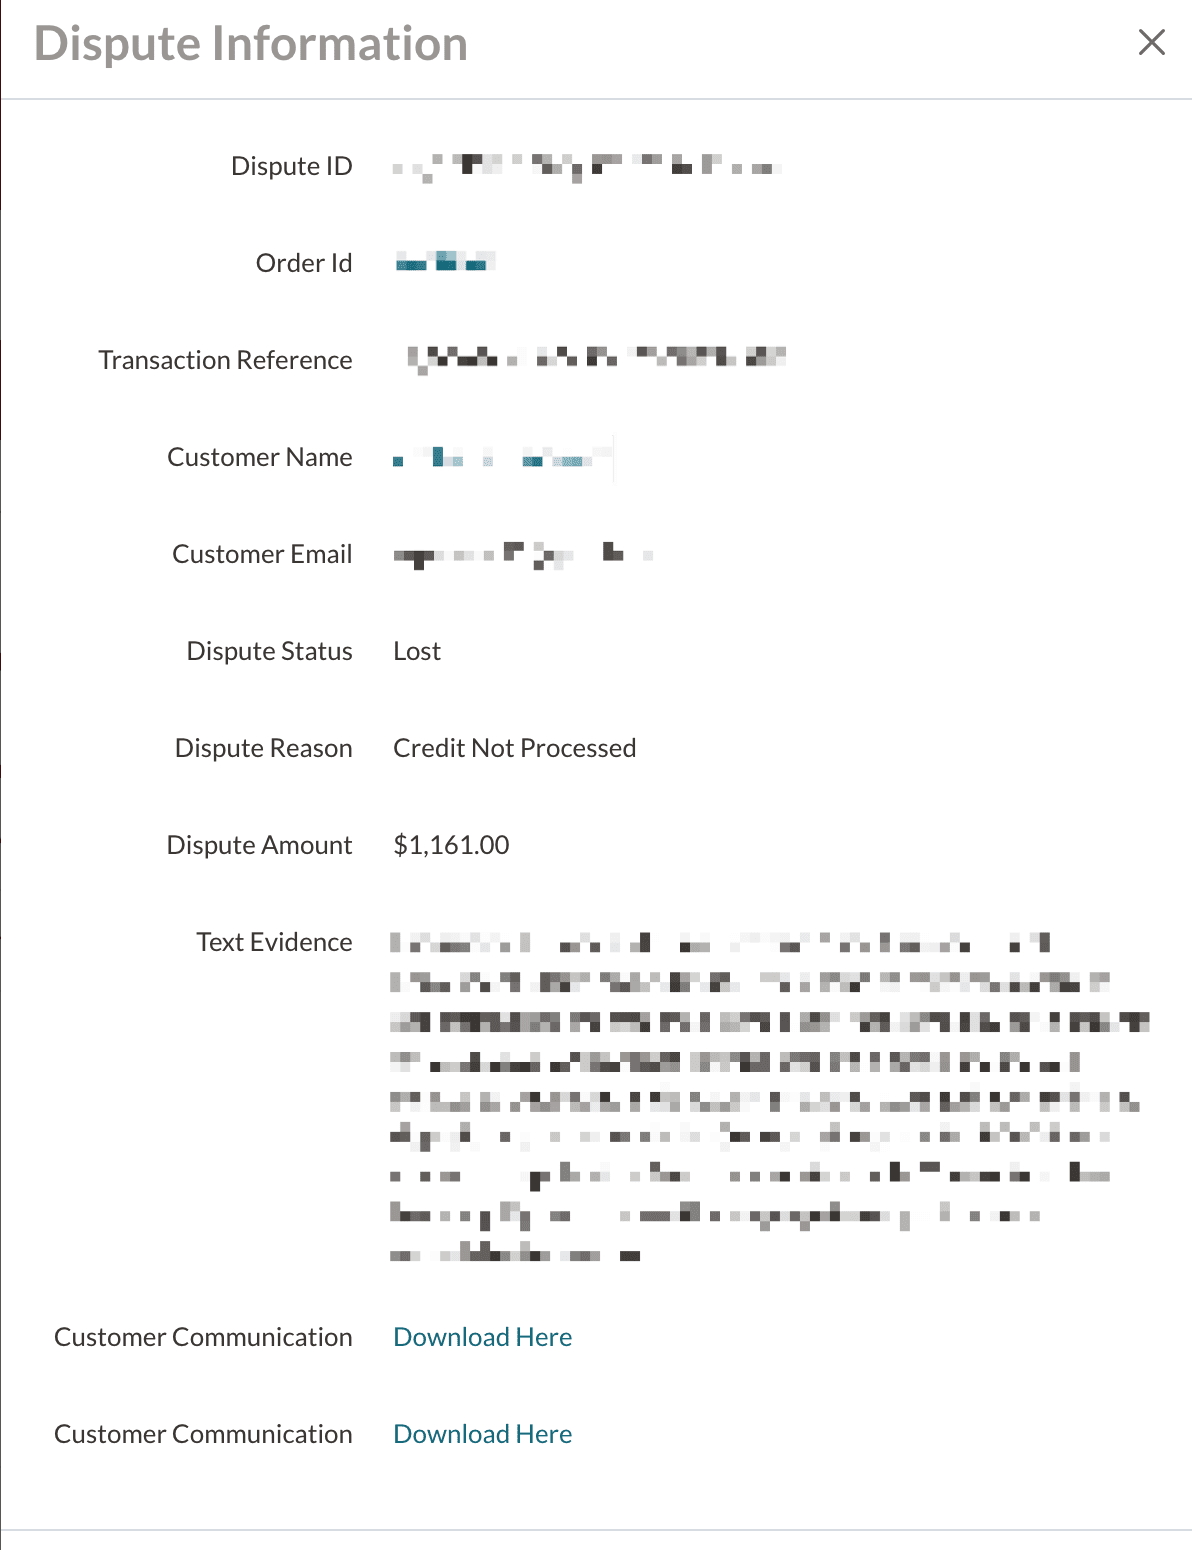
You will see the status of a lost dispute reflected on the Disputes page (Settings > Financial > Disputes). Here is what that looks like:
When you click Show, you will see more details and notes about the dispute, including any submitted evidence.
What Happens Next
As mentioned in the note at the top of this section, once a dispute is considered "Lost", there is nothing that can be done to alter that outcome in Finalsite Enrollment and our team can not affect or change the outcome in any way. Because disputed amounts are not added back to the ledger, it may be necessary to make a manual adjustment to the parent's ledger.
Managing Lost Disputes on the Ledger
Disputed amounts do not automatically charge back to a payer’s ledger. This means that you may need to take action on the ledger depending on the circumstances.
If you still need to charge the parent, add a Reverse Payment to the ledger.
When it comes to lost (or accepted) disputes, you take no action on the ledger; the parent will not owe the disputed amount. If you need to charge the parent for the disputed amount, you'll need to add a Reverse Payment to their ledger.
How to Reverse a Payment
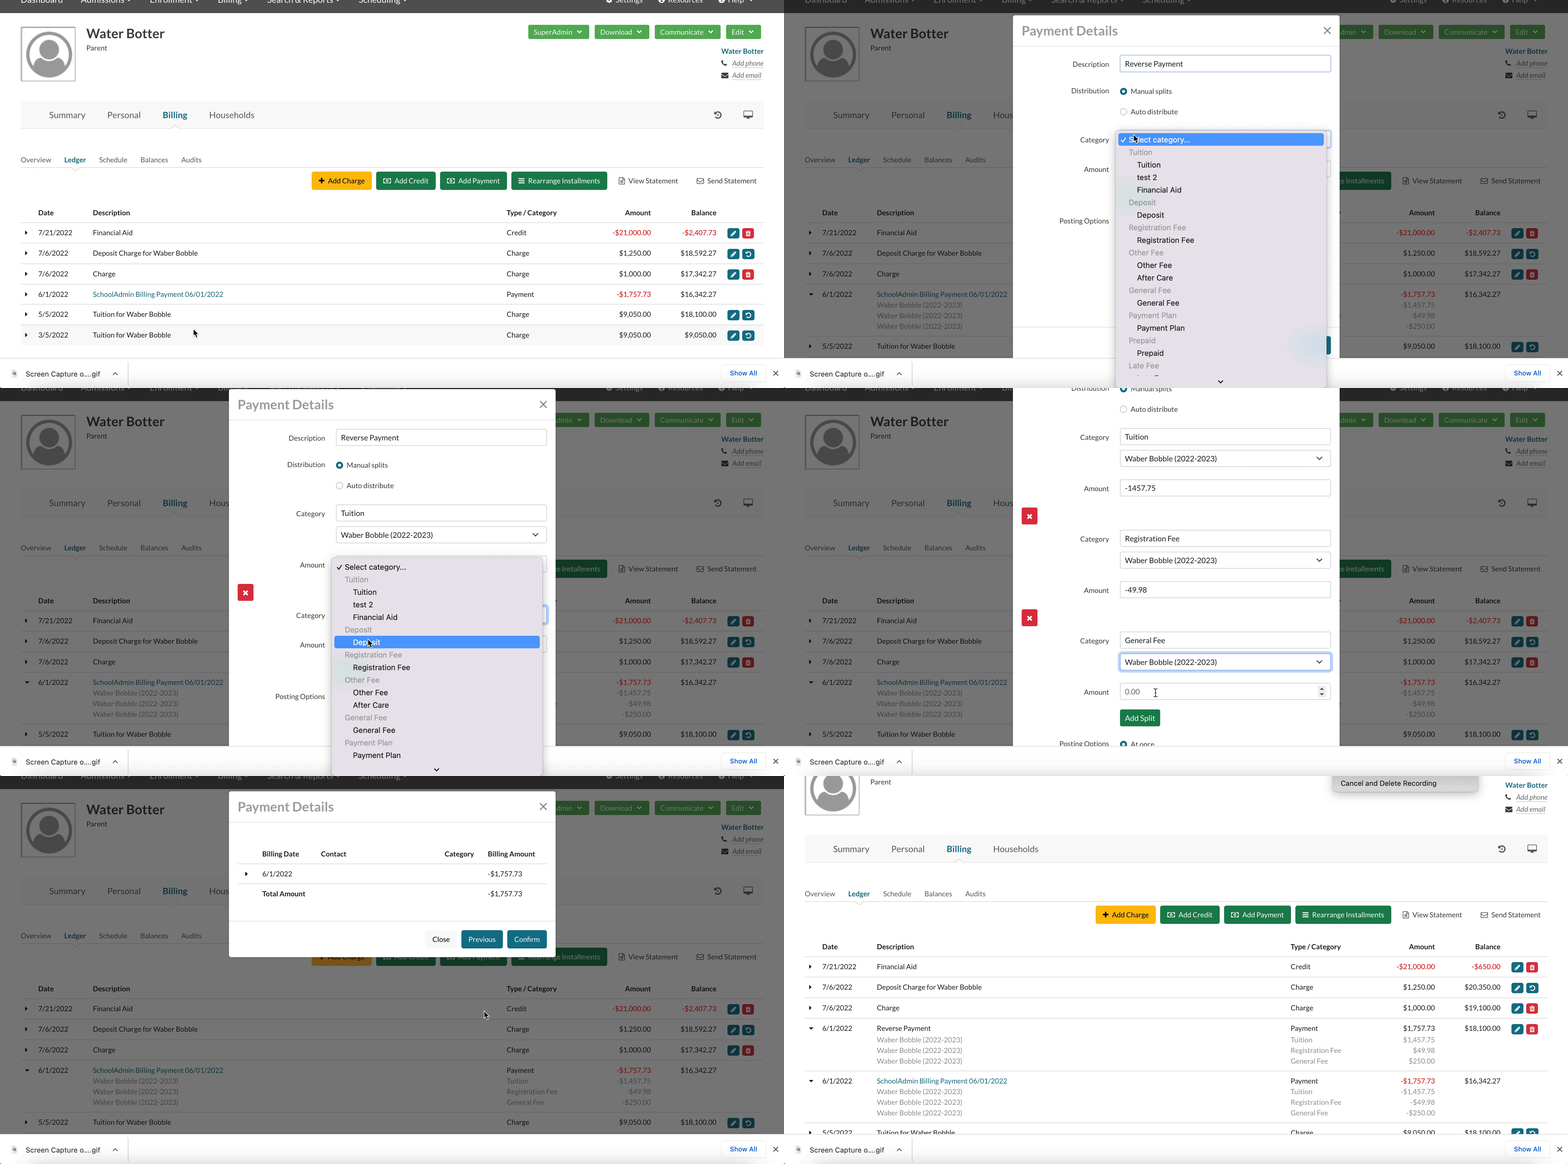
Navigate to the parent’s billing ledger and select the Add Payment button.
-
Description
- Enter a description to note the reason for the payment reversal.
-
Distribution
- Select Manual Splits: This is the only option you should select when reversing a payment. Do not select auto-distribute for payment reversals.
-
Category
- Set the billing category that the payment should be applied to. For payments that comprise of multiple categories, you will need to split the payment so that this negative payment is an exact match for the original one.
-
Amount
- Add the amount as a negative number. You MUST add the amount as a negative number in order to reverse the original payment.
-
Add Split
- In order to match the reversal to the exact setup at the original, you will need to match the category split as well.
- For each split, be sure to add the payment amount as a negative number.
Short example video of a Payment Reversal:
If you don't need to charge the parent but want a record of the dispute for your reporting, you need to reverse both the payment and the charge.
For a guide on Reversing the Payment, see the steps above.
Reverse a Charge
The Reverse Charge button allows you to reverse individual contract charges.
- This is useful anytime you need to reverse a contract charge and you don’t want to remove the contract (which deletes all the charges).
- Reverse Charge is only available for charges added through the contract. You won't see the Reverse Charge icon on manually added charges.
If you need to use this option, you can do so along the far right of the charge line item within the ledger.
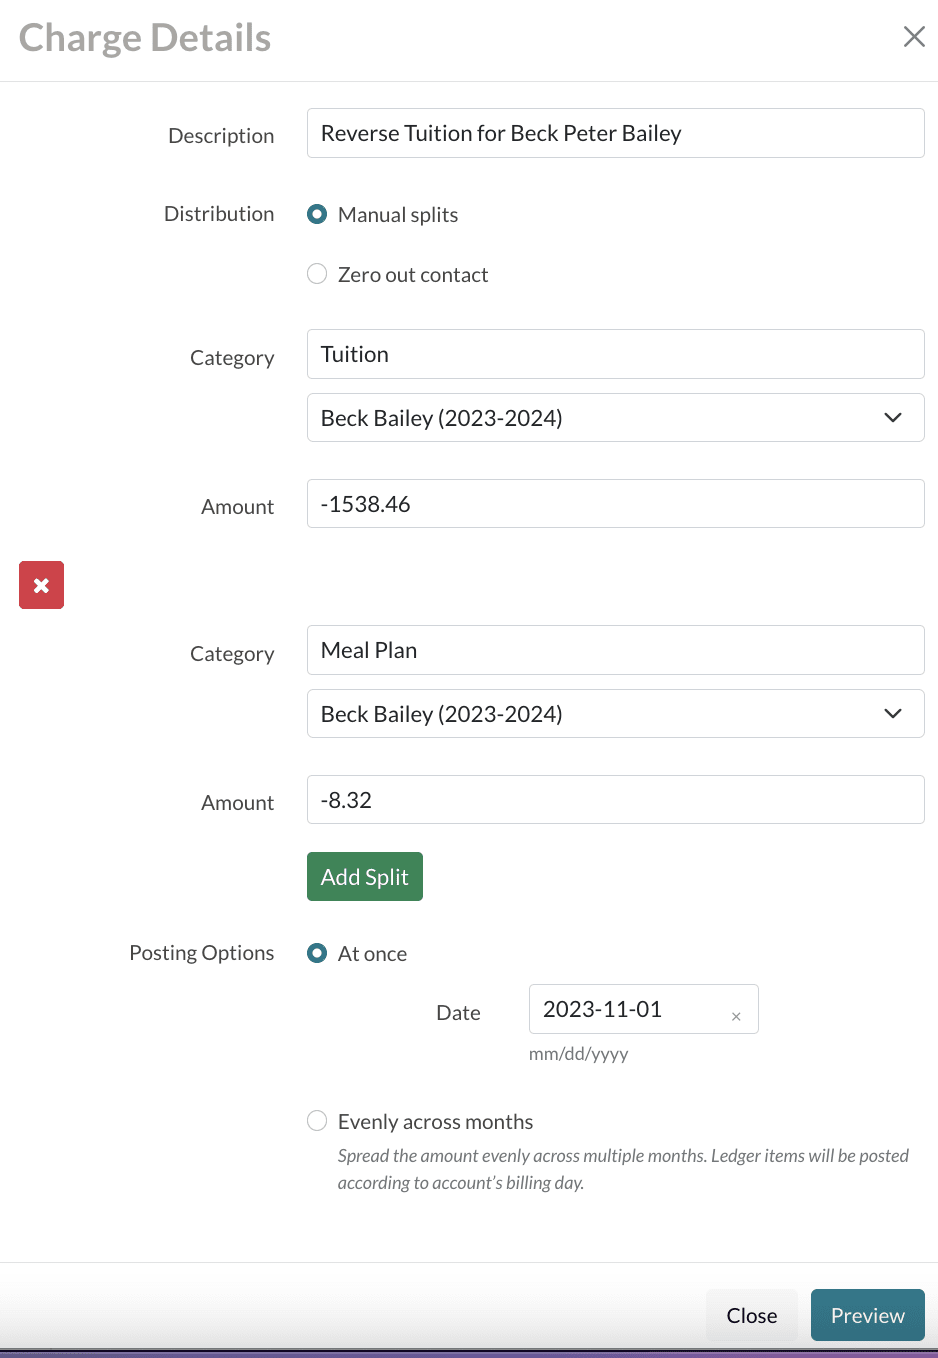
Click on the reverse charge arrow and the credit details window will open with the credit details auto-populated.
You can make any changes as needed.
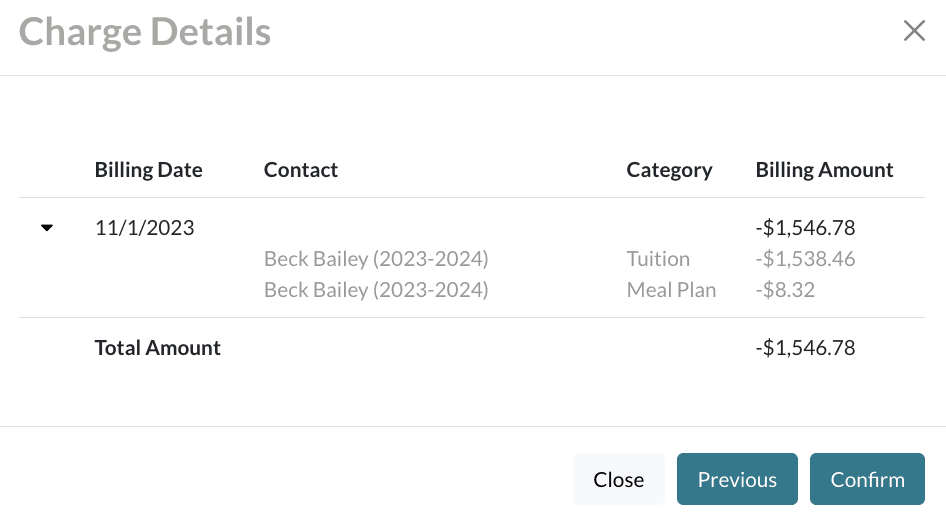
Select Preview to review the reversal.
Select Previous to go back and make changes.
Select Confirm to approve the reversal and add it to the ledger.
Additional Resources
- Office Hours & Past Session Recordings
- Parent Billing Workflow
- Admin Billing Workflow
- Stripe documentation on responding to disputes
- Stripe documentation on dispute categories





Comments
0 comments
Article is closed for comments.