One of the benefits of Payments is the ability to issue full or partial refunds to parents/guardians directly within the Finalsite Enrollment system. Electronic check or credit card payments can be refunded from the Payment History page.
Refunds are first deducted from any available funds in your account that have not been paid out to your bank. If your account balance is $0, funds will be pulled directly from your connected bank account.
Click here for an Overview & FAQs on Payments.
Time limits for processing refunds:
- Refunds for Credit Card Payments must be initiated within 90 days from the original payment date.
-
Refunds for ACH payments must be initiated within 180 days from the original payment date.
- IMPORTANT: parent accounts saved before moving over to Payments (from Stripe Legacy) only have a 90-day window in which ACH refunds can be processed.
In this Article
- How-To: Refund a Payment
- Refunds Deductions and Ledger Behavior
- Failed Refunds
- Convenience Fees
- Safeguards
- How-To: See who made a refund and when it was issued
How-To: Refund a Payment
Please Note
You must enable refunds under Settings > Financial > Payments before you can process them.
If you have not enabled refunds, you will see an error when you attempt to issue one. To enable refunds, you will complete step 1 on the Payments page (Settings > Financial > Payments.)
If you do not see an error when attempting a refund on this page and you've already completed Step 1 on the payments page, you can proceed with the steps below.
Refunds can be issued from the Payment History page, found within Settings > Financial in your Finalsite Enrollment site.
Within the Payment History page, locate the payment that you want to refund in the list by browsing or using the Search Options menu to narrow down the list based on criteria such as name or transaction number.
After locating the payment you want to refund, click the down arrow next to Show, then select Issue Refund.
Refunding an ACH/electronic check payment
ACH/Electronic check payments may take 5-7 business days to clear, so they'll display as ACH Pending during this time. While an ACH payment is pending, the Issue Refund option will not be available until the payment has fully processed and moved to Paid status.
The Refund Payment window will open. In this window, you can select the Reason for the refund (Duplicate, Customer Requested, Fraudulent, or Other) and whether you want to refund the Full Amount or a Partial Amount.
If you select to refund a partial amount, you will be asked to input the specific amount you want to refund. Note: If you issue a partial refund for a payment, you can still issue additional refunds for it later until the full amount of the transaction is refunded.
If there are multiple billing categories in the payment, you will be able to enter the amount you want to refund from each. For example, if the payment included Tuition and Deposit, you could refund $50 from Deposit and $50 from Tuition.
Click Submit once you have made your selections. You will then be asked to confirm the amount of and reason for the refund.
Review the information, and then click Confirm to complete the refund. Please note that refunds can take 5-10 days to appear on a statement.
The original payment will remain on the Payment History page. Within the Payment Details window (accessible by clicking on Show to the right of the payment), you can view the details of the original purchase as well as the refund under the Transactions heading.
Refunds Deductions and Ledger Behavior
Deductions
Refunds are first deducted from any available funds in your account that have not been paid out to your bank.
In the event that your account balance is $0, funds will be pulled directly from your connected bank account.
Any fees incurred by disputes or ACH failures will also be collected in this manner.
Ledger Behavior
Payment:
When a refund occurs, the payment is automatically added back to the ledger by the system as a negative payment.
Charge:
The original charge remains on the ledger because it might still be owed. If it is not owed, the charge should be canceled out with a negative charge or deleted.
Example of a refund as it appears on the parent's ledger:
Ledger Lock Note
The Ledger Lock feature lets you secure your financial records by setting a locked date. Once enabled, it prevents any alterations to the ledger entries dated on or before the set date. It's set up in the Billing Setup page (Settings > Financial > Billing Setup).
Here's how the Ledger Lock affects refund behavior
- If the original date is within the locked range, the refund will be posted to the ledger with the current date instead of the original payment date.
Read more about Ledger Lock and how it affects other areas of your site in our Settings: Billing Setup Page article.
Failed Refunds
When a refund fails, the following will happen automatically:
- The refunded amount is automatically sent back to the bank account connected to your Payments account.
- If you have enabled the Failed Payments notification email enabled (which is turned on in the User Notifications page), you will automatically receive the Failed Refund Notification email.
In addition to the above, you'll be able to see the failed refund recorded in the following places within the site:
Parent Ledger
The failed refund is added back to the ledger as a Payment.
As a reminder, when you process a refund, it's added to the ledger as a negative payment. When a refund fails, it's added back to the ledger as a (positive) payment to balance out the ledger.
Example of a failed refund as it appears on the parent's ledger:
Payment History Report:
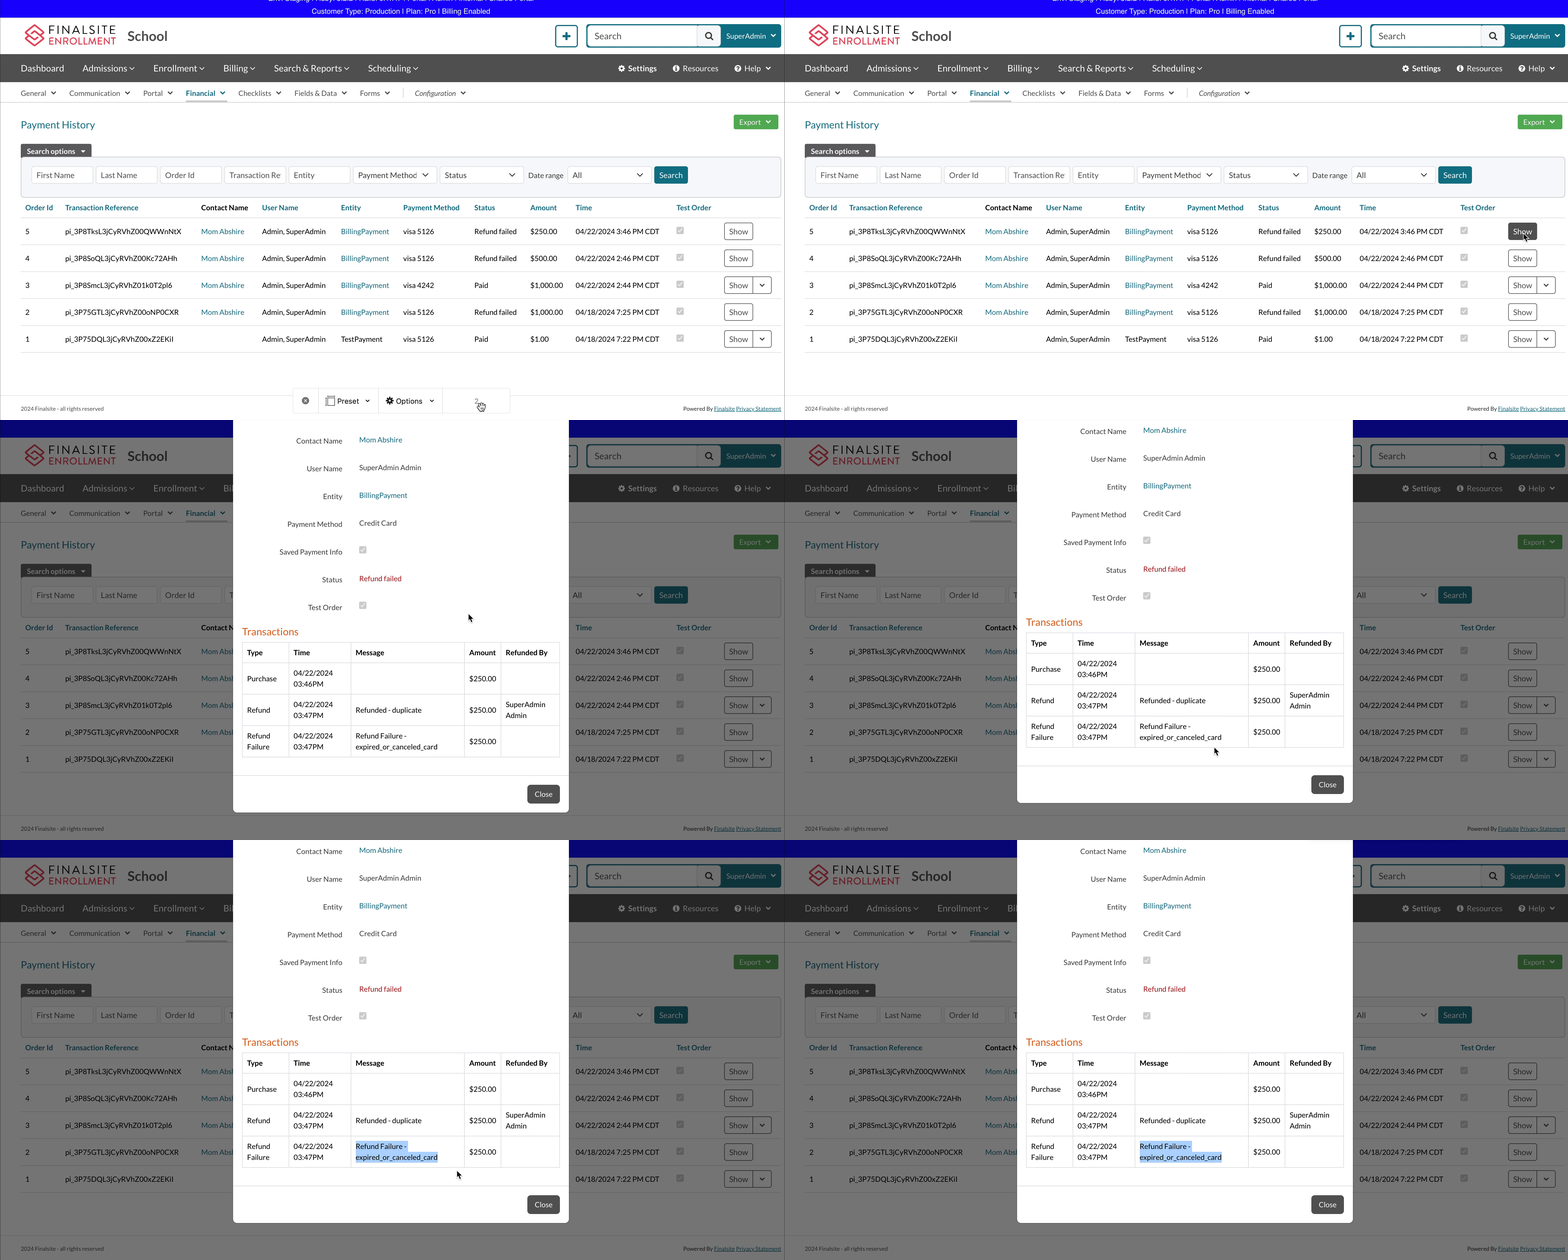
Within the Payment History Report, when you select Show, you will see a full history of the refund, including the failure reason.
Failure Reasons
You can see a list of the failure reasons and their descriptions within this Stripe article: Refund and Cancel Payments in the Handle Failed Refunds section.
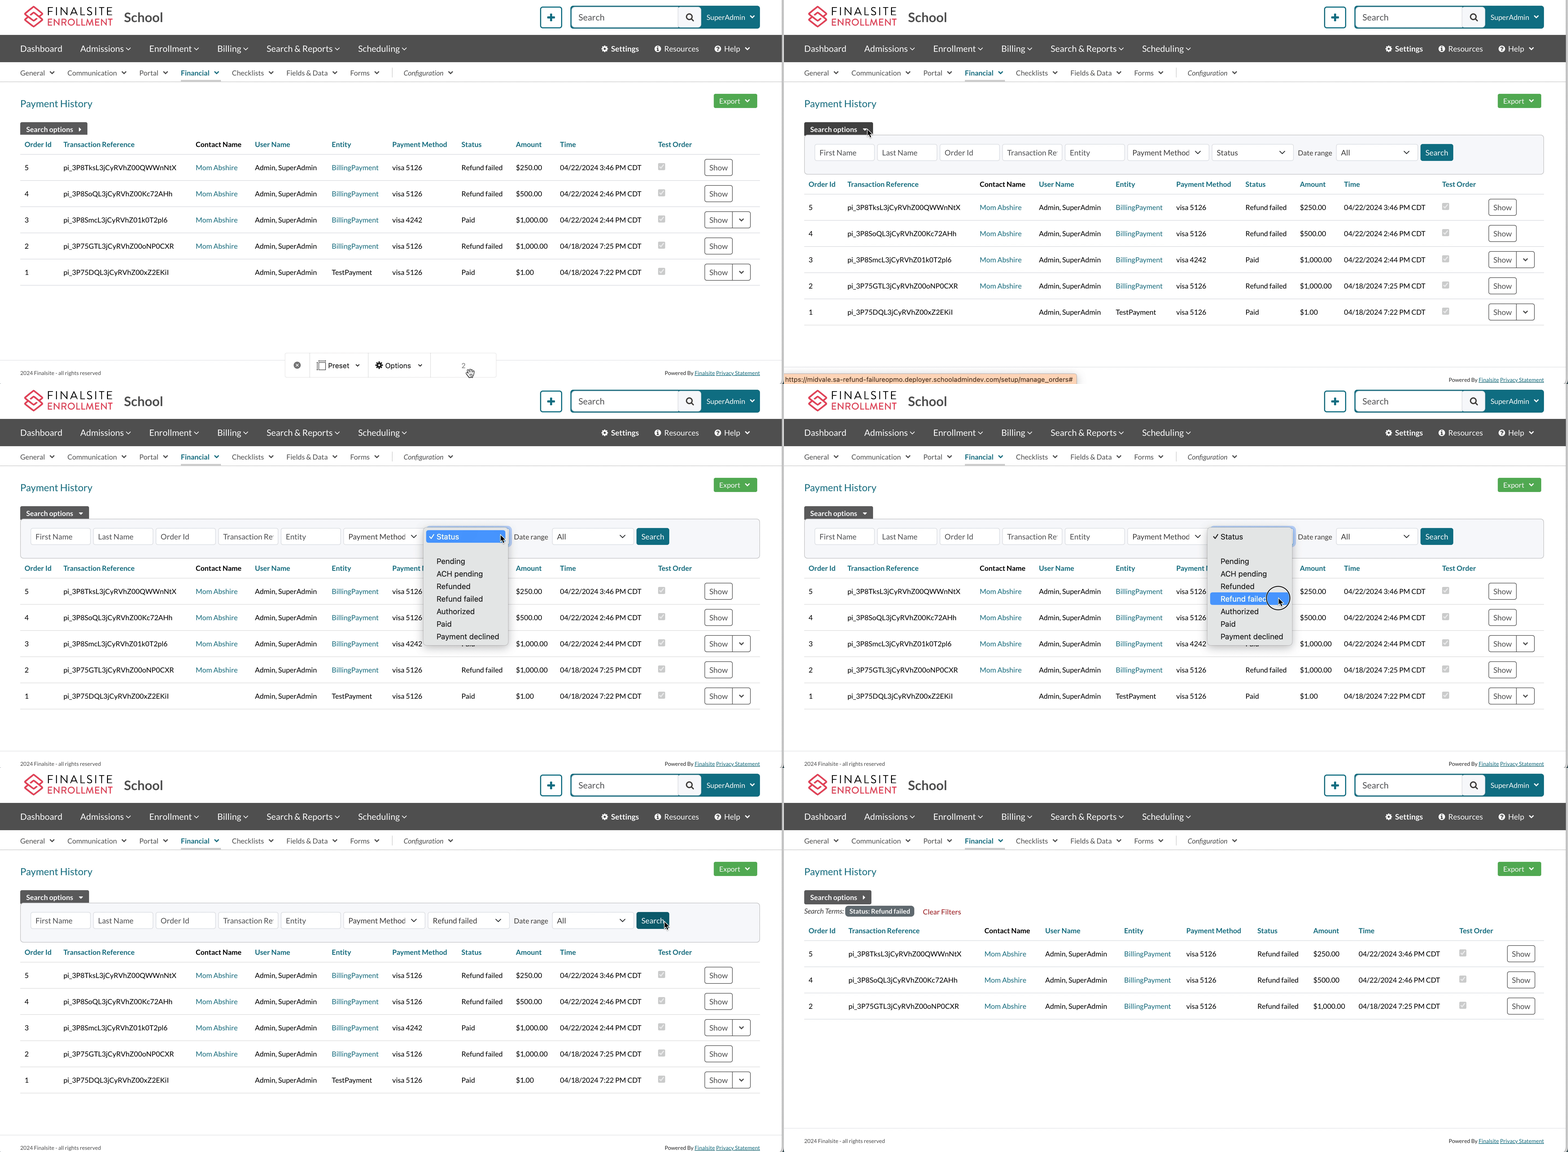
You can also filter the Payment History Report to only show failed refunds.
How to Filter by Failed Refunds in the Payment History Report:
- Open the Search Options dropdown.
- From the Status dropdown, select Refund Failed.
- Click Search.
Payout Report:
All transactions related to the failed refund will be recorded in the Payout Report.
Convenience Fees
When refunding a credit card or ACH/PAD payment, the full amount includes the convenience fee. If you want to give the family back the fee as well as the amount, select full refund on any credit card or ACH payment.
Important
While the convenience fee can be refunded to a family, it is not refunded to your bank account. Therefore, when you refund a family the full amount, you are accepting the loss of the convenience fee amount.
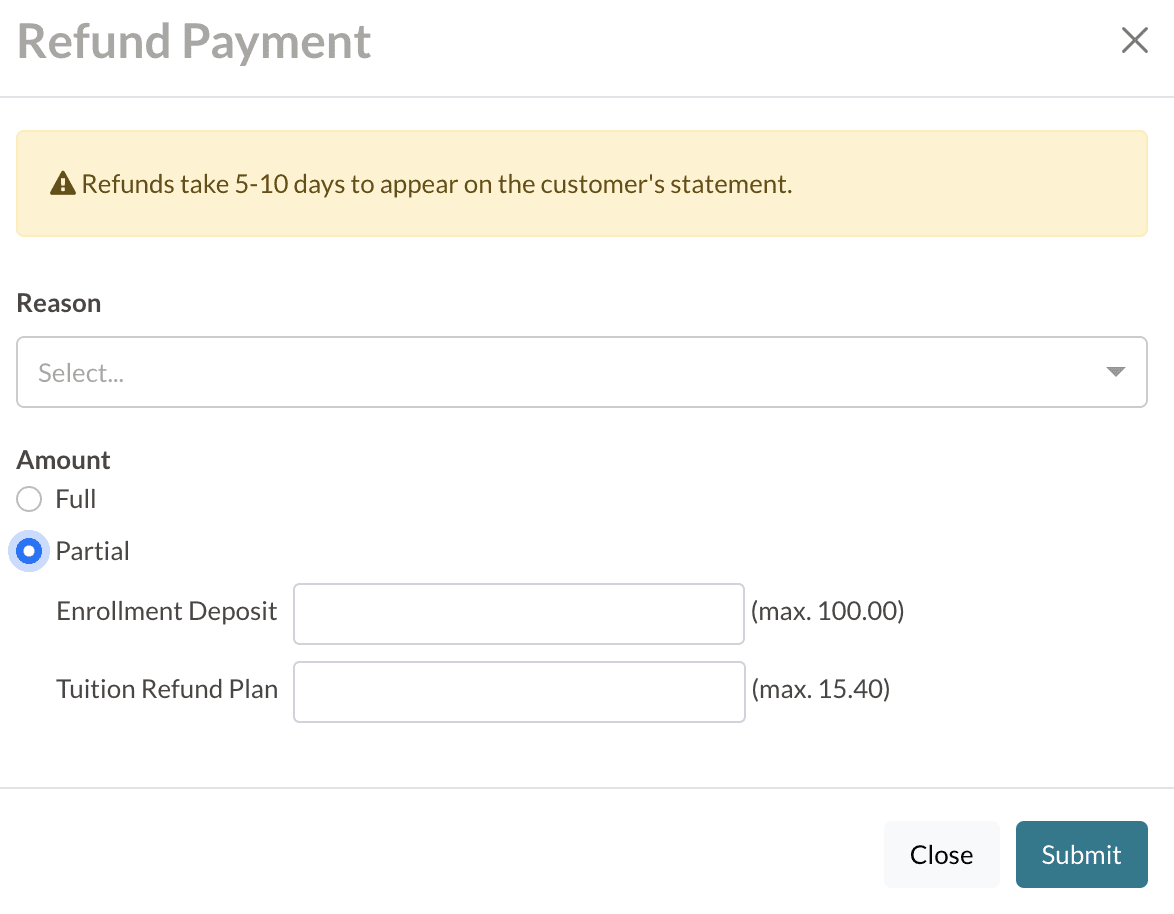
If you do not wish to absorb the fee, you need to select partial refund and enter the max amount next to each category of the payment. This will total the full amount less the convenience fee. In the example below, you would set the Enrollment Deposit Refund to 100.0 and the Tuition Refund Plan to 15.40.
Safeguards
As an internal safeguard, refunds will automatically turn off in the event of large usage that is unexpected.
If this happens you can contact support. They will verify that the account is in good standing, the refunds are authorized, and that the account is connected to direct debit.
After a quick check, refunds will be re-enabled.
How-To: See who made a refund and when it was issued
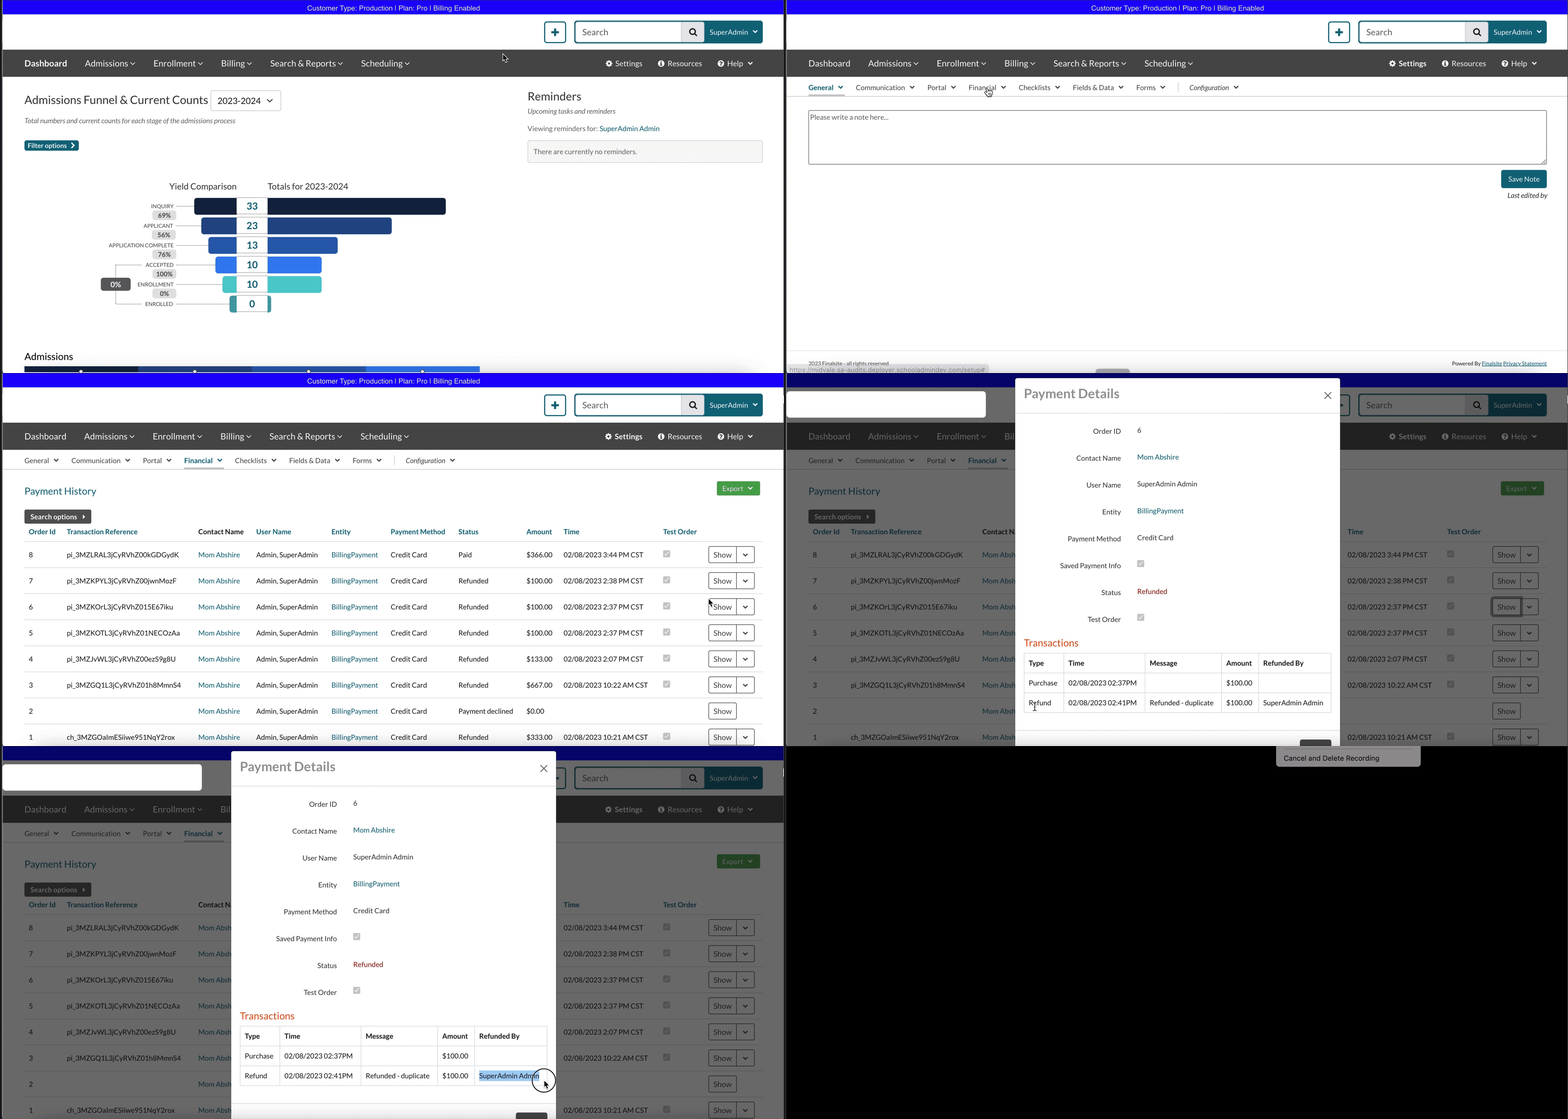
You can view an audit of who processed a refund within Finalsite Enrollment and when it was issued within the Payment History page. On the right side of the page, selecting Show will open the Payment Details dialogue box.
Within this pop-up, you will have access to view the Transaction History of the refund, including the following data:
- The Type column will say Refund.
- The Time column will display the timestamp of the refund.
- The Message column starts with Refunded, followed by the reason that the Admin selected when initially issuing the refund.
- The Refunded By column will display the username of the admin who issued the refund.


Comments
0 comments
Article is closed for comments.