This article provides a step-by-step guide on how to conduct a lottery using the Lottery feature in Finalsite Enrollment. It covers testing the lottery process and accessing the results for viewing or presentation purposes.
Learn more about lottery in the Lottery Basics article, and check out our Lottery Settings article to learn how to customize your lottery settings and presentation
Who has access to this?
Schools currently using the Lottery feature within Settings > Lottery. Submit a request to our Support Team if you would like this feature enabled on your site.
Types: System Admin and Admin
Permissions: Any
In this Article
- Setting up your tiers
- Configuring your Lottery
- Testing your Lottery
- Running your Lottery
- Presenting the results
Setting up your tiers
Before configuring and running a lottery, you must first create and save your tiers.
What are tiers?
Tiers are collections of saved searches used in the lottery to control how students are selected. They allow you to prioritize specific applicant groups.
Example Tier Structure:
- Tier 1 (Highest Priority): Applicants with siblings enrolled in the school.
- Tier 2 (Second Priority): Applicants whose parents work at the school (Faculty Students).
- Tier 3 (Catch-all): All remaining students in an Applicant or Application Complete status.
Application Submit Time
In addition to tiers, you can also select the Application Submit Time option when configuring your lottery to accept students in the order in which they applied. Learn more about this setting in the Configuring your Lottery section below.
How to set up your tiers
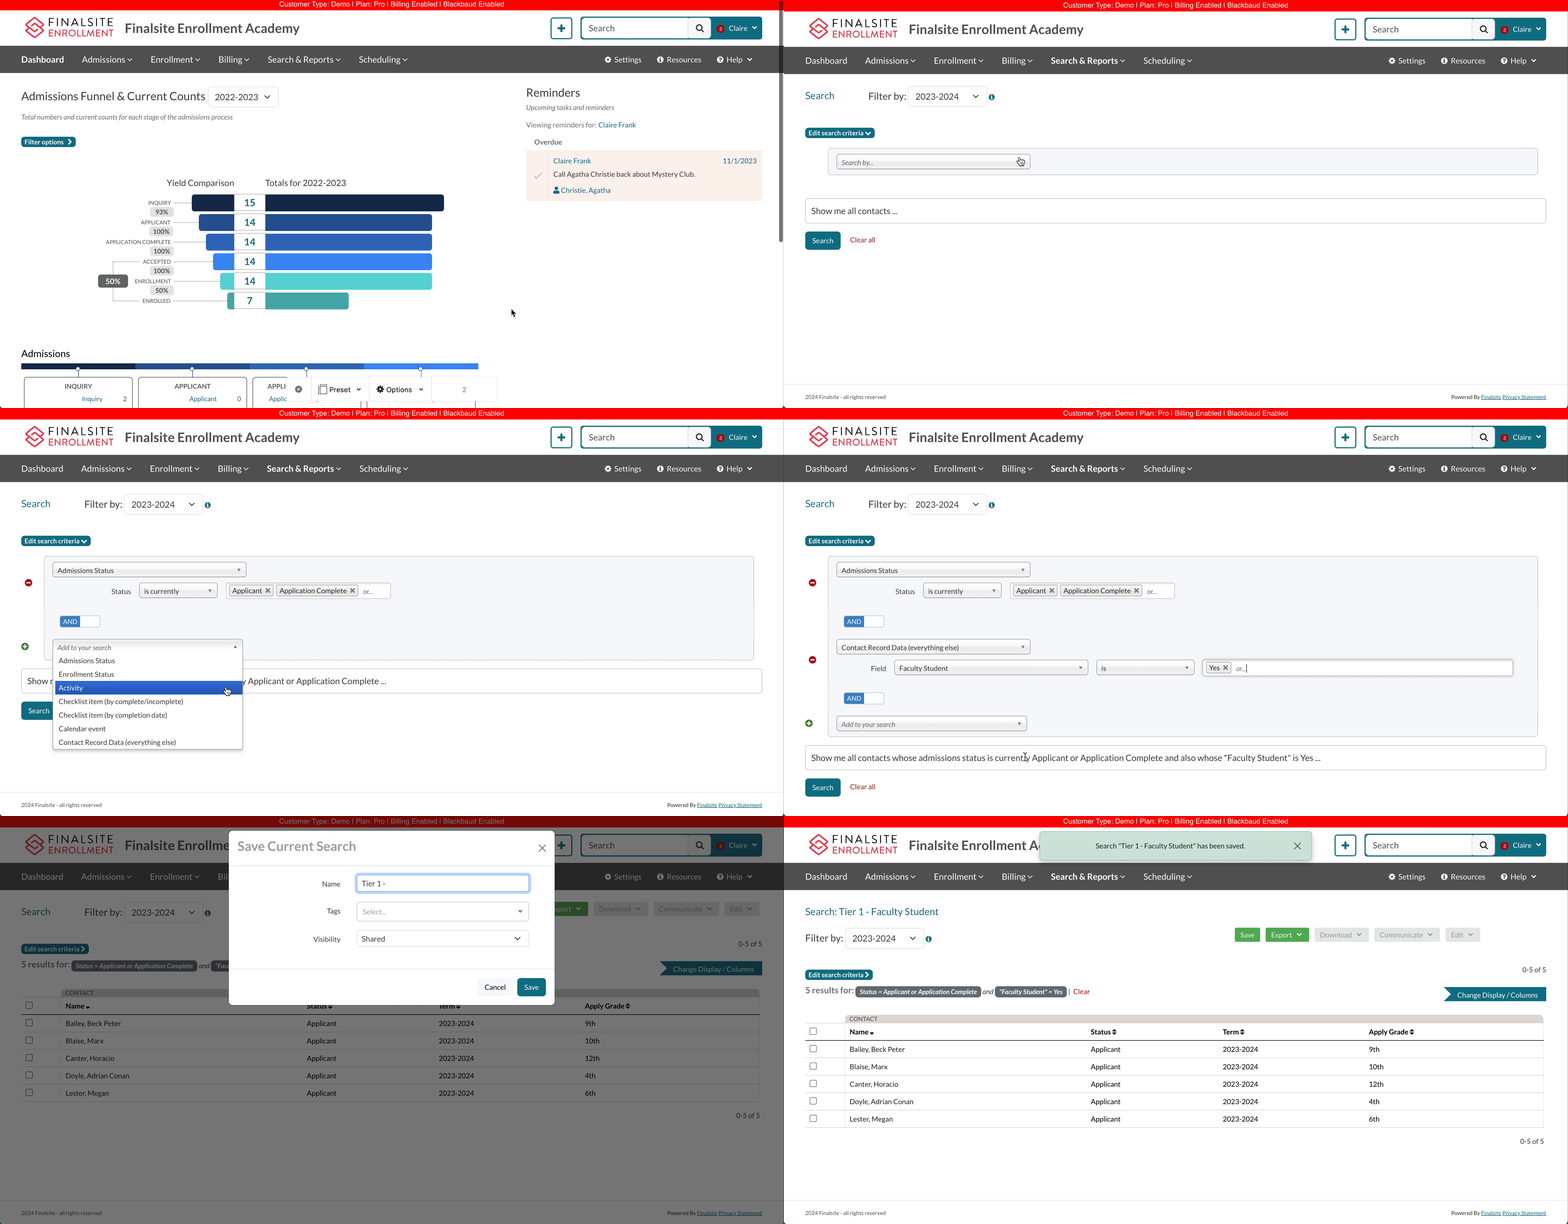
- Navigate to the Search page (Search & Reports > Search)
- Select the correct term for the lottery you plan to run.
- Add Criteria:
- Start by requiring that all students be in an Applicant or Application Complete status. (Students must be in one of these statuses to be eligible for the lottery.)
- Refine the criteria to define your specific priority group (e.g., faculty parents, sibling status). Note: This requires you to have the necessary field set up to differentiate the group.
- Save your Search. Use a clear naming convention, such as Tier 1 - Faculty Student.
Notes about tiers
- The final tier should always be the "catch-all" set to the criteria: status is applicant or application complete.
- Alternatively, you can select the Application Submit Time option when configuring your lottery if you want to accept in the order the applications were received.
- Annual Update: Each year, you must go into your saved tier searches, update the term to the following year, and re-save the search to ensure it pulls the correct group of students for the new cycle.
Configuring your Lottery
To begin, navigate to Settings > Lottery > Lottery and click the Create a New Lottery button.
In the dialog box, you will see the following options.
Understanding the Lottery options
Apply Year
Set the term for which the lottery is being run.
Apply Grades
This allows you to set the apply grade(s) of the lottery you’d like to run. Here you can use the checkboxes to select one grade or multiple grades. If all of your grades need to be selected, you can click the Select All Grades button at the top of the drop-down menu.
LotteryOption1
Add a third criterion (e.g., campus, gender) to partition the lottery. The LotteryOption1 field only appears if you have enabled the Partition lotteries & waitlists by lottery_option_1? option within the Lottery Settings page under Settings > Lottery > Lottery Settings.
Size for Each Grade
After you select the Apply Grades, you will set the number of students you’re going to accept for the Apply Year and Apply Grades selected. You can click the trash can icon to remove the grade from the list. Lotteries will be run starting with the lowest grade first.
Automatically accept siblings?
This allows you to choose how to handle siblings. You can choose from the following options:
- No
- All siblings
- Siblings in the same grade
- Siblings in higher grades
You can learn more about each of these options by visiting the Lottery Basics article.
Important Note
If you select one of the options to auto-accept siblings and you are running a lottery with more than one grade, please note that lotteries will be run from the lowest grade to the highest grade.
If selecting All siblings or Siblings in the same grade, you have the option to also automatically waitlist same-grade siblings together
Lottery Type
Next, you can choose between doing a Tiered Lottery and a Weighted Lottery.
- Tiered Lottery: This allows you to select the tiered searches that the lottery will run off of.
Weighted Lottery: In addition to your tiered searches, Weighted Lottery allows you to set a weight for each tier. The lottery will then create a total weight for each student based on the tiers in which they appear.
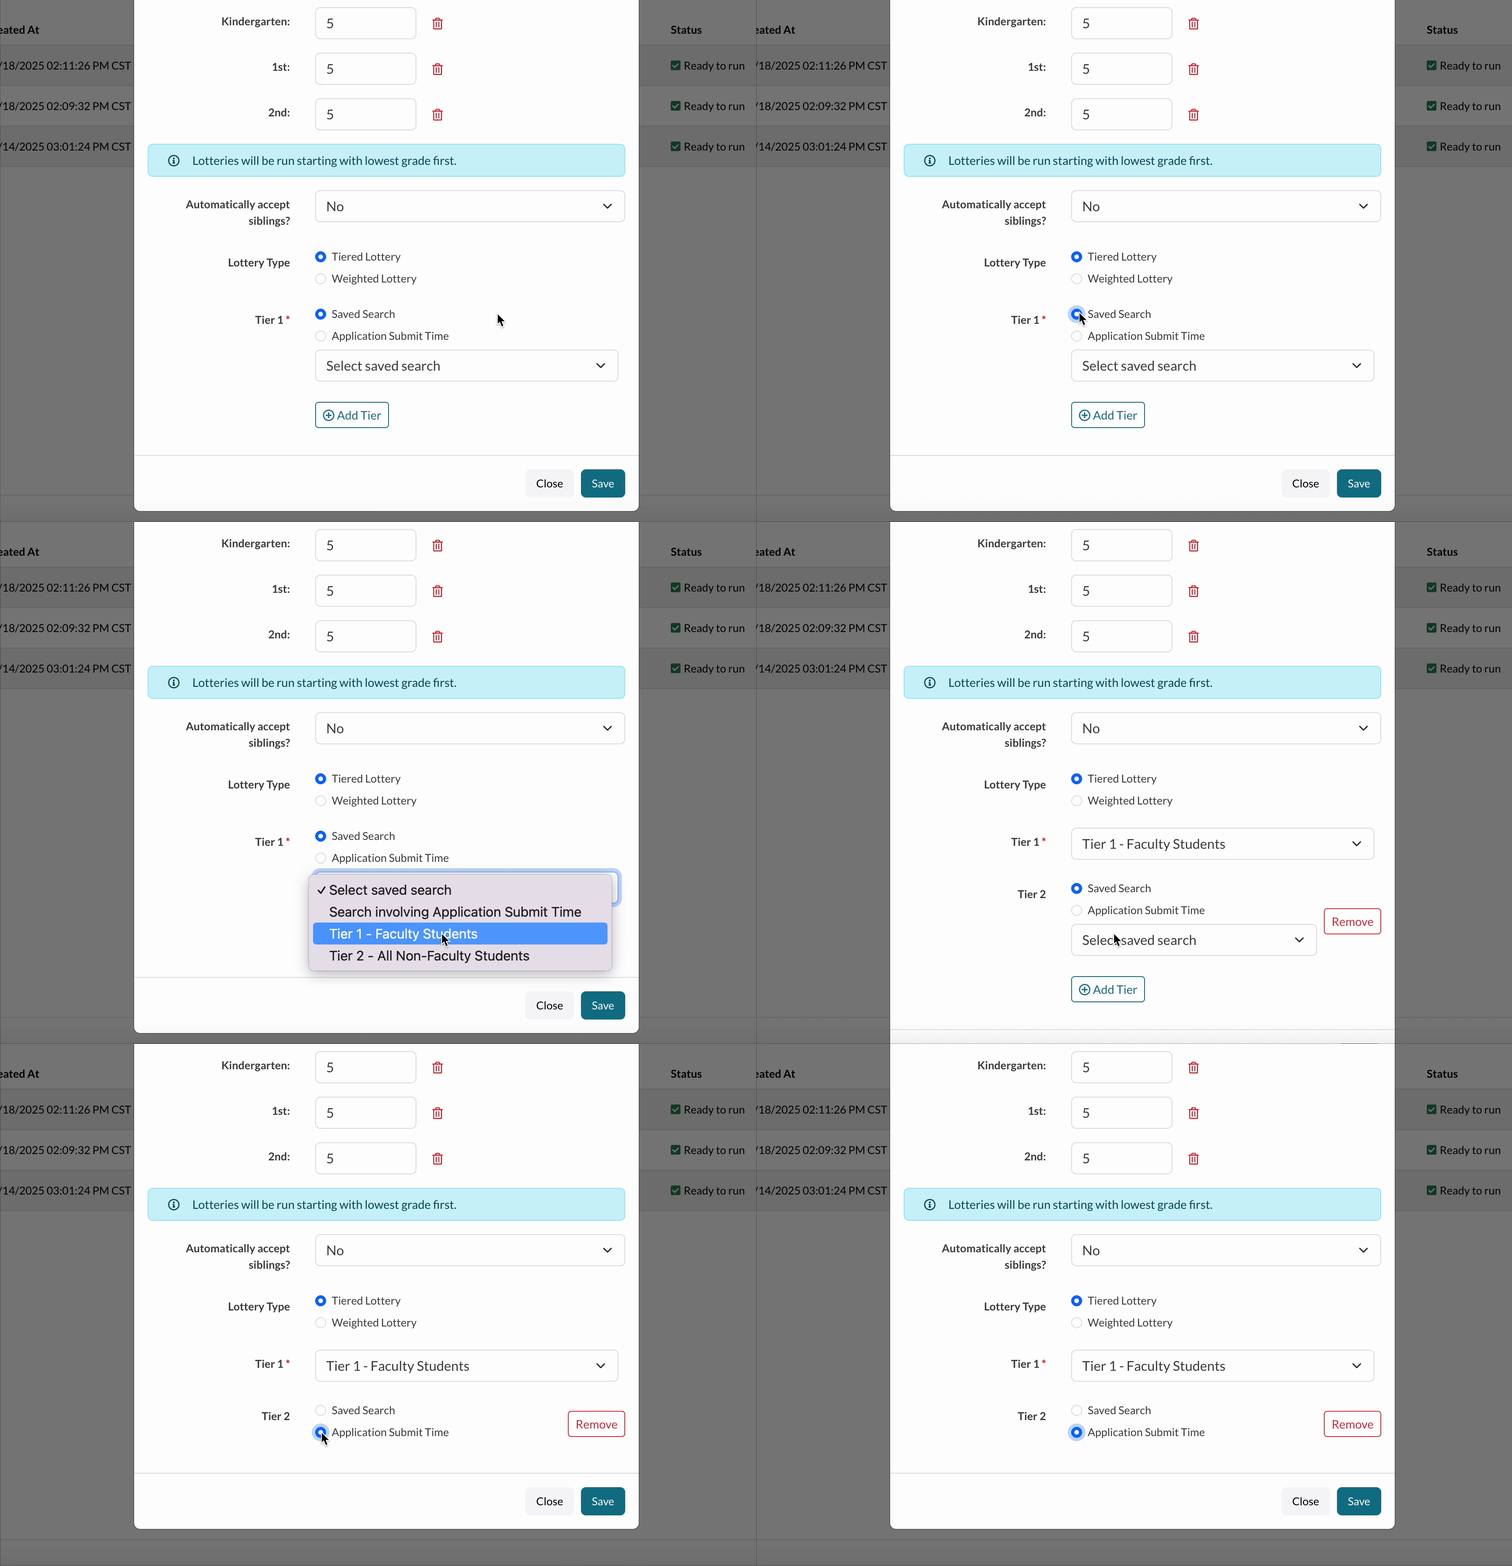
Adding tiers to your lottery
This is where you will add your tiers. Both tier options can be used with Tiered Lottery and Weighted Lottery.
- Saved Search: Select your saved search(es) starting with Tier 1.
-
Application Submit Time: Accept students in the order in which they applied. This option will pull all students with active statuses in the Applicant workflow (including Applicant, Application Complete, Review in Progress, and custom statuses) who have a value in the Application Submit Time field.
- This can be used independently or with Saved Searches, but it can only be added as the last tier in the configuration.
Click + Add Tier to add tiers to your lottery. Click Remove if you add too many tiers.

Is there a limit to how many tiers I can add?
Yes and no. Technically, you'll run into some issues if you try to add more than 30 tiers, but it's rather unlikely that you'd need more than that amount to begin with, so have no fear when selecting your tiers.
Tiered vs. Weighted Lottery configuration
Tier Lottery: Open the drop-down menu for each tier and select the corresponding saved search (e.g., Tier 1, Tier 2, etc.).
Weighted Lottery: You must enter a whole number into the Weight box for each tier, then choose the saved search next to it. This box does not accept decimals.
Testing your Lottery
Once you've set up and saved a lottery, it is required to perform a successful test before running your lottery.
Step 1: Click Test under the Test Actions column
When selected, the system will perform all steps of the lottery except the final step of changing a student's status. There is only one Test button per lottery, so if you are running a lottery with multiple grades, the test will be run for all selected grades.
Testing may take a few minutes to complete, and you will see Test Running in the Status column while the test is being performed. Refresh the page to check the progress of your test.
Once the test is complete, the Status will update to Ready to Run.
Step 2: View your test results
- For single-grade lotteries, you will see a Test Results link in the Test Actions column, which will allow you to view the results for that grade.
- To see your test results for a multi-grade lottery, click the View Results button under the Test Action menu. This will expand the lottery's row and allow you to view the test results by grade. Click Test Results next to the grade to view that grade's results.
Important Notes on Testing
If you need to edit a lottery after running a test, you can update the lottery's settings by clicking the Settings button under the Setup column and then running the test again by clicking the Test button until the Test Action column.
If no changes have been made to a lottery, but you want to re-run the test, you can use the circular arrow icon under the Test Action column to re-run the same test.
Please note: Re-running a test will clear out that lottery's previous test results. If you would like to maintain a history of test results, you will need to recreate the lottery and run a new test.
If you need to delete a saved lottery that you do not want to run, you can click the Delete button on the far right side of the row. You cannot delete a lottery after it has been run.
A test will fail if non-applicant statuses are used in your searches, such as Inquiry and Enrollment statuses. If a test fails, ensure that your searches pull only Applicant and Application Complete statuses. Learn more about statuses in the article Roles & Statuses Explained.
Running your Lottery
When you run a lottery, students are automatically moved into one of two statuses based on the outcome: Accepted and Waitlisted.
A few important reminders:
- Your Waitlist can also be viewed from the Admissions tab (Admissions > Waitlist).
- Custom columns can be added to the Lottery Results page from the List Page Configuration setup page (Settings > General > List Page Configuration).
About Statuses: Accepted and Waitlisted
Neither of these statuses is visible to parents. Here's what the parents will see for both:
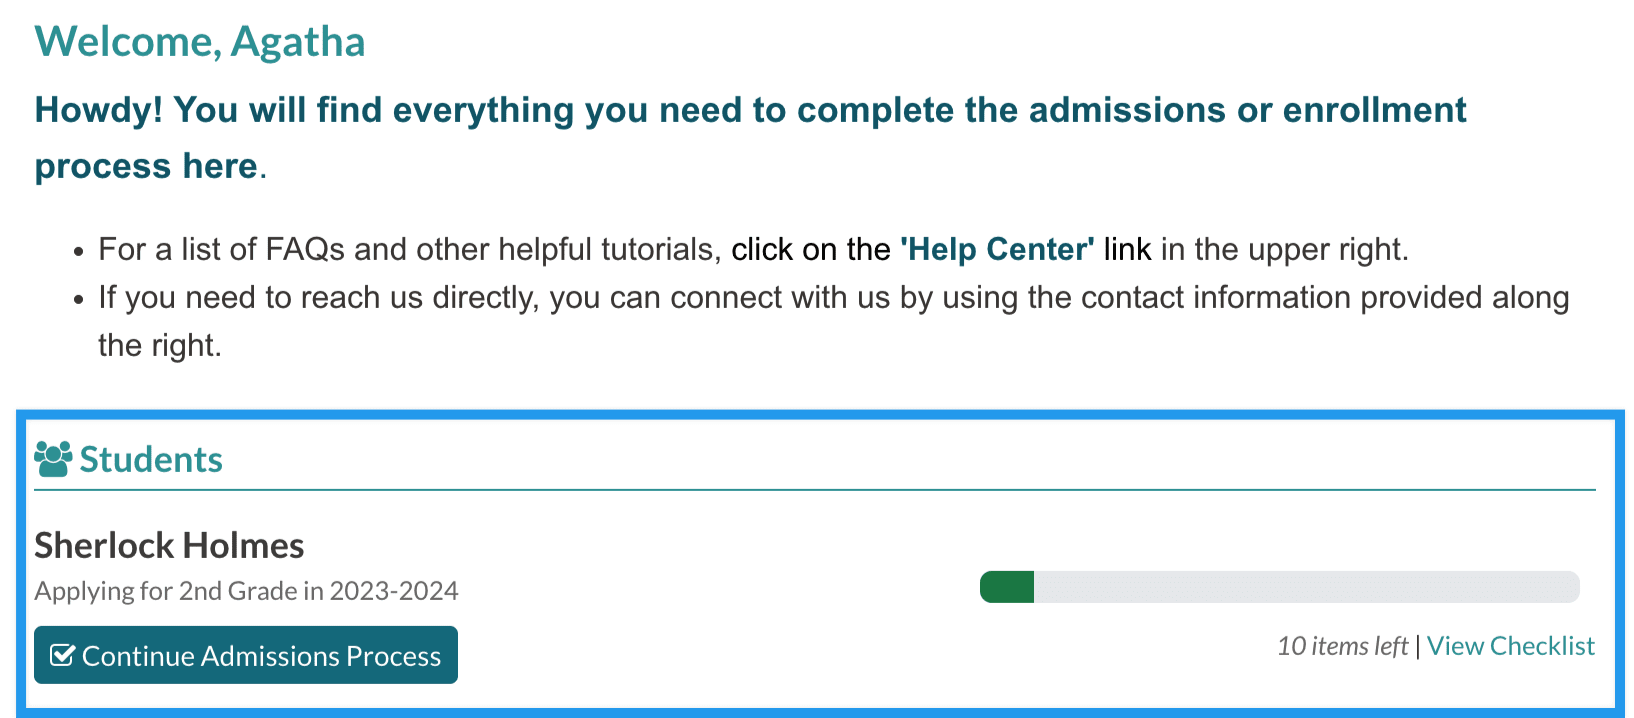
If the parent hasn't completed all of their checklist items:
Parents will see the "Applying for X Grade in [Term]" message and still have access to their checklist.
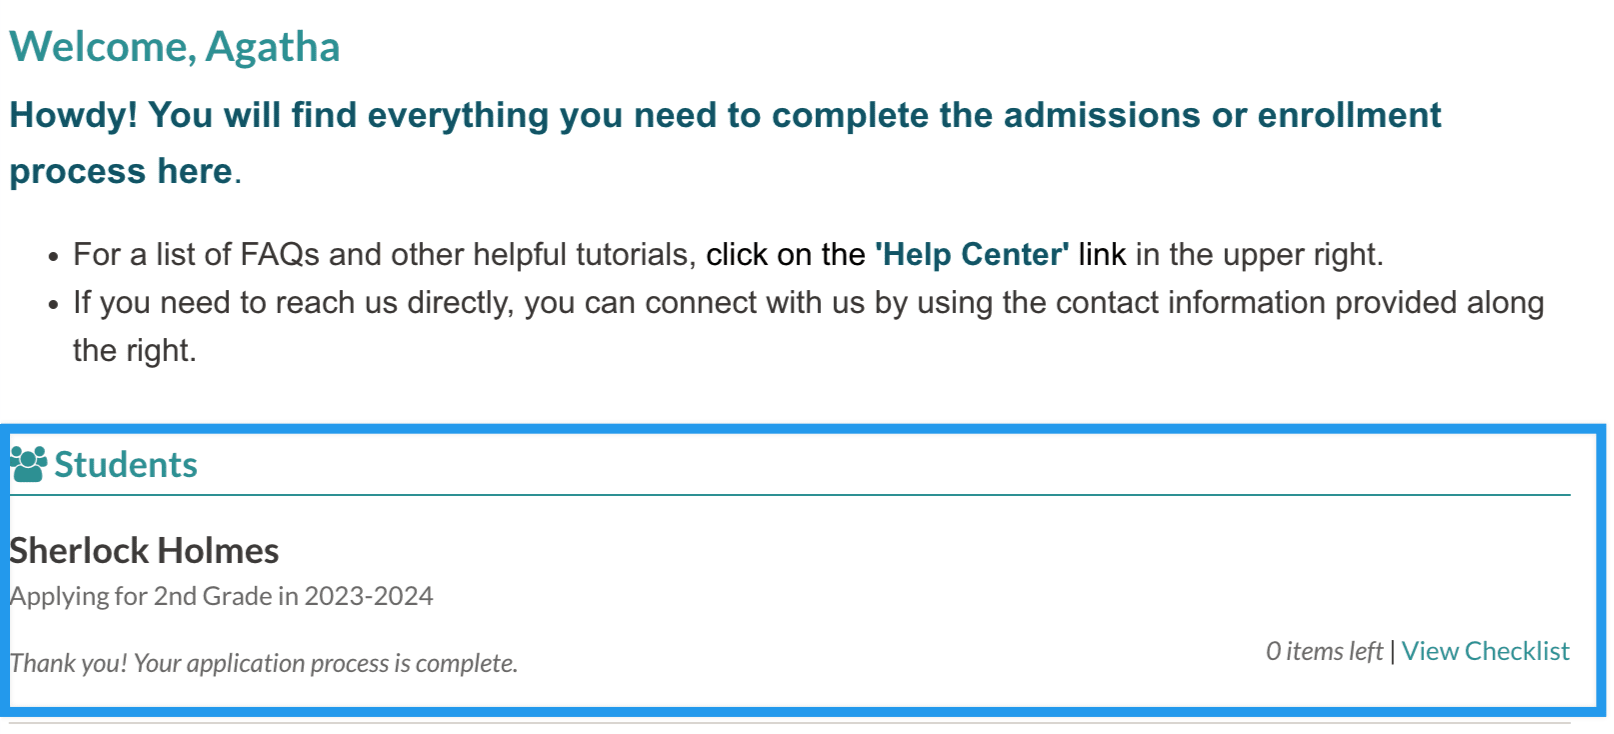
If the parent has completed all of their required checklist items:
The parent will see the "Application Complete" message and still have access to their checklist.
Step 1: Click Run Lottery under the Lottery Action column
There is only one Run Lottery button per lottery, so if you are running a lottery with multiple grades, the lottery will be run for all selected grades.
Once the lottery is finished, the Status will update to Lotteries Finished.
Step 2: View your lottery results
- For a single-grade lottery, you will see a Lottery Results link under the Lottery Action column, which will take you to see the results for that grade.
- For multi-grade lotteries, you will click View Results under the Lottery Action column to expand the lottery's row and view the results by grade.
Click on Lottery Results next to each grade to see which students were moved to Accepted or Waitlisted statuses.
Once you click on Lottery Results, you will be brought to the results screen for that grade. This page will show you how many students were accepted and waitlisted in each tier, the names of the students, and any siblings that were also accepted.
Hidden names and/or birthdates
In the Lottery Settings, you can opt to hide student names and/or birthdates.
If you selected to hide the name, the student's name in the Contact column on the Lottery Results pages will appear blank until you click the Reveal Student Names button above the list.
Presenting your results
Presentation mode allows you to display the presentation for parents or in front of your auditors to give a visual demonstration of the lottery.
- To view the lottery presentation for a single-grade lottery, click the Presentation link in the far-right column.
- For multi-grade lotteries, click View Results under the lottery's Lottery Action column and select Presentation next to the grade you want to present.
Schools operating remotely can run this presentation and then share their screen, so that parents and students can watch over Zoom, Google Meet, etc. Please note: The link to the presentation should not be shared with anyone outside of your Finalsite Enrollment users, as it will prompt them to log in to your Admin Portal upon clicking it.
Once the Acceptance Lottery presentation has played, you will be able to start a Waitlist Lottery presentation.
A few closing notes on the Lottery presentation
- By default, the presentation mode will show each student's name, lottery result, and birthdate. Within the Lottery Settings page, you have the option to hide student names (and replace them with a unique Lottery ID for each student) and/or hide student birthdates when presenting your lottery. Please note: in order for an ID to populate, one must be set up. To set this ID value for students, you can either (1) import it into the lottery_id field, (2) update it manually on the student contact record, or (3) have our Support Team set the field to auto-generate.
- Waitlisted students will have their waitlist position number listed. If the lottery was run as a test lottery, this will be indicated on the presentation mode as well. To change how many rows to display, fade-in/fade-out times, or delays on the lottery presentation, go to your Lottery Settings.


Comments
0 comments
Article is closed for comments.