Overview
When a student leaves the school after enrollment, you can update their records to indicate their withdrawal. This article includes details for both Billing and Non-Billing schools on managing students who withdrew.
In this article
Managing a Midyear Withdrawal Student
Update the Students Status
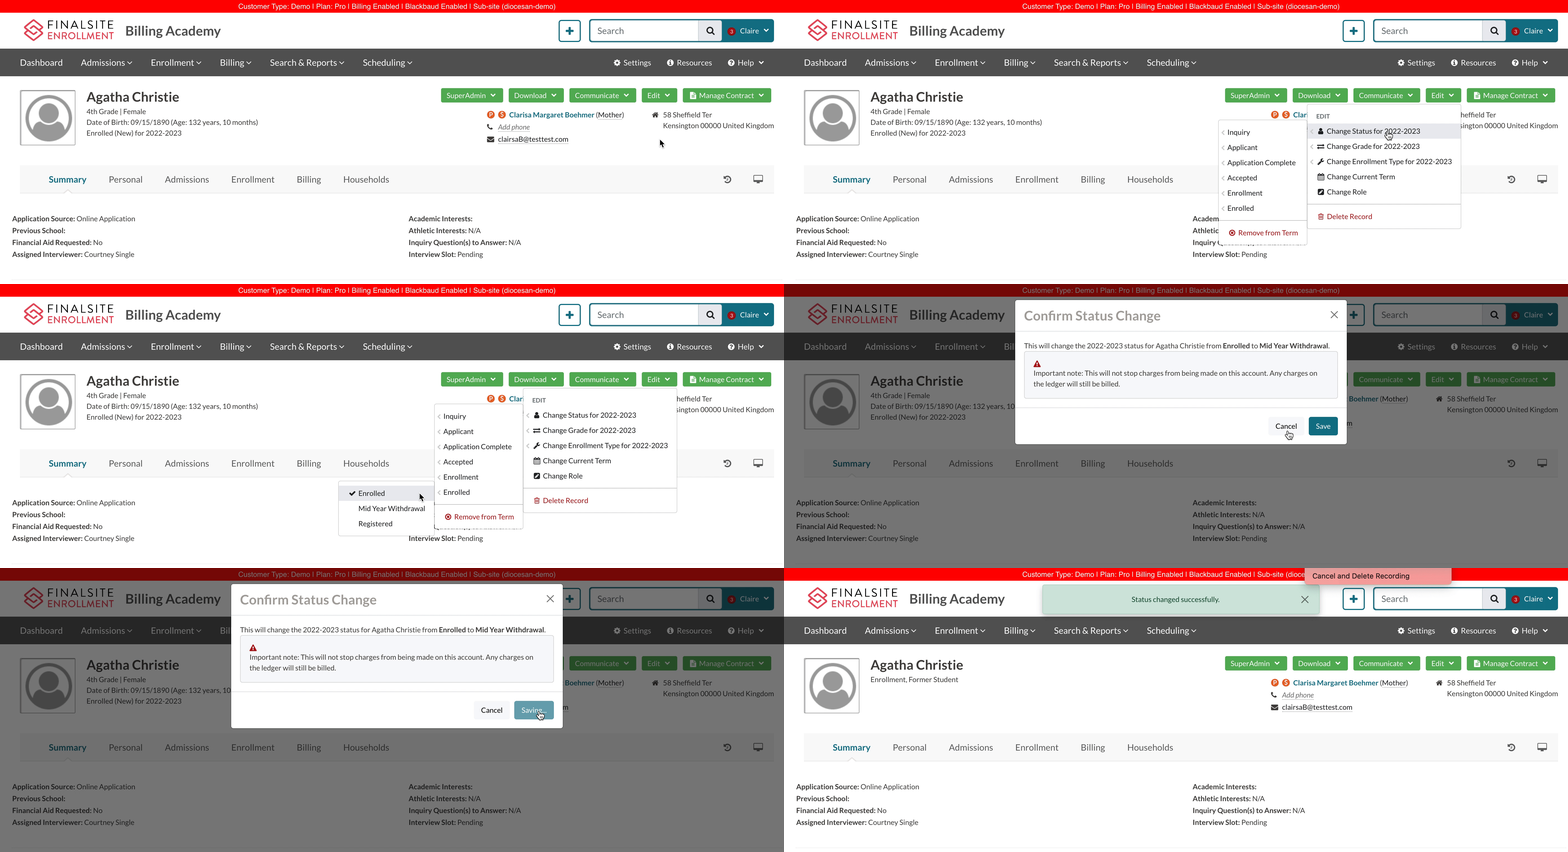
When dealing with a student who has withdrawn, you'll first want to update their status to Mid Year Withdrawal. Here's how:
- Access the student's contact record and click on the Edit button.
- Hover over Change Status for XXXX-XXXX
- Hover over Enrolled
- Select Mid Year Withdrawal
- A pop-up box will ask you to confirm whether or not you want to proceed with the status update. Click Save to confirm.
What Updating the Status Does and What the Parents See
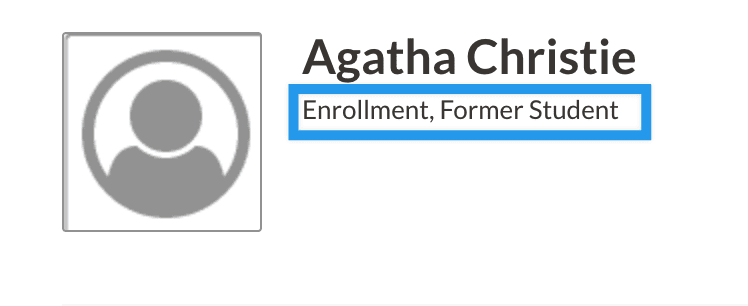
This updates the student's status and assigns them the Former Student role, which means that the student is now considered Out of Workflow. The student will no longer be counted in your Dashboard Funnel or Current Counts.
You can read more about Roles and Statuses within our Roles and Statuses Explained article.
What the Parent sees when they log in:
Parents/Guardians will no longer see the student in the portal and the student's checklist will no longer be available to them when they log in.
Note for Billing Schools
It is important to note that changing the status will not waive the contracted tuition amount or affect the ledger in any way. You can read more about managing this in the next section of this article.
Billing: Ledger Management for Students who Withdrew
Pop some Popcorn!
If you'd like to watch our video on this, you can check that out here, in our video library.
As noted above, updating a student's status to Mid Year Withdrawal does not affect the ledger in any way.
If the parent will be responsible for the remaining charges within their ledger, no action is necessary.
However, if you'd like to forgive the balance of the parent/guardian, you will need to make adjustments to their ledger. There are three ways to approach this, each is outlined below.
Important
When forgiving balances with one of the methods below, please consider the following note:
When forgiving the remaining balance of a parent, it should ideally be at zero, not in the negative (aka credit balance). If the parent has a balance or credit balance, they’ll still receive billing communications.
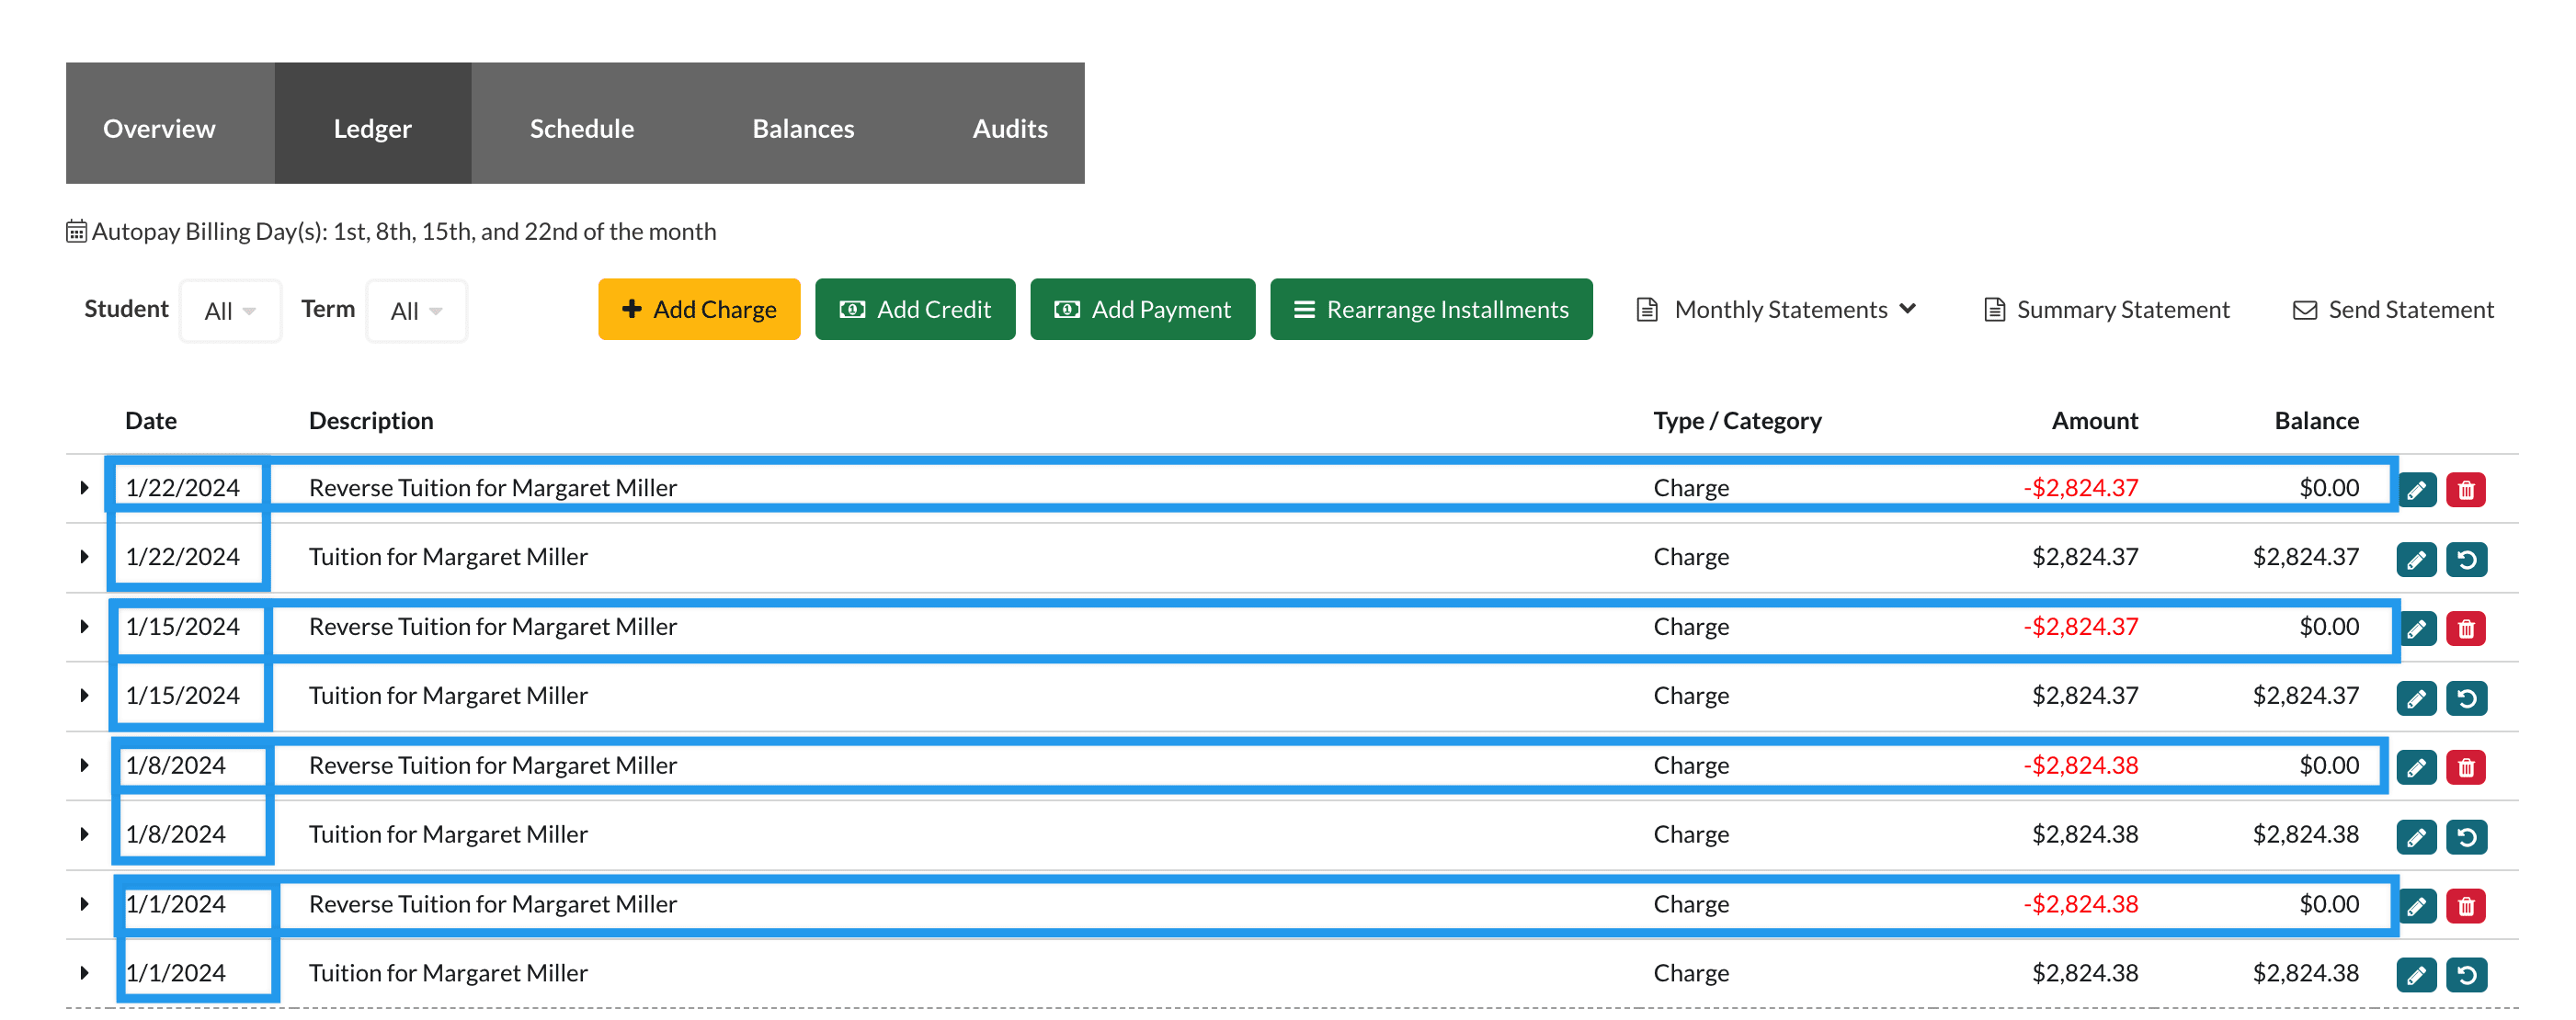
To accomplish this, it's vital for each upcoming month to have a zero balance. See this example image below. Each month in the parent's remaining financial obligations has a zero balance. This is what you want.
Reverse Charge
Use the Reverse Charge button within the ledger to reverse outstanding contract charges. Then, you can use the trashcan icon to delete any outstanding manually added items.
Step 1: Reverse the Contract Charges
Use the reverse button on the right side of each contract fee to reverse the charge. Refer to the Reverse Charge section of the Billing: Add Charge article for step-by-step details or practice below with the interactive tutorial.
Here's an interactive tutorial
** Best experienced in Full Screen (click the icon in the top right corner before you begin) **Step 2: Remove manually added Charges
Because the reverse button is only available for use with charges that came from the contract, you'll also need to manually adjust any remaining charges in order to bring the account to a zero balance.
To accomplish this, you can use the red trashcan icon to delete the remaining outstanding charges.
A few notes:
Use caution when deleting items. Take care to ensure that you are only deleting outstanding charges. The goal is to bring the account to a zero balance, so, you can leave charges that already have matching payments as is.
If you delete an item by mistake, you can restore it on the Audit tab. Please review our Billing: How To Restore a Deleted Ledger Item for more insight or try it for yourself in the interactive tutorial below.
Here's an interactive tutorial
** Best experienced in Full Screen (click the icon in the top right corner before you begin) **Rearrange Installments + Reverse Charges
Step 1
Use the Rearrange Installments button to combine the remaining charges into the smallest number of payments allowed.
Here's an interactive tutorial
** Best experienced in Full Screen (click the icon in the top right corner before you begin) **Step 2
Use the Reverse Charge button to individually reverse all contract charges that the family is no longer responsible for.
Here's an interactive tutorial
** Best experienced in Full Screen (click the icon in the top right corner before you begin) **Step 3
Delete any manually added charges that the family is no longer responsible for. To accomplish this, you can use the red trashcan icon to delete the remaining outstanding charges.
Here's an interactive tutorial
** Best experienced in Full Screen (click the icon in the top right corner before you begin) **Additional Resources:
To read a step-by-step guide of using the Rearrange Installments feature, please check out this article.
Refer to the Billing: Add Charge article for step-by-step details on how to use the Reverse Charge button.
Zero out Contact
This option is built into the Add Charge and Add Credit ledger buttons. When selected it zeros out the entire balance of the contact.
Important
This option is not recommended unless you have an equal distribution of expenses across all months or if you are able to Rearrange the Installments of the contract into one lump charge as mentioned in Option 2.
The effectiveness of this option relies on the parent owing the exact same amount for each month. If the amounts owed vary, the system will be unable to evenly divide the total, resulting in the parent receiving billing communications implying they still have outstanding payments.
If the parent does not owe the exact same every month (or you were not able to lump the charge into one installment, it is not recommended to choose this option.
If you aren't sure, go through the steps to Zero Out the Contact and, on the preview page, if the amounts divided are not exactly matching the charges of each month on the ledger, then choose one of the other options.
Zero out Contact
This option zeros out the remaining balance of an account ledger.
You'll see the Zero out Contact option in both the Add Charge and Add Credit options. It functions the same regardless of which option you use to apply this.
Selecting Zero Out Contact adds a negative charge for the amount outstanding in order to bring the amount owed to $0.
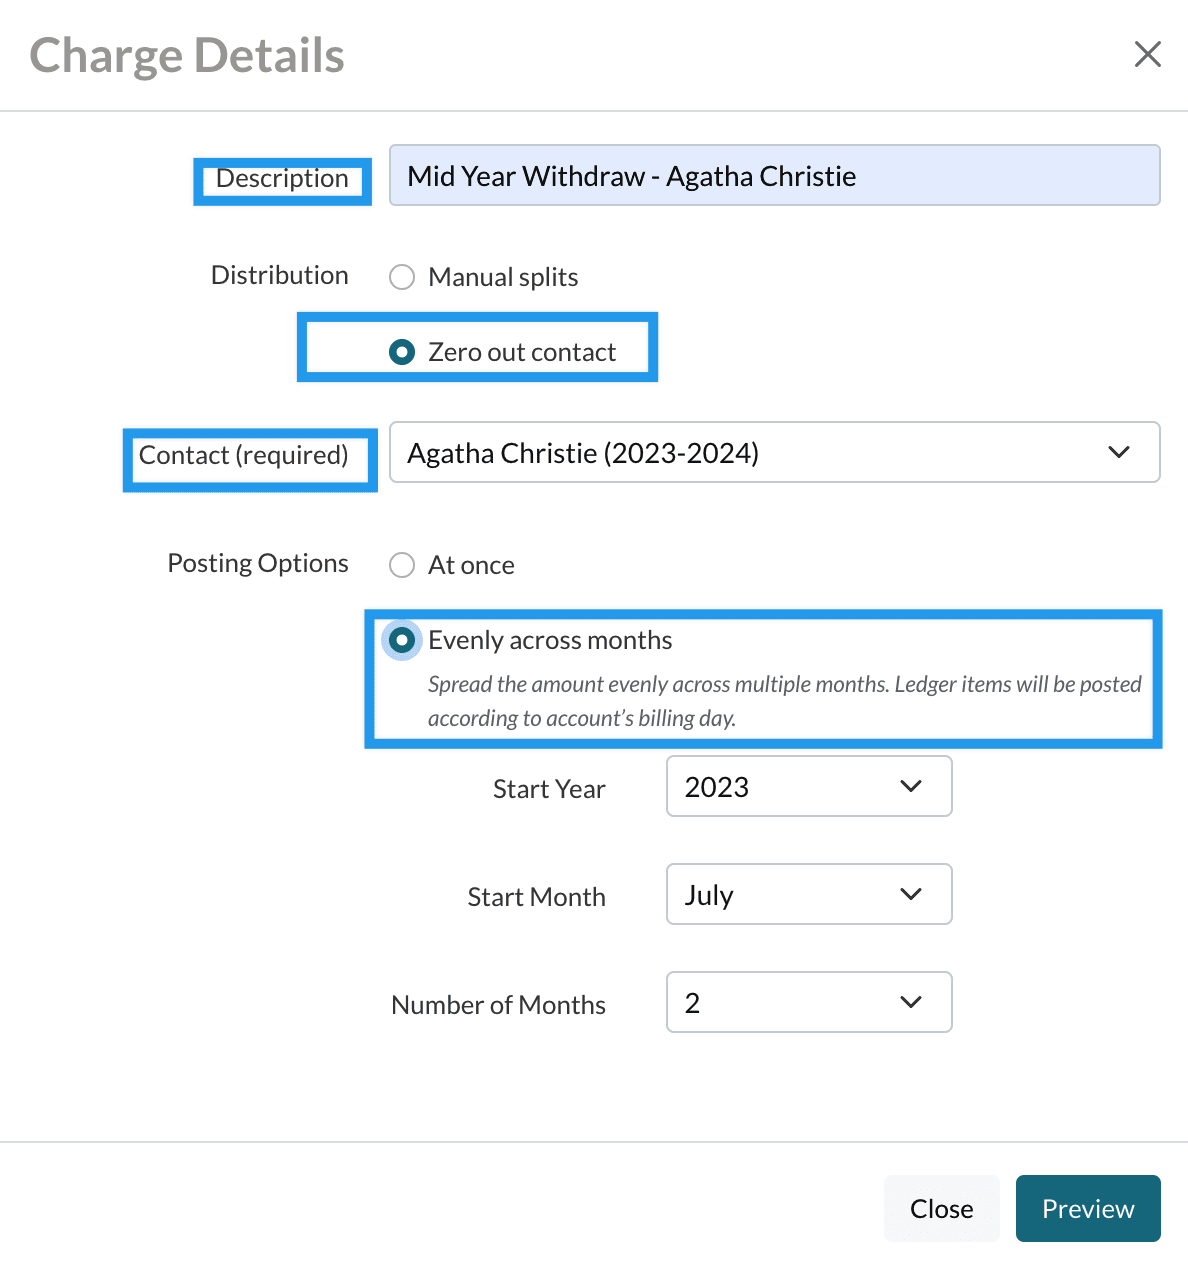
Once you have set a Description and selected Zero Out Contact for the Distribution, you will complete the following options.
Contact: Select the contact/term you'd like to zero out.
Posting Options: When zeroing out a contact, we recommend choosing the Evenly Across Months option.
Keep the Start month set as the current month and set the Number of Months to the number of months remaining on the family's ledger. Select Preview to review.
Select Previous to go back and make changes.
Select Edit Splits if you need to make any changes to the breakdown.
Select Confirm to approve the reversal and add it to the ledger.
Remember, if you zero out the contact and you see a balance owed each month you should delete the withdrawal items from the ledger and go with one of the other options. Even though the family is at a zero balance, they will continue to receive communications if their ledger shows an amount owed each month.
Try this out with an interactive tutorial below


Comments
0 comments
Article is closed for comments.