Overview
Text messages can be sent individually in the contact record or in bulk from a list page. Message content can be customized for one-time use or pre-defined text message templates can be used for bulk communications.
Please note the following important information with regards to text messaging:
-
Text Message Recipients: Text messages will ONLY be sent to phone numbers labeled with the 'Cell' phone type in the system. You can set this phone type as a default field value in your forms if it's helpful for your process.
-
International Phone Number Support: Currently, text messages can be sent to Canadian phone numbers. Other international numbers are NOT currently supported and will not be received.
-
Intended Use & Disclaimer: Finalsite Enrollment text messaging is NOT designed to be used for emergency alerts or crisis management. Please review the full Text Messaging Intended Use & Disclaimer information below.
-
Availability: Text messaging is only available to schools on our PRO plan.
Click to jump to a specific how-to section:
--
Text Messaging Intended Use & Disclaimer
Finalsite Enrollment's text messaging system is designed for parent communication within the inquiry, admissions, and enrollment process.
Finalsite Enrollment text messaging is not designed or intended to be used as part of an emergency alert or crisis management system.
Emergency and crisis management systems should include multi-channel communications such as text, voice, email, social media, website, and push notifications along with the appropriate delivery SLAs (such as delivery of notification within X number of minutes). Depending on the needs, it may also include check-in response features.
--
How-To: Send Text Messages
The process for sending text messages is similar whether sending an individual, one-off message, or sending multiple messages in bulk. If you frequently send emails through Finalsite Enrollment, these steps should be familiar as they are very similar to the send email process.
-
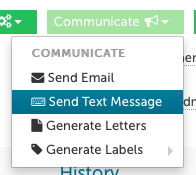
To send an individual text message, navigate to the contact record for the student or parent/guardian you want to receive the message. Then, click on the green Communicate menu in the upper right and select Send Text Message.
-
To send a message in bulk, go to a search or list page, apply any filters as needed, and then select the desired contacts by checking the box next to their name. Then, click on the green Communicate menu in the upper right and select Send Text Message.

Once you have selected this option, the Send Text Messages window will appear, and you can follow the workflow to select your recipients and message content, as described below.
--
Selecting Recipients
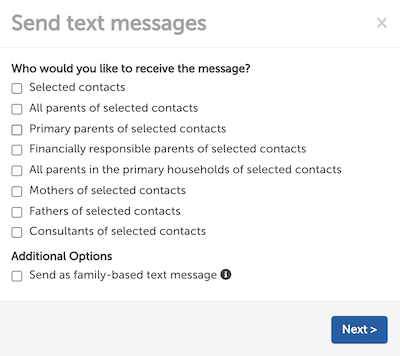
On the first page of the Send Text Messages window, you will select who you want to receive the text message. There are multiple recipient options, as described below. Please note: Recipients will only receive a single text message if they are in multiple groupings. For example, if you select all parents of selected contacts and primary parents of selected contacts, the primary parent will only receive the text message once.

-
Selected contacts - This will send a text message to the contacts selected on the list page/search or the contact record you are currently viewing. This can be used to send text messages directly to students, if they have a cell phone number set.
-
All parents of selected contacts - Includes anyone with a parent, mother, or father role. This means it will include any aunts, uncles, and grandparents who have these role assignments.
-
Primary parents of selected contacts - Refers to the parent or guardian with the primary parent flag set (noted as the orange 'P' icon to the left of their name) on the student's contact record.
-
Financially responsible parents of selected contacts - Refers to any contact with 'Financially Responsible' set to Yes within the Parent Portal Access page of the student's contact record.
-
All parents in the primary households of selected contacts - Includes anyone with a parent, mother, or father role in the primary household only. You can review who is in the primary household for a student by visiting the Household Details page on their contact record.
-
Mothers of selected contacts - Refers to any contact with the 'mother' relationship set. This will also include any aunts, step-parents, and grandparents who may have the 'mother' relationship set.
-
Fathers of selected contacts - Refers to any contact with the 'father' relationship set. This will also include any uncles, step-parents, and grandparents who may have the 'father' relationship set.
-
Consultants of selected contacts - Includes all consultants tied to the student's record.
On this page, you can also choose whether or not you want to send it as a family-based text message by checking the box. Family-based texts will only be sent once to each contact, even if they are responsible for multiple students within the selected search or list page.
After you've made your choices, click the blue Next button.
--
Editing Text Message Content
On the second page of the Send Text Messages window, you will see a stripped-down version of the template editor. Please note: HTML formatting (e.g. bold or color text) does not work in text messages, so be mindful when copying content from another source, such as emails. Merge tokens DO work in text messages, which is useful if you want to address the student or parents, plug in your school's contact information, etc. You can insert merge tokens using the picker provided (directly above the main content box in the template editor).

If you have a previously created text message template, you can select it here using the 'Insert Template' drop-down menu. Otherwise, you can write a custom message from scratch directly in the editor.
A best practice is to let your recipients know that replies to the message will not be received. You can also include commands for them to opt out or opt back into your messages. The list of standard commands for opting in and out are included in the 'Parent Subscription' section of the Text Message Overview article.
After you've added your desired message content, click on the blue Next button.
--
Previewing & Sending a Text Message
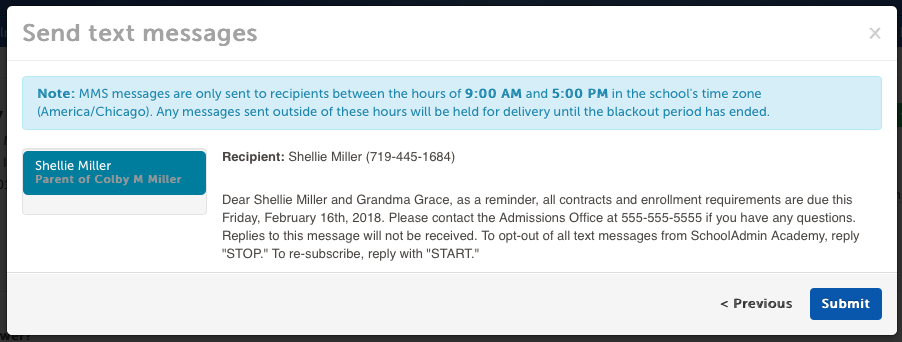
On the final page of the Send Text Messages window, you will be able to preview your text message before sending it. All merge tokens will be populated with the appropriate data, so you can see exactly what the recipient will see when they get that text message on their phone.
A note will display at the top of this page indicating the send window for your communications. It states that any messages sent outside of these hours will be held for delivery until the blackout period has ended. The send window hours can be adjusted from Settings - Communication - Text Messaging Setup.

REMINDER: Text messages will ONLY be sent if there's a cell phone listed for the recipient(s) selected.If your selected contacts do not have a cell phone number in the system, they will not be able to receive your text message.
After previewing your text message and confirming that it looks the way you want, click the blue Submit button to send the text message to your selected recipients.

The system will confirm how many recipients the message was sent to. Click the Done button to exit. You can monitor the delivery status of your text messages from within Settings - Communication - Text Message History.
--

Comments
0 comments
Article is closed for comments.