Overview
Throughout the enrollment process, it’s important that you know how to create custom searches and reports so that you can access the data you’re collecting from enrolling families. This article provides a variety of sample searches that you can use and tailor to your specific process. Please keep in mind that your fields may vary from the examples provided below, and you may have additional fields of data that you’d like to include when building your search. All searches should be saved for repeated use, and may also be exported to Excel to format your data into other forms (e.g. calculations and visual reports).
Use the links below to jump directly to a specific search example:
How-To: Run a Custom Enrollment Search
To get started with any of the search examples provided below, click on the Search & Reports tab at the top of your Finalsite Enrollment site.
Number of New and Returning Students by Grade
To see a total count of your new and returning students by grade level for the current enrollment year or years prior, you can create a summary report.
1. Set the Term (school year) to filter from the drop-down menu at the top of the search page.
2. Add the following to your search criteria: 'Enrollment Status' - 'New & Returning' - 'is currently' - 'Enrolled'. Then, click the blue Search button.
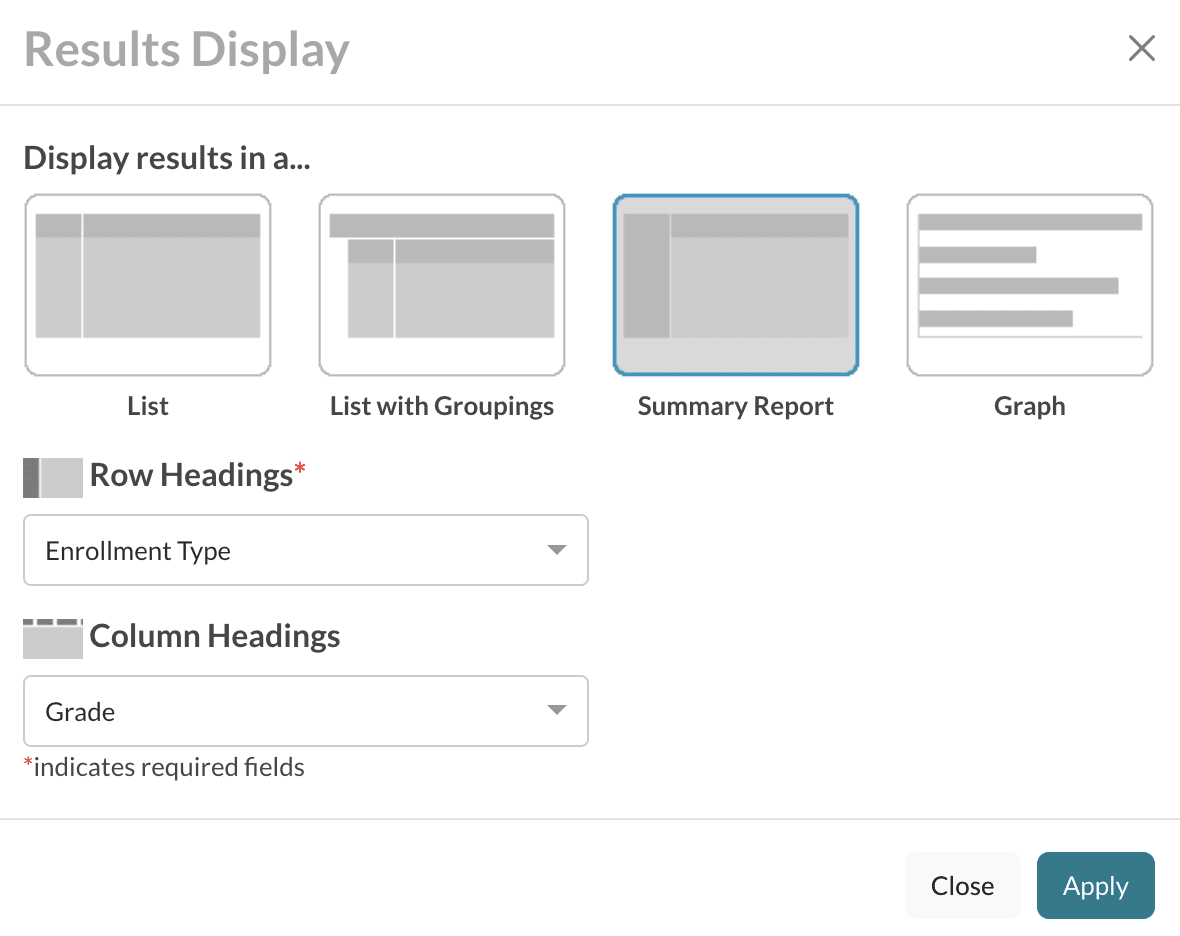
3. Once the search results have loaded, click on the blue Change Display/Columns button in the upper right of the page and select the Summary Report option.
4. Set Enrollment Type as the row heading and Grade as the column heading. If you want a total count of just one of these criteria, you can set it as the row heading and leave the column heading blank.
5. Click the blue Apply button to confirm and you will see your summary report!
Completed Contract
To look for all students in enrollment with a completed contract, you can run the following report.
1. Set the Term (school year) to filter from the drop-down menu at the top of the search page.
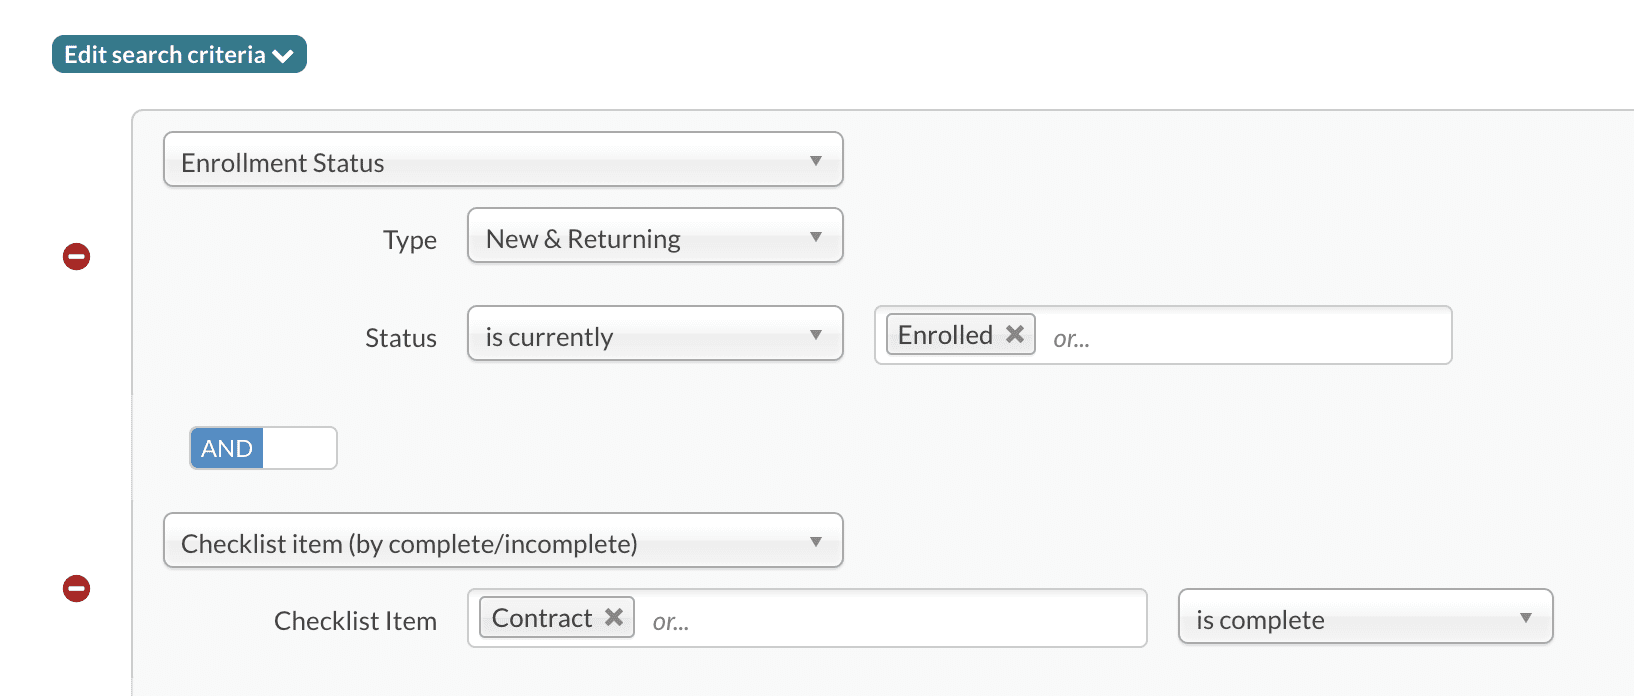
2. Add the following to your search criteria: 'Enrollment Status' - 'New & Returning' - 'is currently' - 'Enrollment in Progress'. Then, click the blue Search button.
3. The contract is an enrollment checklist item, so add the following to your search criteria: 'Checklist item (by complete/incomplete') - 'Contract' (or registration form, depending on what your school calls it) - 'is complete'.
Completed Contract, Incomplete Deposit
Maintaining a list of families that have submitted the contract but have not yet paid their deposit makes it easy to send follow-up communications in bulk to remind parents/guardians that the deadline is approaching.
1. Set the Term (school year) to filter from the drop-down menu at the top of the search page.
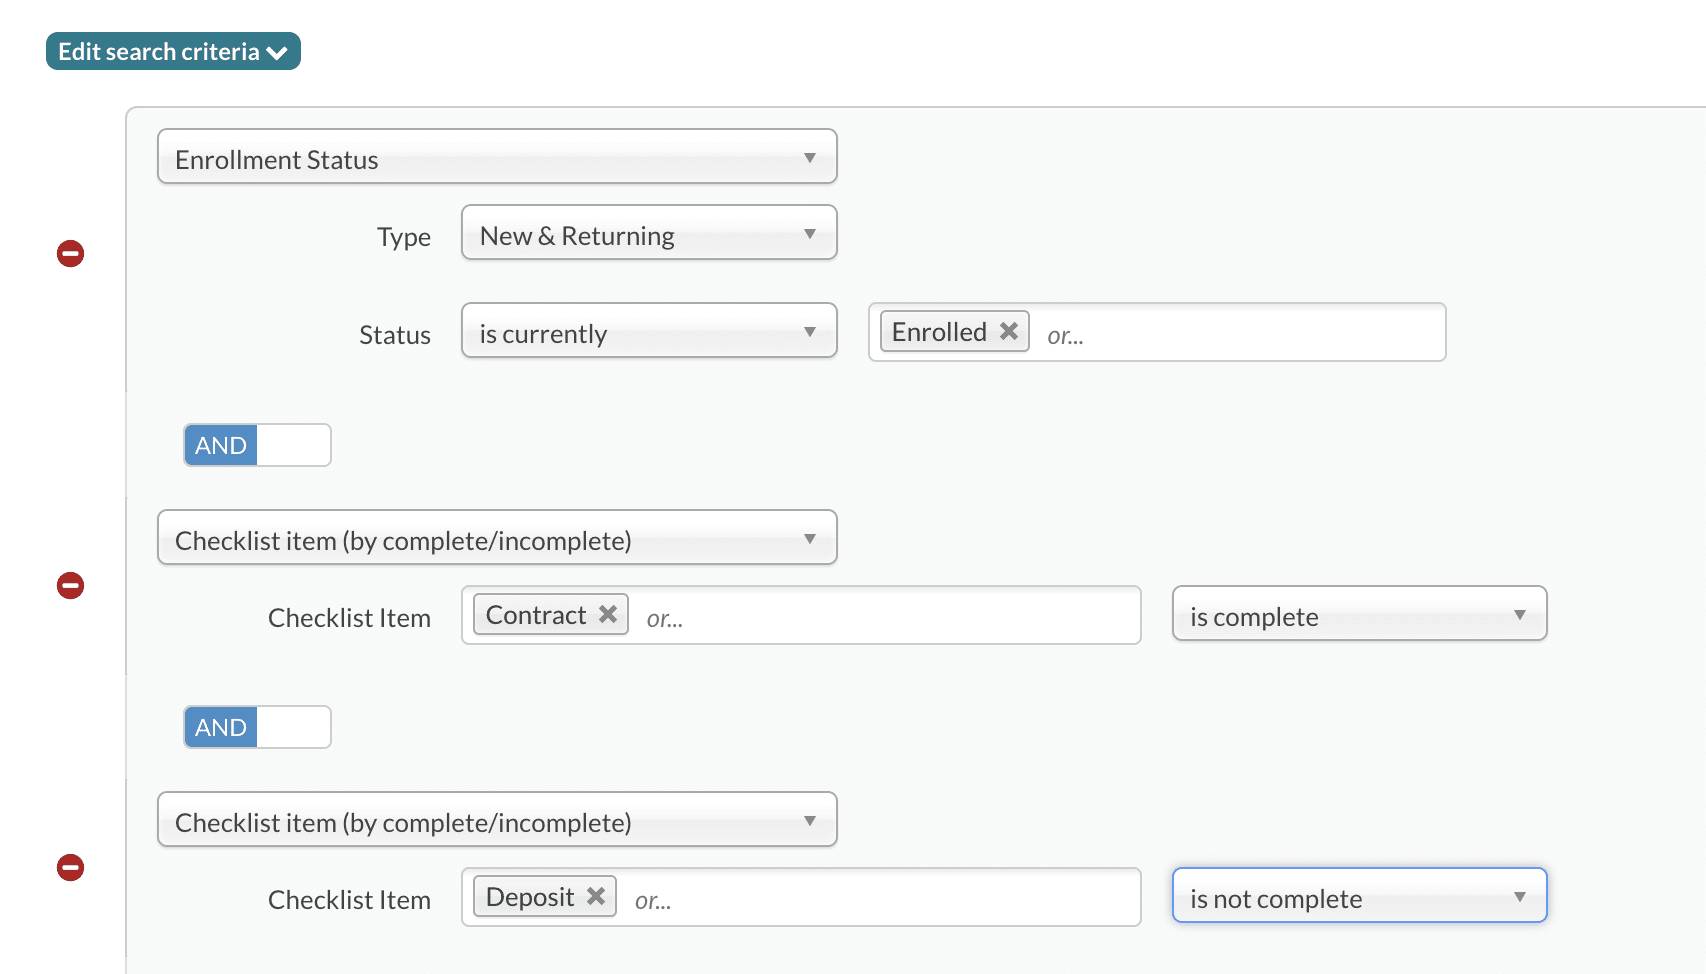
2. Add the following to your search criteria: 'Enrollment Status' - 'New & Returning' - 'is currently' - 'Enrollment in Progress'. Then, click the blue Search button.
3. The contract is an enrollment checklist item, so add the following to your search criteria: 'Checklist item (by complete/incomplete') - 'Contract' (or registration form, depending on what your school calls it) - 'is complete'.
4. The deposit is also an enrollment checklist item, so add the following to your search criteria as well: 'Checklist item (by complete/incomplete') - 'Deposit' (or registration fee, depending on what your school calls it) - 'is not complete'.
Completed Contract, Incomplete in FACTS
Maintaining a list of families that haven’t logged in and finalized their FACTS agreement via the Finalsite Enrollment checklist item makes it easy to send follow-up communications in bulk to remind parents/guardians that the deadline is approaching. Please note: This only applies to schools using the FACTS Integration.
1. Set the Term (school year) to filter from the drop-down menu at the top of the search page.
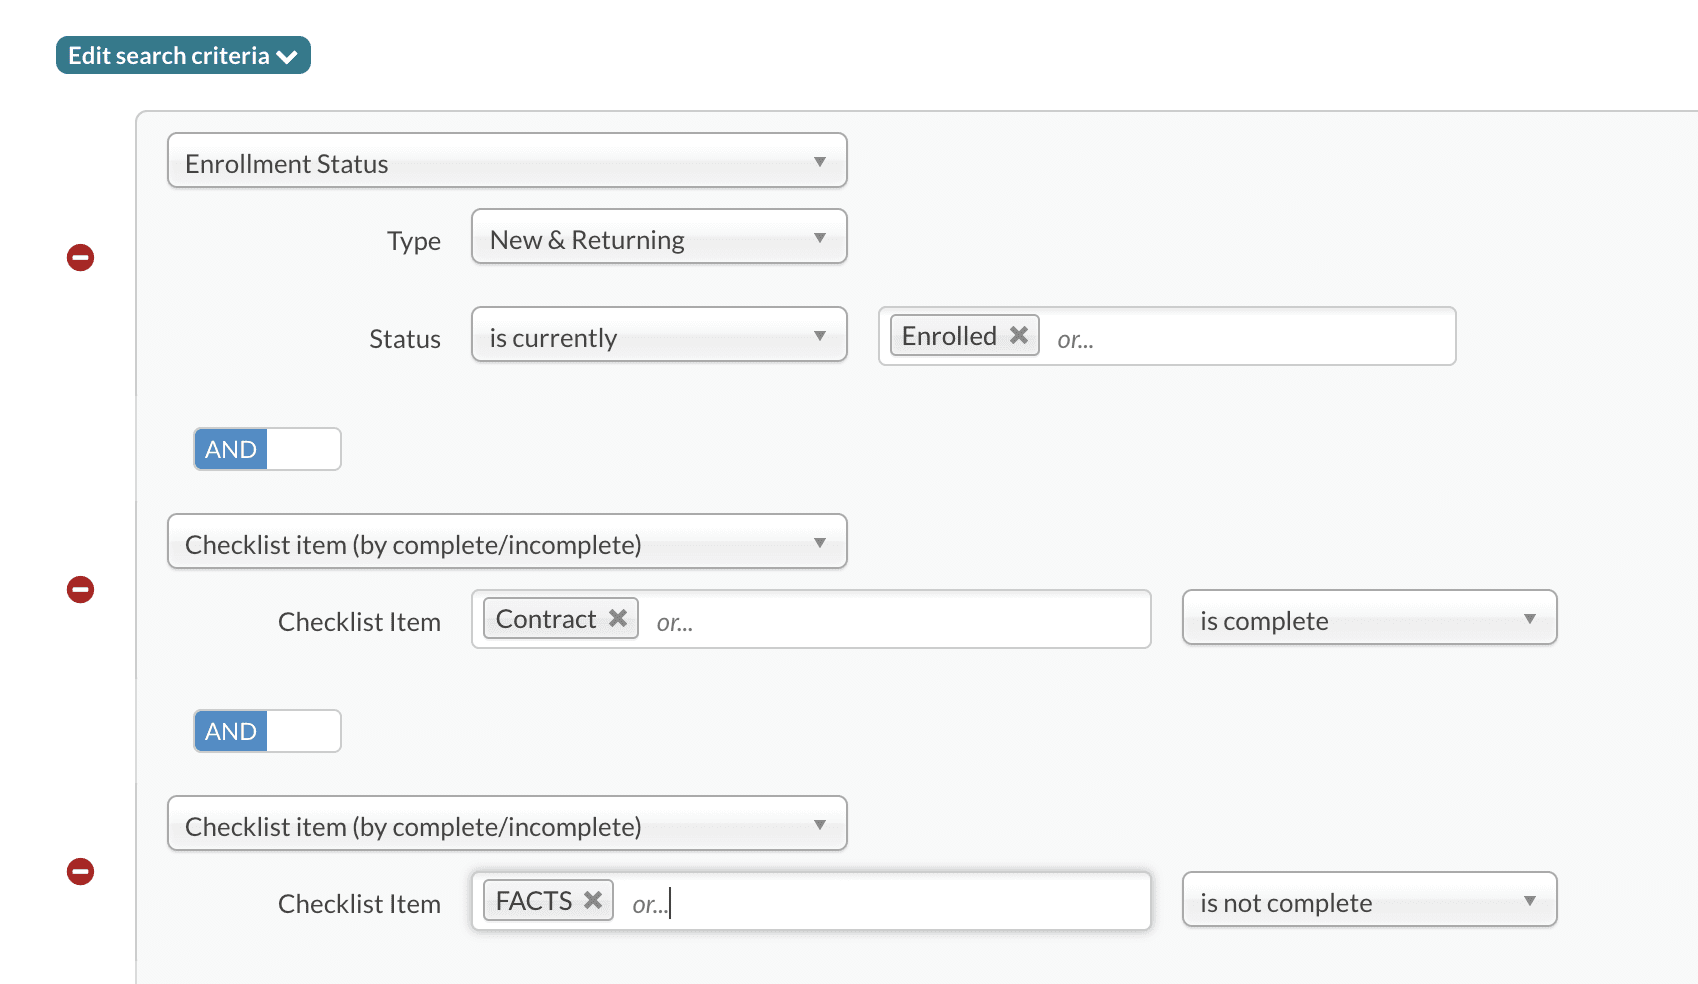
2. Add the following to your search criteria: 'Enrollment Status' - 'New & Returning' - 'is currently' - 'Enrollment in Progress'. Then, click the blue Search button.
3. The contract is an enrollment checklist item, so add the following to your search criteria: 'Checklist item (by complete/incomplete') - 'Contract' (or registration form, depending on what your school calls it) - 'is complete'.
4. FACTS is also an enrollment checklist item, so add the following to your search criteria as well: 'Checklist item (by complete/incomplete') - 'FACTS' - 'is not complete'.
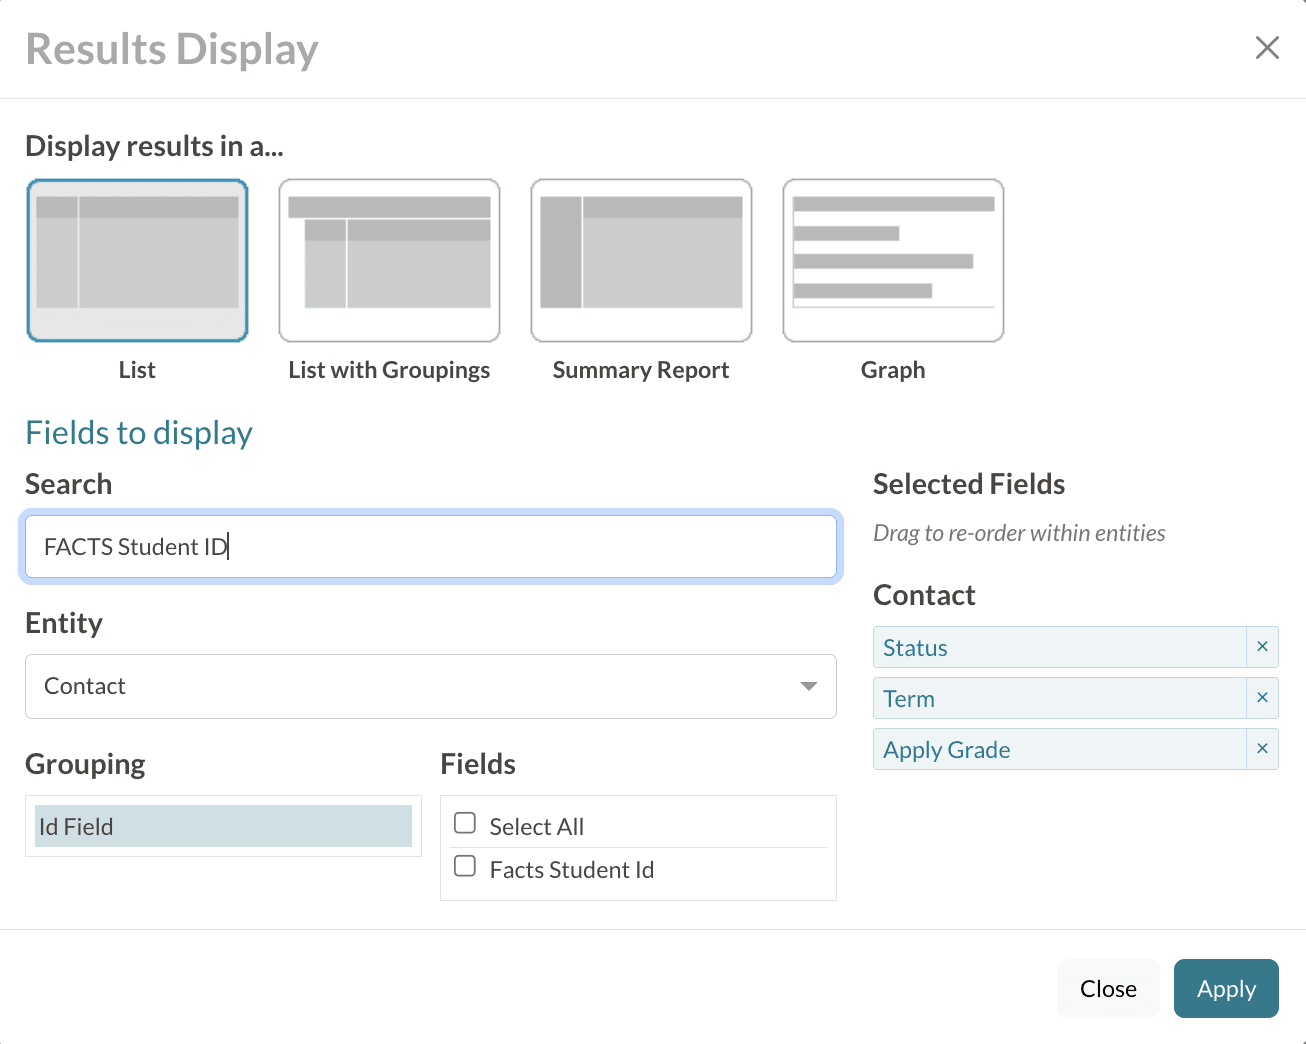
Once the search results are pulled up, you may want to add the student FACTS IDs as a column on the search. To do this, click on the Change Display/Columns button in the upper right of the page.
Locate the FACTS Student ID field within the Search Fields list by searching for "FACTS Student ID". Then, click the Apply button to add this column to your search.
Contract Amounts
To see the details of your student’s contracts such as amounts paid, applicable fees, and payment plans in bulk, you can create a customized report with this information included as columns.
1. Set the Term (school year) to filter from the drop-down menu at the top of the search page.
2. Add the following to your search criteria: 'Enrollment Status' - 'New & Returning' - 'is currently' - 'Enrollment in Progress'. Then, click the blue Search button.
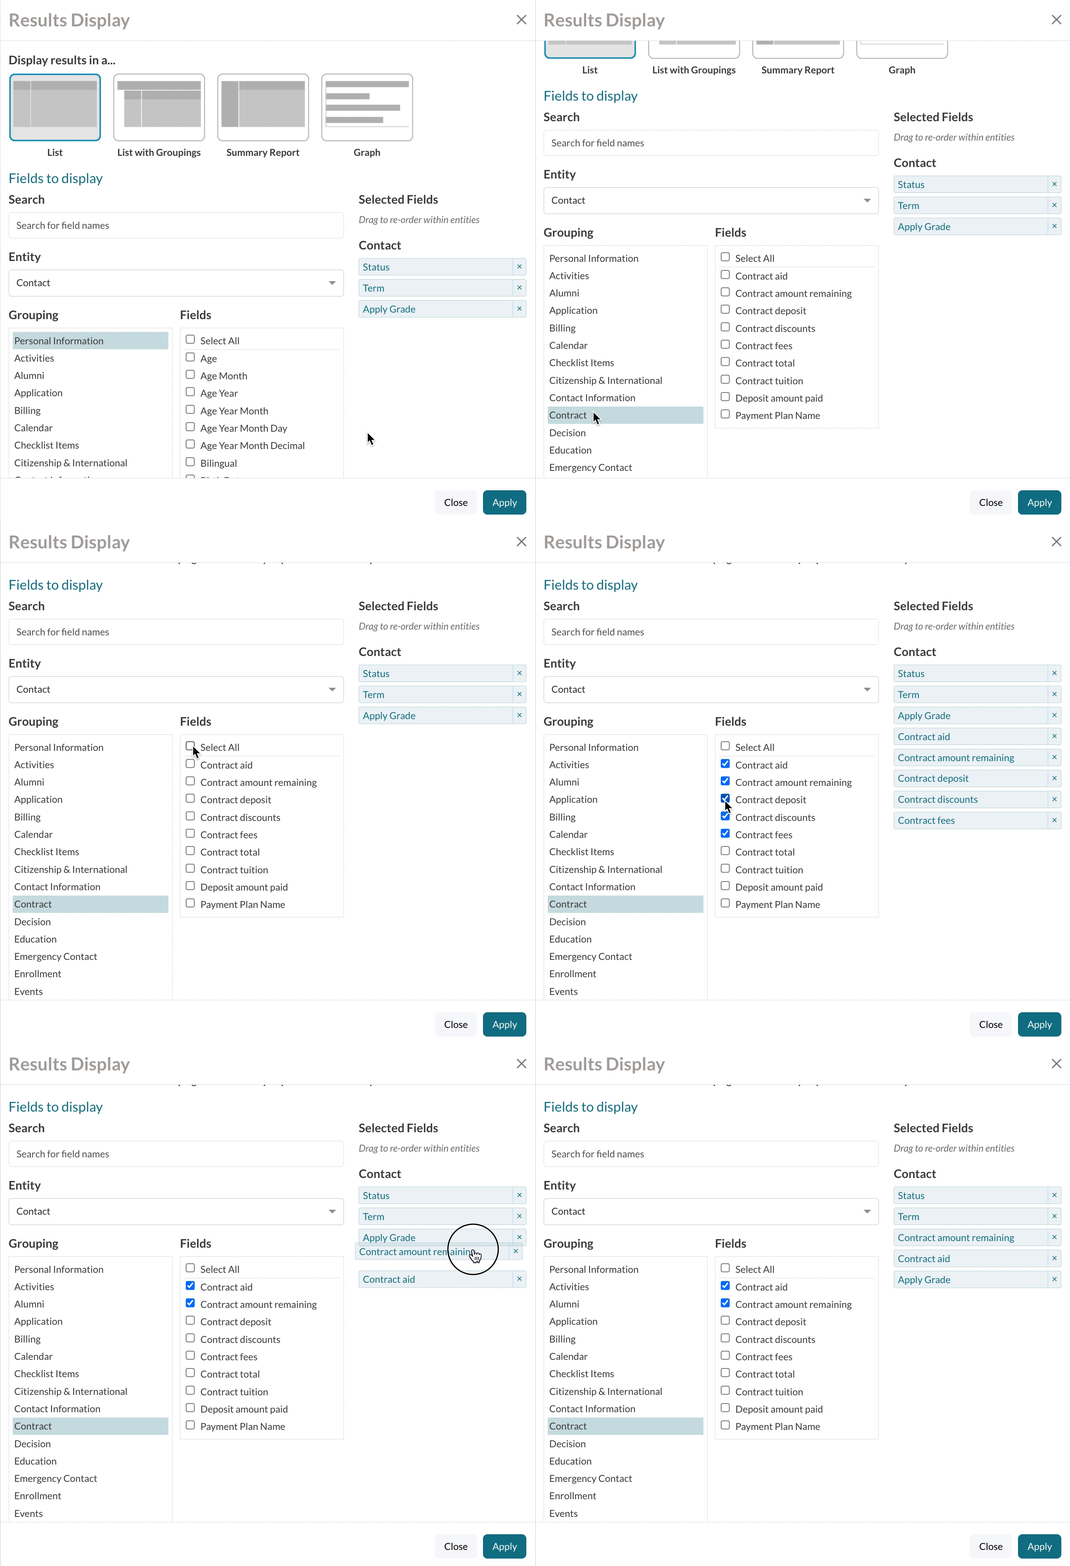
3. Once the search results have loaded, click on the blue Change Display/Columns button in the upper right of the page.
4. Make sure that Contact is selected for the Entity and open the Contract field grouping. This will open a list of fields related to the contract within the Fields section. Select whichever contract fields you'd like to add to your search. Then, click the Apply button to see them as columns in the search.
Now you have a comprehensive report of the important contract information for your enrollment in-progress students!
To customize this report further, you can go back into the Change Display/Columns window and select the List by Grouping option to sort by grade level, contract status, etc.
Contract Status Summary Report
To see an overview of where your students are in completing their contracts, you can create a summary report based on Contract Status. This will give you a total count of your students and who is pending their contract being generated, who is working on their contract, who needs to pay their deposit/registration fee, who needs a second signature for dual signature enabled contracts, and who submitted their contract.
1. Set the Term (school year) to filter from the drop-down menu at the top of the search page.
2. Add the following to your search criteria: 'Enrollment Status' - 'New & Returning' - 'is currently' - 'Enrollment in Progress'. You can also include 'Enrolled' status students if you wish. Then, click the blue Search button.
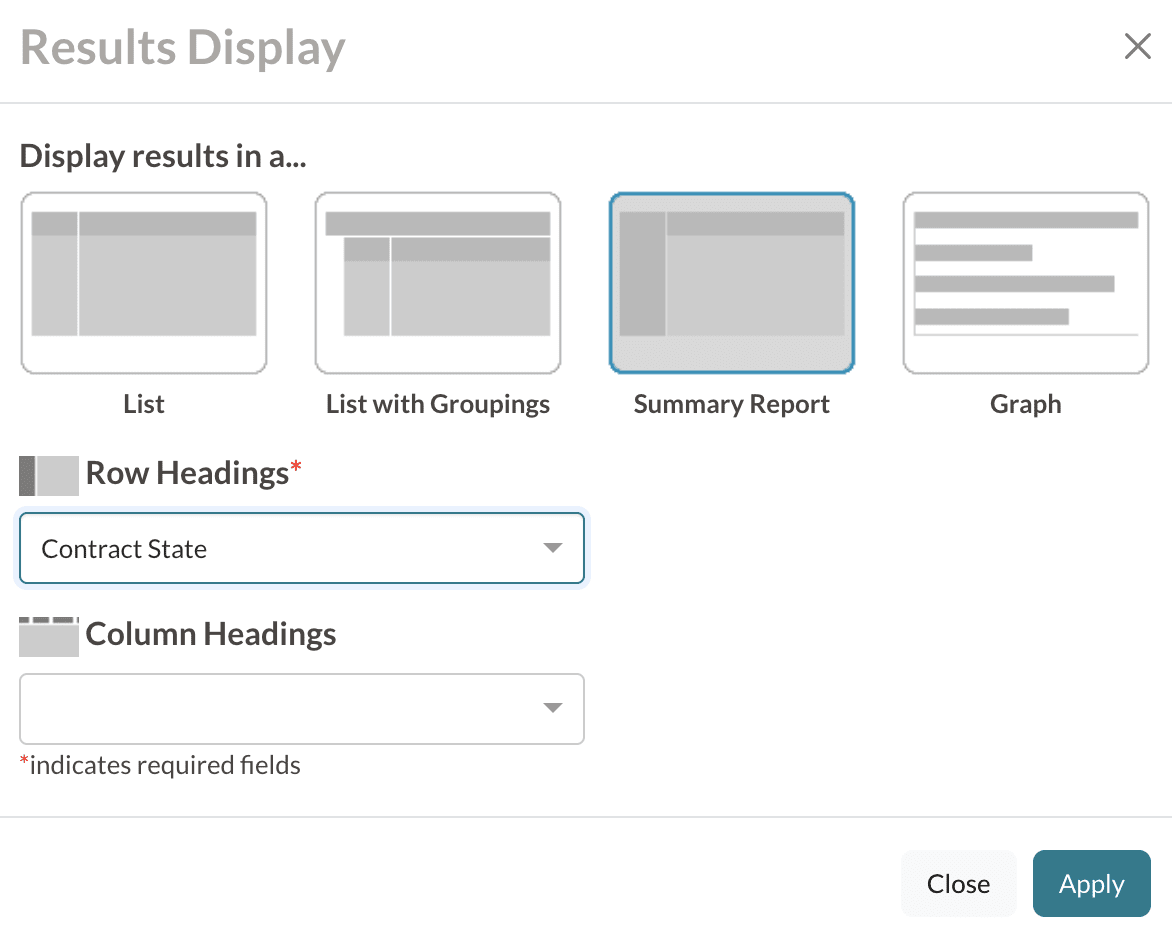
3. Once the search results have loaded, click on the blue Change Display/Columns button in the upper right of the page and select the Summary Report option.
4. Set Contract State as the row heading. If you want to see contract status by grade level, then select Grade as the column heading.
5. Click the blue Apply button to confirm and you will see your summary report!
Late Contracts
To track contracts that are submitted late, you can search on date ranges. The contract is a checklist item, so once the contract is submitted the checklist item is marked as complete with the completion date. For this search, we will use the checklist item (by completion date) criteria.
1. Set the Term (school year) to filter from the drop-down menu at the top of the search page.
2. Add the following to your search criteria: 'Enrollment Status' - 'New & Returning' - 'is currently' - 'Enrollment in Progress' AND 'Enrolled'. Then, click the blue Search button.
3. The contract is an enrollment checklist item, so add the following to your search criteria: 'Checklist item (by completion date') - 'Contract' (or registration form, depending on what your school calls it) - 'is after' - select your school's deadline date.
You could also search for contract completion before or between specific date ranges. For example, if you want to see who qualifies for an early enrollment discount.
Financial Aid & Scholarship Report
When managing financial aid and scholarships, you can display this information in a single report or you can create a report for each (e.g. one report for Merit Scholarship, one report for Athletic Scholarship, and so on).
1. Set the Term (school year) to filter from the drop-down menu at the top of the search page.
2. Search for the students you want to include in your report. For example, you might add the following to your search criteria: 'Enrollment Status' - 'New & Returning' - 'is currently' - 'Enrollment in Progress' AND 'Enrolled'. Then, click the blue Search button.
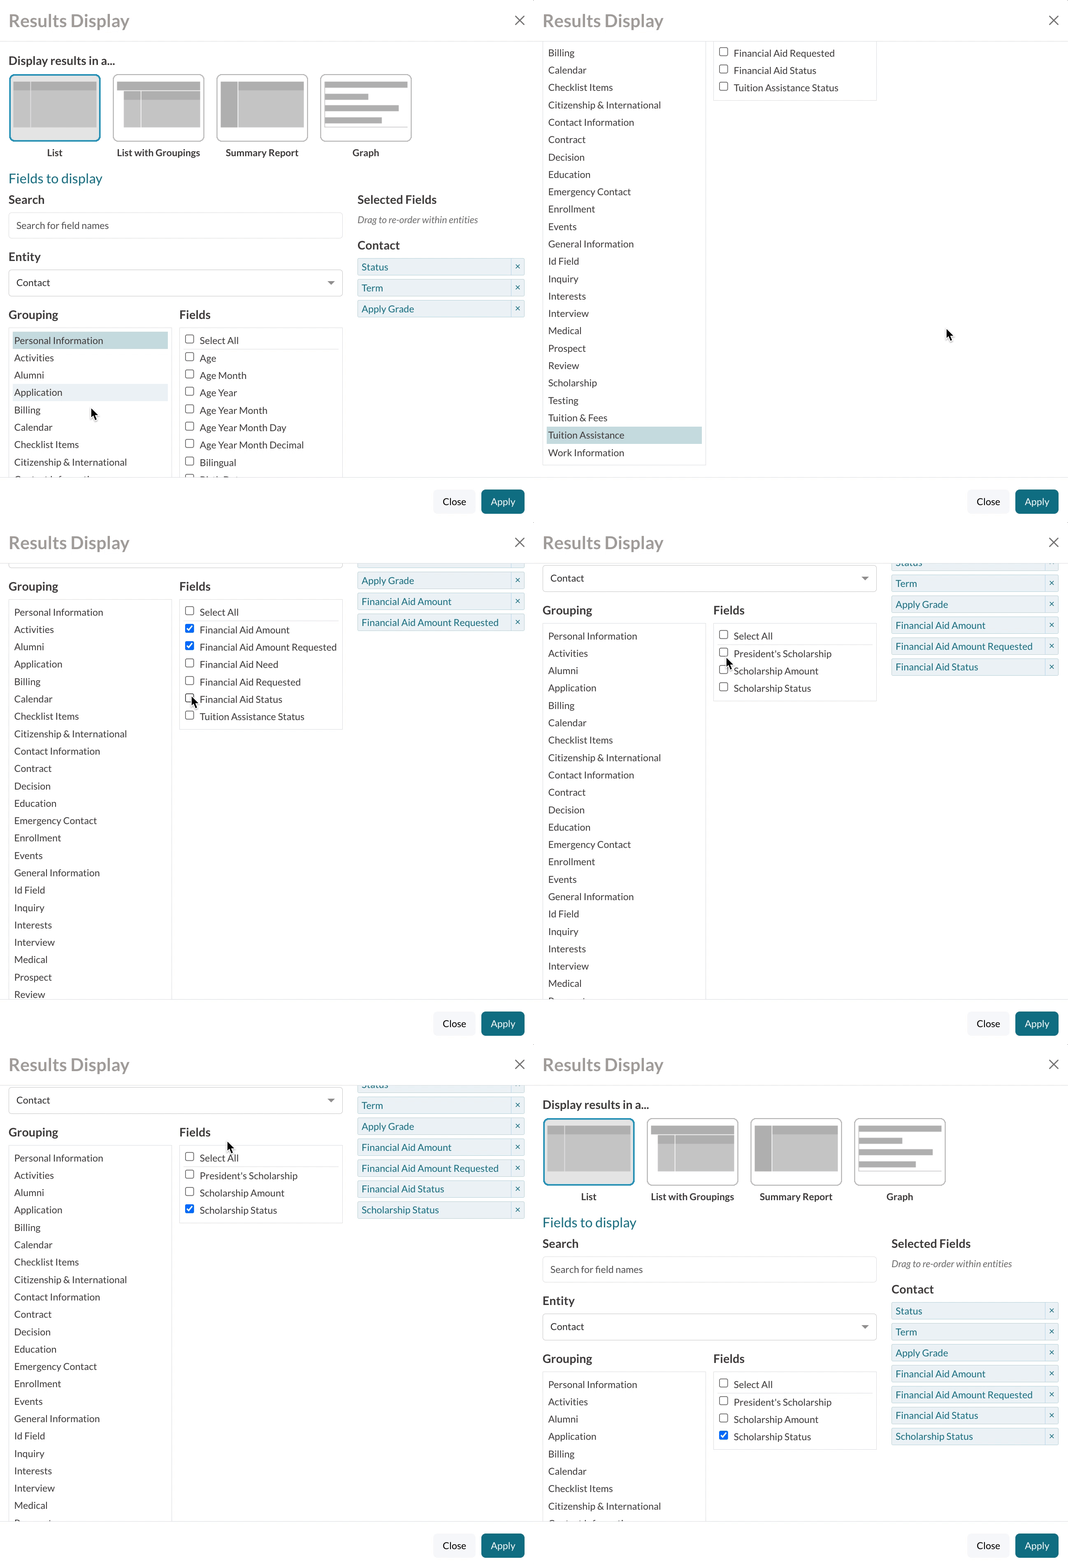
3. Once the search results have loaded, click on the blue Change Display/Columns button in the upper right of the page.
4. Select any financial aid, scholarship, or other tuition-related fields that you need in your report.
Aid-related fields are typically saved within the Tuition Assistance grouping. Open this group to see a list of fields related to Financial Aid. (You also have other groupings that you may find aid-related fields in, such as your Scholarship group. Scholarship and Tuition Assistance are the most common groups that financial aid fields are stored within.)
5. Click the blue Apply button to confirm and you will now have a report on financial aid and scholarship amounts!
You can organize your data further by going back into the Change/Display Columns window and selecting List with Grouping. You can then group your results by grade level or by scholarship name, if appropriate.
Enrolled Student List with Parent Names, Phone Numbers, Address
A parent directory is a useful tool to have on hand for your enrolled students so you can contact families quickly and easily. If you have emergency contact information, you can include this as well, or create a separate report for it.
1. Set the Term (school year) to filter from the drop-down menu at the top of the search page.
2. Add the following to your search criteria: 'Enrollment Status' - 'New & Returning' - 'is currently' - 'Enrolled'. Then, click the blue Search button.
3. Once the search results have loaded, click on the blue Change Display/Columns button in the upper right of the page.
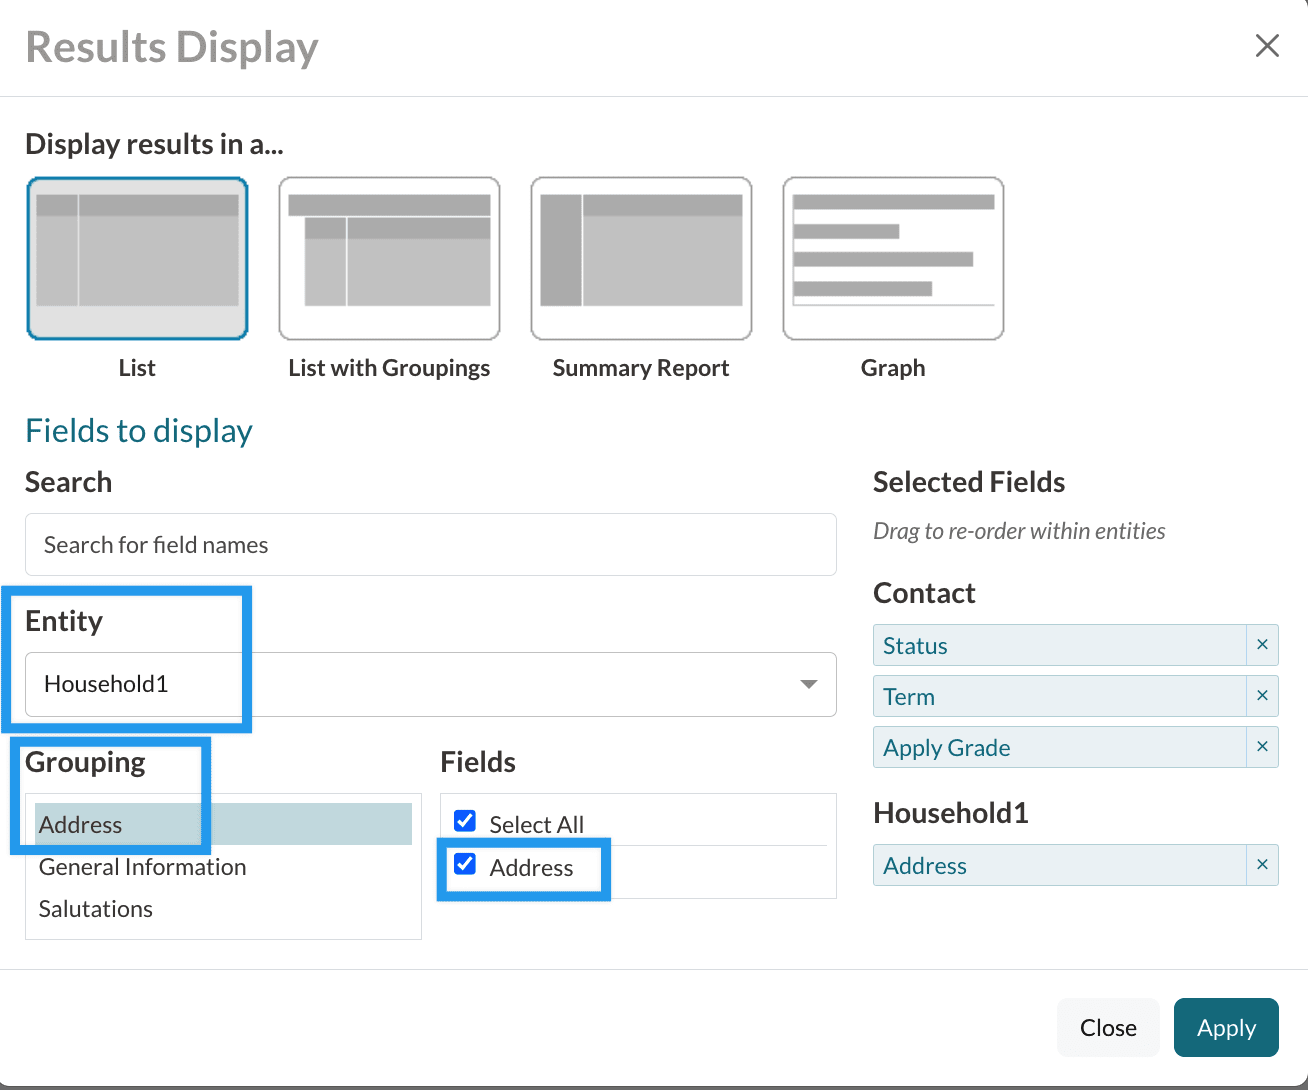
4. To pull in the student's primary address, select Household 1 from the Entity dropdown. Under Grouping select Address and then under Fields select Address.
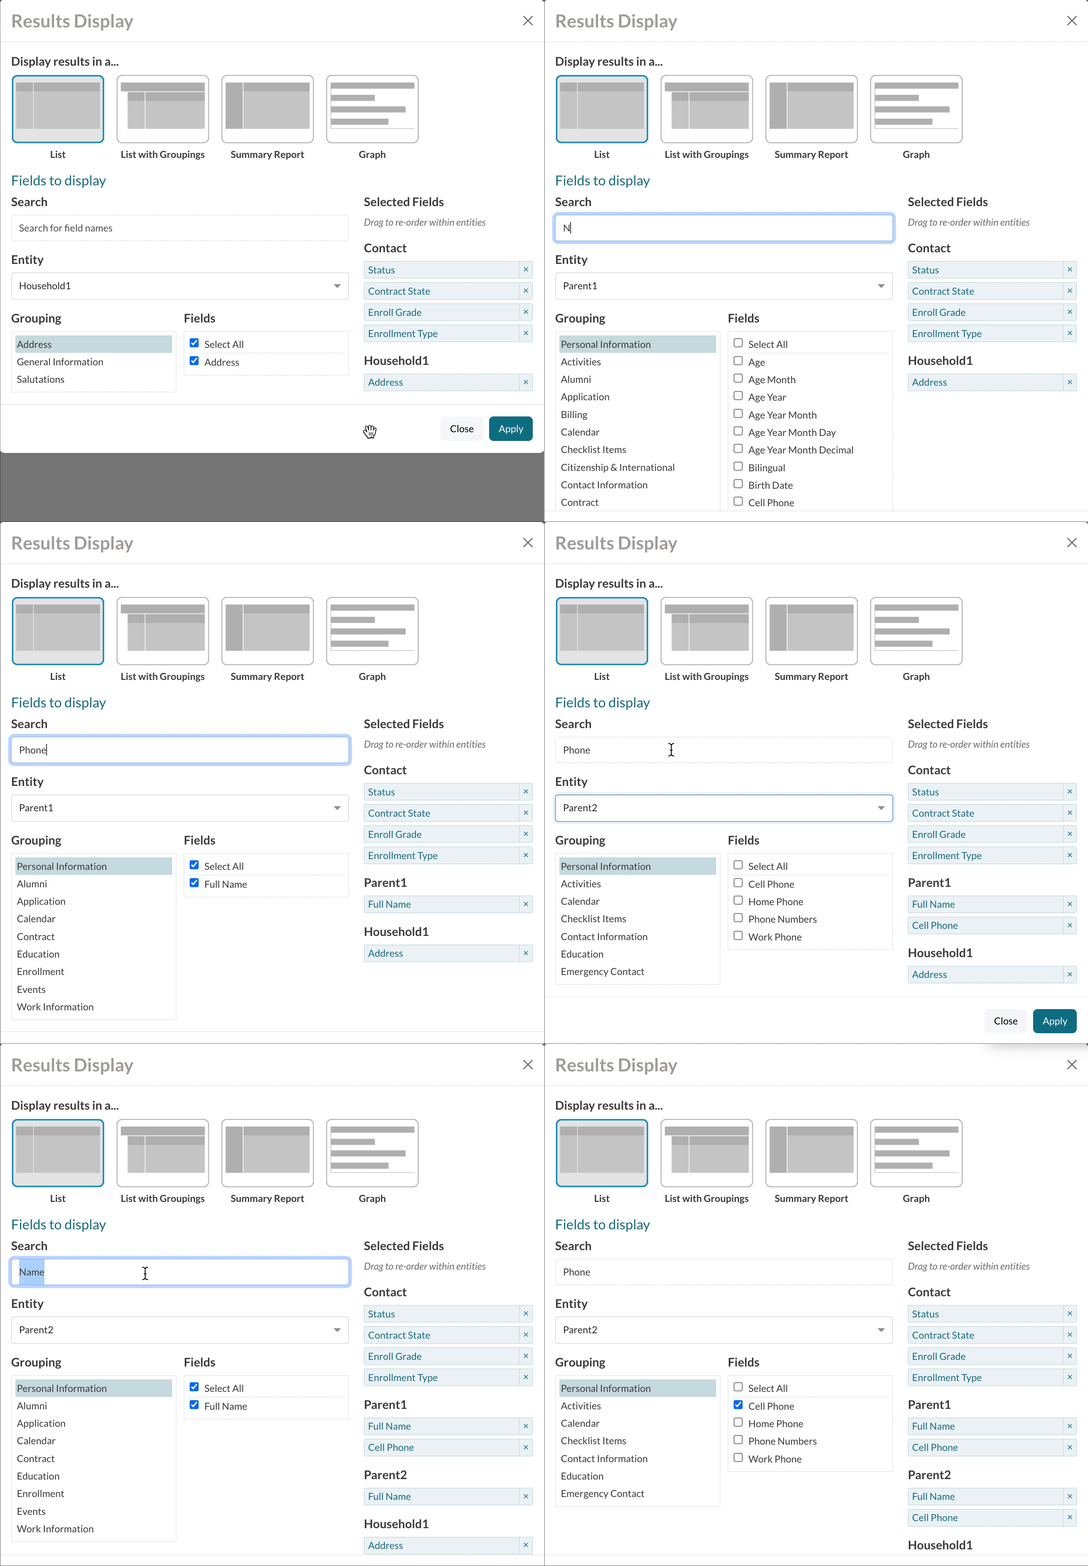
5. To pull in the names and phone numbers for the parents that reside in the primary household, start by updating the Entity dropdown to Parent 1.
Next, type "name" into the search box and select the name field that appears in the Fields section to pull it in as a column in the search.
Then, search for "phone" and select one or more of the phone numbers that appear in the Fields section. Once you've done this, you'll have the name and phone number(s) of the primary parent in the student's primary household pulled in as columns in your search.
Repeat the process by changing the Entity to Parent 2 and then search for "name" and "phone" number just like before to pull in that same information for the second parent.
7. If you'd like to, you can reorder the columns within the Selected Fields section by dragging them up or down within their individual sections. Then, click the blue Apply button to confirm and you will now have a parent directory report!
Additional Resources
</>









Comments
0 comments
Article is closed for comments.