Overview
Providing Autopay as an option saves time for your school and families. It helps you manage payments easily and speeds up the process of collecting them. For parents, it's simpler than remembering to pay bills manually every month. Read more about setting up and managing Autopay within this article.
Who can access this feature?
Admin Account Types: Admins, System Admins, and Users
Permissions: Financial
In this article
- Autopay Terminology
- How Autopay Works (In a Nutshell)
- Autopay Setup
- Autopay on the Parent Record
- Parent Facing Autopay Management
- Changing Autopay Dates
- Past Due and Autopay
- Autopay Reporting
- Autopay Communications
- Additional Workflows and Notes
Autopay Terminology
Autopay Date: All of the date(s) that the system withdraws from a payer’s account. This includes:
-
Billing Date: This is the last Autopay Date of the month. The payer's account is not considered past due until this date has passed.
- Note: Past Due status still also depends on the overdue Threshold and Grace Period if your school has that set. Read more about Threshold and Grace Period within our Settings: Billing Setup Page article.
-
Prepay Date: These are all of the Autopay Dates before the Billing Date.
- For example, if a payer has Autopay set to withdraw on the 1st, 15th, and 28th, the 1st and 15th are considered to be their Prepay Dates.
How Autopay Works (In a Nutshell)
-
For payers with 1 billing day a month:
- Autopay is pulled once a month on the payer’s billing date.
-
For payers with multiple billing days per month:
- Autopay is pulled on each of the payer's billing dates. For example, if the payer's dates are the 1st and the 15th, Autopay will automatically collect their balance on the 1st and the 15th of each month.
Autopay Setup
Autopay can be set up within the Billing Setup page (Settings > Financial > Billing Setup).
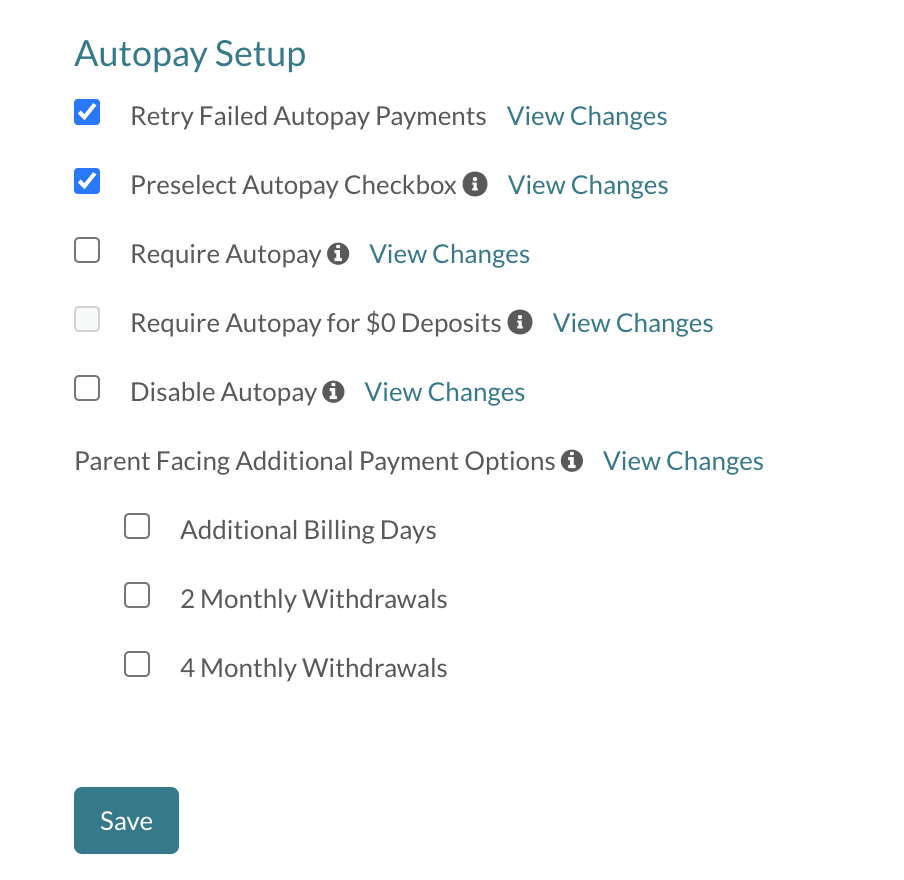
The Autopay Setup section of the Billing Setup page allows you to disable, preselect, or require autopay.
You can also opt to Retry Failed Autopay Payments in this section. This allows the system to re-attempt to charge most* failed payments. You can read more about this feature in our Retry Failed Autopay Payments article.
The Parent Facing Additional Payment Options section allows you to set whether or not the Autopay options will be available in the Parent Portal for payers to choose and set on their own.
*While the system can re-attempt to charge most failed payments, some can not be reattempted. For example, the system can not re-attempt to charge a payment that fails due to a closed bank account.
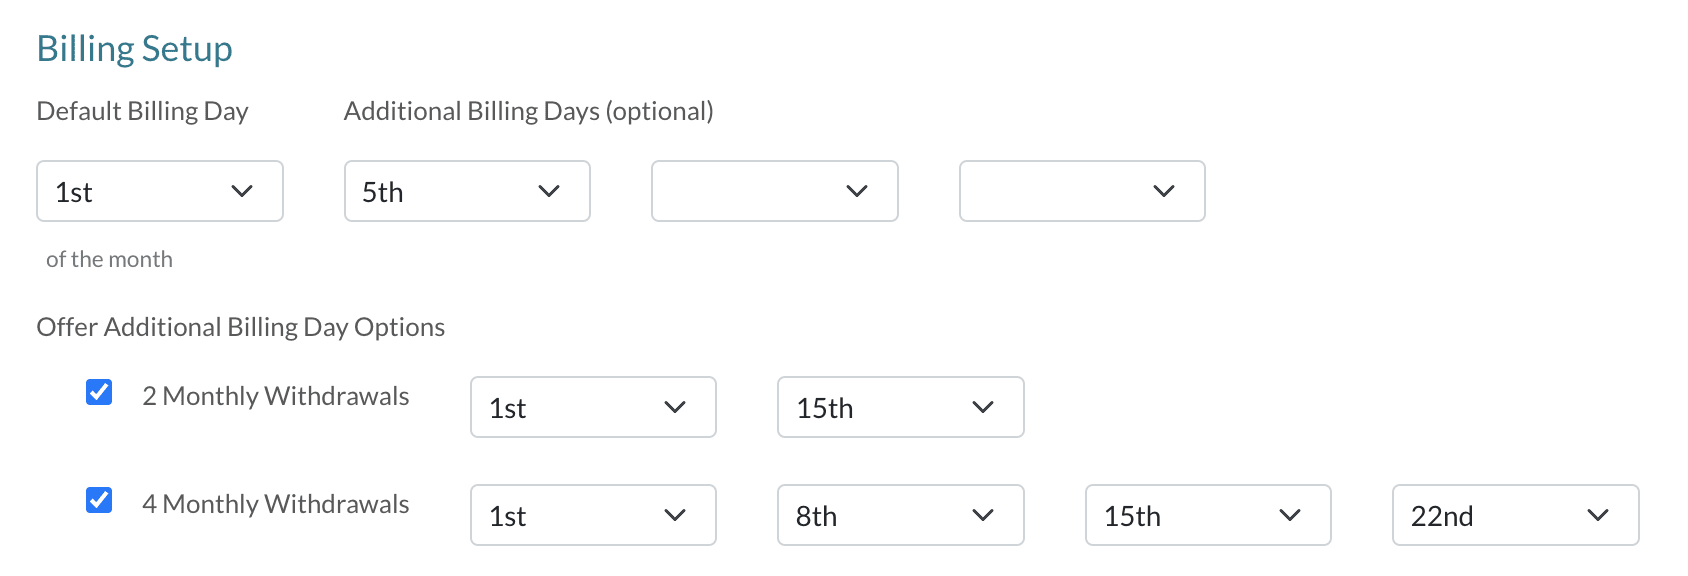
The Billing Setup section on the Billing Setup page lets you choose extra billing days for payers. Additionally, the Additional Billing Date Options section enables multiple monthly autopay withdrawals and select the dates that you'd like to offer.
Our Settings: Billing Setup Page article outlines the details and specifics of setting up these Autopay options.
- Refer to the Billing Setup section of the article to learn about setting up and managing Billing Date options.
- Refer to the AutoPay Setup section of the article to learn about options for enabling Autopay.
Autopay on the Parent Record
Billing Overview Tab
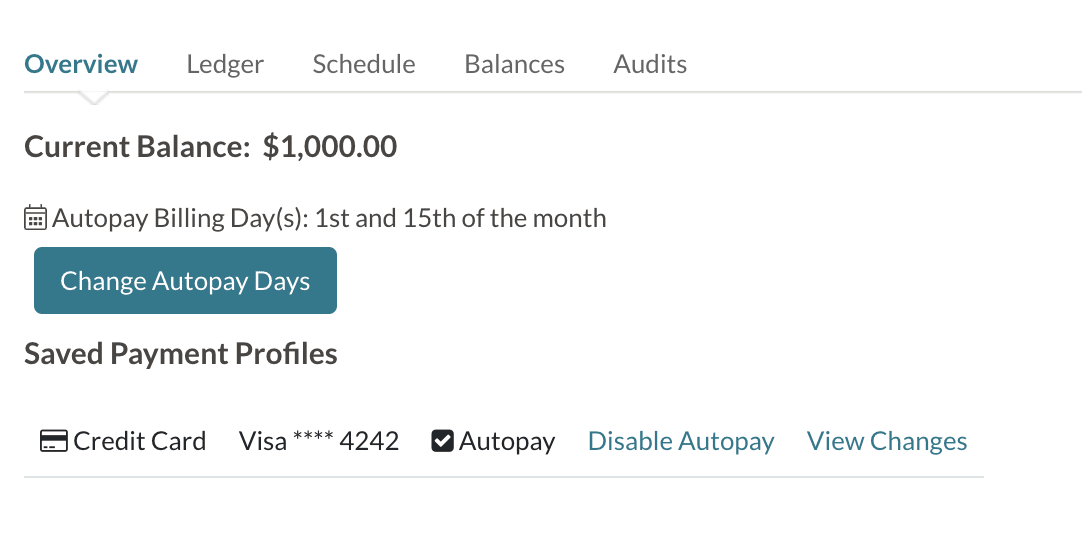
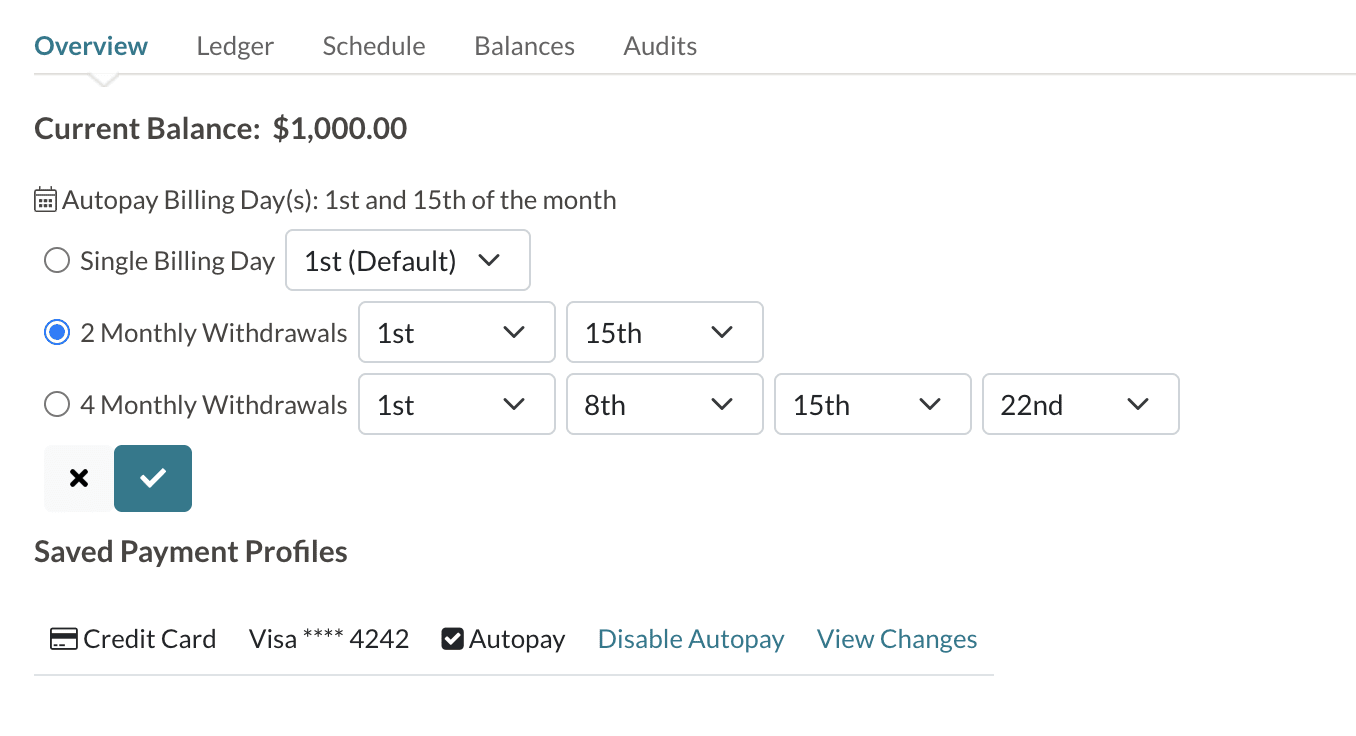
The overview tab of a parent/payer's record displays their Autopay dates and includes an option to change them.
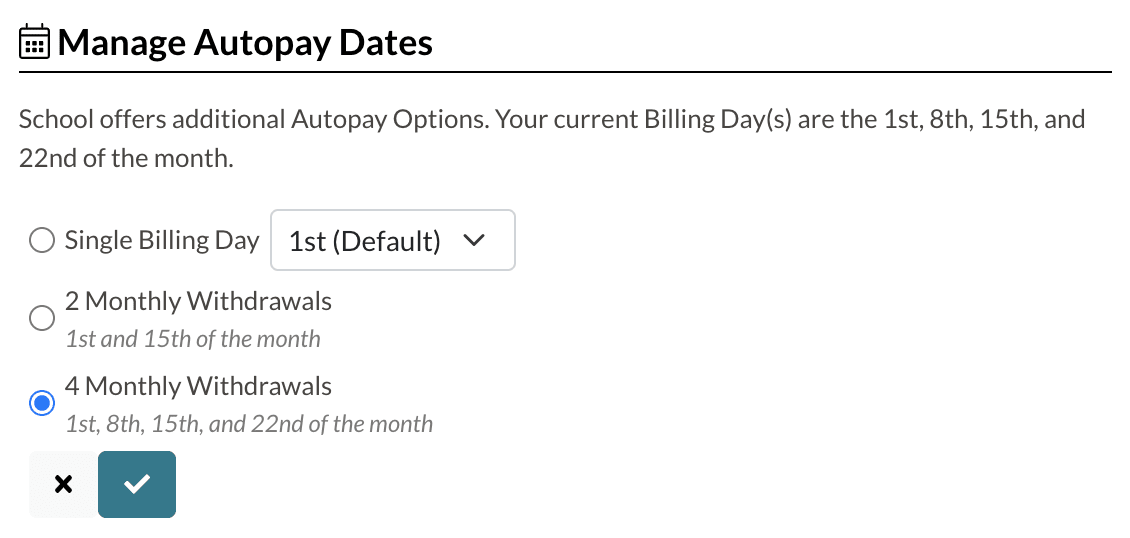
Example of the Overview Tab when the Change Autopay Days button is selected.
Please refer to the Contact Record: Billing Tab article for more in-depth details of this section.
Ledger Tab
The Ledger tab on a parent/payer's record also displays their Autopay dates.
Additional Notes regarding Autopay behavior on a payer's ledger.
-
Incidental Charges
- Added Incidental charges will be withdrawn on the payer's next autopay date. Because of this, we recommend taking extra care to ensure that everything is correct when adding incidental charges to the ledger.
-
Contract Charges on the Ledger:
- When the contract charges post, they will reflect the payer's multiple autopay dates (if set). If the autopay dates are changed, the contract charges on the parent/payer ledger will automatically update to reflect the new dates.
- Please note: The contract only breaks down the payment plan by the Default Billing Date you have set on the Billing Setup page. This is the case, even if the parent/payer has custom date(s) set up before submitting the contract.
Parent Facing Autopay Management
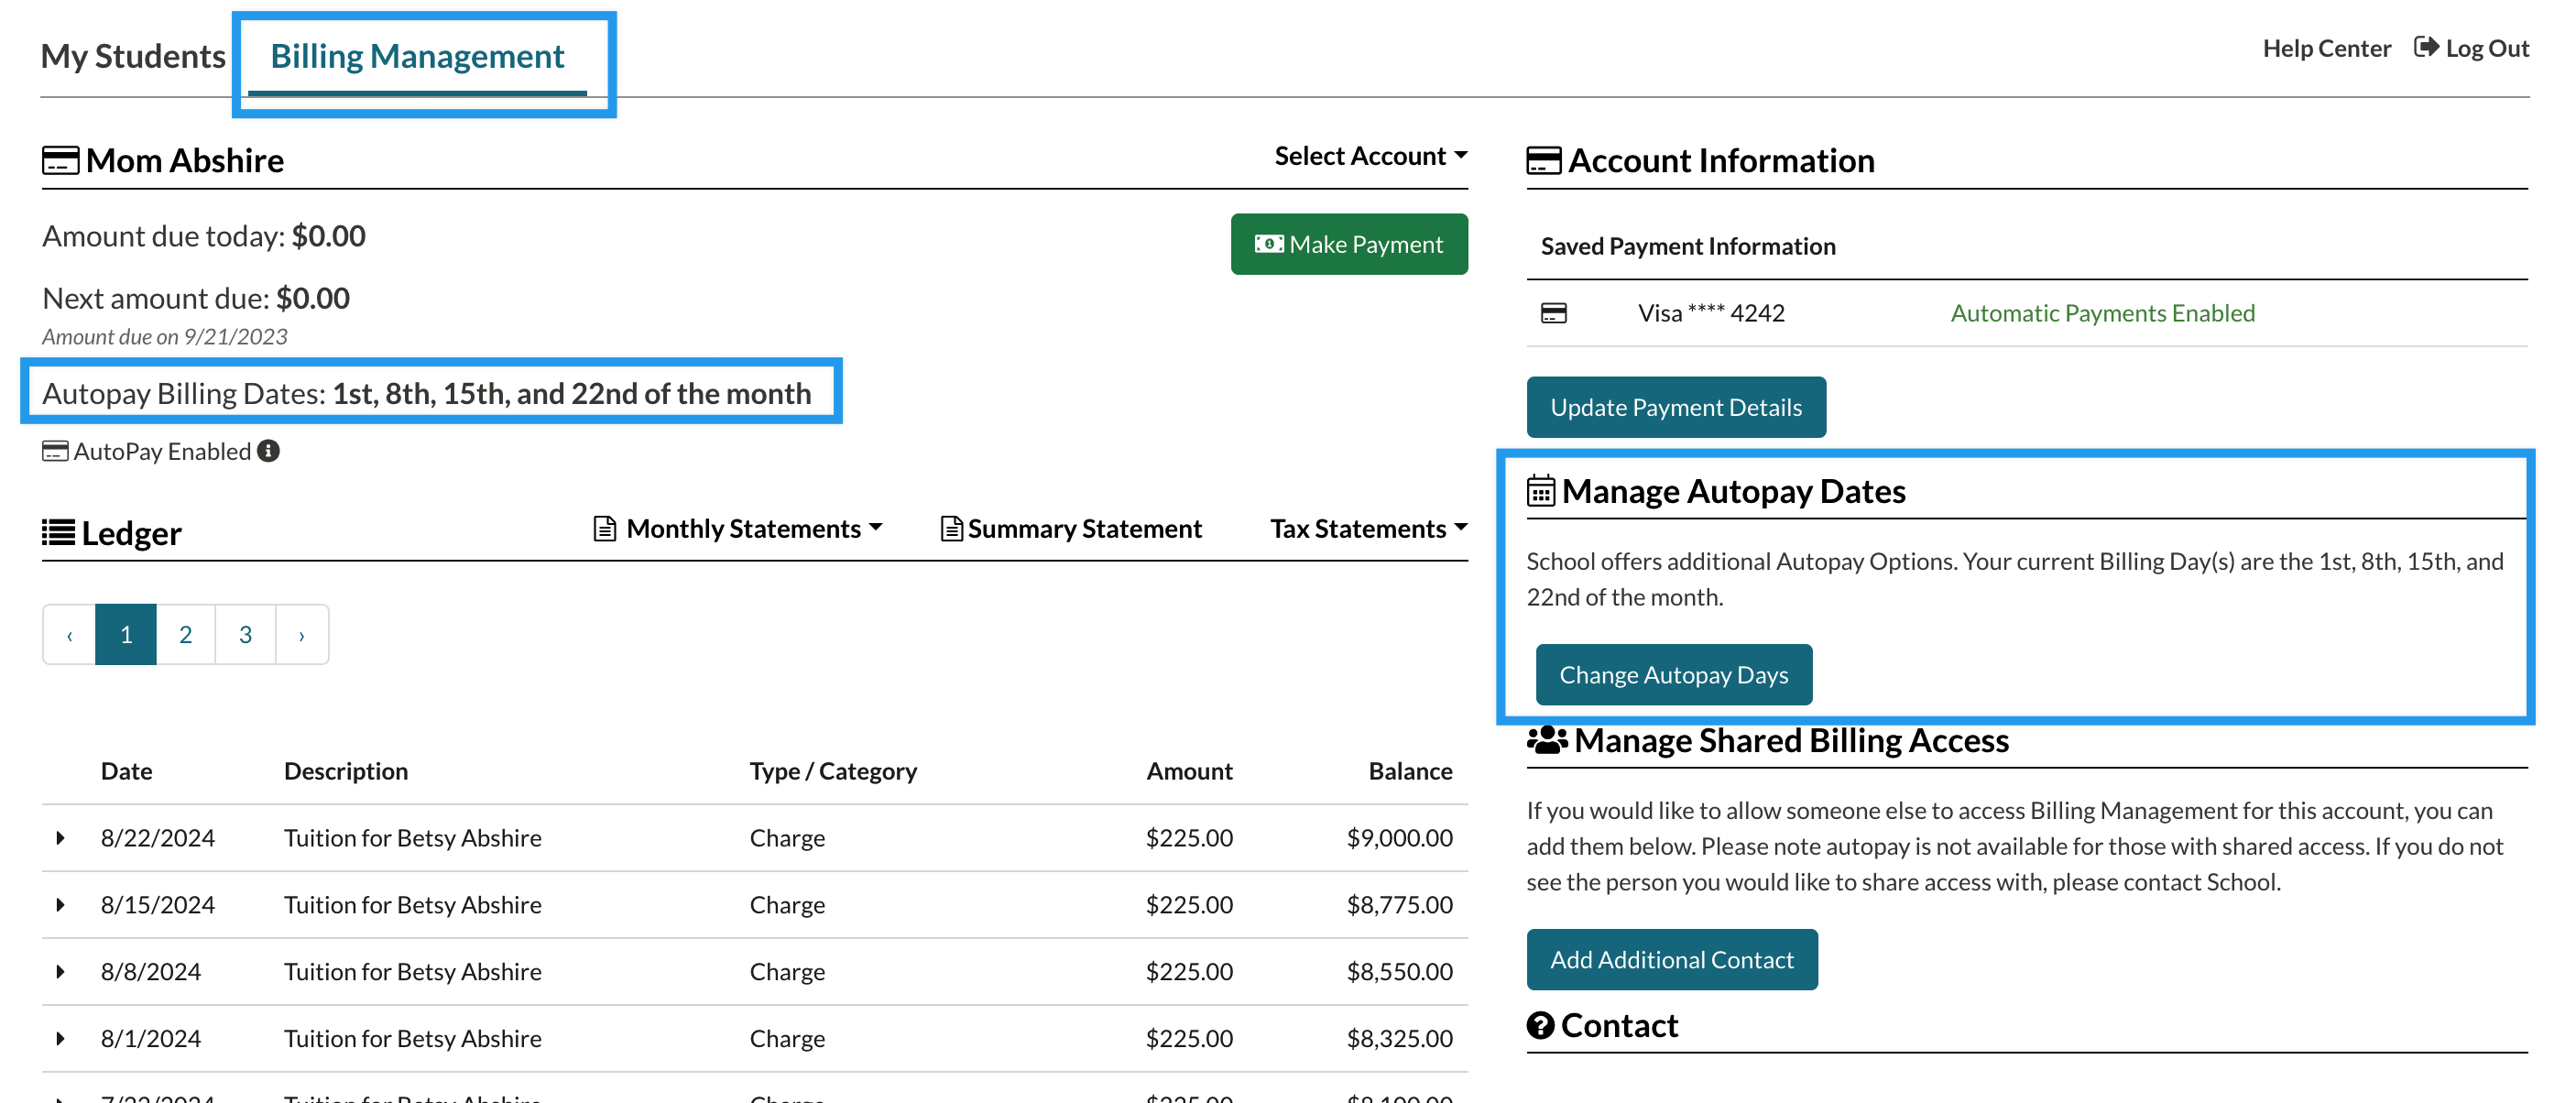
If you have enabled autopay and opted to set payment options parent-facing on the Billing Setup Page, your payers will see a Manage Autopay Dates section within their Billing Management tab in the portal. They will also see their Autopay dates listed above the ledger.
If the payer selects Change Autopay Dates, they will see additional options for managing their autopay dates, depending on what you have set within the Billing Setup page.
If you have hidden the option for payers to set their own dates*, they will not see the manage autopay dates section on the right side of their Billing Management tab but they will still see their autopay dates listed above the ledger.
*The option for payers to change their dates is hidden when you don't select any of the Parent Facing Additional Payment Options on the Billing Setup page.
For example:
⚠️ Important Note
Auto-payments made by ACH/Electronic check may take 5-7 business days to clear, so they'll display as ACH Pending during this time. A pending payment cannot be stopped while it is processing and can only be refunded once the payment has fully processed and moved to Paid status. Learn more about refunds and processing payments by visiting the "Payment History Report" article.
Changing Autopay Dates
Autopay changes only affect future withdrawals.
- If the autopay date change affects past dates the change will not take place until the next billing month.
- This goes for both single and multiple autopay date accounts i.e. If one or more of the multiple autopay dates are being moved backward to date earlier than the current day, the changes will take effect the following month.
Important Exception:
For parents sharing financial responsibility, if one of the parents changes their autopay date to a date in the future, the change will only take effect that month if the other parent doesn’t have any past dates. (see the last example below)
Example Scenarios
Scenario date: October 10th
-
Agatha’s Billing Date is the 17th. She updates it to the 1st. The change will take effect in November and she will be charged November 1st.
-
Jane’s Billing Date is the 15th, she changes it to the 20th. The changes take effect in October (she is charged on the 20th).
- (exception example) Jeff and Gianna have a 50/50 split.
- Jeff’s billing dates are the 1st, 5th and 15th
- Gianna’s date is the 15th.
- If Gianna changes her date to 20th, it won’t take effect until next month because one of Jeff’s dates has already passed.
Changes from single to multiple autopay made after the first billing date will be initiated the following month.
If a parent opts to switch from a single autopay day to multiple autopay days after the family's first billing charge of the month has passed, the change will not take effect until the following month.
Example Scenario
The Jenkins family has a single billing day each month (the 10th) and they are set up for autopay. Every month on the 10th, they are automatically charged their balance.
Then, one month on the 14th, they decide to switch from single autopay to multiple autopay. Because their billing charge date (the 10th) has already passed, their new multiple autopay schedule will not take effect until the following month.
Past Due and Autopay
- Payers with multiple autopay dates will be considered past due if they meet the criteria after the last autopay billing date of the month has passed.
- If the payer meets the criteria to be considered overdue, they will only be charged the Late Fee once that month.
- Payers with a single autopay billing date will be considered past due if they meet the criteria after their billing date has passed.
Meeting the criteria to be considered overdue also depends on the Threshold and Grace Period being met if you have that setup.
Autopay Reporting
You can track Autopay data through the following reports within your site.
Accounts
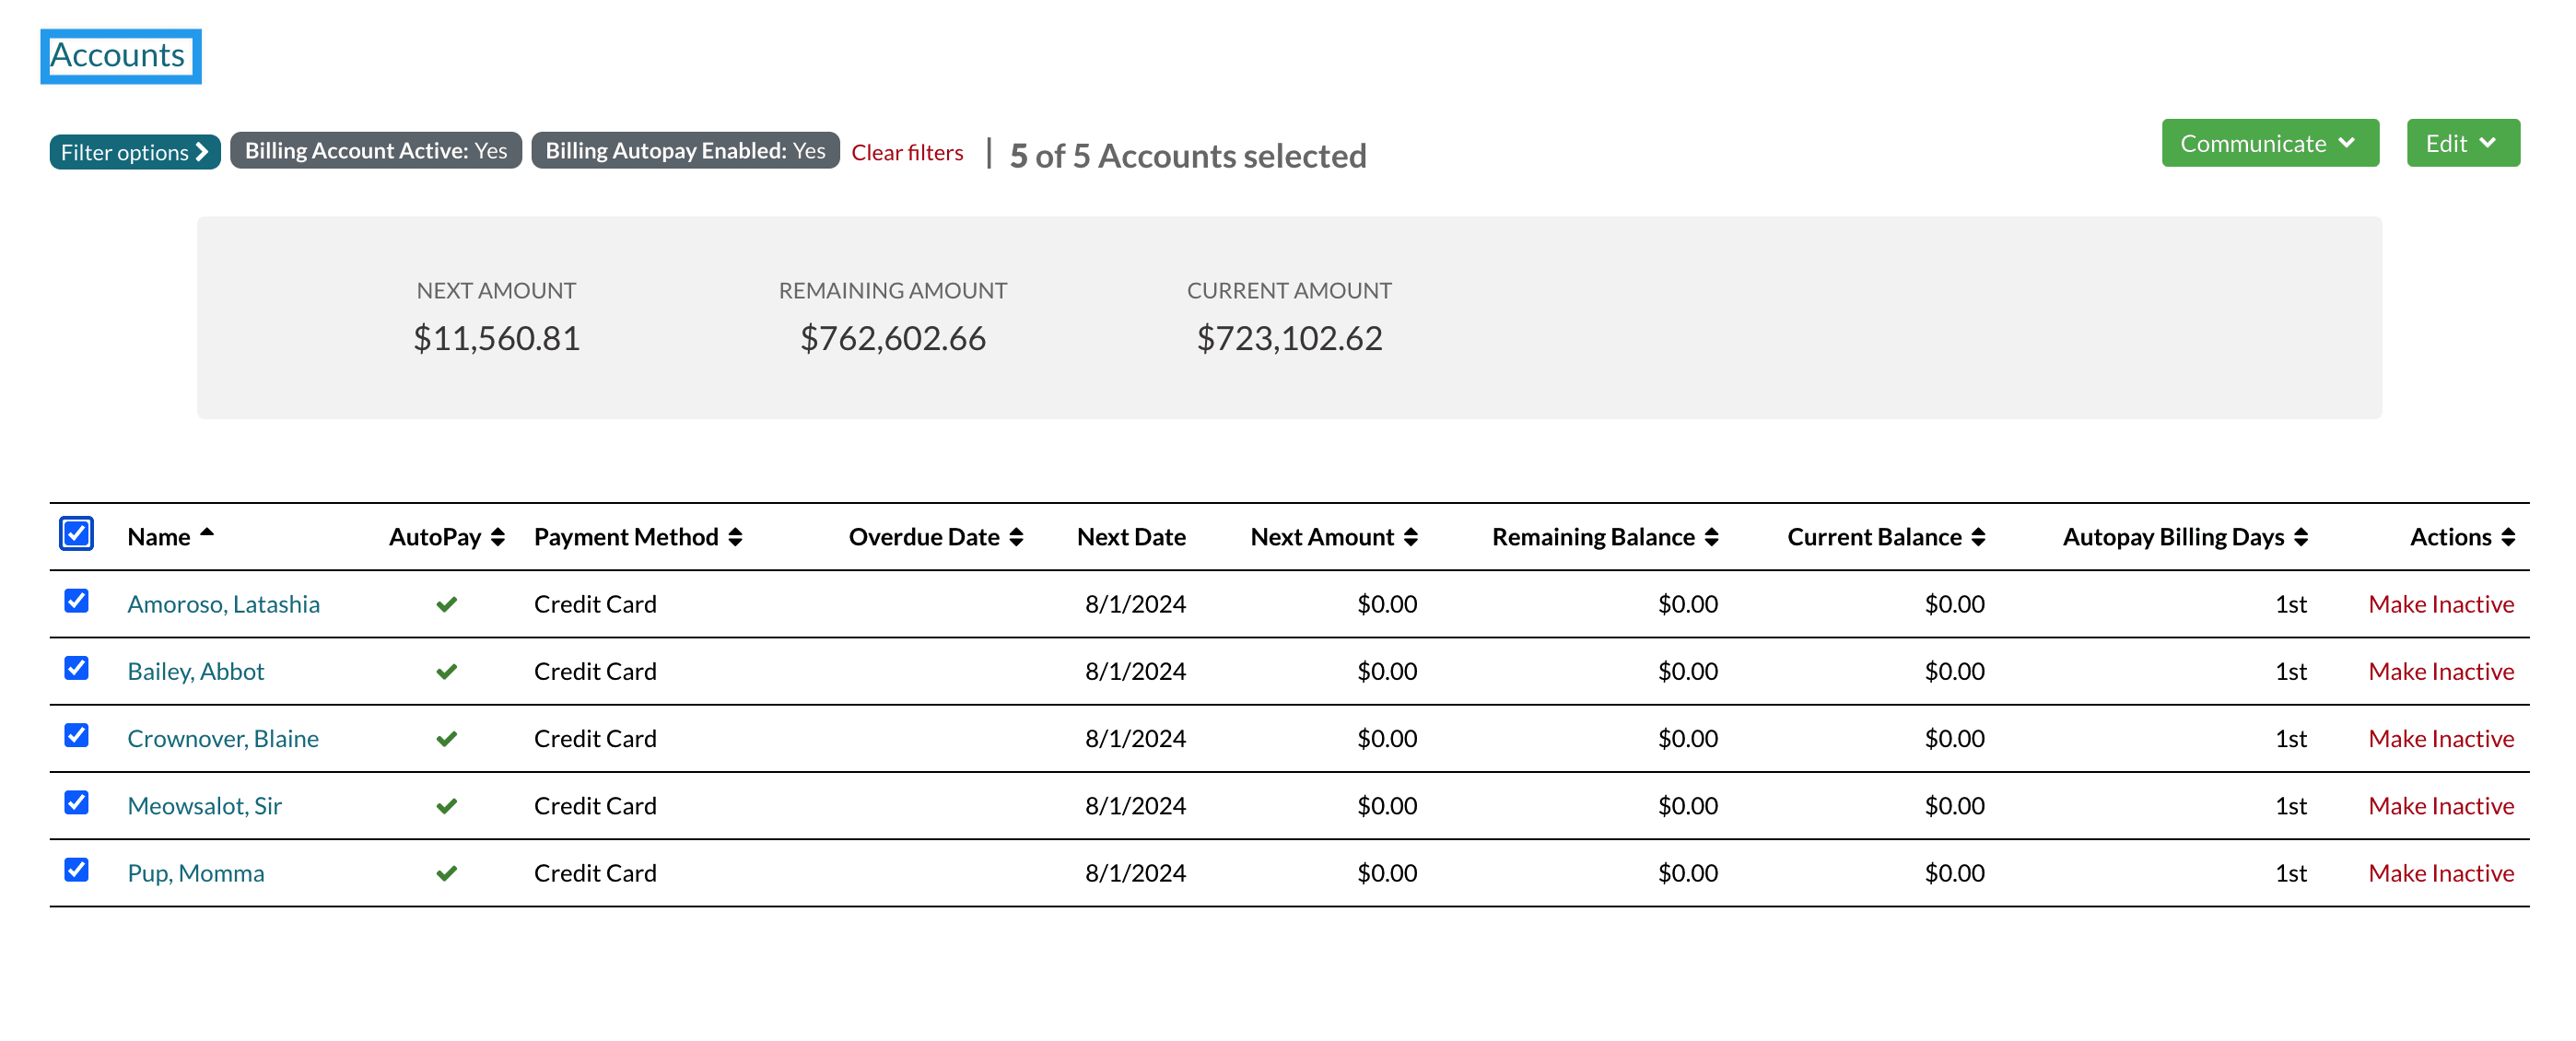
The Accounts List Page Report (Billing > Accounts) contains:
-
The Billing Autopay Enabled filter option, which allows you to filter the report based on which of your accounts have Autopay enabled.
-
The Autopay Billing Days column, which lists every account's Billing Day(s).
- The option to email families right from this page. You can filter to see only those enrolled in Autopay and select your families to open the communicate menu.
You can read more about the Accounts report within this article: Billing: Accounts List Page
Search & Reports
With a Search (Search & Reports > Search), you can:
-
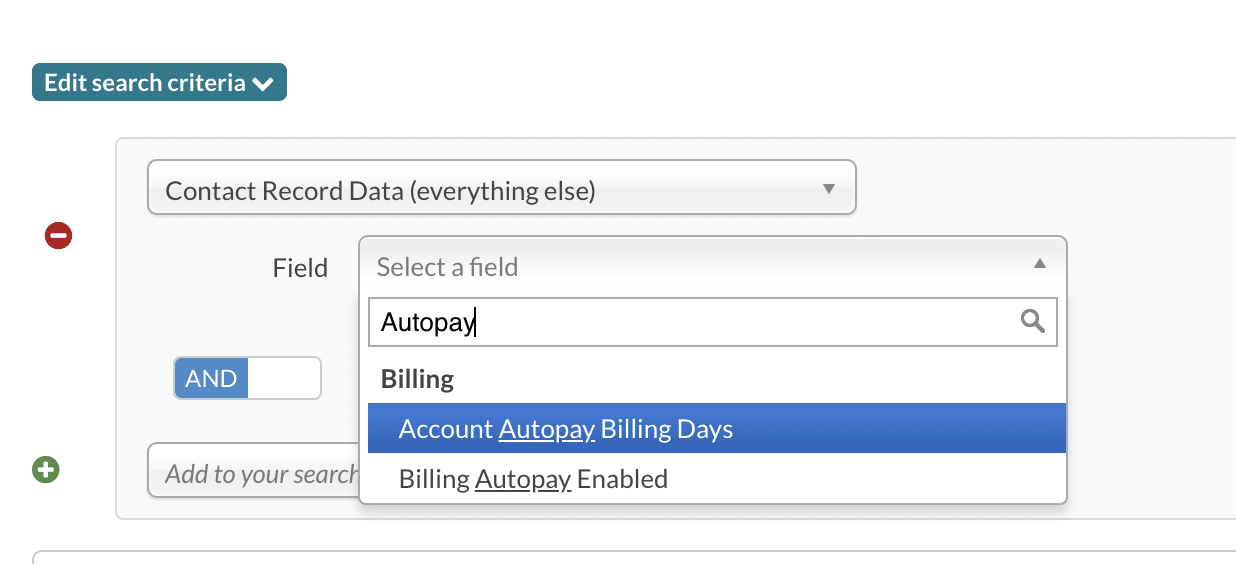
Use the Contact Record Data (everything else) criteria to search based on Autopay Billing Days or whether or not an account has Autopay enabled.
-
Account Autopay Billing Days is a text field, so to search by that, you need to enter the date as a number and choose a symbol (greater than, less than, equal to, etc.). Because of this, it's likely not the most practical way to view that data. You may instead prefer to pull that data in as a column within the search. See the next bullet for details.
-
Use Change Display/Columns to pull in Autopay data as columns within the report.
-
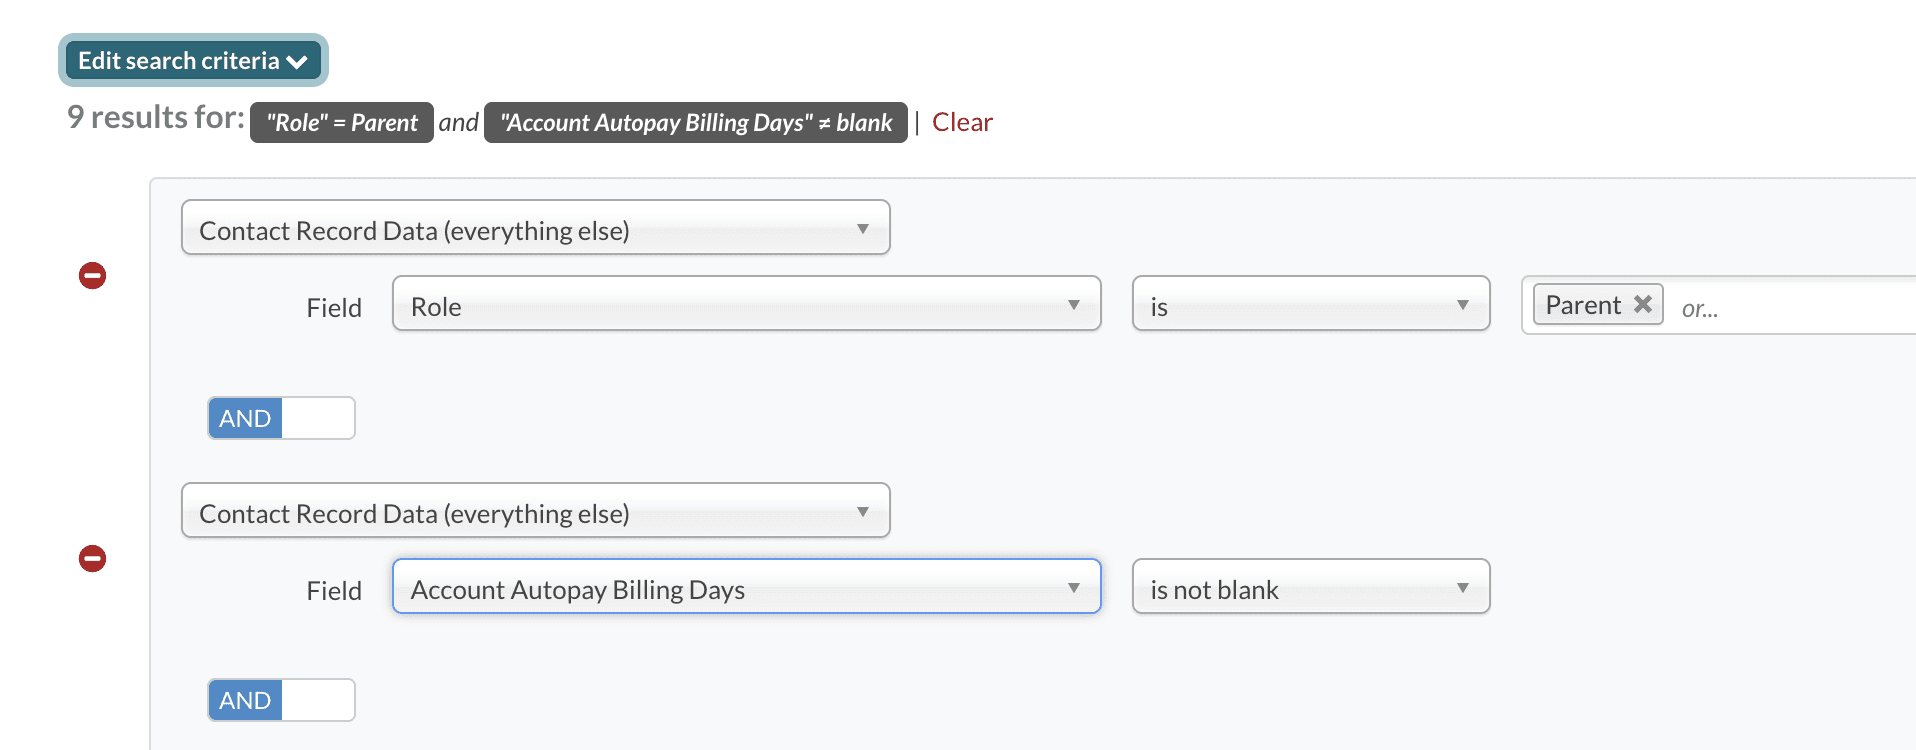
First, use the following criteria to pull in parents with Autopay:
- Contact Record Data (everything else) > Role is Parent
- AND
-
Contact Record Data (everything else) > Account Autopay Billing Days is not blank.
-
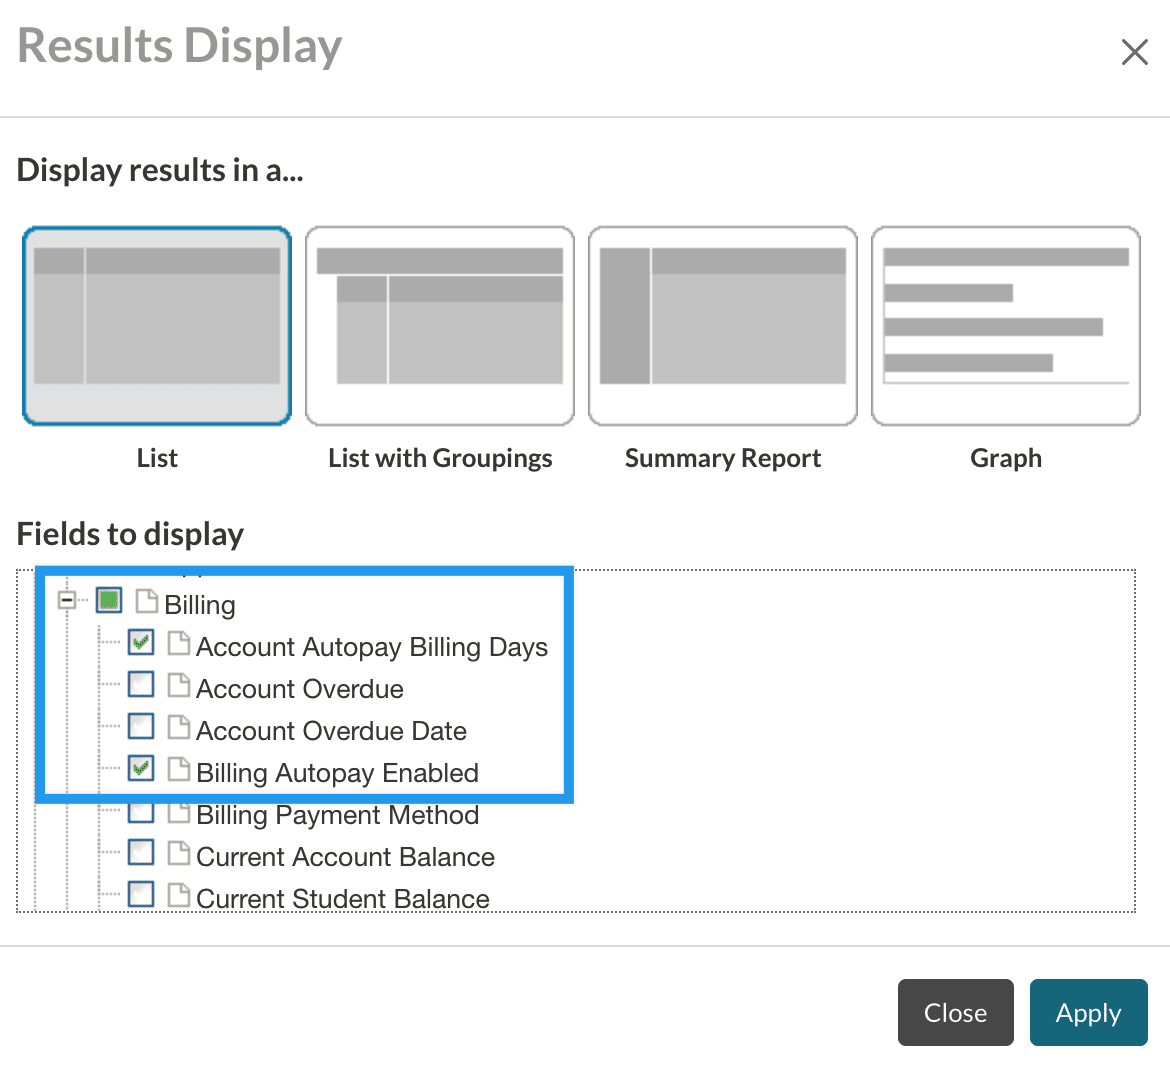
Next, select Change Display/Columns and, under the Contact grouping, expand the Billing fields and select Account Autopay Billing Days and/or Billing Autopay Enabled.
-
First, use the following criteria to pull in parents with Autopay:
Read more about Billing Searches within our Billing: Search & Reports article.
Autopay Communications
Autopay Merge Tokens
-
{{statement.autopay_dates}} - the payer's autopay dates.
- These similar merge tokens pull in the same information: {{contact.autopay_billing_days}} and {{recipient.autopay_billing_days}}
-
{{statement.formatted_next_autopay_amount}} - the payer's next amount due.
-
{{statement.next_autopay_date}} - the payer's next autopay date.
- {{recipient.billing_autopay_enabled}} - whether or not the payer has autopay enabled.
- {{ statement.autopay_convenience_fee_disclaimer }} - Displays a message that informs the recipient of the convenience fee associated with their charge.
-
{{ statement.formatted_autopay_convenience_fee_amount }} - Displays the amount of the convenience fee associated with the recipient's charge.
Important
- Autopay tokens that begin with "statement" can only be used in the Billing Email Templates (Settings > Communication > Email Templates > Billing Emails). They will not work if you put them in any other email template.
- Please refer to our Billing Merge Fields article for information on all Billing Merge tokens.
Emails
You have a few automated communications related to Autopay that are already set up on your site. (Read about those in this section.) You can also email families through the Accounts list page which includes a filter for Autopay. That means, you can filter down to get a list of all of your families with Autopay enabled and then send emails to them right from that list page. You can read more about that in our Account List page article.
The templates for the below emails are found under Settings > Communication > Email Templates > Billing Emails. Each of the emails described below can be further customized on that page.
The list below does not include all billing emails, but, rather, those that specifically relate to Autopay. You can read more detail about these and all Billing emails within our Billing Communications article.
Billing Day Changed
If you change a payer’s billing date, they will immediately be sent the Billing Day Changed email. (remember, changes made to autopay don't take effect until the following month).
Upcoming Auto Payment
This email is sent 2 days before a payer’s autopay prepay dates. As a reminder, the "autopay prepay dates" are all of the Autopay Dates before the Billing Date.
For example, if a payer’s autopay dates are the 8th, 15th, and 22nd: the 8th and the 15th are considered their "autopay prepay dates" and the 22nd is considered their "billing date".
This payer will automatically receive the Upcoming Auto Payment email on the 6th and 13th, and then, two days before their final billing day of the month (the 20th in this example), the payer would receive the Upcoming Payment email.
The timing of the email can not be altered.
Upcoming Statement
As a reminder, the timing of this email can be adjusted on the Billing Setup page.
If a payer's 1st autopay date of the month is at least 10 days after their last autopay date of the month: this email will be sent 10 days before the payer’s 1st autopay day of the month.
If a payer's 1st autopay date of the month is less than 10 days after their last autopay date of the month: this email will be sent the day after their last autopay date of the month.
Account Overdue
When an account has multiple Autopay dates, the system designates the last autopay day of the month as the Billing Day. Consequently, if the account remains unpaid after this date, provided that both the grace period and threshold requirements are met, the account overdue email will be sent to the account.
Auto Payment Failure Retry
If you have Retry Failed Autopay Payments enabled on the Billing Setup page, this email is sent immediately whenever an Autopay payer's payment fails (so long as it fails due to an accepted reason - check out our article on this, linked below, for more insight on this).
The email informs them of the payment failure and lets them know that the charge will be re-attempted. The message also contains the date that the autopay will be re-attempted on. You can read more about this feature in our Retry Failed Autopay Payments article.
Rate Change
This email is automatically sent to the affected parents who have autopay enabled when you update the rates for Credit Card or Electronic Fees that you are passing along them.
Once you click Save after updating the rate on either the Credit Card or Electronic Check page, you'll see a confirmation pop-up box. If you click Confirm in that box, the rate will be updated and the email will automatically be sent to affected parents who have autopay enabled when you update the rates for Credit Card or Electronic Fees that you are passing along to parents.
- It's sent based on what you update and is only sent to active, applicable parents with autopay enabled.
- Only parents with autopay enabled who either have an upcoming charge or an unpaid past charge that will be pulled in the next autopay cycle will be emailed.
- For example: If you update the Credit Card convenience fee, only active parents with a Credit Card saved to autopay will be emailed.
- If you cancel the confirmation, the rate will not be updated and the email will not be sent.
- It can be updated in the Billing Email templates page: Settings > Communication > Email Templates > Billing Emails
Autopay Communication Recommendation
As a best practice, we recommend the following updates to billing email templates to ensure clear communication around Autopay. You're school may have already changed these emails, if not, you will see the default text (current text) as listed below.
-
Upcoming Statement: (change the statement.due_date merge token to the statement.autopay_dates merge token in the last paragraph.)
- Current text (last paragraph): 'If you are enrolled in Auto Pay, you will be automatically charged on {{statement.due_date}}. If you have any questions about this statement, please contact the school'
-
Our recommended update: 'If you are enrolled in Auto Pay, you will be automatically charged on {{statement.autopay_dates}}. If you have any questions about this statement, please contact the school'.
-
Billing Day Changed: (Add the {{statement.autopay_days}} merge token to the last paragraph.)
- Current text (last sentence in the first paragraph): 'If you have enabled automatic payments your account will also be drafted on this day.'
- Our recommended update: ' If you have enabled automatic payments your account will be drafted on the {{statement.autopay_days}} of the month.'
Additional Workflows
Skip a Payment
If a parent needs to skip a payment, simply disable autopay for them for that month.
- To be safe, we recommend waiting until the 1st of the following month to re-enable autopay for the payer.
- Re-enabling Autopay will allow their balance to be withdrawn on their billing date of that month.
- For example, if you disable autopay for April to allow a payer to skip that month’s payment, we recommend that you wait until May 1st to go back and re-enable autopay.
Important: One word of caution on this, depending on the ledger, this may also mean that the parent may be faced with a larger payment the next month. Please keep this in mind when assisting payers with skipping payments by disabling autopay for a month.
For schools requiring Autopay: A note about disabling it.
If your school has Autopay set as required and you manually disable it for any one of your parents, Autopay can only be re-enabled for that parent if either:
- You re-enable it on the Admin side (by clicking the ‘Enable Autopay’ link on the parent’s Billing > Overview tab.)
OR - The parent adds a new payment profile within their Billing Management tab. This new profile will give them the option to enroll in Autopay again.
-
Notes on this process: When the parent adds a new payment method and selects to Enroll in Autopay, the selection they make is locked in (the ‘Enroll in Autopay’ checkbox can not be unchecked).
- The parent can refresh their page or click back to get out of making this selection or they can proceed to finalize enrolling in Autopay.
-
Notes on this process: When the parent adds a new payment method and selects to Enroll in Autopay, the selection they make is locked in (the ‘Enroll in Autopay’ checkbox can not be unchecked).



Comments
0 comments
Article is closed for comments.