Overview
The Accounts page is found within the Billing menu. Within this report, you can view the details of all billing accounts including payment methods, overdue accounts, upcoming payments, remaining balances, and current balance amounts.
In This Article
- About the Accounts Page
- At-a-Glance
-
Export, Communicate, and Edit
- Totals Box and Columns
- Filter Options
- Active/Inactive Accounts
About the Accounts Page
At-a-Glance
The Accounts List page is a summary view of data on a parent-by-parent basis. You can use the Edit menu to add account-level charges or credits and the page can be filtered in a variety of ways through the Filter Options menu.
Export, Communicate, and Edit
Once you select one or more of the Accounts, the Edit, Communicate, and Export menus become available.
Export Menu
The report can be exported to a CSV or PDF through the Export menu.
Emailing Accounts (Communicate Menu)
Once you select one or more of the Accounts, the Edit and Communicate menus become available.
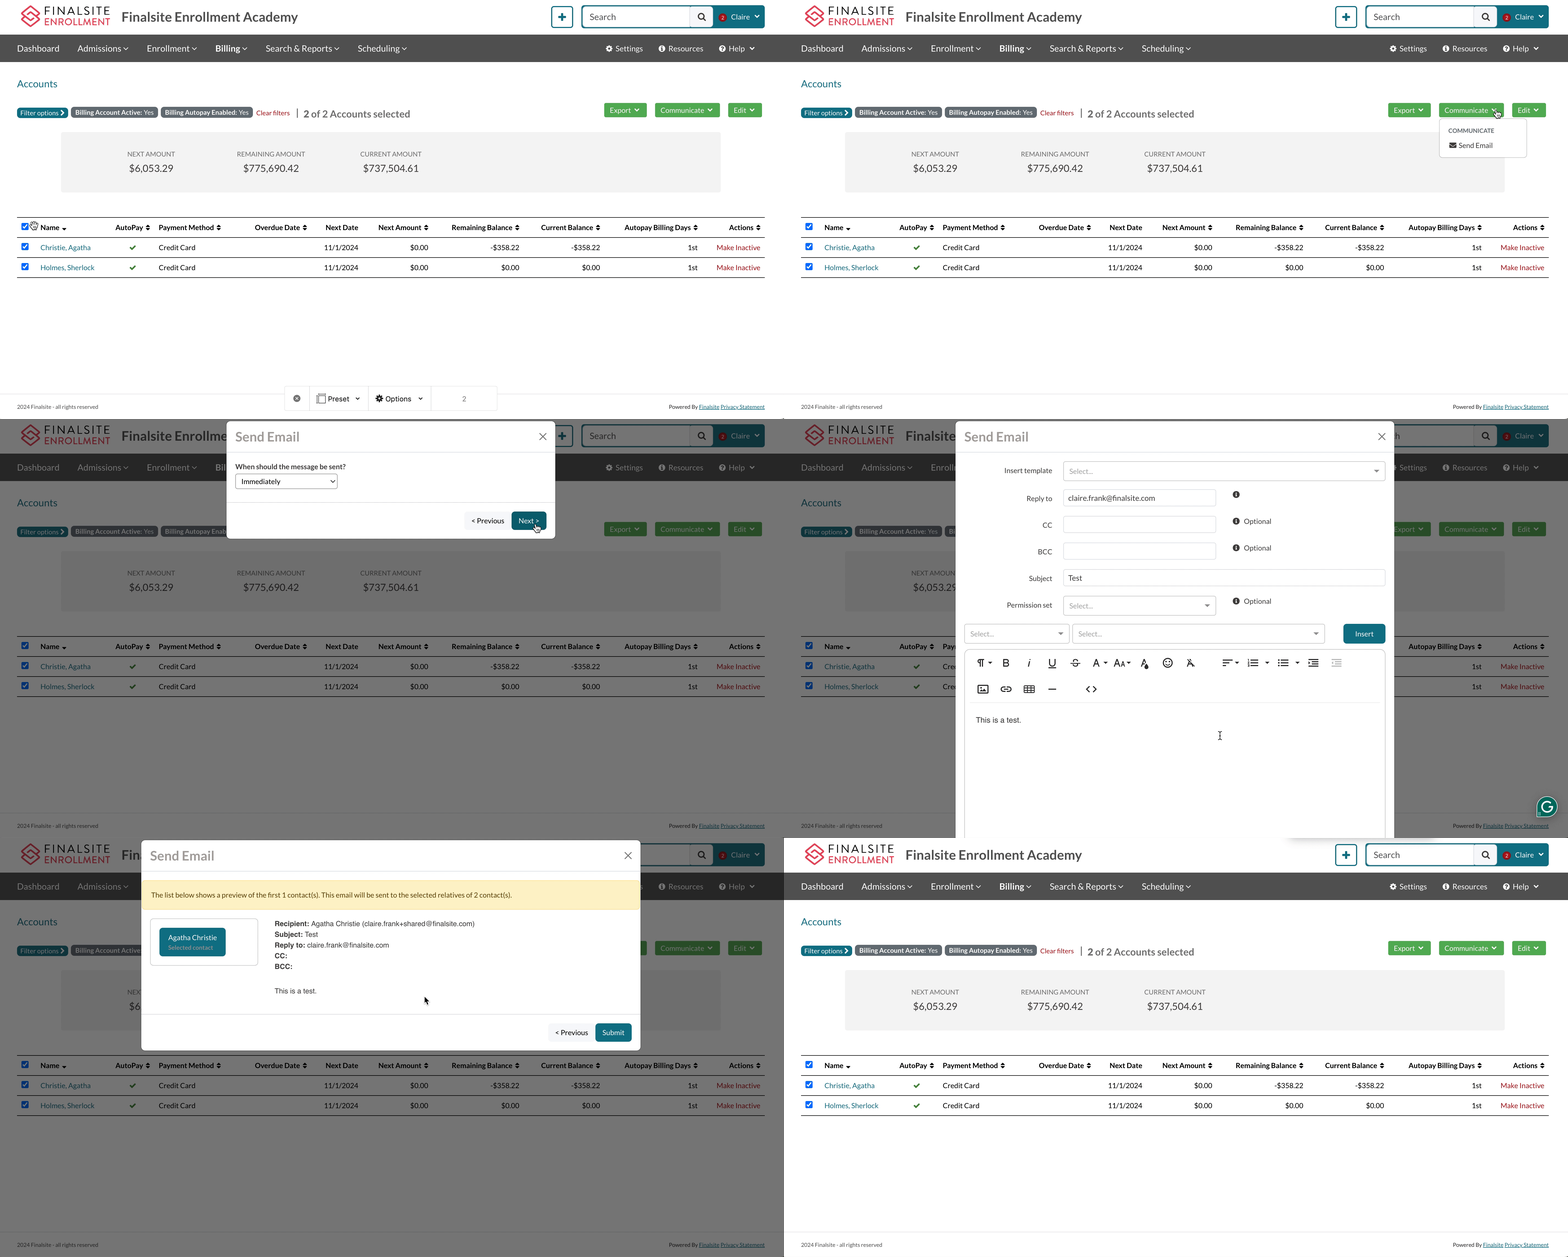
You can use the Communicate menu to email the accounts you've selected. You may find it particularly useful to use this in combination with the filter options. For example, you can filter the report to show only families that have Autopay enabled in case you'd like to email them.
Emailing from this page works the same as it does from any other page or report. Here's what you'll select:
-
Recipient: choose whether to send this to every contact in the list or send a family-based email. Sending "family-based" emails will send the communication once per family to the primary parent or guardian rather than duplicating the message and sending it to every parent/guardian in a family.
-
Timing: Either send the email right away or schedule it to be sent later. Remember, scheduled emails can be found under Settings > Communication > Scheduled Emails. Also good to note, scheduled emails get locked in about an hour before they are sent so be sure to check them before them to make sure you are ready to have them sent out.
- Crafting the message: Finally, you'll be able to either write up a message from scratch or select one of your custom email templates to send.
After previewing your email, hit the Submit button to send (or schedule) the email! Here's a peek at what that looks like:
Edit Menu
You can use the Edit menu to add charges and credits to any of the accounts on this page individually, or in bulk. Once added, the charge will appear on the parent/payer's ledger and will also be visible on the parent end.
Important: Only account-level charges/credits can be added.
- Account-level charges are charges that are not applied to the student, but, rather, applied at the account or payer level. Common examples of account-level charges are Late Fees and NSF fees.
- On the ‘Billing Categories’ page, these fees will not have the ‘Apply to Student Balance’ box checked off. You can read more about Billing Categories, within our Billing Categories article.
- You can read about automating late fees in our Billing Setup article.
Adding Charges or Credits in Bulk
- Select one or more accounts from the list.
- Select Edit
- Select Add Charge or Add Credit
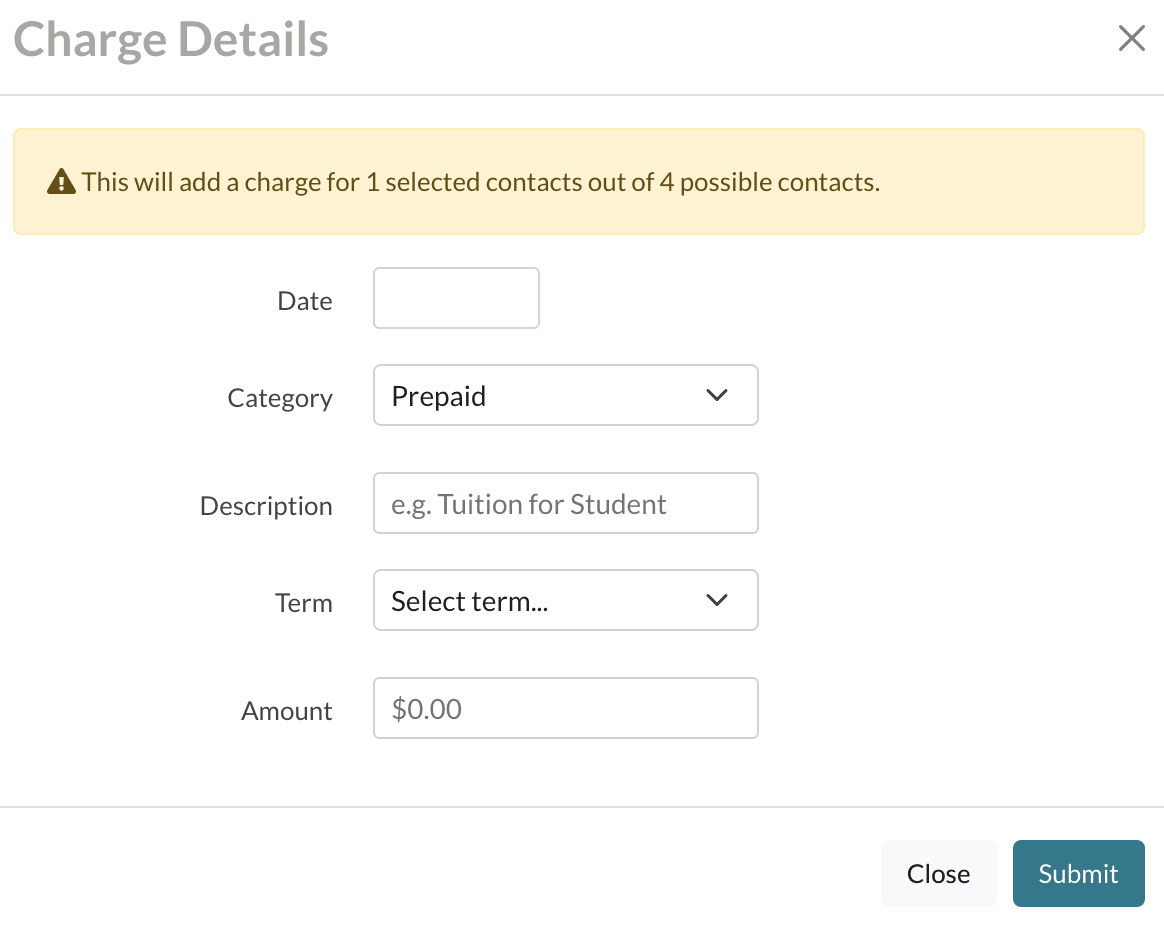
- Enter the details of the charge or credit within the details pop-up box.
The charge details pop-up box:
Ledger Lock Note
The Ledger Lock lets you secure your financial records by setting a locked date. Once enabled, it prevents any alterations to the ledger entries dated on or before the set date.
If you are utilizing the Ledger Lock feature, you will not be able to add charges or credits to apply during the locked period.
This feature can be adjusted on the Billing Setup Page (Settings > Financial > Billing Setup). Read more about Ledger Lock and how it affects other areas of your site in our Settings: Billing Setup Page article.
Totals Box and Columns
Totals Box
The grey box above the list sums up the list totals into three different groups:
- Next Amount: Displays the total sum of the Account charges that are due in the next billing cycle.
- Remaining Amount: Shows the total sum of any upcoming charges and any unpaid tuition.
- Current Amount: Displays the total sum of the balances that are due as of today.
Columns
The column headers, located at the top of the list, provide descriptions for the data within each corresponding column. To organize the list, you can click on the triangle icons adjacent to most headers, allowing you to sort based on those specific column attributes.
-
Name (sortable): All accounts are listed by the parent/payer name.
-
Autopay (sortable): The checkmark indicates that the payment information is saved and stored in Stripe. Please note: payment information is NEVER stored in Finalsite Enrollment. It’s passed over to Stripe from SA via the browser to indicate if the account is on Autopay.
-
Payment Method (sortable): Indicates a credit card or electronic check.
-
Overdue Date (sortable): This will show the date the account became overdue, according to the grace period set by your school (if applicable) and in parenthesis how long it has been overdue. If the account is overdue, a red triangle will display under the current balance column along the far right as shown below.
-
Next Date: Shows the due date for the next amount column. The date will change over to the next month on the billing day.
-
Next Amount (sortable): Displays the amount due on the next billing cycle, including any deferred charges. This column will update to the next amount due in the billing cycle on the billing day.
-
Remaining Balance (sortable): Shows the total of any upcoming charges and any unpaid tuition.
-
Current Balance (sortable): Displays the current balance that's due as of today. This is consistent with the amounts in the Ledger of the payer record and the amount reflected in the Parent Portal for the payer. If the account is overdue, based on the grace period (if one is set), there will be a red triangle with an exclamation point to flag the account as overdue (see the example above).
-
Autopay Billing Days (sortable): Displays the account's Billing Date(s).
-
Actions: This column allows you to Activate or Inactivate Billing accounts.
- You can only inactivate Billing accounts that have a zero balance.
- For more in-depth info on Active and Inactive billing accounts, please refer to the Active/Inactive Accounts section of this article.
Filter Options
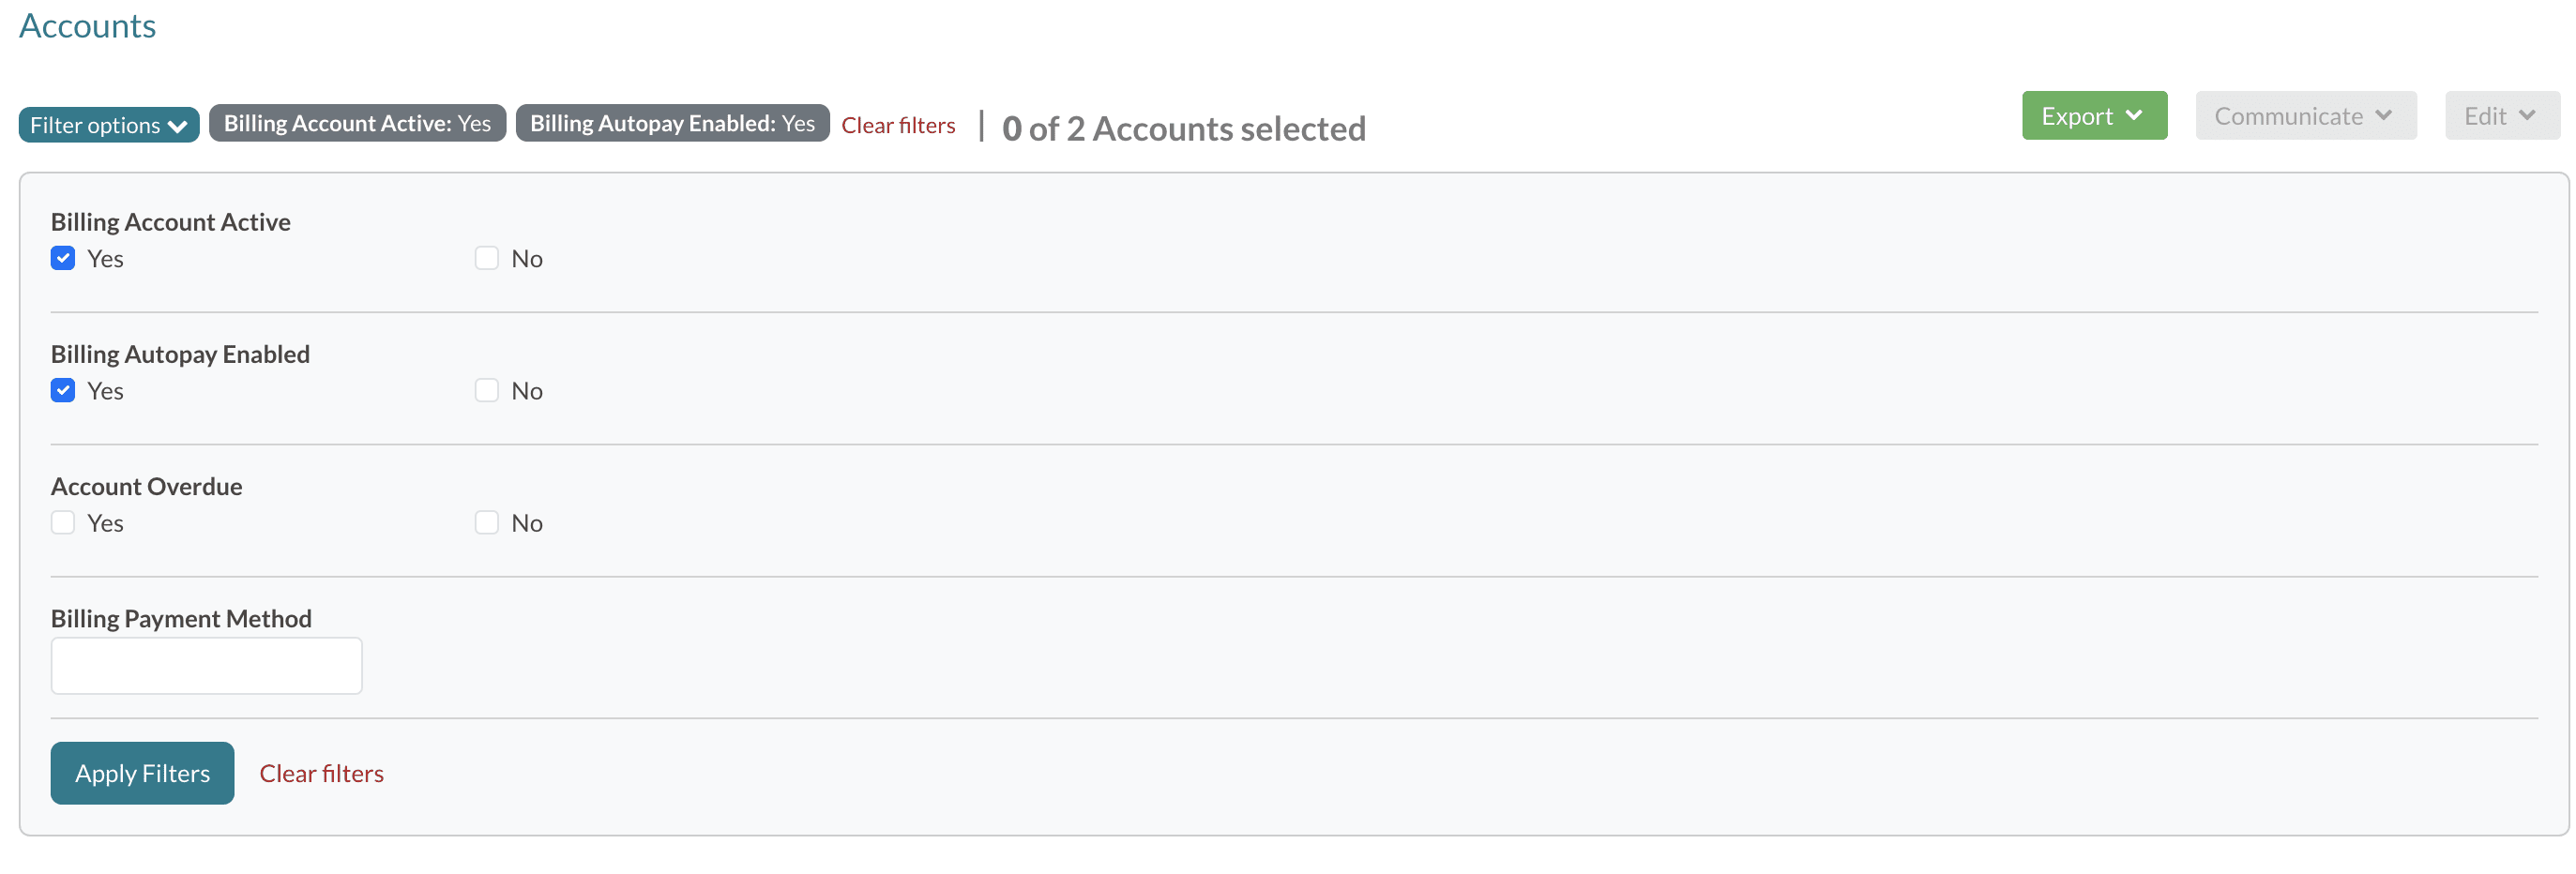
When you expand the Filter Options menu, you can filter the list in the following ways:
-
Billing Account Active:
- Yes: Only displays active billing accounts. The list automatically defaults to show only active billing accounts.
- No: Only displays inactive billing accounts.
-
Billing Autopay Enabled:
- Yes: Only displays the accounts with autopay enabled.
- No: Only displays the accounts that do not have autopay enabled.
-
Account Overdue:
- Yes: Only displays overdue accounts.
- No: Only displays current accounts.
-
Billing Payment Method:
- Text box to search by Billing Payment Method.
- If you enter the exact payment method, it will filter the report to only show payers who have that method set as their autopay method.
-
Custom Filters
- Our team can add custom filters to your Billing Reports. In the example image above, you can see that we've added the International Student field as a custom filter. To request custom filters, contact our Support team.
Active/Inactive Accounts
The Accounts List page includes a way to mark accounts as inactive. This provides a way to manage the list on the page so that only relevant accounts are displayed.
How does this help?
Designating accounts of families who have withdrawn from your school or exhibit limited billing activity as "inactive" enables you to maintain more concise and streamlined data. This approach enhances your ability to effectively monitor accounts with increased efficiency.
How are accounts inactivated?
Accounts are inactivated either manually or automatically.
-
Manual: Any account with a zero balance can be manually marked as inactive.
-
Please note that this means that if the account has any balance, regardless of whether the balance is positive or negative, the account can not be inactivated.
-
Please note that this means that if the account has any balance, regardless of whether the balance is positive or negative, the account can not be inactivated.
-
Automatic: If the account meets all of the following criteria, it will be automatically marked as inactive by the system.
-
Zero Balance. The account must have a zero balance.
- If the account has any balance (positive or negative), it will not be marked as inactive.
-
Ledger Activity. The account can not have charges on the ledger for the current term or future terms.
- Even if the account has a zero balance, if there are charges on the ledger in the current term or any future term, it will not meet the criteria to be automatically marked as inactive by the system.
- One Year. The account must have had no ledger activity for one calendar year.
-
Zero Balance. The account must have a zero balance.
How do you manually mark an account as inactive?
Click on the Make Inactive link in the Actions column to mark an account as inactive. If it does not meet the criteria to be manually marked as inactive (having a zero balance), you will not be able to mark it as inactive and an error message will display.
Once you mark an account as inactive, when you filter to show only active accounts, the account will not display within the list.
How do they become active again?
- Manual: Once you've filtered the Accounts page to see your Inactive accounts, click the Make Active link in the Actions column to make an account active.
- Automatic: Inactive accounts will automatically become active again if there is any activity on the ledger (payment/charge/credit).
Once active, the account will reappear in the list on the Accounts page when filtered to show active accounts.
Does inactivating an account affect anything else on your site?
No, accounts that are marked as inactive do not affect any other part of your site. It does not affect the payer ledgers or any of the reports. Inactivating accounts only affects data management on the Accounts page.


Comments
0 comments
Article is closed for comments.