
Linking a calendar to a checklist item lets families sign up for tours, interviews, or other events directly from their admissions or enrollment checklist, rather than from a public link. This is the right way to handle event scheduling for any student already in your workflow, since public links create a new inquiry on every sign-up.
💡Quick Answers
- What's the first setup step? Open the calendar (Scheduling > Calendars > select the calendar) > Calendar Settings > Edit Settings > scroll to Calendar Access > check Allow parents to book appointments via the checklist in the Parent Portal > Submit. Without this checkbox, the calendar won't appear in the portal.
- How do I link the calendar to a checklist item? Settings > Checklists > pick the right checklist (Admissions or Enrollment) > Add a New Checklist Item > set Item Type to Calendar, then pick your calendar from the dropdown. Set name, parent explanation, visibility, optional terms and grades, and Submit.
- What does a parent see and do? In their checklist they click Schedule Appointment, pick a date and time on the calendar, and can optionally click Add to my Calendar afterward. If you enabled cancel/reschedule, those options appear too.
- Why isn't the calendar checklist item auto-completing after the family books? Calendar checklist items never auto-complete by design, so you can use them to track actual attendance, not just booking. After the event, build a calendar event search and use Bulk Updates to mark the item complete for students who actually showed up.
- Can admins book appointments on behalf of a student? Yes. See Registering Students for Events as an Admin. You can book right from the checklist on the contact record.
- What happens with duplicate bookings? Both appointments show on the parent's checklist and the admin checklist. If cancel/reschedule is enabled, the family can cancel any of the duplicates themselves. If not, you'll need to cancel the extras from the admin side.
Link a Calendar to a New Checklist Item
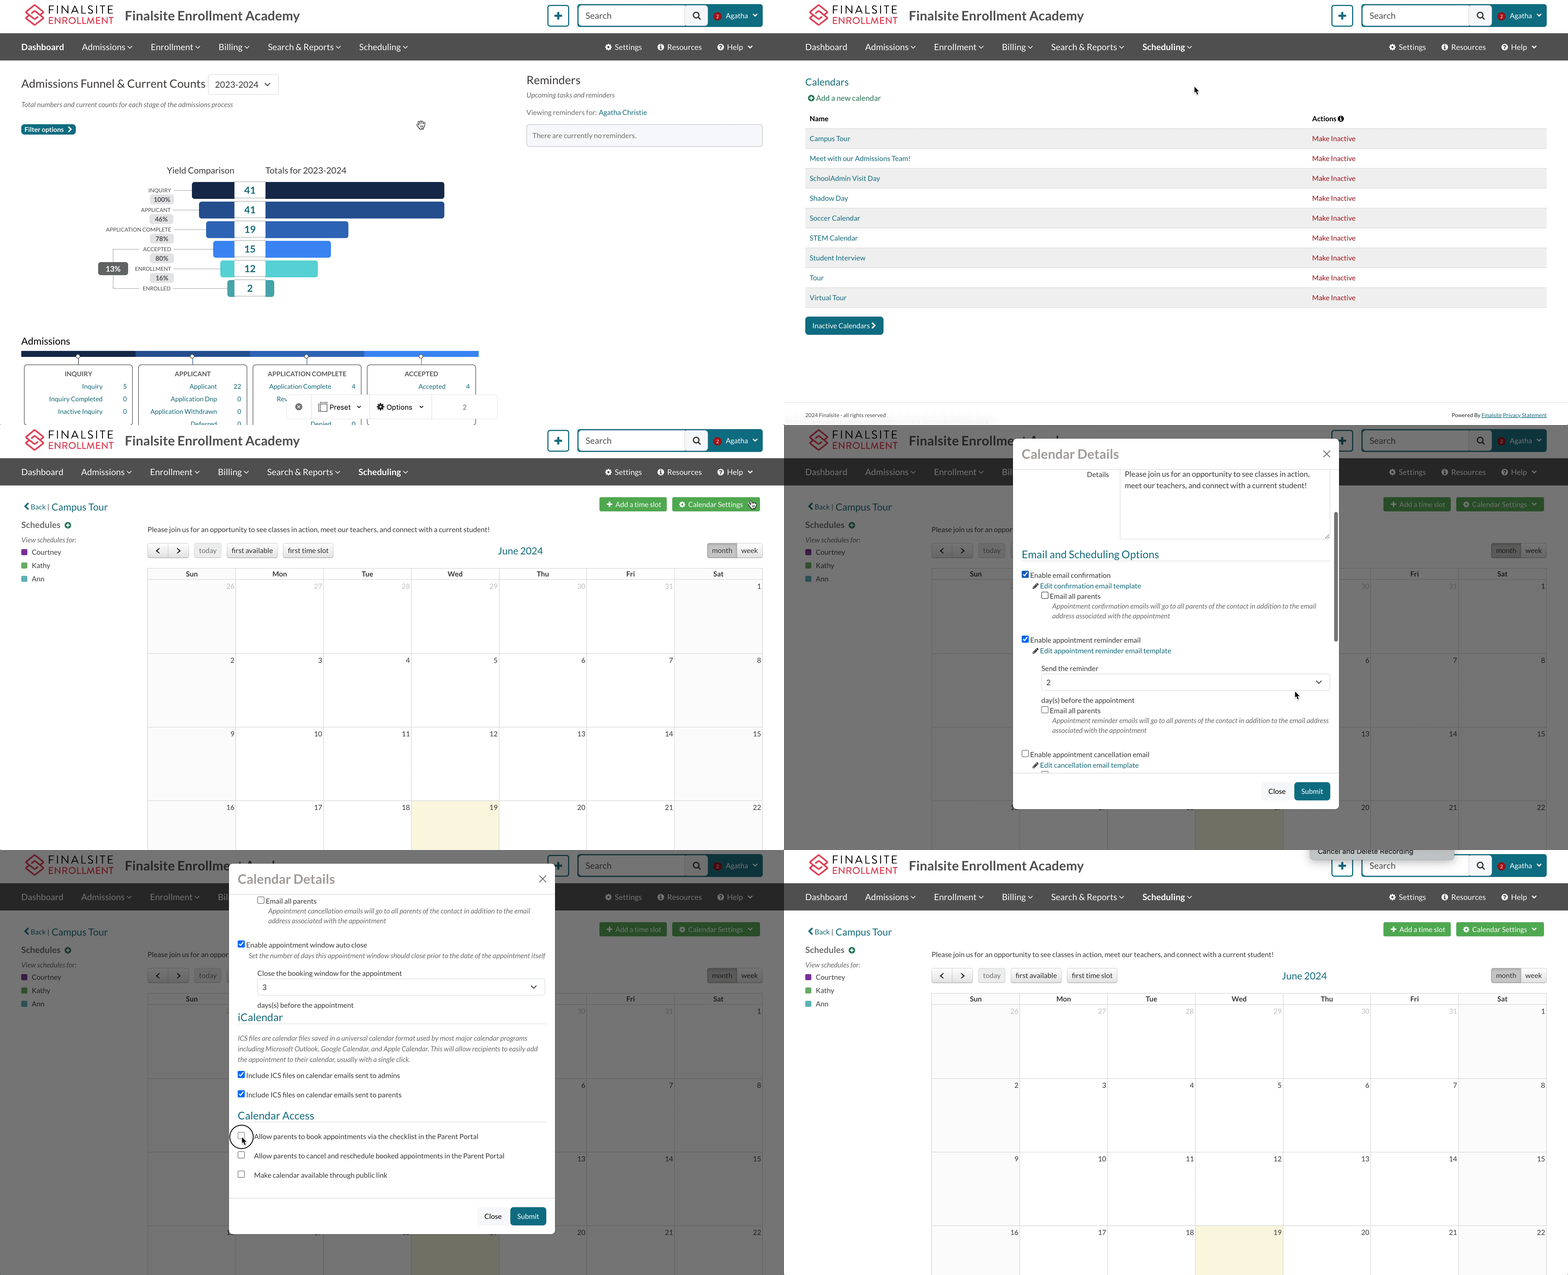
Update the Calendar's Settings
Before setting up the checklist, you'll need to check a setting within the Calendar itself.
- Navigate to the Calendar (Scheduling > Calendars > select the calendar name)
- Open the Calendar Settings menu and select Edit Settings.
- Scroll to the Calendar Access section in this window. Within that section, make sure that the following is selected: "Allow parents to book appointments via the checklist in the Parent Portal."
- Select Submit to save your changes.
Good to know: You may notice in the Calendar Access section, you have a couple of additional options:
- Allow parents to cancel and reschedule booked appointments in the Parent Portal: With this option, parents can manage canceling and rescheduling for events right through the parent portal. If you have enabled the notifications for calendars, you will receive an email if a parent reschedules their appointment.
-
Make calendar available through public link: This allows you to share the calendar via a link that can be posted on your website or in an email. This is meant for prospects and inquiries only.
- Remember: Do not send Public Links for students who have already applied! Students in the admissions and enrollment workflow should always be booking and scheduling events through their checklists.
- Allow parents to view schedules in the Parent Portal: You can make the schedule color and title parent-facing with this option. Read more in our Creating & Using User Schedules article.
See it in Action
Set up the Checklist Item and Link the Calendar to the Item
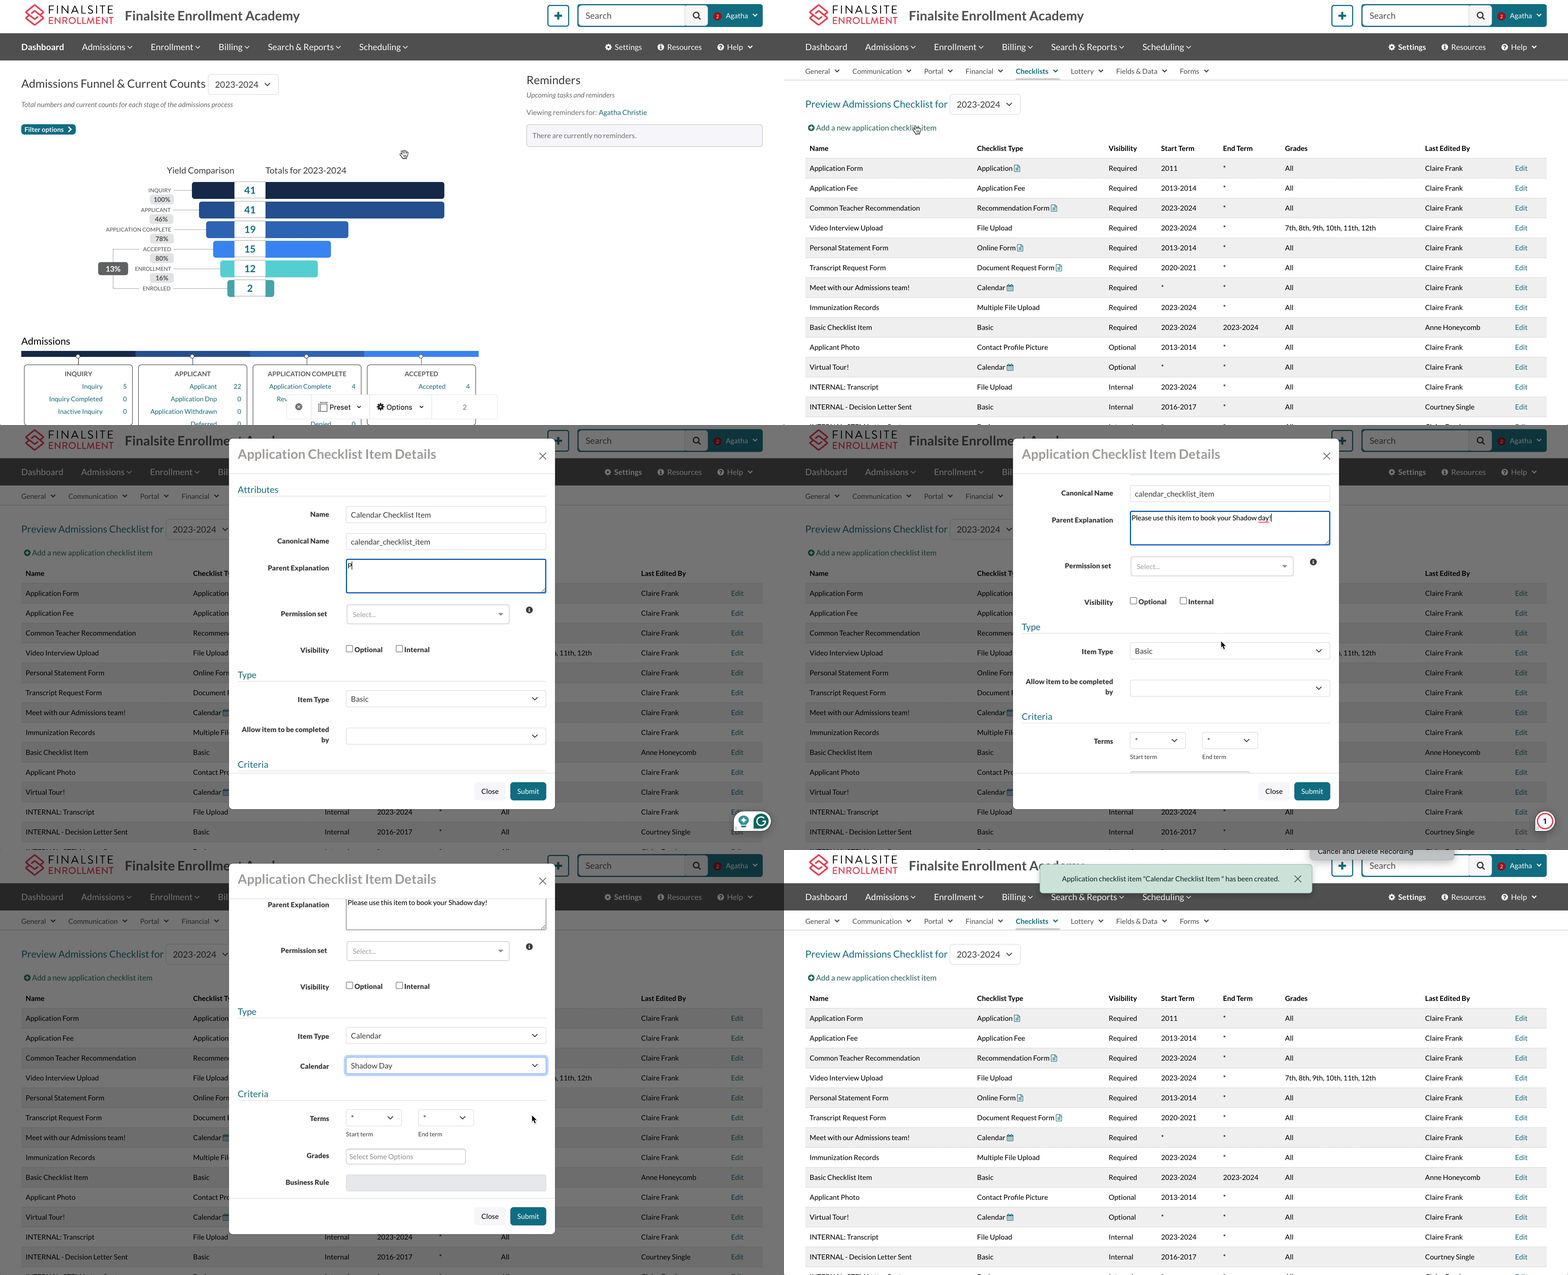
- First, open the Admissions or Enrollment checklist (Settings > Checklists).
- Select Add a New Checklist item.
- Type in a name for the checklist item (this is parent-facing.) The canonical name is an internal name and will populate automatically.
- Enter a parent explanation. This is also parent-facing.
- If applicable, select a permission to determine which admin can see the checklist item.
- Select your visibility preference. (If it's required, leave box boxes unchecked.)
- For the Item Type, select Calendar. This opens the calendar drop-down menu, where you will select the calendar you want to link to the item.
- Optional: Set the terms. The Start Term tells the checklist item which term it should first start to appear in, while the End Term tells the checklist item the last term it should appear in. You can leave the end term blank if you don't want the checklist item to expire.
- If there are specific grades that the Checklist item should appear for, select them by clicking on the Grades box.
- If you need a rule added to specify the student group this should appear to, contact support for assistance.
See it in Action
Parent Checklist Experience
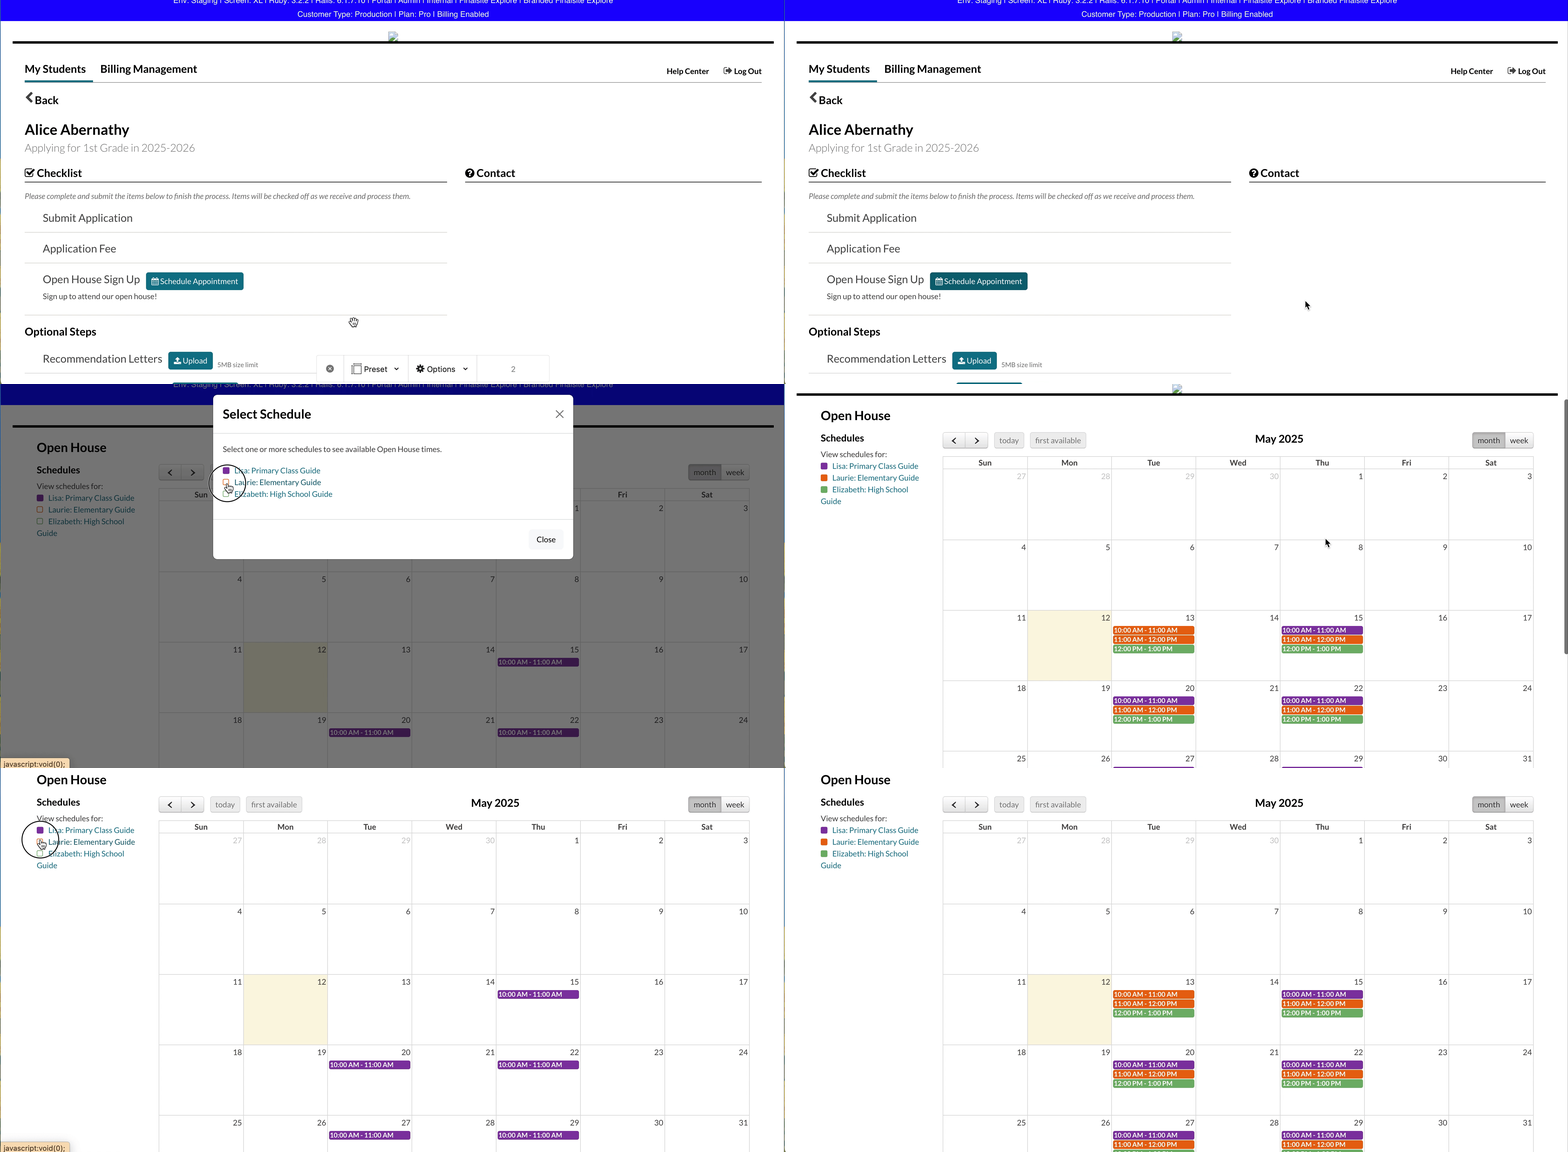
When the family goes into their checklist, they can select the Schedule Appointment button. When they select it, they will be brought to the calendar where they can select and book their date for the event.
Good to note: If the schedule is parent-facing, the parent will first select which schedules they would like to display when viewing the calendar.
Families who register for an event through their checklist will have the option to add the appointment to their calendar by selecting "Add to my Calendar" in the Appointment Details modal.
If you've included the option to allow them to cancel and reschedule, they will also have those options in the checklist after booking.
Admin Checklist Experience
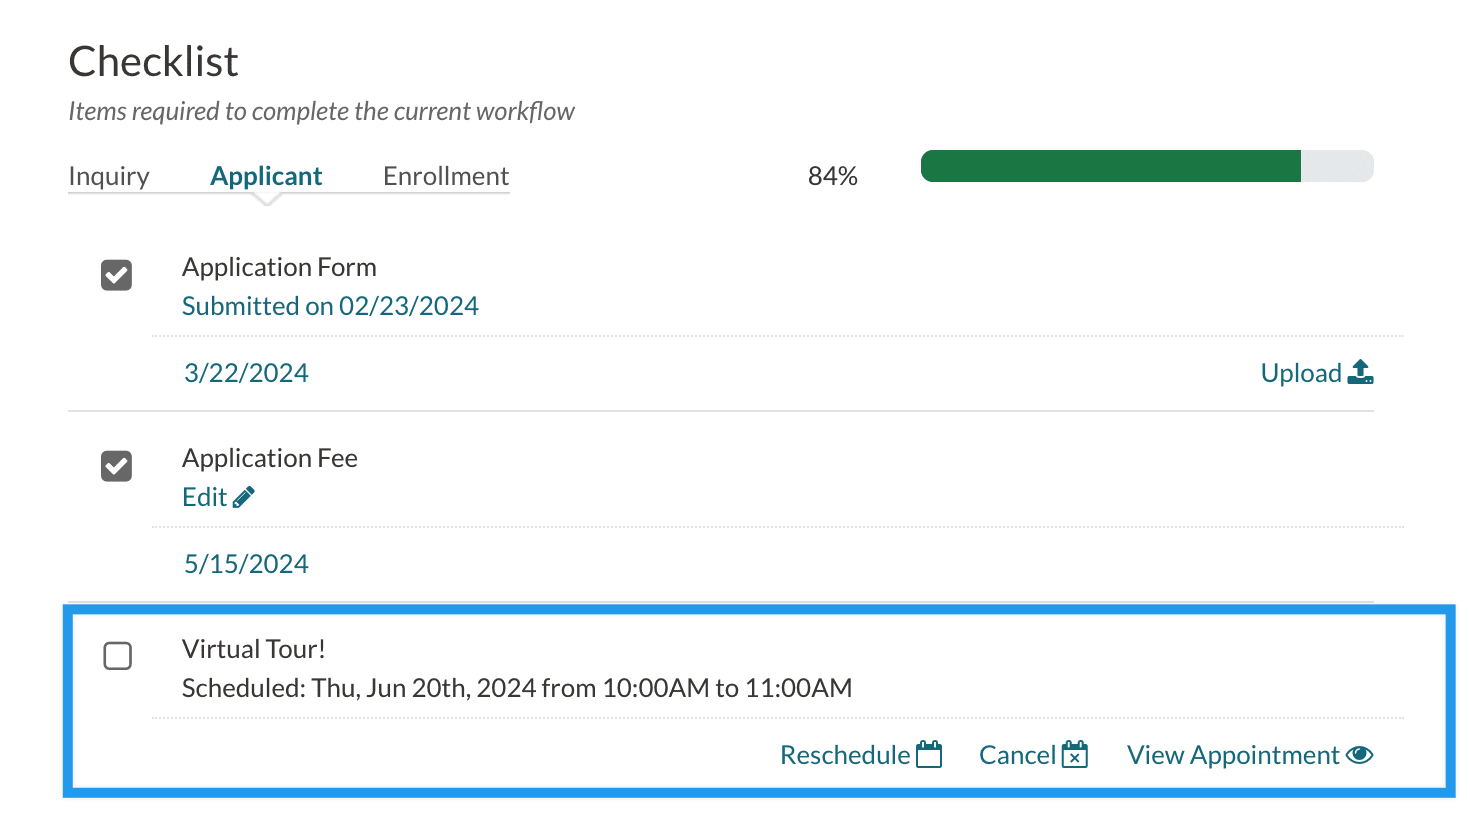
Within the student checklist, on the admin side, you will see the date and time of the appointment reflected after the student books it. You also have the option to reschedule and cancel the appointment. Clicking on View Appointment opens a pop-up that displays the appointment details.
Calendar Checklist Item Management
Notice in the image below that the checklist item is not marked as complete. Calendar checklist items do not get automatically checked off. They must be managed manually. This is by design because it allows you to use the item to track which students actually attended the event. After the event is complete, create an event search and use the bulk update feature to update the checklist items for students who attended.
Booking Appointments for Students
Did you know that you can book appointments for students right from their checklist? Learn how in our Registering Students for Events as an Admin article.
Duplicate Appointment Bookings
If a parent books a duplicate appointment for the event, both appointments will be displayed on their checklist. (They'll display on your end in the Admin-facing checklist as well.)
If you've allowed parents to cancel/reschedule appointments in the parent-facing checklist, they'll have the option to cancel/reschedule any of the appointments. In other words, if a parent has signed up for an event three times, they'll have the cancel/re-schedule option for all three bookings.
Comments
0 comments
Article is closed for comments.