Public Calendar Links allow your families to sign up for events in your Finalsite Enrollment site, such as Open Houses or Tours, with a direct link from your school’s website or emails. This can be helpful for families who just want to register for a single event your school is hosting, instead of filling out an entire inquiry form right away.
When you set up calendar events in the Scheduling tab of your Finalsite Enrollment site, you have the option to make them public. This option becomes available after a new calendar has been created and the hyperlink has been created in the system for that calendar.
Best practice: Don't use Public Calendar links to share calendars with students who already have a checklist, i.e., they are already an applicant or enrollee.
So...why shouldn't I use public links for students who have a checklist?
Public links create an inquiry form every time they are used to sign up for an event.
If a student with an Admissions checklist fills out an event sign-up from a public link, it creates an inquiry for them and, therefore, can result in duplicate records and mixed-up statuses! And anyway, for all students who have already applied, you can just have them sign up for events through their checklist.
Pop some Popcorn!
New to Calendars or need a refresher? Check out our quick learn video. It's under 5 minutes!
In this Article
Set Up a Public Calendar Link
To start setting up a public calendar link, navigate to the Scheduling tab in your Finalsite Enrollment site, then click on Calendars and select the calendar that you want to make public from the list. To learn how to create a new calendar, visit the article "Creating New Calendars."
Once the calendar page has opened, click on the green Calendar Settings button in the top right and select Edit Settings from the menu.
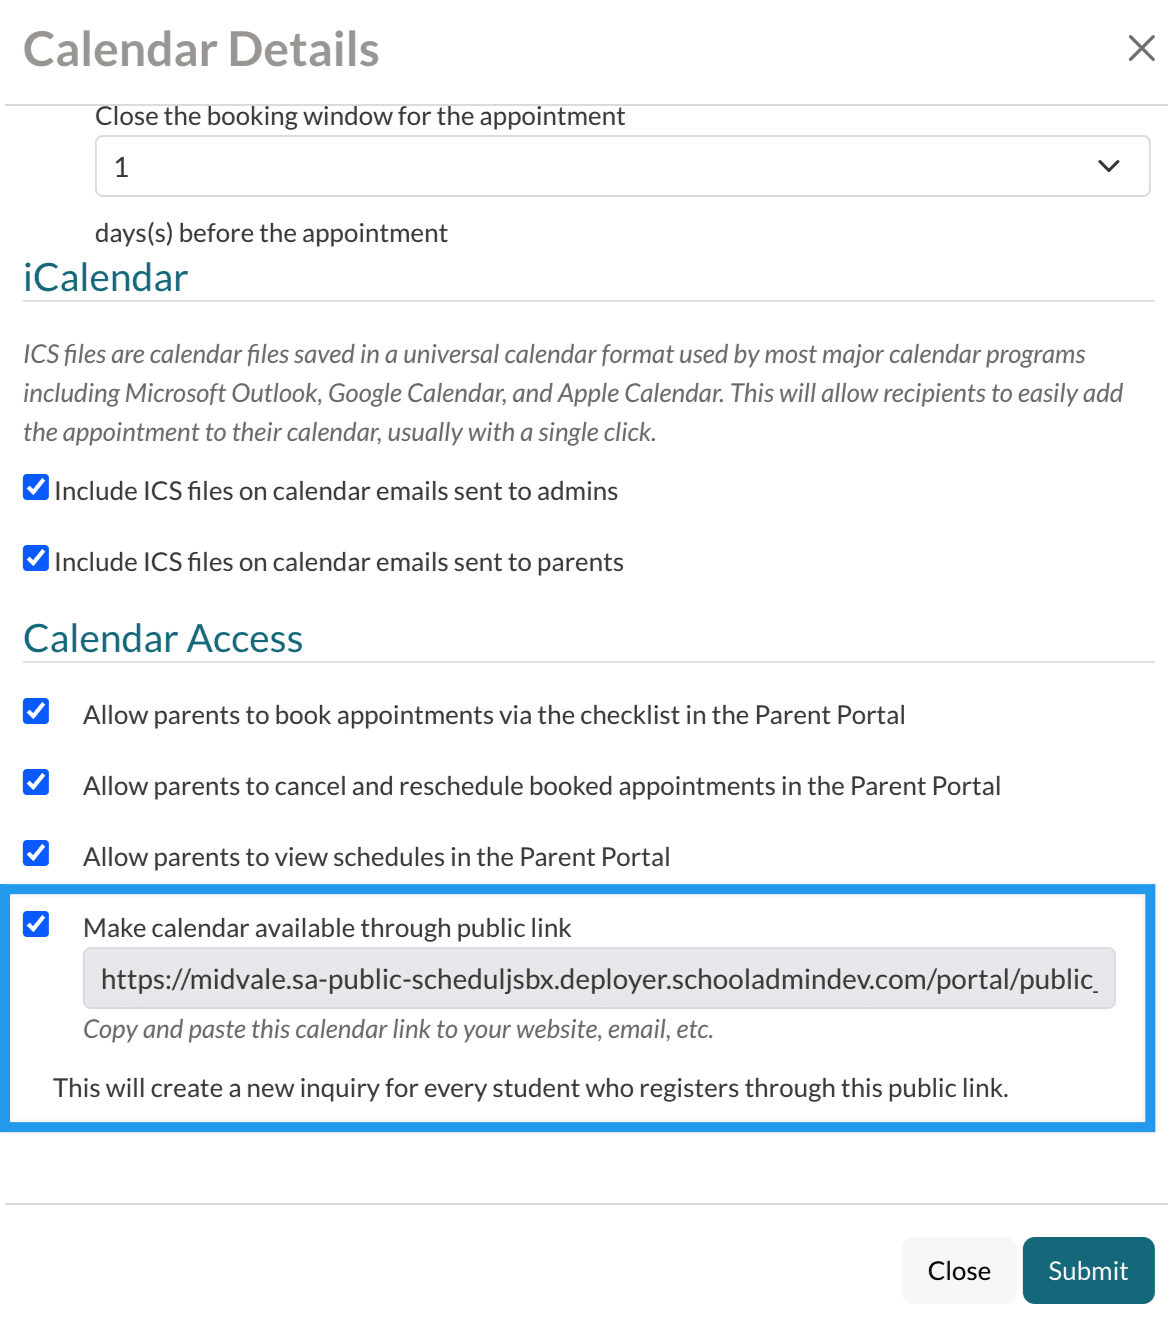
In the calendar settings, scroll down to the Calendar Access section and check the box for 'Make calendar available through public link'. Once you have done so, a hyperlink will appear. This is the direct link to your calendar, which you can copy and paste into your website, emails, or elsewhere for families to click on and register for the event. Remember to click Submit to save your changes!
Manage Public Calendar Sign-Ups
Event Registration
When a family clicks the public link, they are taken to a Finalsite Enrollment page that has your calendar and any available dates listed. They will simply click on a date and enter the required information to register for the event.
By default, this is the only information that public calendar sign-ups must provide:
- Student First & Last Name
- Student Apply Grade
- Student Apply Year
- Parent/Guardian First & Last Name
- Parent/Guardian Email
- Parent/Guardian Phone
If you want to collect additional information about the family (e.g. interests for shadow day, t-shirt size, etc.), consider setting up a Custom Appointment Form.
Post Registration
Families who register for an event through a public link will have the option to add the appointment to their calendar by selecting "Add to my Calendar" in the Appointment Details modal.
Families will also receive email confirmations or reminders as configured in the settings for that calendar.
The system will create inquiry records with all of the basic appointment information for each student that signs up, along with their parent/guardian contact. From the admin side, the submitted form will look like an inquiry, but it will contain only basic information.
If a family needs to change or cancel their registration, they will need to contact the school, so that this can be taken care of on the Admin side. The school can then cancel the existing appointment, and the parent can click on the link again to sign up for a different date and/or time.
Duplicate Appointment Bookings
When you share a Public Calendar link, families can easily click the link, select a date, and input their information. Since it's a public link without login requirements, there's no way to stop someone from accidentally signing up multiple times.
To help you manage duplicate bookings, we've set up layers of alerts to notify you, allowing you to check in with the family and remove any duplicate bookings. You'll see the duplicate appointment in your event search, on the student checklist, and when importing the forms in the Forms inbox.
Check out our Duplicate Appointment bookings article to learn more!


Comments
0 comments
Article is closed for comments.