Overview
Setting up a test student and connecting them to a test FACTS account is a great way to make sure your integration is working as expected before sending out contracts. It also allows you to keep tabs on it throughout the year to check on any errors/make sure it's working as expected if anything has changed.
In this Article
Set Up Your Test Student/Parent in Finalsite Enrollment
The first step is to make sure you have a test student set up in Finalsite Enrollment.
Use this article to guide you in the initial step of adding a test student: Creating a Test Student
Setup Tips
- Remember to use the word "Test" in their name when you add your student. This ensures that you can easily find them and prevents confusion as to whether or not they are a real student.
- Make sure your test kiddo doesn't have any siblings attached to them (it will be easier to test FACTS without siblings).
- If they have a sibling attached, make sure the sibling is also in an Enrollment in Progress status or that they are placed in an inactive status. (Inactive statuses: Parent declined, Application withdrawn, Denied, or any custom admissions statuses that are marked as 'inactive'.)
Next, follow these steps to finish their setup:
Step 1. Go to their record.
Once you have your test student set up, navigate to their record.
Step 2. Update their status.
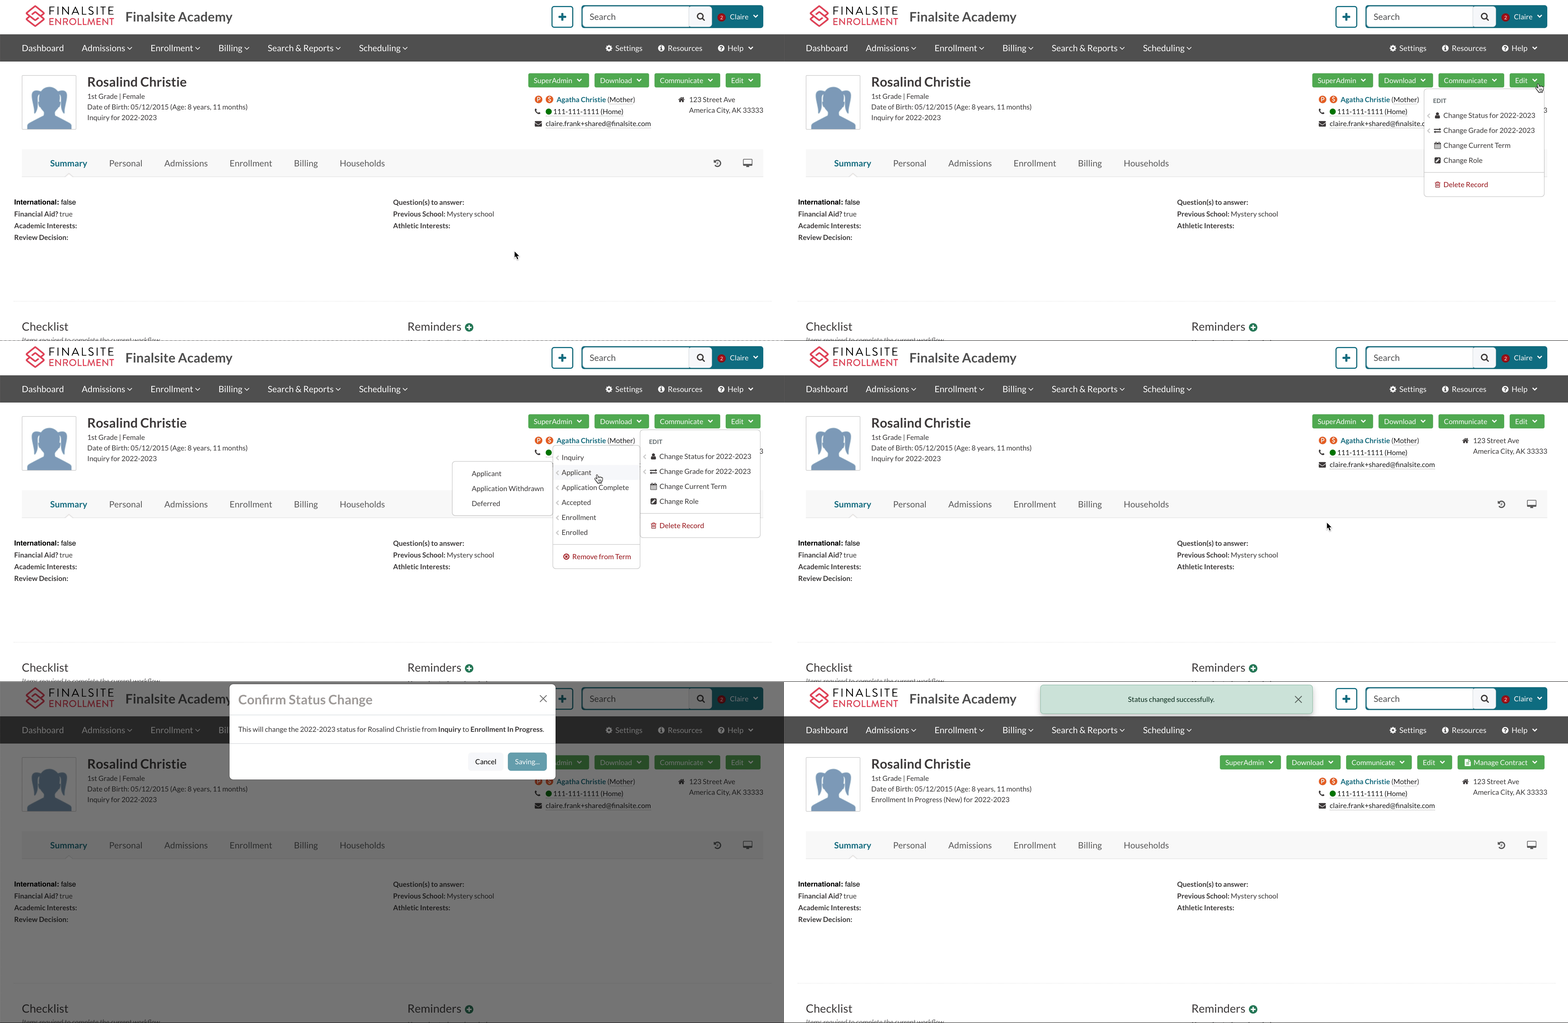
Change the test student to an Enrollment in Progress status. (Edit > Change Status for xxxx-xxxx > Enrollment > Enrollment in Progress)
Step 3. Check for rules on your FACTS checklist item.
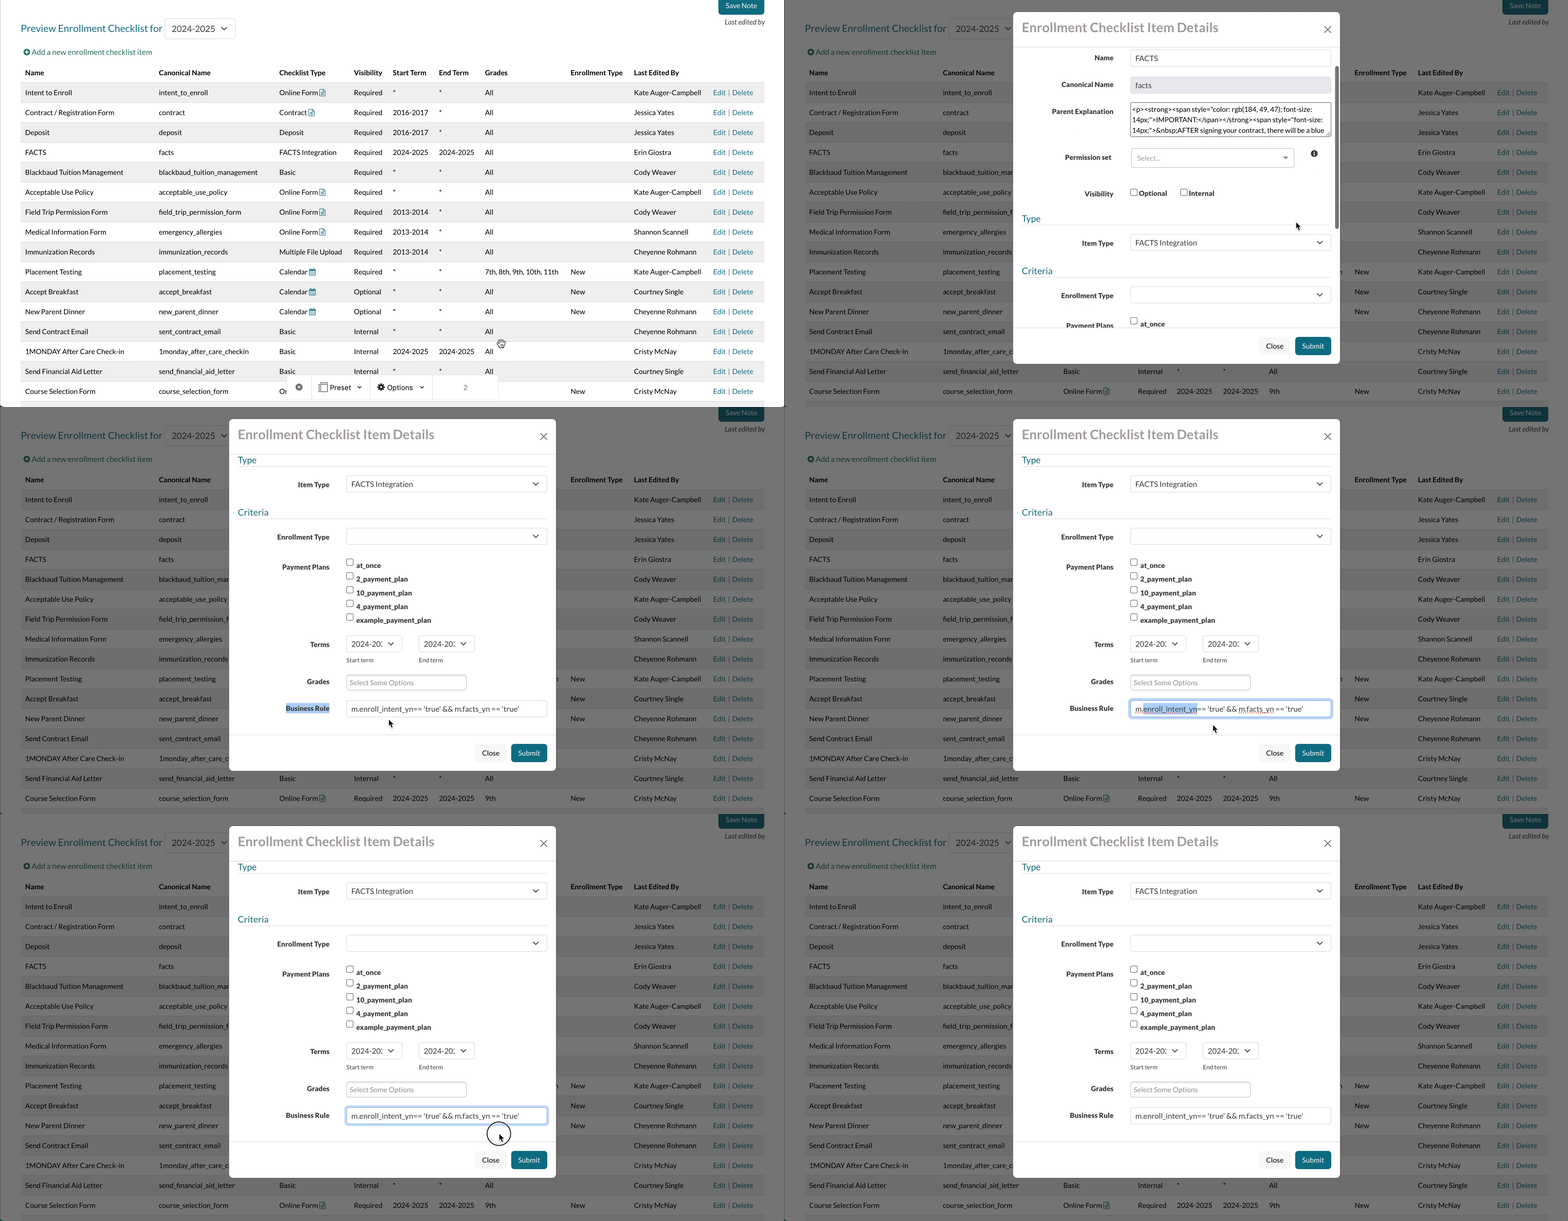
Sometimes schools have rules attached to their FACTS checklist item to designate who it should show for or when it should show. Open the Enrollment Checklist and open the FACTS checklist item. If there are rules attached to the checklist item, adjust your test student to make sure they meet the criteria for the FACTS item to show.
If there are no rules attached to your FACTS checklist item, proceed to the next step.
Step 4: Assign Financial responsibility and save the Authentication code.
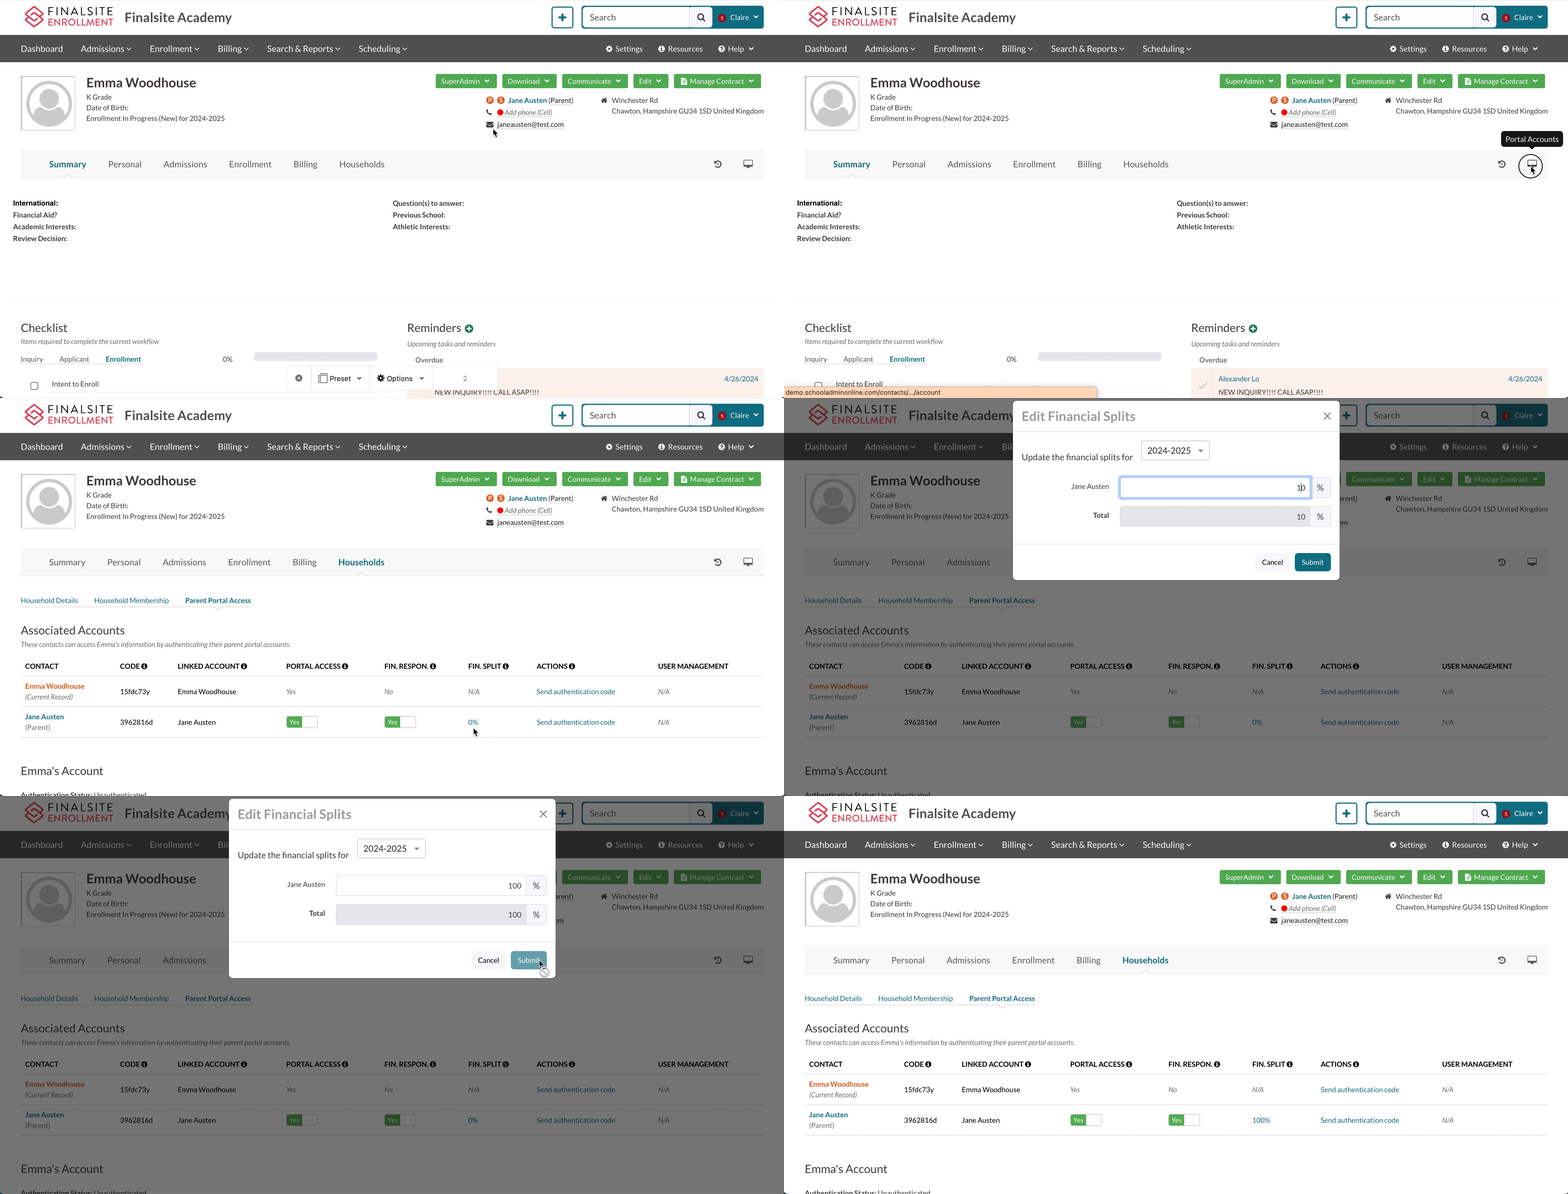
Back on the test student record, navigate to the Parent Portal Access tab.
Click on the financial split column next to the test parent that you are going to authenticate to.
Assign 100% financial responsibility to that test parent.
While on this page, copy the Authentication Code of the test parent and save it to a note.
Step 5: Contract Submission.
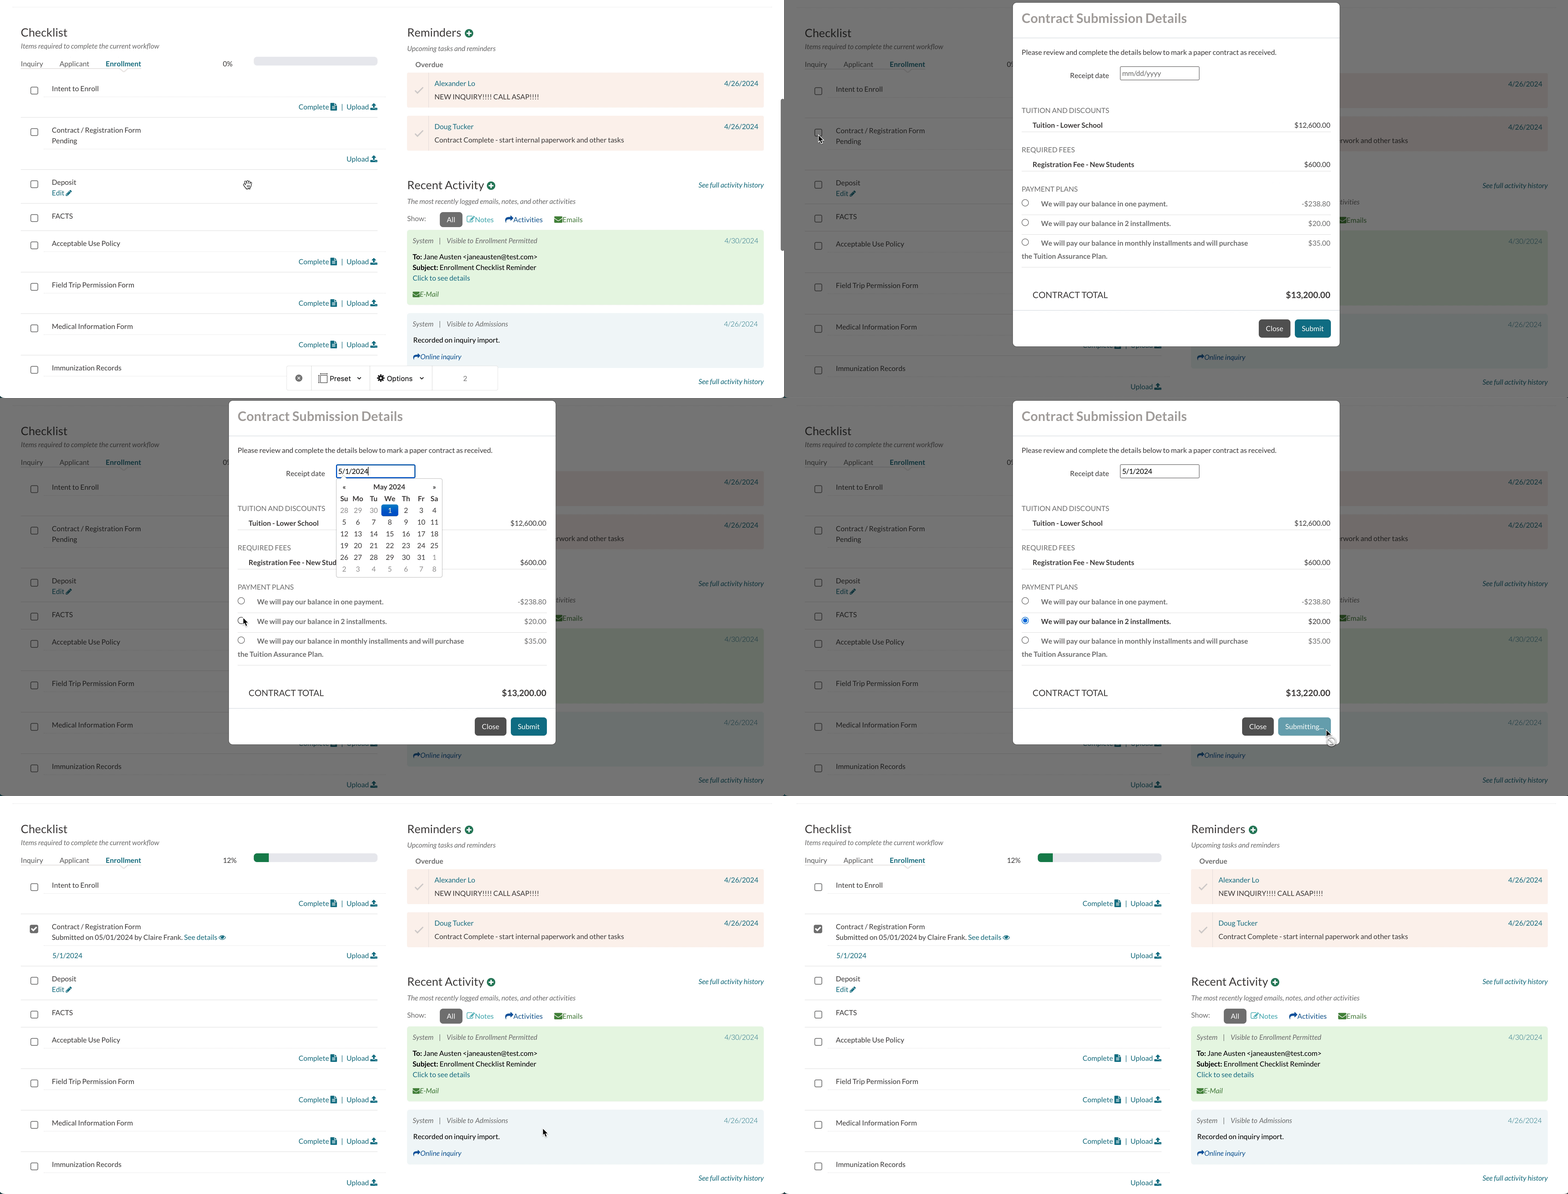
Navigate back to the Summary tab of the student record (where the checklist is) and click the checkbox to submit the student's contract. You don't need to generate it in this case. Just click the checkbox and enter the required selections to submit it.
Authenticate yourself
Now that you've set up the student, you will authenticate yourself to the test account and view the student's checklist from the parent portal side of things. Remember the authentication code you saved? You are going to need it now.
Open the username menu and select Parent Portal.
In the Parent Portal, select to enter an Authentication code.
Paste in the saved code and save it by clicking Next.
You'll see you're test student appear.
Note: If you already have a test student in there, you'll see the authentication code entry link at the bottom of the page.
Check on the FACTS checklist item
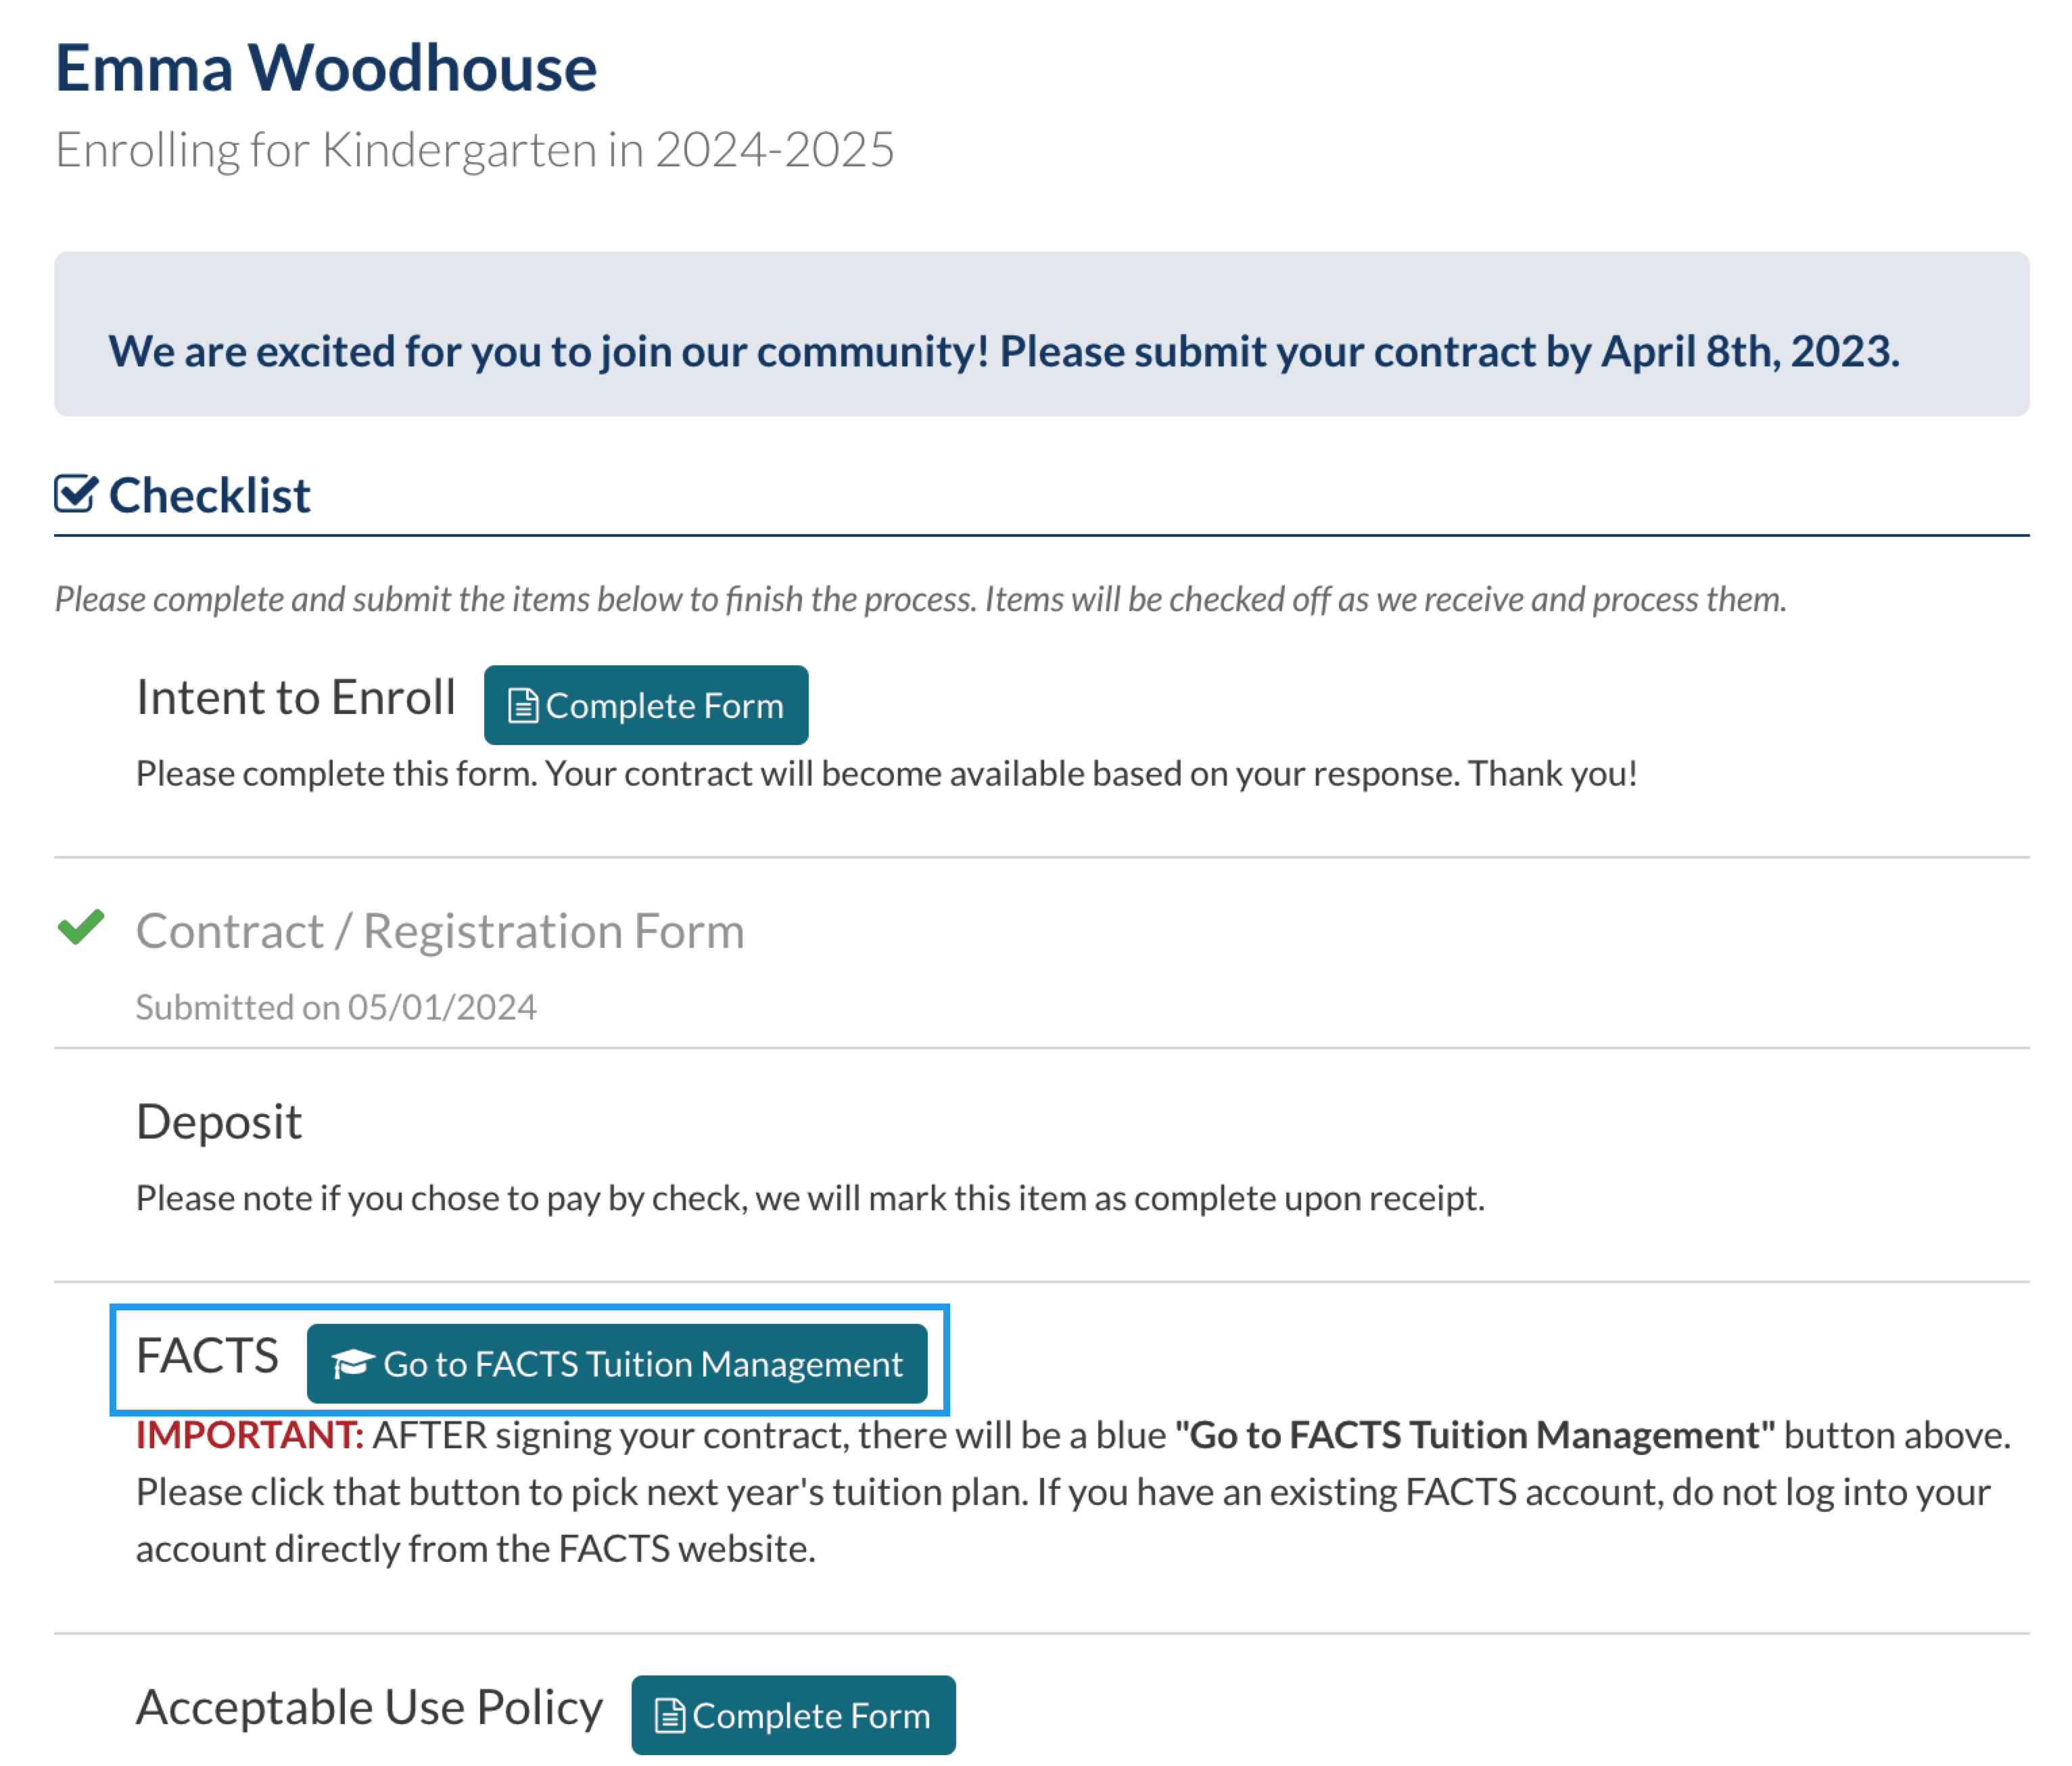
Click on the student's checklist to check that the FACTS checklist item is available (the button is clickable).
- If the checklist item is not there: Check on the checklist item rules again. Did you need to set answers in any other fields to make the FACTS checklist item show up on the checklist?
-
If the checklist item is not clickable: Check on your test student.
- Is the contract submitted? For the FACTS item to be available, you need to submit that checklist item.
- Does your test student have siblings? For this to work all siblings must be in either an Enrollment in Progress status or set to have inactive statuses. See the Setup tips above.
Here's what you should see if everything is working as expected.
Use your test student to create a test FACTS account
Now we're ready to move into FACTS. Click on the FACTS checklist item.
If it's your first time in FACTS, you'll be asked to enter contact information to set up your account. It's okay to enter fake information here since you are setting up this account for testing purposes.
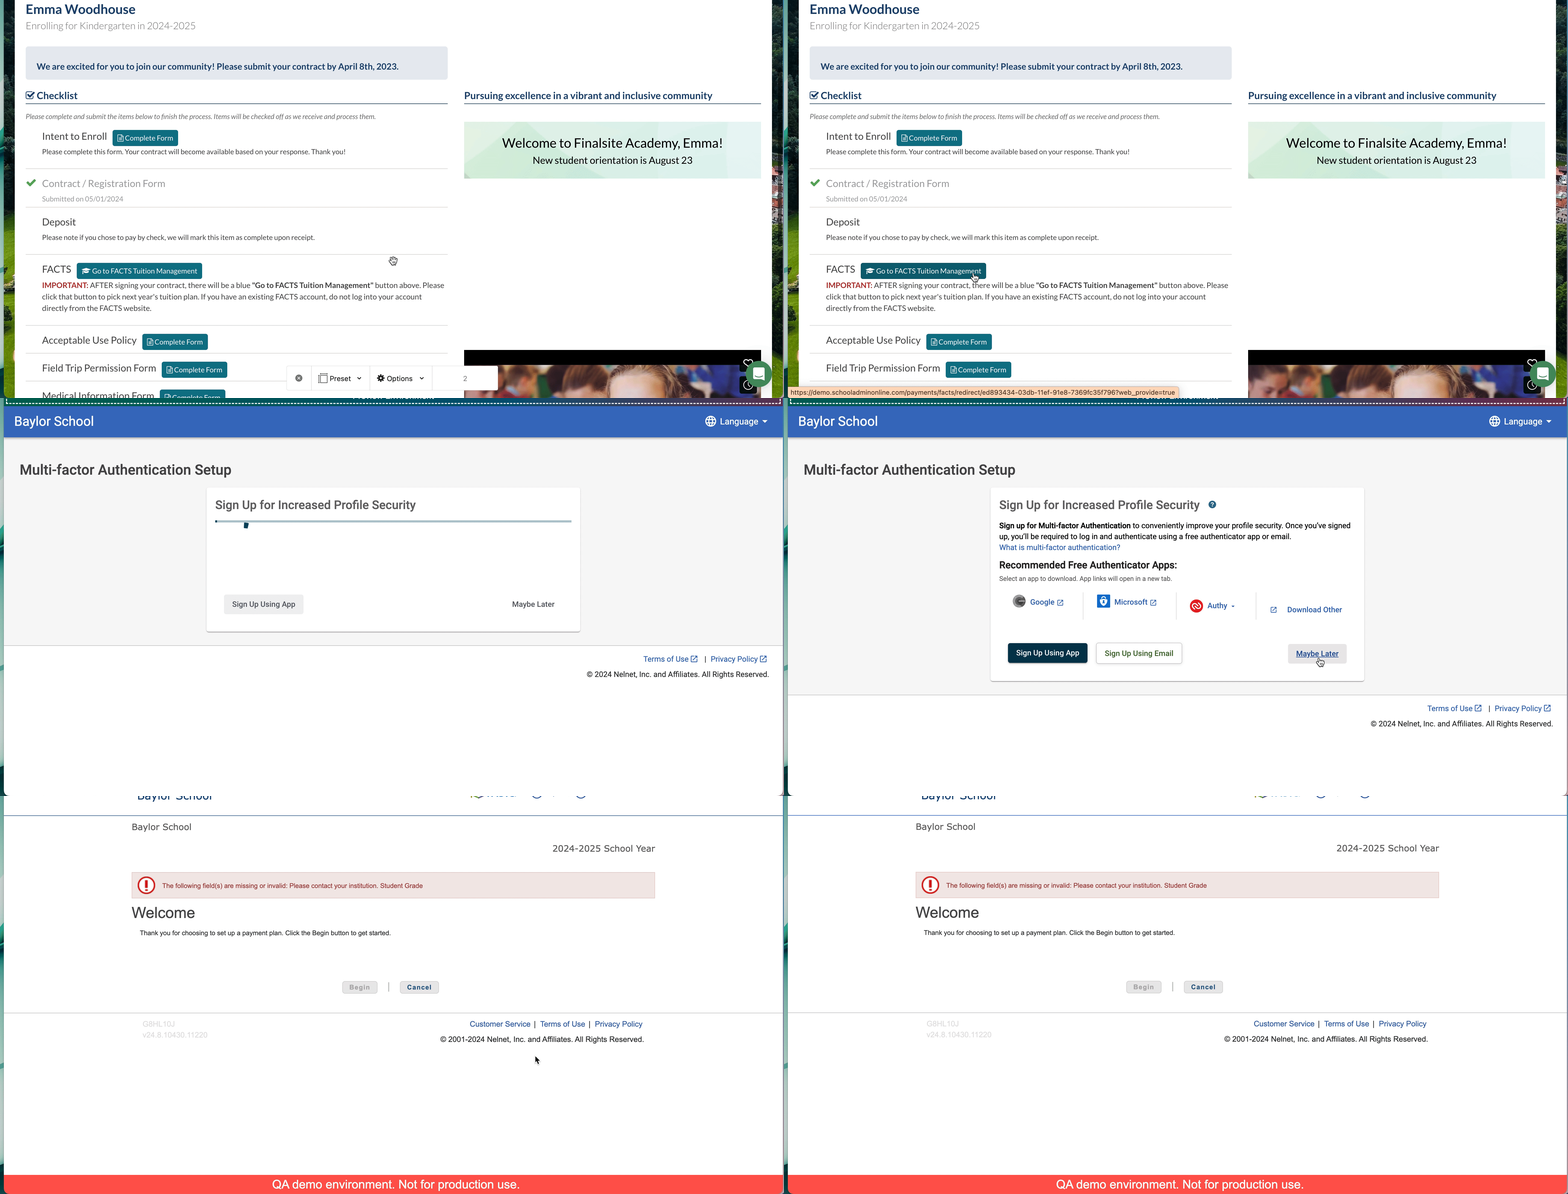
When you see the multifactor authentication option, just skip it by clicking Maybe Later.
Once you do that you'll be brought to the entry screen. If you have an error in the setup, it will show here. If you see an error here, take a screenshot and contact the support team to let us know. We'll be able to help you fix it.
Here's an example of what the process looks like (if you see an error on the home page).
If you don't see an error like in the example above, you'll be able to select Begin and you'll see the parent experience with the fees that have been sent over.
Check out this video for a peek into what the experience looks like from a parent's perspective: FACTS Web-provided Parent Experience.
Troubleshooting Parent Issues
When a parent runs into an error message on the FACTS end, you may not be able to see the error by using the Impersonate feature in Finalsite Enrollment. There's a possibility you'll be blocked by an authentication requirement.
Here's what we recommend:
- First, try to see the FACTS error by impersonating the parent. If you are not blocked by multi-factor authentication, you should be able to see an error message toward the top of the screen. Take a screenshot or write down the exact error message and send it to our team so that investigate further.
If you are blocked by a requirement to authenticate, we recommend the following:
- Ask the parent exactly what the error message says and have them send you a screenshot of the error if possible.
- Send the error message language and (when applicable) a screenshot of the error to our Support team.
- We'll work with FACTS and your school to help ensure that the error is clear!
Keeping an eye on errors on your end
We recommend that you create a test student in Finalsite Enrollment and set yourself up as their parent with a test account on the FACTS side. You can use this to make sure your FACTS account is set up correctly. Ideally, you should make sure to use this test student to check your integration before sending out contracts to ensure that your families won't run into any preventable issues.
Some common issues and what they mean:
Term Code Error: This means FACTS has not enabled the term or the active terms do not match in Finalsite Enrollment and FACTS. Contact our team for support.
Account Code Error: This means there is a code or codes that do not match in Finalsite Enrollment and FACTS. Contact our team for support.
Grade Error: This means that the grade doesn't match in FACTS with the way that it's written in Finalsite Enrollment. For example, we may list a grade as "K" in Finalsite Enrollment, which is listed as "Kindergarten" in FACTS. Contact our team for support.
The FACTS button is hidden on the checklist: This one can be managed on your end! The FACTS link will be hidden if any siblings are still in an active admissions status (regardless of their term). Manage this by moving all kids in the family to either an Enrollment status with a completed contract or an 'inactive' Admissions status.


Comments
0 comments
Article is closed for comments.