Overview
Did you know?
Did you know that you can create and edit your own fields? Check out this article to learn more: Creating and Editing Fields.
Within Finalsite Enrollment, fields are the containers that store specific data about students, parents, or other contacts in the system. Fields can store different values for different contacts (e.g. a child vs. a parent). Some common examples of fields that you might see in your Finalsite Enrollment instance are:
-
Name (student, parent, etc.)
-
Apply Grade or Apply Year
-
Academic or Athletic Interests
-
Test Scores
-
Current School
-
Financial Aid Amount
-
International Student
You can access a list of all fields in your system by navigating to Settings > Fields & Data > Fields. This opens the Fields Setup Page as shown below.
Here you can:
-
Search for a field by typing the field name in the filter options search bar
-
Edit elements of an existing field (e.g. change groupings, set as searchable)
-
Examine where the field is being used in the system
Click here to learn more about these options.
In this Article
How-To: Use Fields to Collect/Store Data
Fields live in a few different areas within your Finalsite Enrollment site, so they can be used to collect information and view or edit that information later on. Read on below for more.
Online Forms
The most common way you will use fields is for collecting information from families on Online Forms throughout the Admissions/Enrollment process. Your major forms include the Inquiry Form, Application Form, and Enrollment Contract. You may also have supplemental forms such as teacher recommendations, health/emergency contact forms, intent to enroll forms, and more.
Each piece of data (e.g. current school name, emergency contact phone number, academic interests, etc.) that you want to collect on these forms needs to be its own field.
While the form examples listed above are parent-facing, you may also have some internal-facing forms that collect information visible to your school only. An example of this would be a Parent/Student Interview Form, which may contain fields for specific interview responses.
Contact Records
However, not all fields needed for your process will necessarily be contained within your online forms. You may also have internal-only fields (that are filled out by your team instead of by applying/enrolling families) that you want to fill out directly from a parent or student contact record.
Some examples of internal-only fields include:
-
Financial aid or scholarship amounts
-
Waiver codes
-
Interview notes
-
Fields that trigger specific checklist items or contract fees to appear
Even if these fields are internal-facing to your school only, they can still be used in your searches and reports, so long as they are marked as searchable within the Fields setup page.
Field data can be edited from the contact record by going to the specific tab where the field lives (i.e. personal, admissions, or enrollment), then clicking on the 'Edit Fields' button. This is described in more detail below in the 'How to Edit Field Data for a Contact' section.
Bulk Updates
Field data can also be updated in bulk for students from a search/list page, or through a contact import. Click the links below to learn more:
-
Bulk Edits (from list page or search)
-
Import Templates: Updating Existing Contacts (using import data tool)
How-To: Edit Field Data for a Contact
As mentioned above, fields are most often filled out by parents/students within online forms. Some fields may be entered in by you and your team, if using an internal-facing form or setting values for fields internally within the contact record.
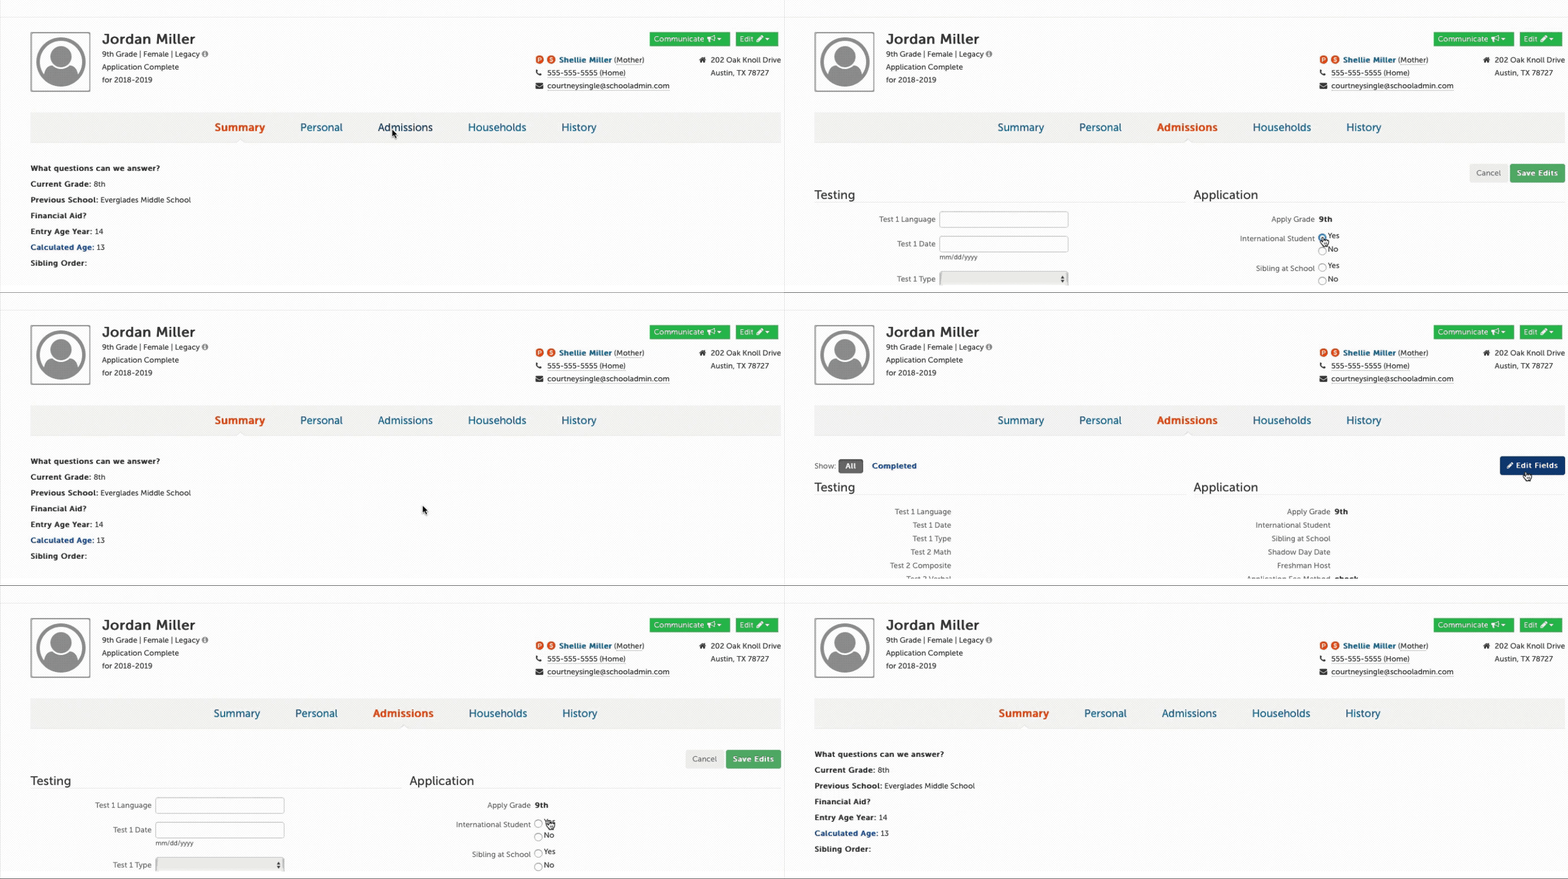
Once a form is submitted by a family, they cannot edit any of the fields within that form. However, the fields can be updated internally by your school within the contact record. To do this, navigate to the contact record that requires an update, then click on the appropriate tab where the specific field is grouped. Click on the blue 'Edit Fields' button in the upper right, update the field value(s), and then click the green 'Save Edits' button.
The new field value will not be updated on the submitted form, but it will be updated throughout the system so that all reports are up-to-date and any additional online forms that are used later in the process will also be updated.
How-To: Understand Field Display Options
How Fields are Displayed Internally
Fields have two internal-facing names. One is the Display Name, which is the name of the field that you see in the contact record, search and reports, list pages, etc. It is the "friendly" name of the field and is customizable so that you can easily identify what information is being captured. It does not have to match the canonical name, which is described below. A best practice is to always have a unique display name for each field, as having two fields named exactly the same will become challenging when trying to build searches/reports or locate a field on a contact record.
The other internal-facing field name is the Canonical Name. This is the name of the field used on the back-end of the system and it can never be changed. The canonical name is created at the time that the field is created. You will see the canonical name when building forms and in the field settings page. It will always be made up of all lowercase letters and underscores instead of spaces.
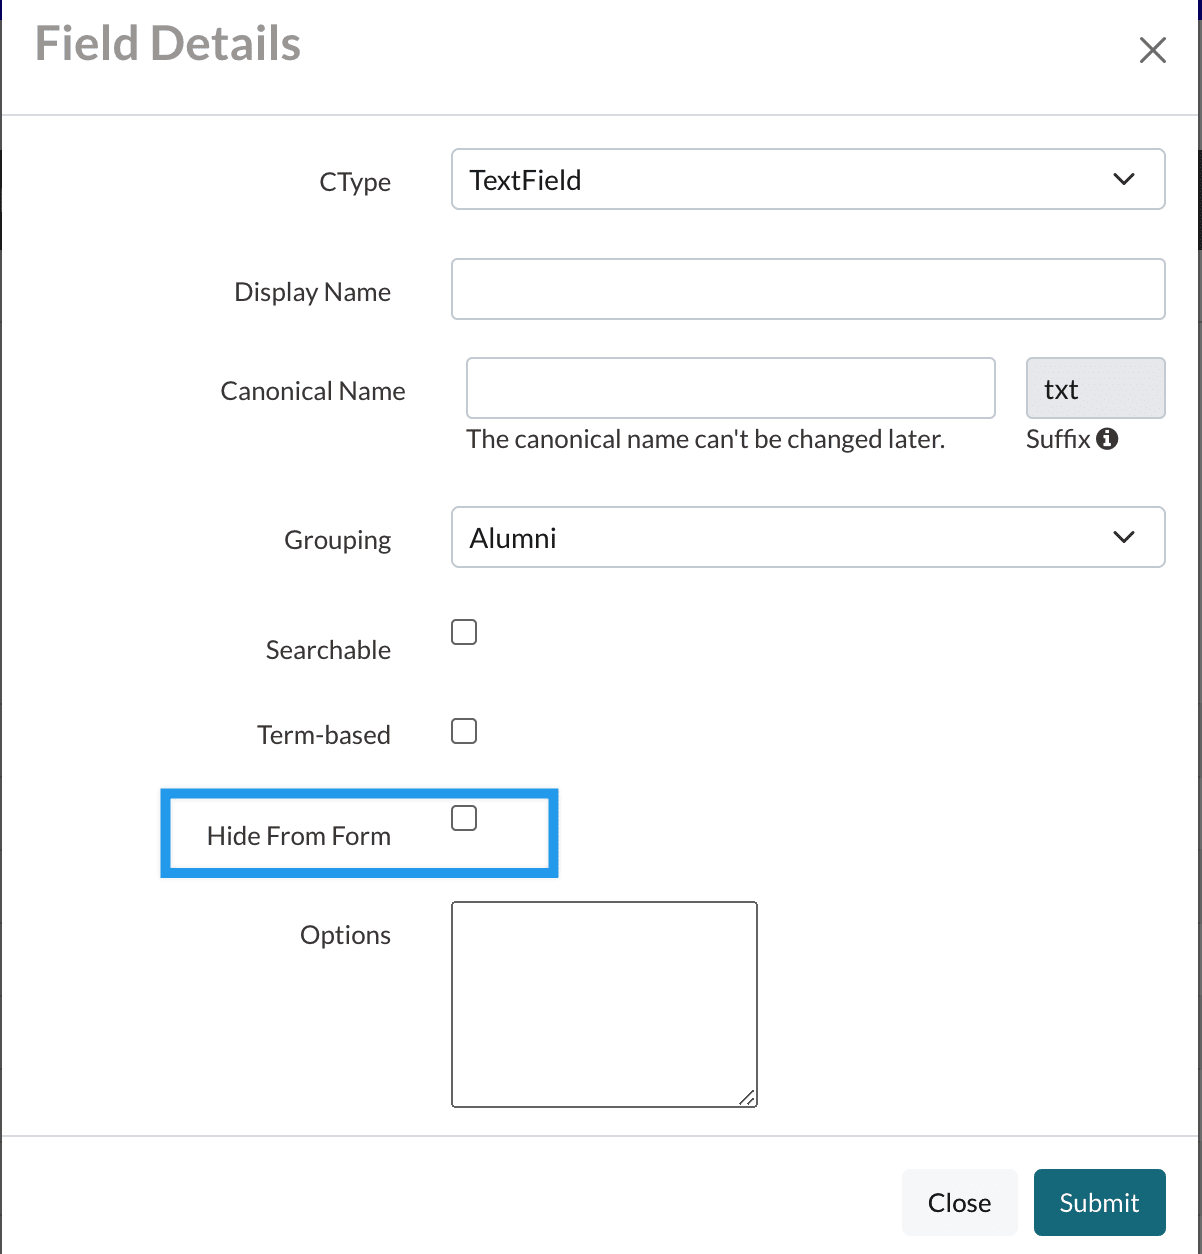
Hide From Form
Hide From Form is an option you can select with creating or editing a field.
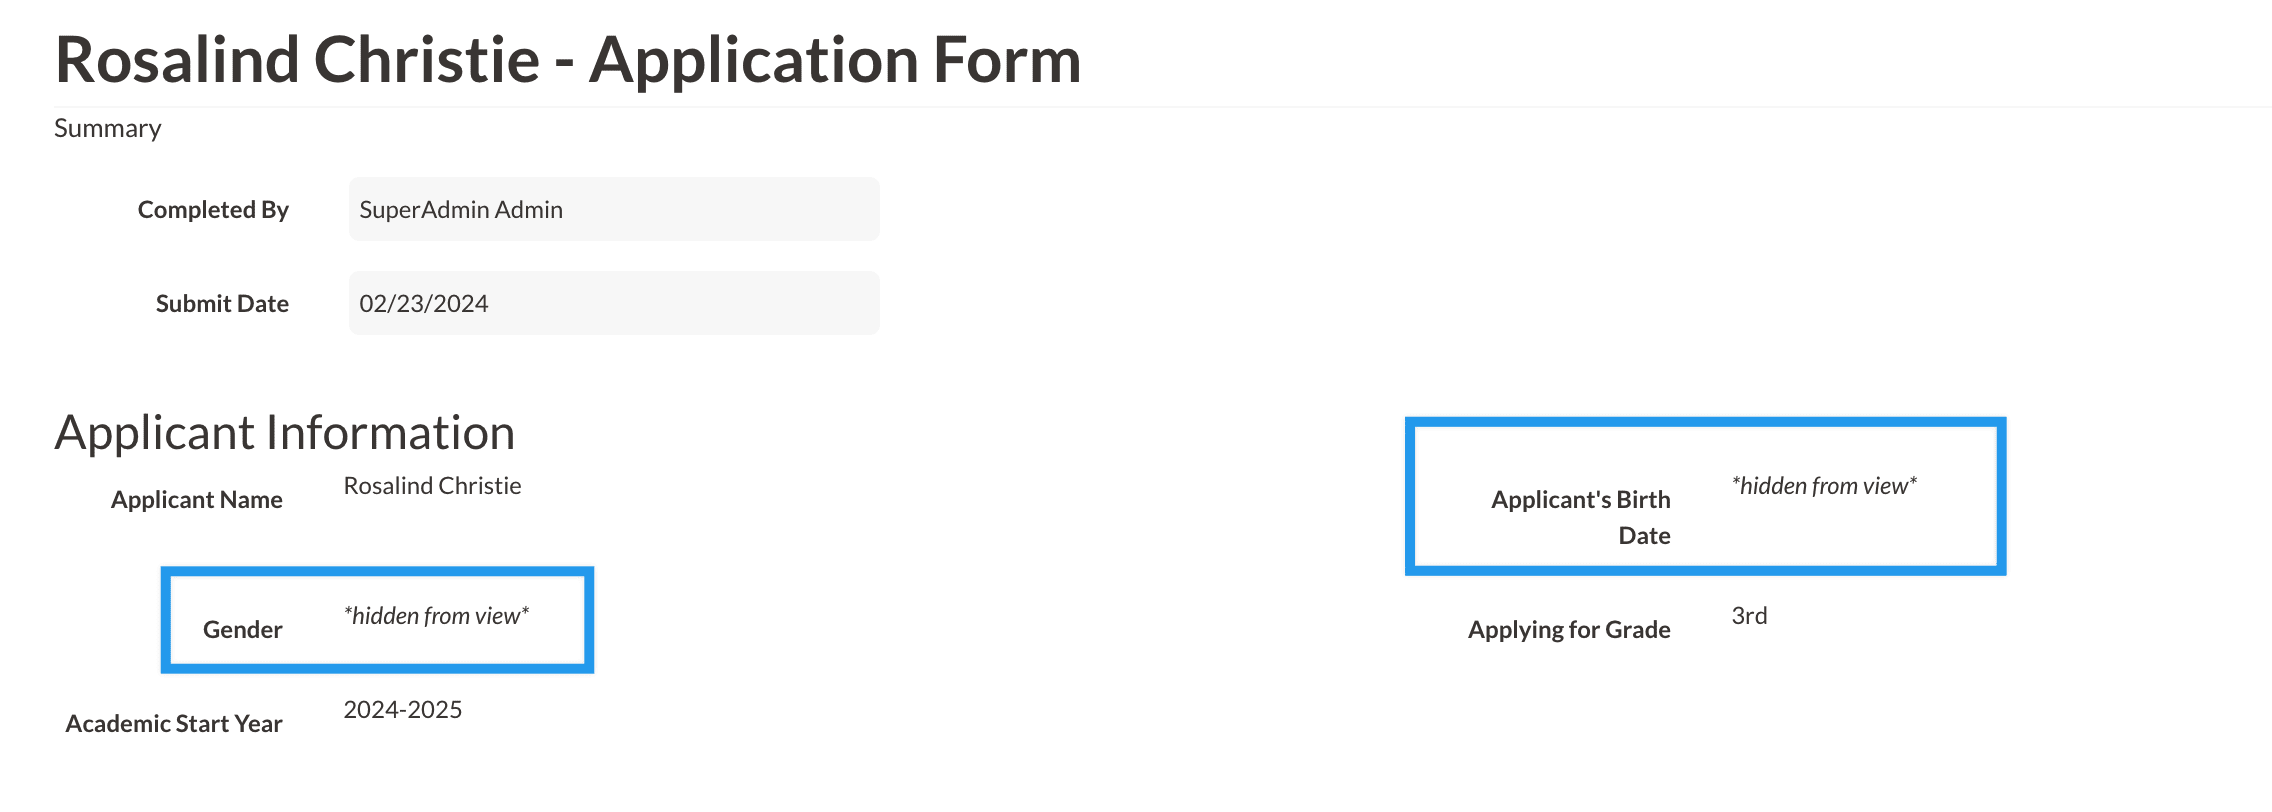
When Hide From Form is selected for a field, it conceals the value of that field from admins when they view it on a form.
For instance, in the image below, both the Gender field and the Applicant's Birth Date field have Hide From Form enabled. Consequently, when an admin views the form, they will not see the data stored in those fields.

When "Hide From Form" is selected:
- Parents will still be able to see the data within the field on their end.
- Regardless of an admin's permission level, whenever they view forms on the record, download the PDF version of the form, or check out the form in the review module, they will encounter 'Hidden From View' instead of the actual data for any field with 'Hide From Form' enabled.
- This only applies to viewing the field on a form. Any field with 'Hide From Form' enabled will continue to display its data within searches, on the contact record (if the field is visible in the Contact Widget or within tabs like Personal, Admissions, or Enrollment), in emails, and any other location where the field is displayed. The information is only hidden from admin when they view the field on a form.
Good to know: Hide Form Form is reversible. You can de-select 'Hide From Form' in the field settings at any time and, as soon as you do so, the data will start to display again.
How Fields are Displayed to Parents
Parents/students will see fields only in the version of a prompt on an online form. They will not see field display names or canonical names. The prompt can be a word or two indicating the information needed such as name, address, or current school. It can also be a question such as, "Did this parent attend Finalsite Enrollment Academy?"
Sometimes the internal display name of a field is also used for the parent-facing prompt, but in many cases, they vary. Let's look at a few examples:
Display Name: Birth Date
Canonical Name: birth_date
Prompt on Form: Date of Birth
Display Name: Full Name
Canonical Name: name
Prompt on Form: Name of Student
Display Name: Apply Grade
Canonical Name: apply_grade
Prompt on Form: Interested in Grade
Display Name: Academic Interests
Canonical Name: interests_academic
Prompt on Form: What academics are most exciting?
Display Name: Referral Method
Canonical Name: referral_method
Prompt on Form: How did you hear about Finalsite Enrollment Academy?


Comments
0 comments
Article is closed for comments.