
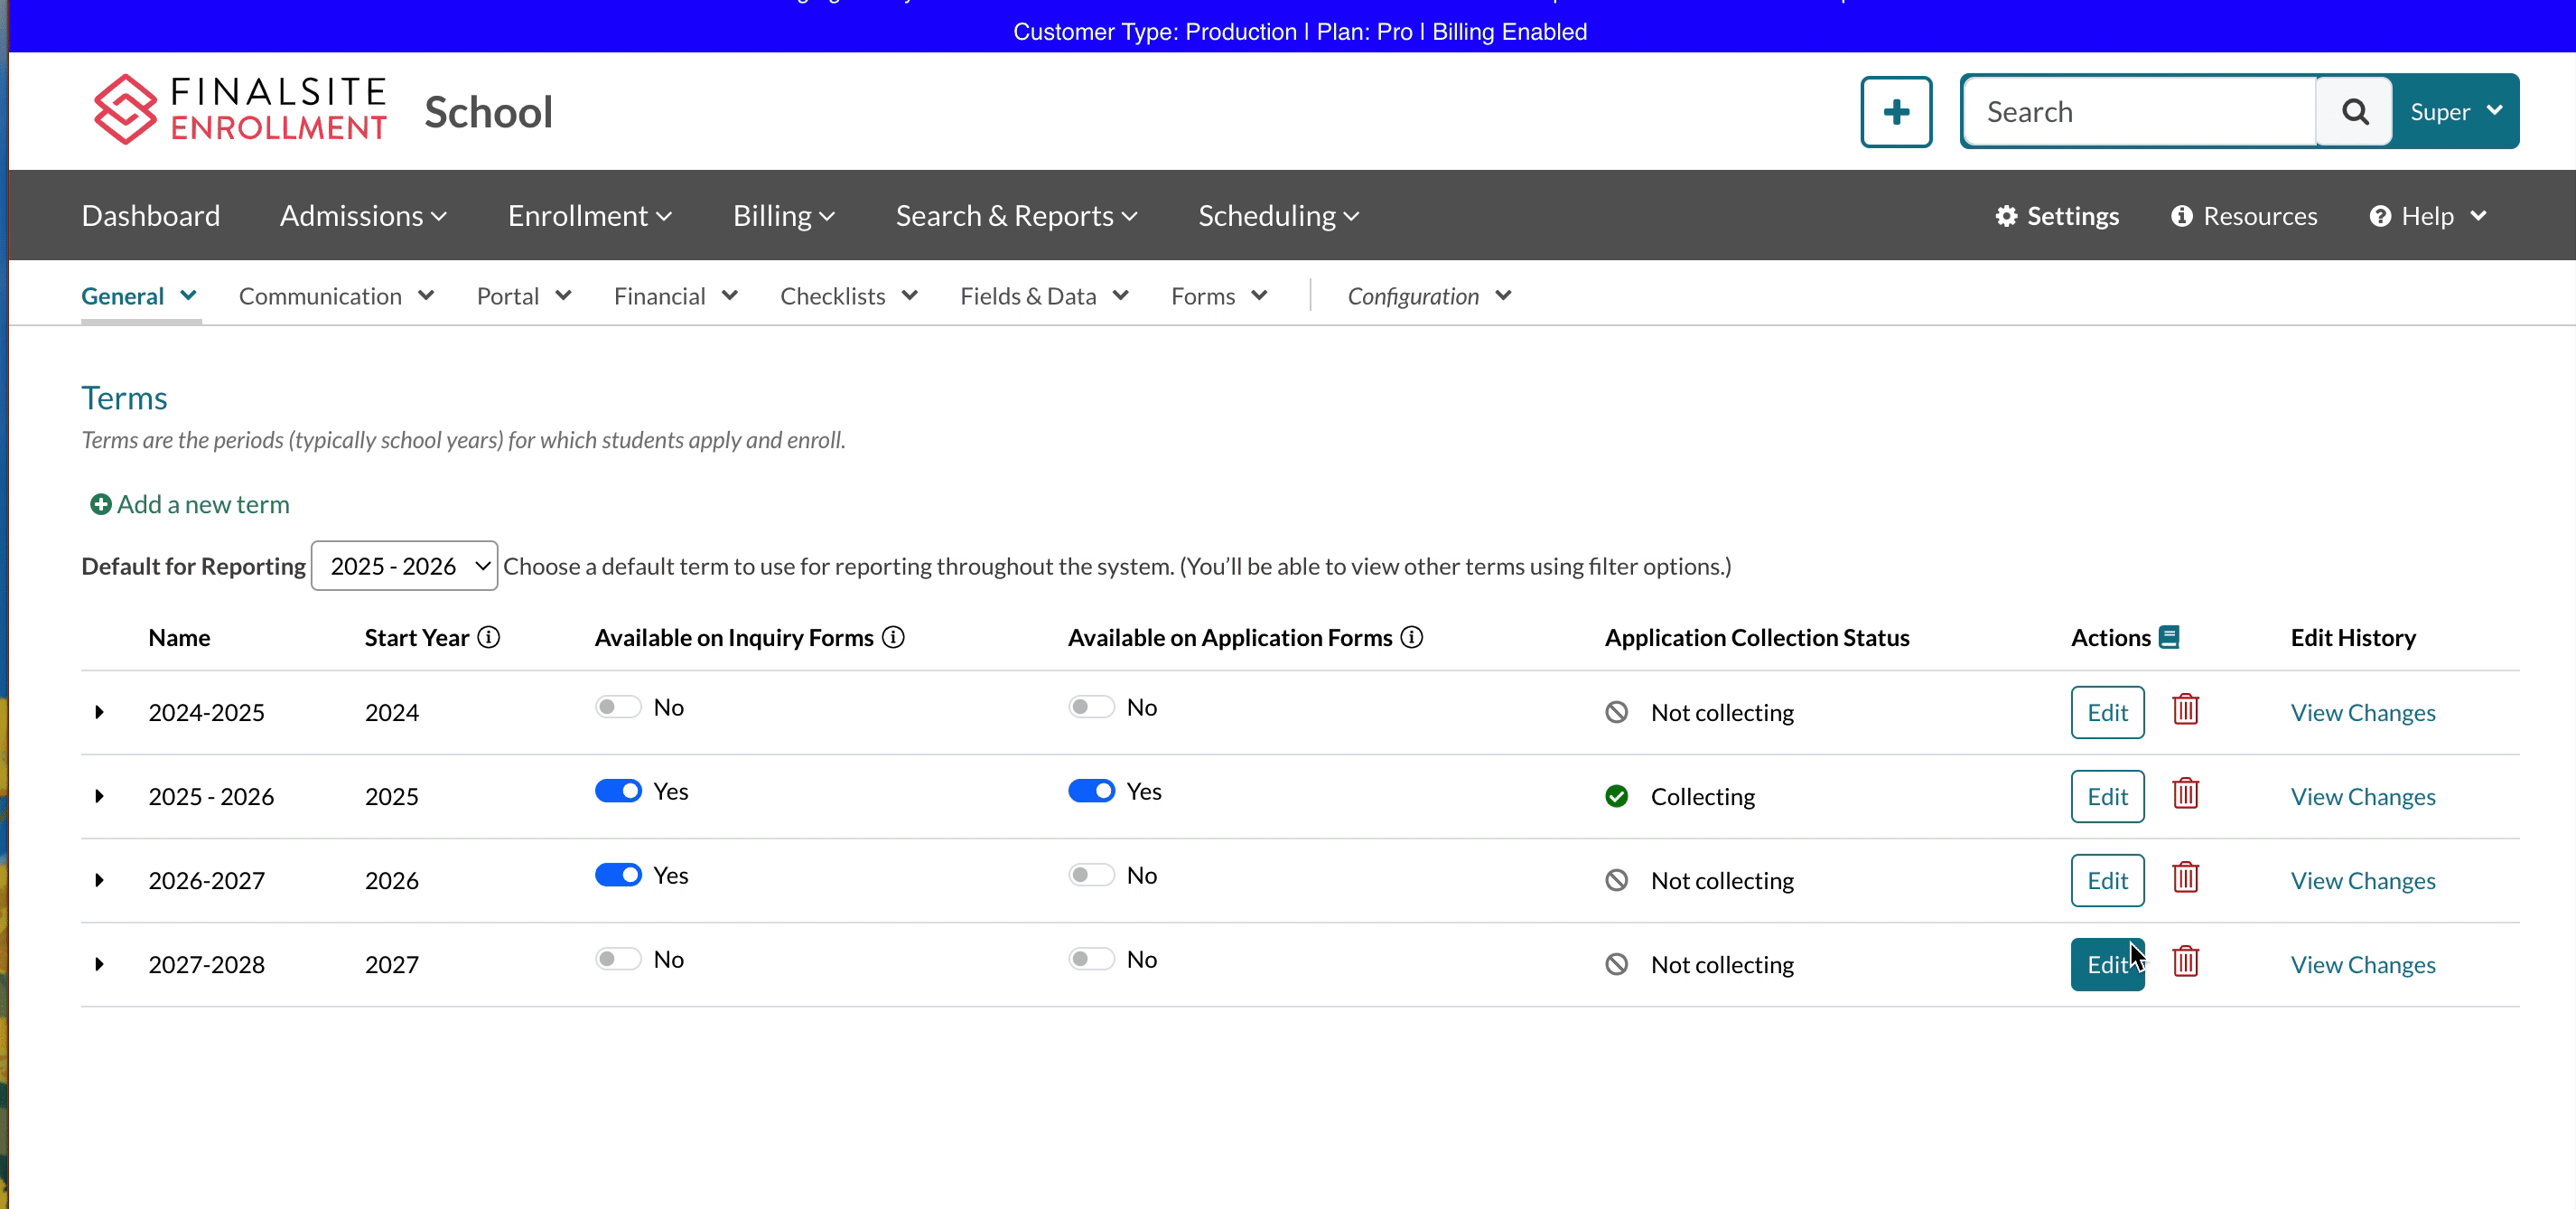
The Terms page (Settings > General > Terms) is where you manage school years, control which terms appear on inquiry and application forms, set open/close dates and applicant caps per grade, archive old terms, and (System Admins only) permanently delete Checklist and Review data for a given year.
Who can access this page?
Admin Account Types: System Admin and Admin (Please note that the Data Management column on this page is only visible to System Admin.)
Permissions: Any
💡Quick Answers
- How do I add a new term? Click Add a New Term in the upper left, enter a Name and Start Year, then Submit. Follow the format of existing terms, and if you use the FACTS Integration, the name must match what's in FACTS, or the integration will error.
- How do I control which terms parents see on the inquiry and application forms? Toggle the buttons under Available on Inquiry Forms and Available on Application Forms for each term. Changes save automatically. Admins always see all past terms when filling out forms internally; toggles only affect the parent-facing view.
- How do I close a grade on a specific date or cap applicants at a number? Expand the term and use Global Configuration (applies to all grades) or Custom Grade Configuration (per-grade). Set a Close Date and choose either Don't collect applications (grade disappears from the dropdown) or Collect and auto-waitlist applications (grade still shows but new applications are auto-waitlisted).
- Which setting wins: Global or Custom? Custom always wins over Global for that grade. And if you set both a close date and a max-applicants cap, the close date wins. The date triggers the action even if the cap isn't reached.
- What does Archive do to a term? Removes it from forms and most drop-down menus across the site (Dashboard, Searches, etc.). Exceptions: Saved Searches still show the archived term, the Admissions Report still shows the last five terms, and all Checklists drop-downs still list every term. For Billing schools, don't archive terms with active balances, since they'll drop off the Students Report and Revenue Recognition Report.
- How does Data Management work (and who can use it)? Only System Admins see the red trashcan icon. Click it to open the Manage Data Retention window, check which checklist or review data to delete, Confirm, then type DELETE to finalize. The data is not recoverable. Use the book icon next to the column header to see an audit log of every deletion.
In this article
- Term Management
- Grade Management
- Data Management
- Archive Terms
- FAQs
Definition: Terms
Terms in Finalsite Enrollment refer to the periods in which students apply and enroll. These are typically school years (e.g. 2025-2026), but some schools may have programs that are longer or shorter in duration.
See it in Action
If you'd like to watch a quick video to learn about managing the Terms page, check out the following videos:
Term Management
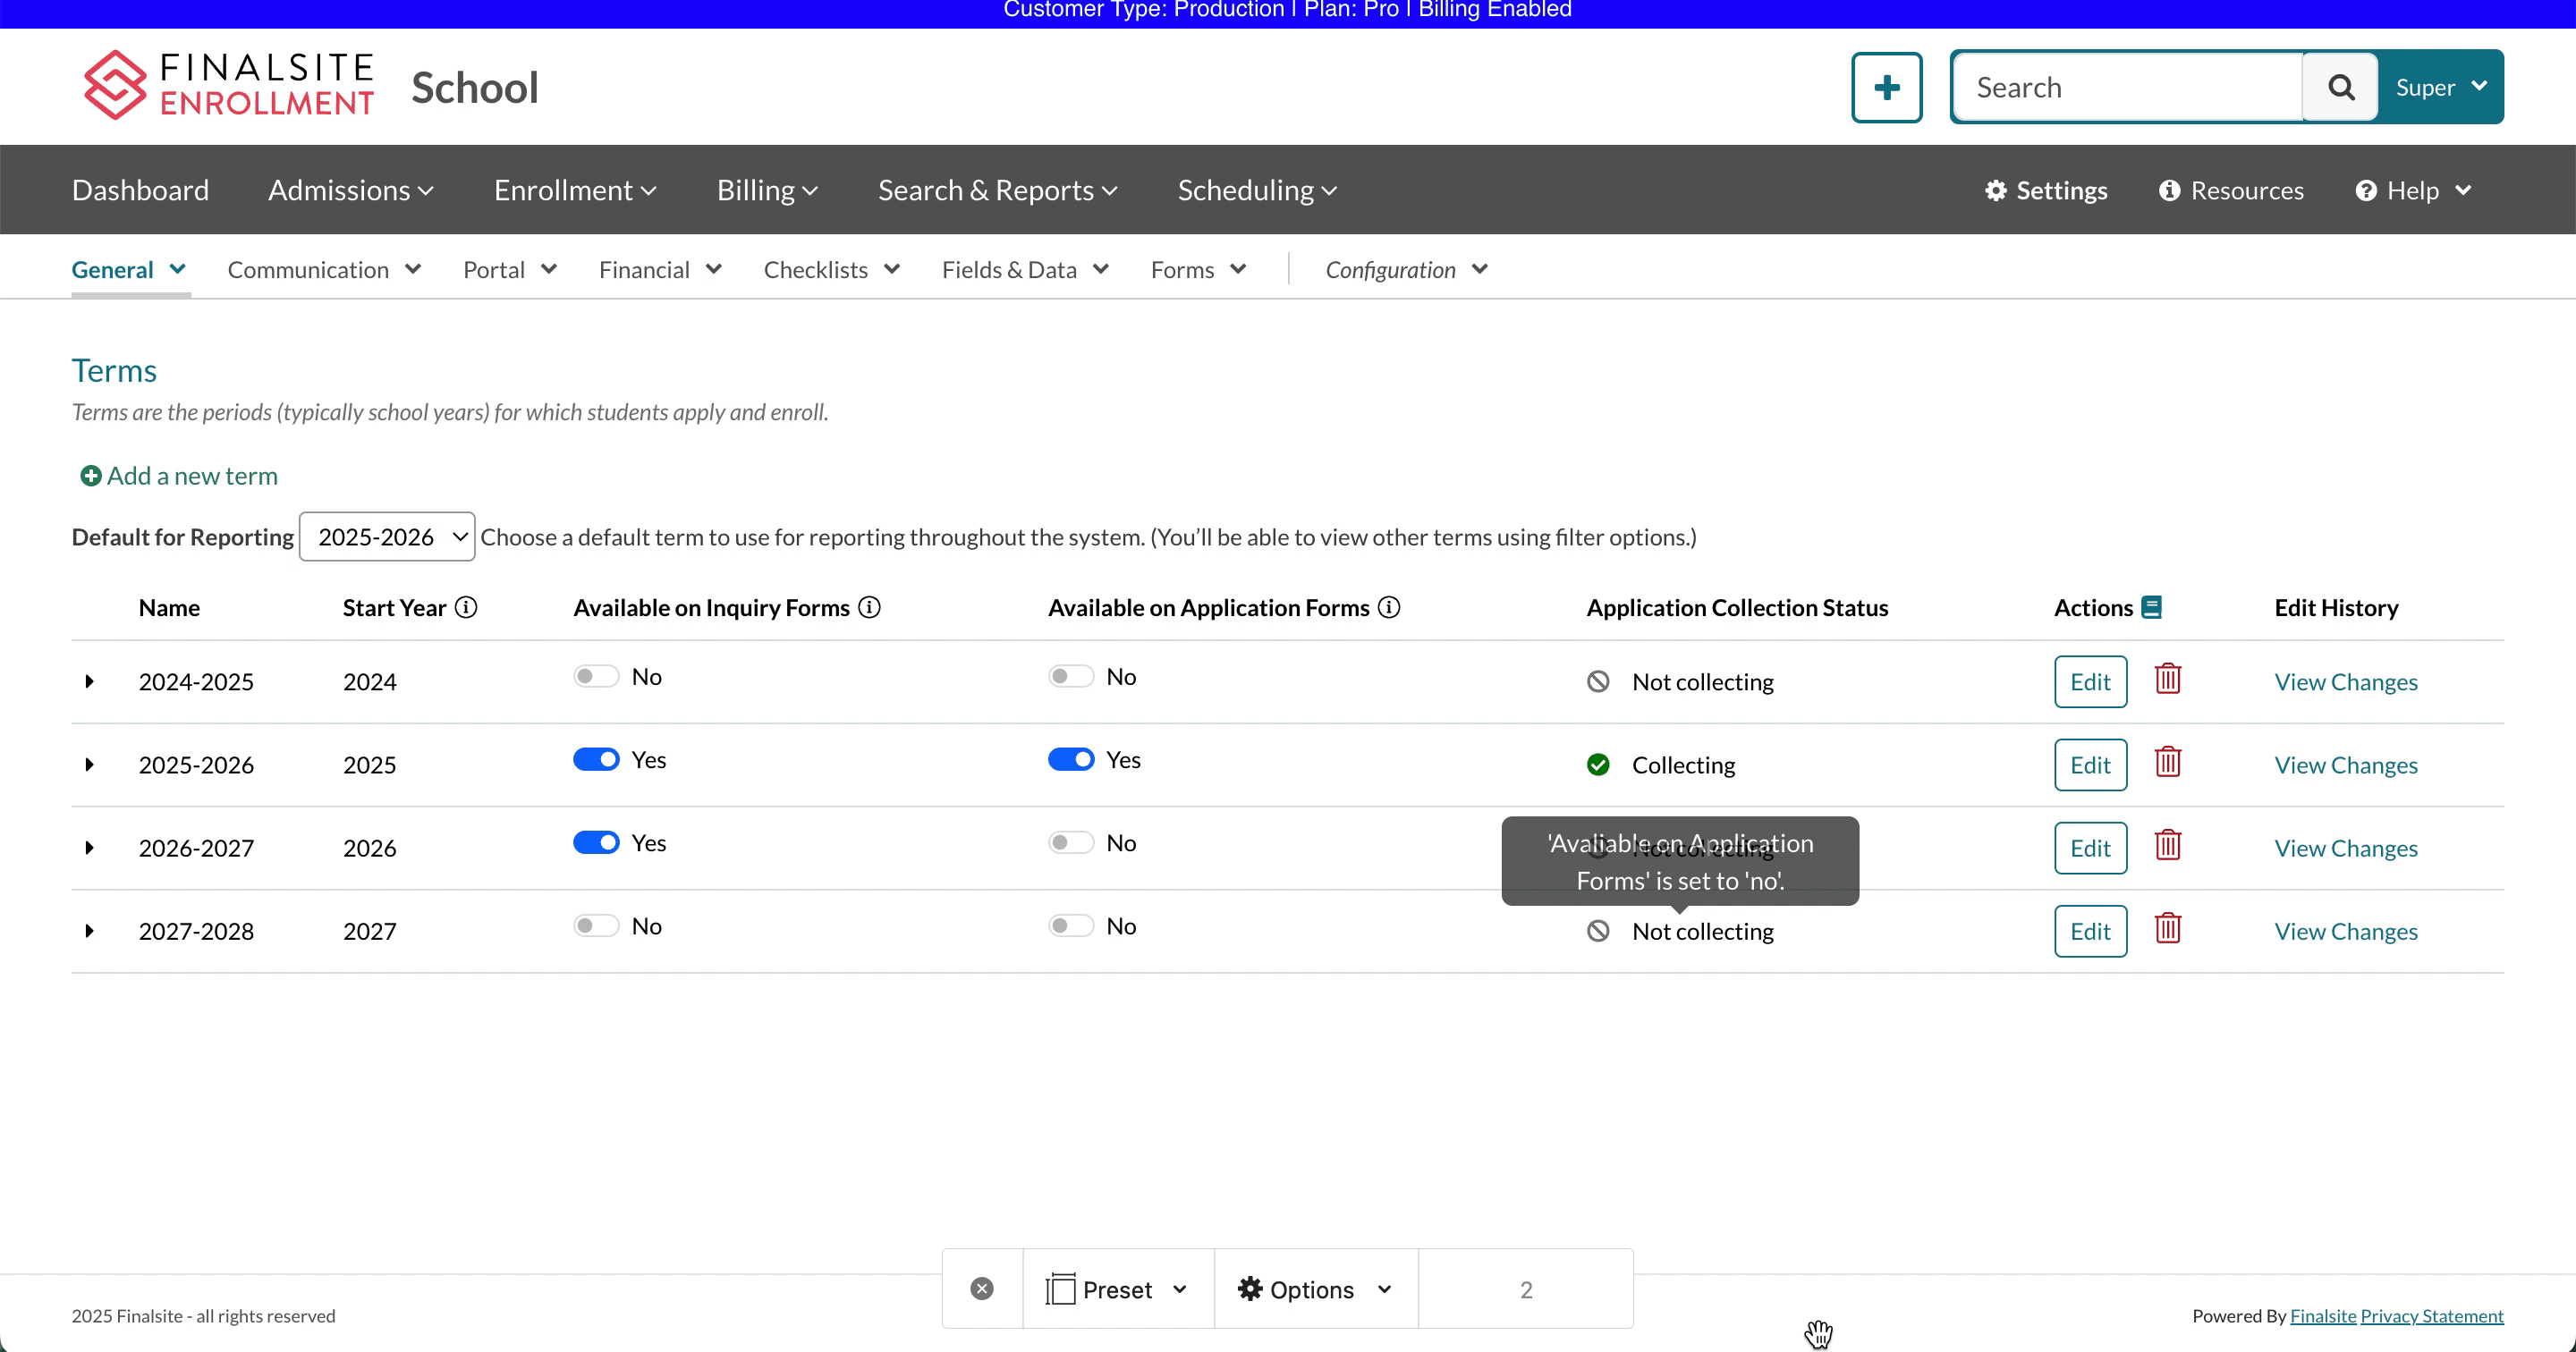
Default Year for Reporting
In the Default for Reporting drop-down menu, you can choose a term that will be the default for certain pages such as list pages (like admissions and enrollment), searches, and reports. However, you can still change the term using the dropdown menu on any page with a term dropdown.
We suggest setting the current school year as your default. You can change it at any time. Also, there is no save button here so whatever term you select should automatically take effect.
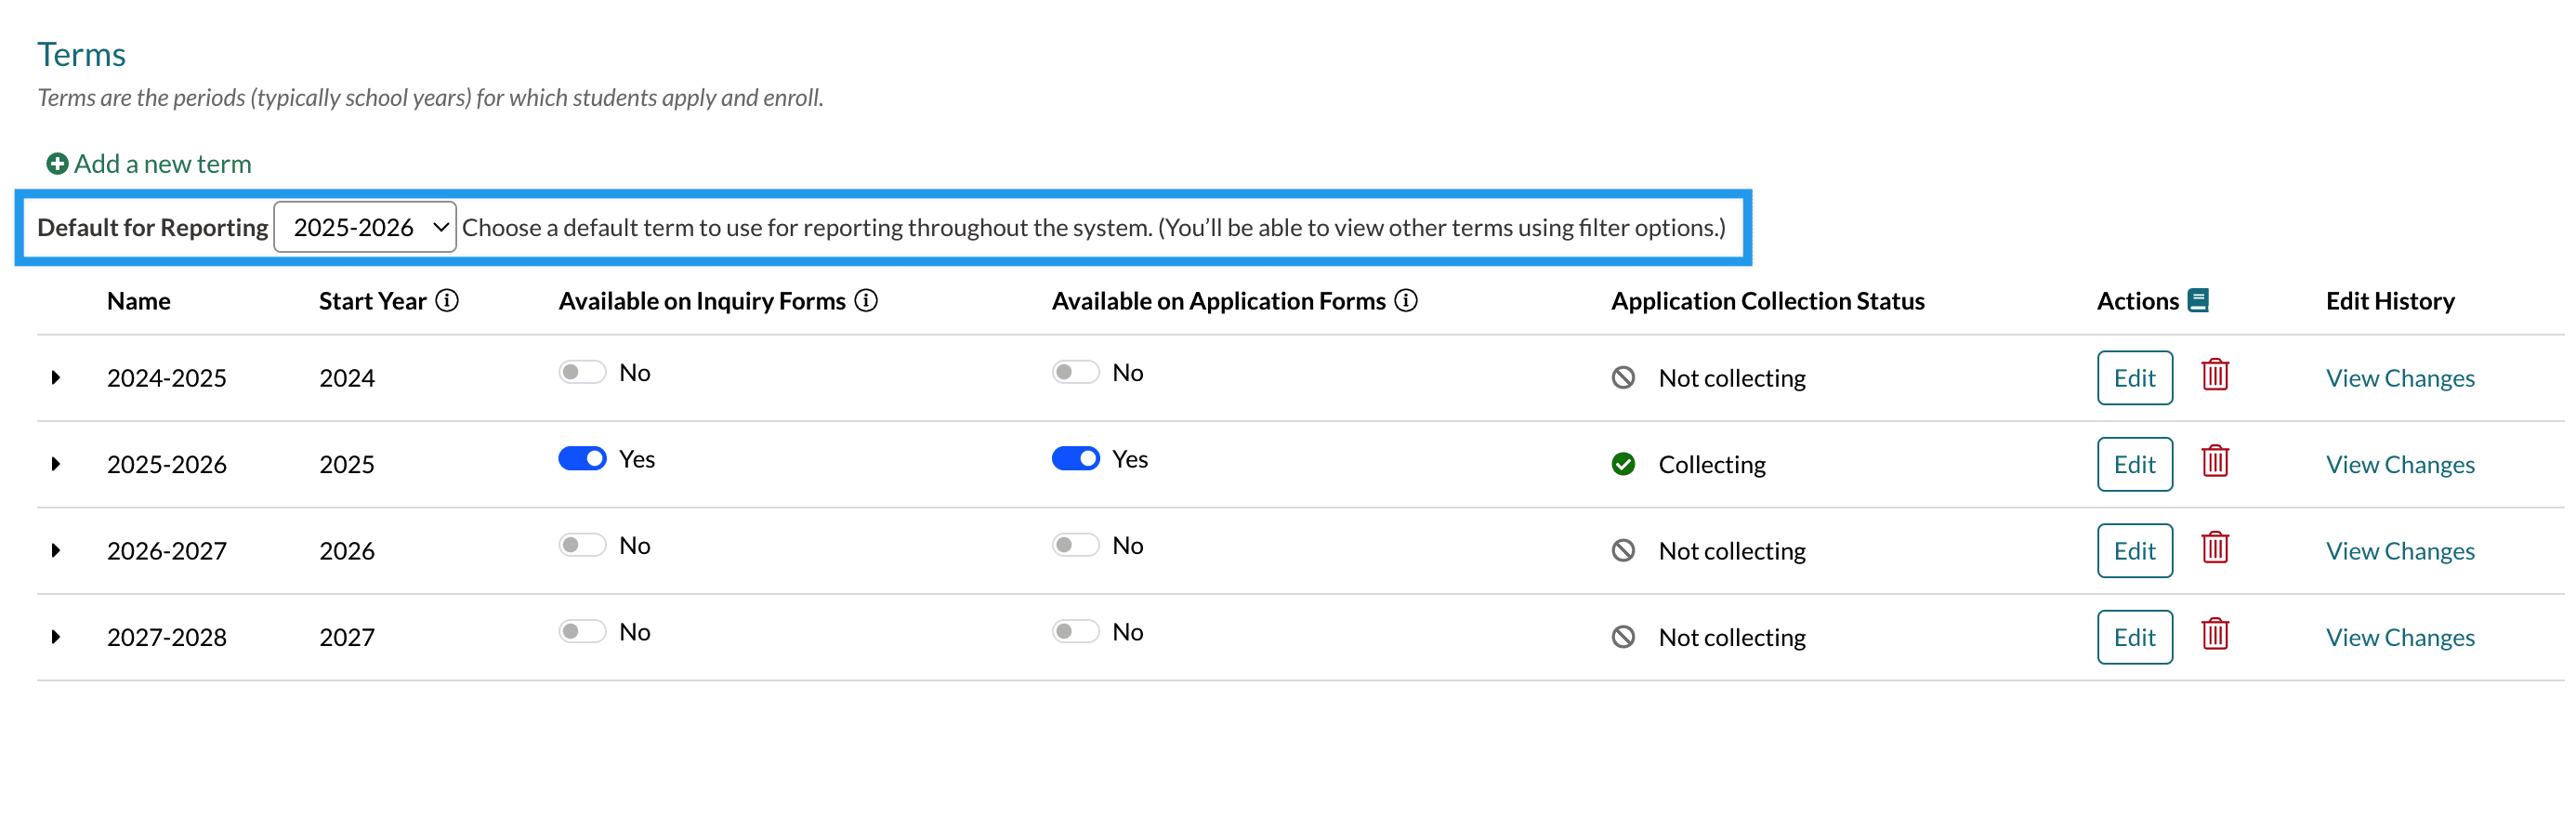
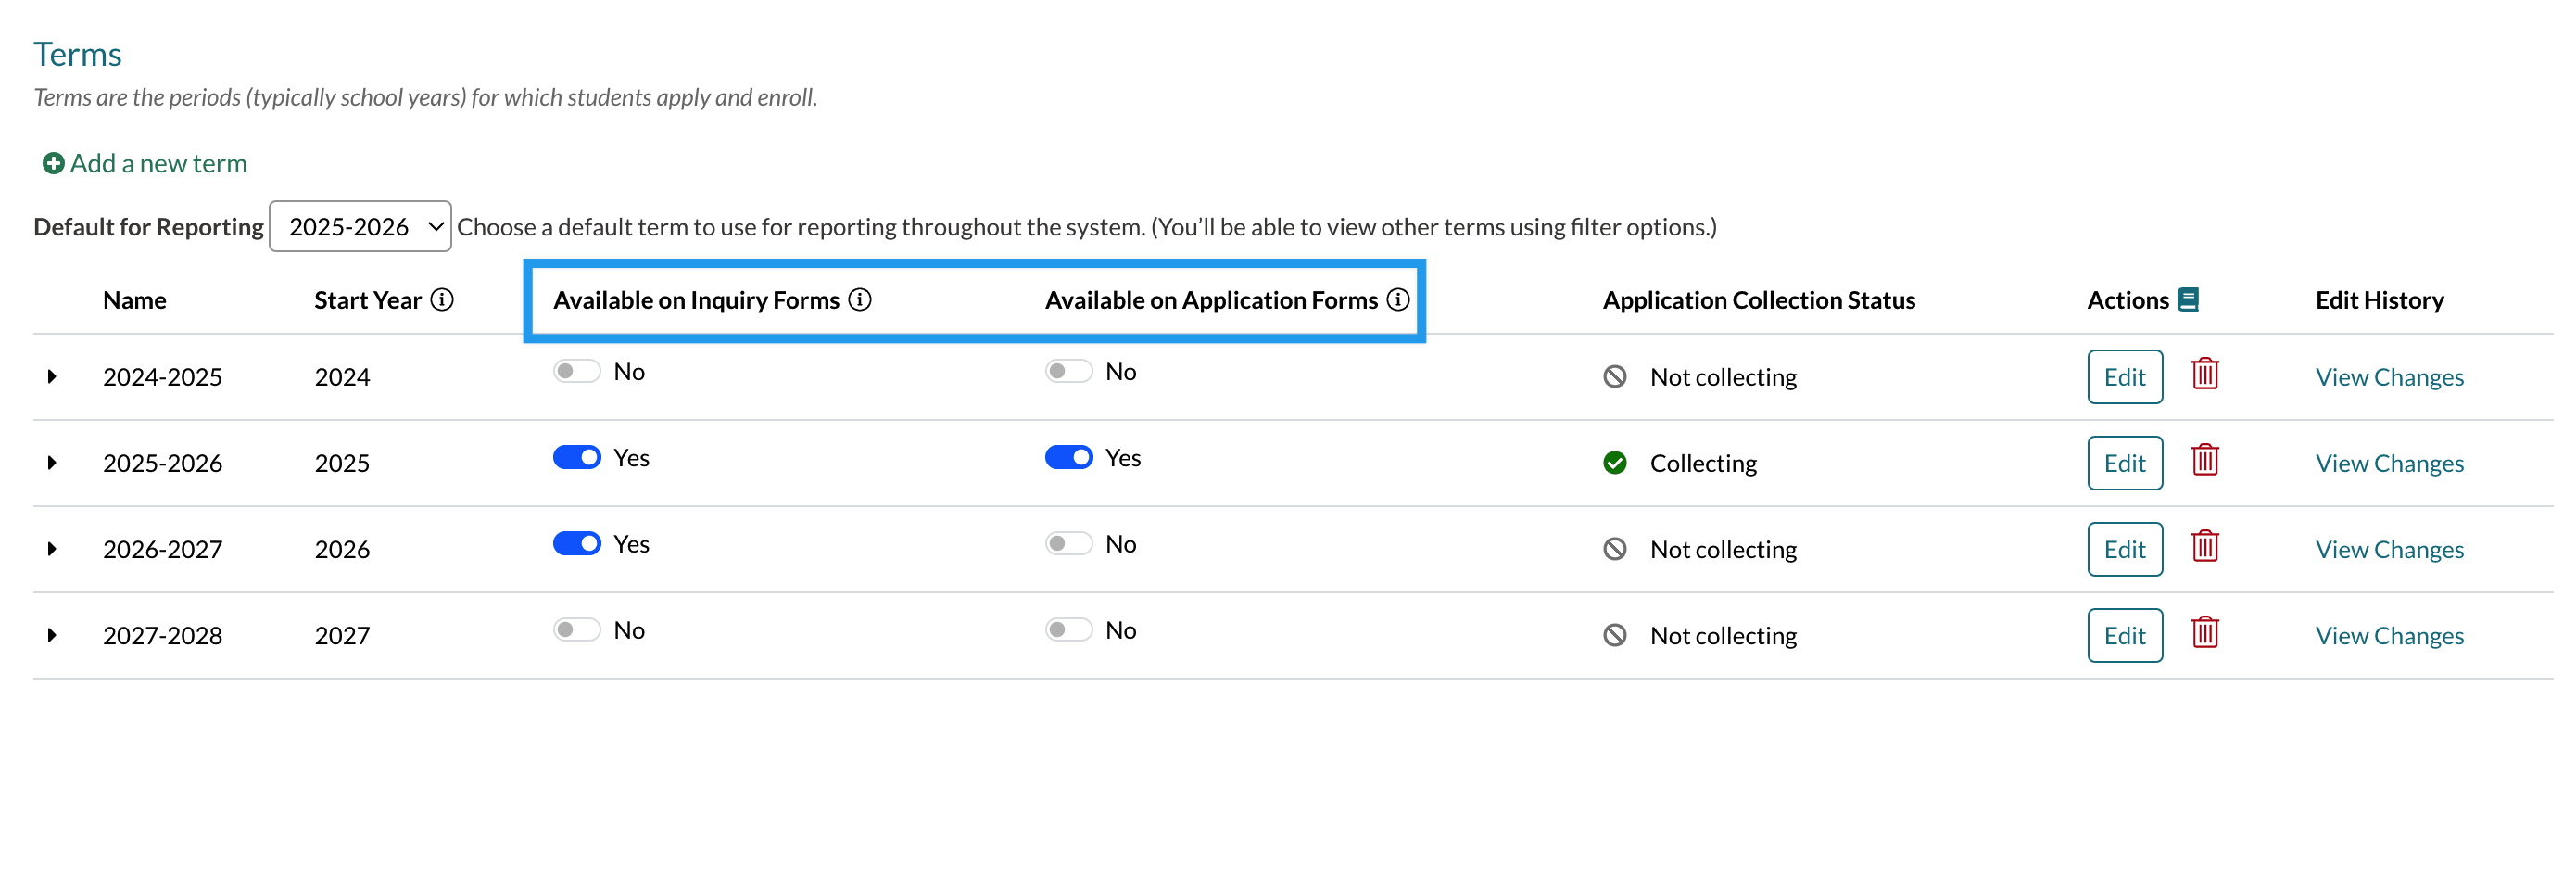
Terms Available on Inquiry / Application Forms
You can manage which Terms will appear to families on your inquiry form and application form by toggling the buttons underneath the Available on Inquiry Forms and Available on Application Forms headers.
Changes to these options save automatically and take effect right away. As a best practice, switch off any old years and stay up to date with current and future years for your forms.
Pro-Tip: These two options can be set separately, which is useful in cases where you want to allow families to inquire about a future term, but you don't want to open applications for that term just yet.
So what happens when I toggle off a term?
When you toggle off a term on your Inquiry or Application, it will no longer appear as an option in the form within the dropdown that asks families which year they are inquiring to or applying for.
Will these also disappear from the internal/admin version of the form?
Nope! When filling out an application or inquiry form when you are logged in as an Admin/User, you will be able to view ALL past terms. However, parents/students will only see the terms that are toggled to 'Yes' on this page.
Add a New Term
Click the Add a New Term button in the upper left to create a new term (school year) in your site.

In the pop-up window that opens, you are required to enter a name and start year.
- Name: How the term will display throughout the system.
- Start Year: The year that the term starts in.
Pro-tip: Follow the format of the existing terms on your site as a reference.
To confirm adding the new term, click the Submit button.
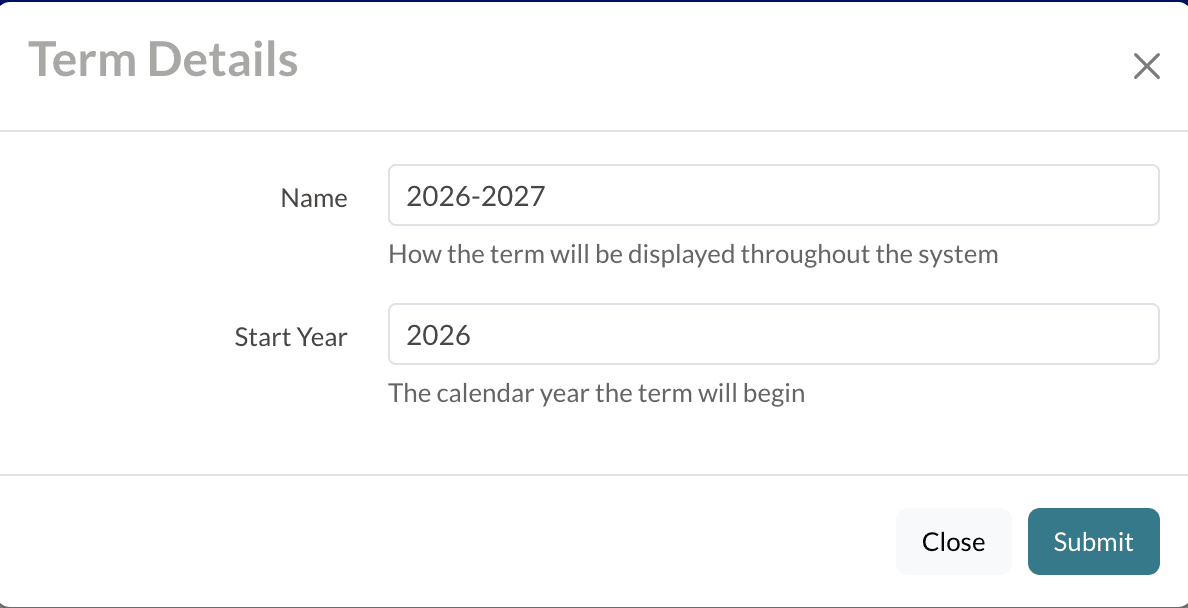
Edit the Term name and Start Year
You can change the name or start year for any existing terms by clicking on the Edit button in the Actions column.
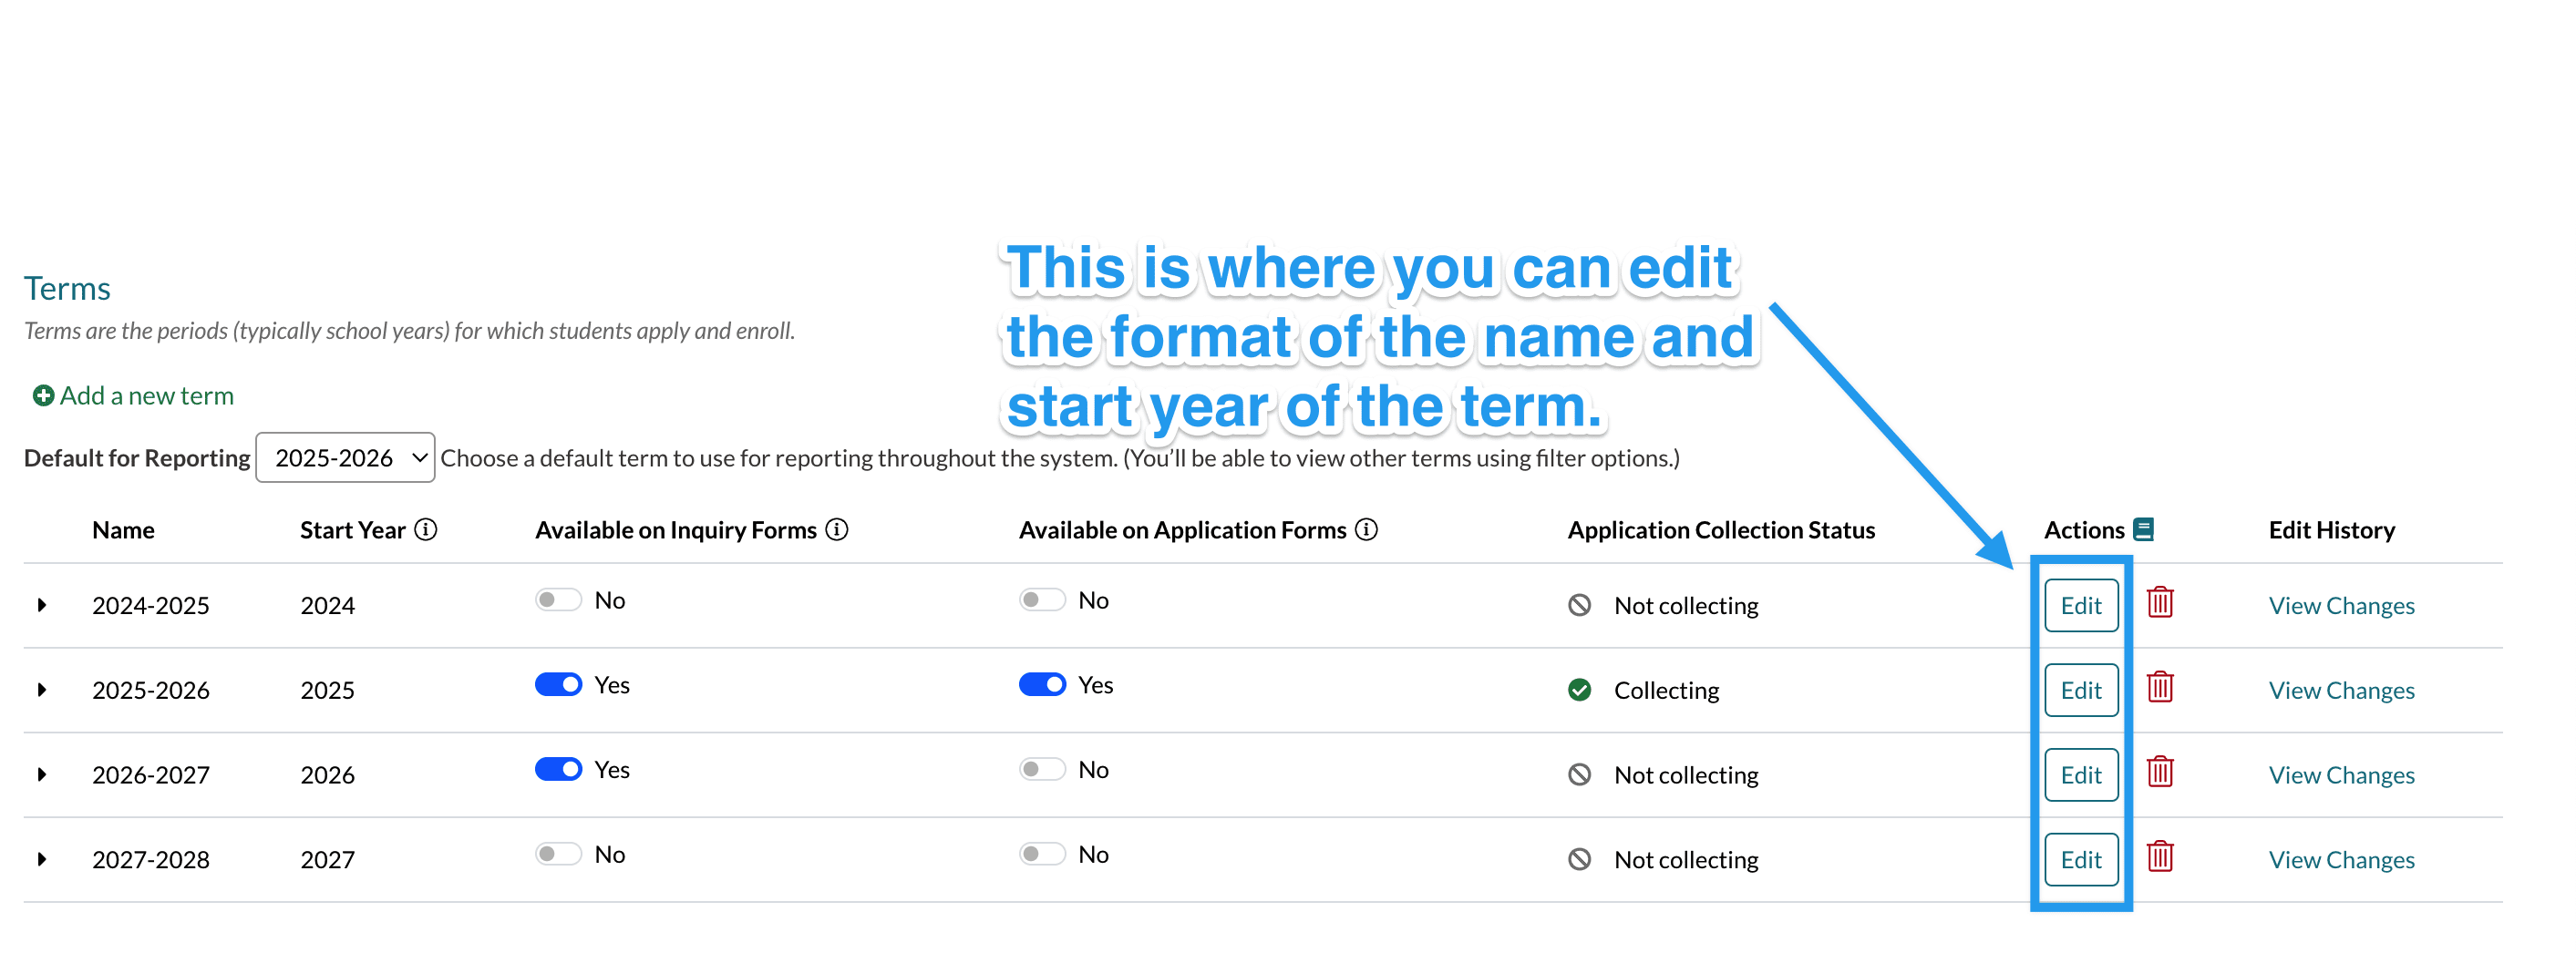
Selecting that will open the Term Details pop up window where you can adjust the name and start year of the term. Remember to click Submit at the bottom of the page to save your changes.
Please note: If you are using the FACTS Integration, your term names in Finalsite Enrollment must match what is in FACTS. Changing the name could cause errors.
Grade Management
When you expand any of your terms, you'll see the option to set global and custom configurations for your grades on a term-by-term basis.
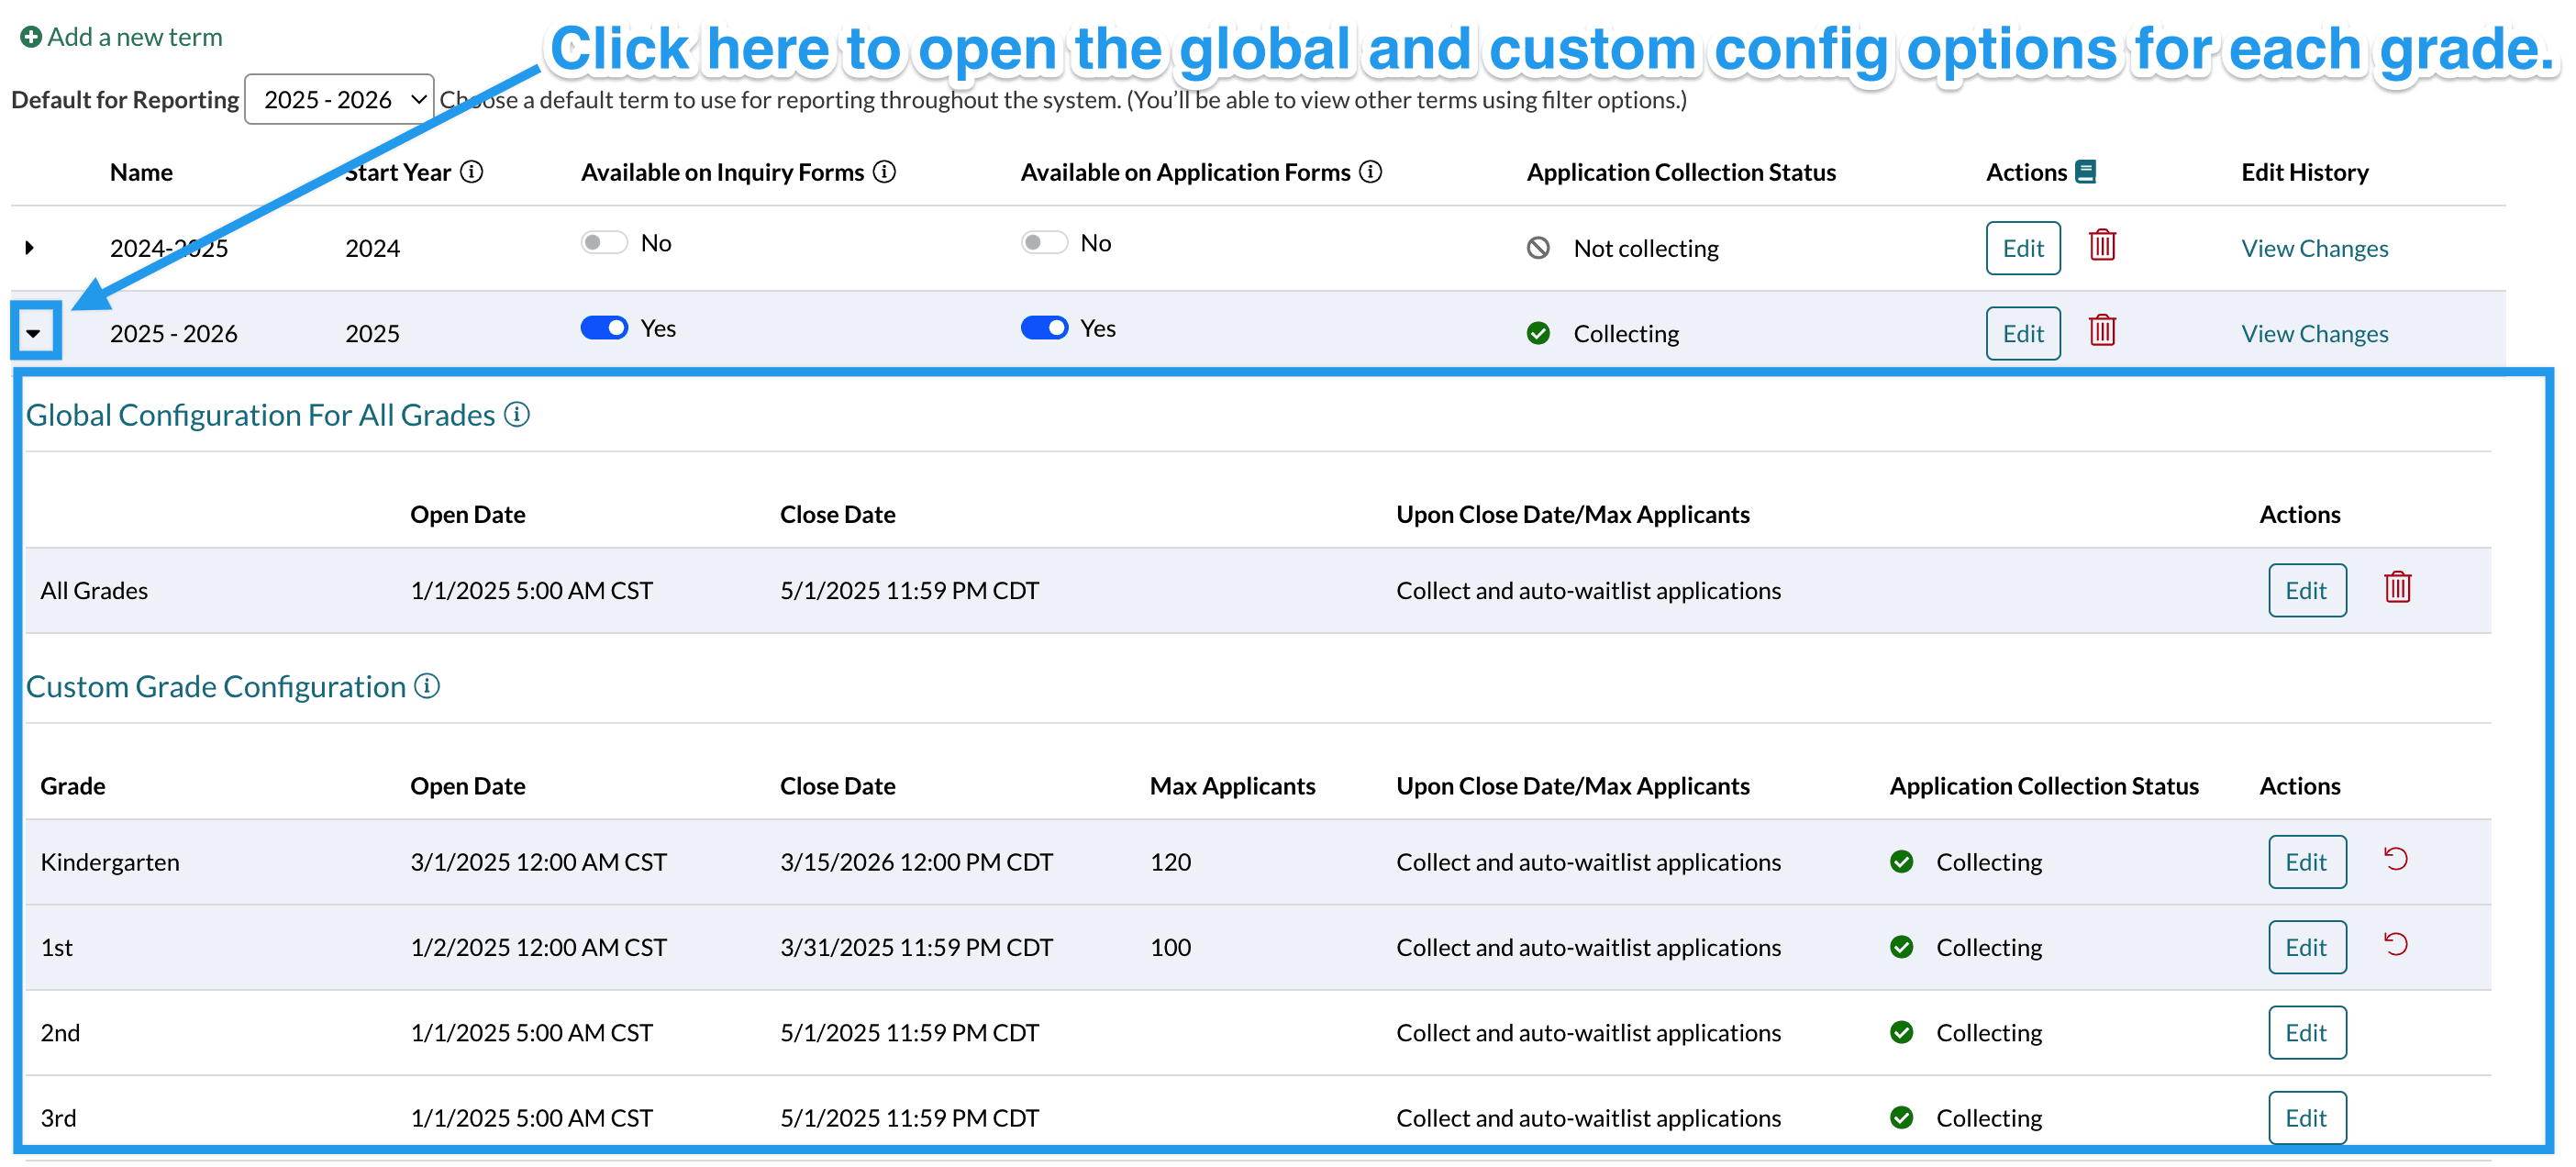
What do these settings affect?
These settings affect the behavior of the grade within your Application form or, for schools that directly enroll students, on the initial Registration form.
You have two levels of settings here:
- Global Configuration for All Grades: The global option allows you to apply the settings across all grades (except where a custom configuration is already in place.)
- Custom Grade Configuration: The custom option allows you to apply the settings on a grade-by-grade basis.
Please note: These settings do not affect your Inquiry form.
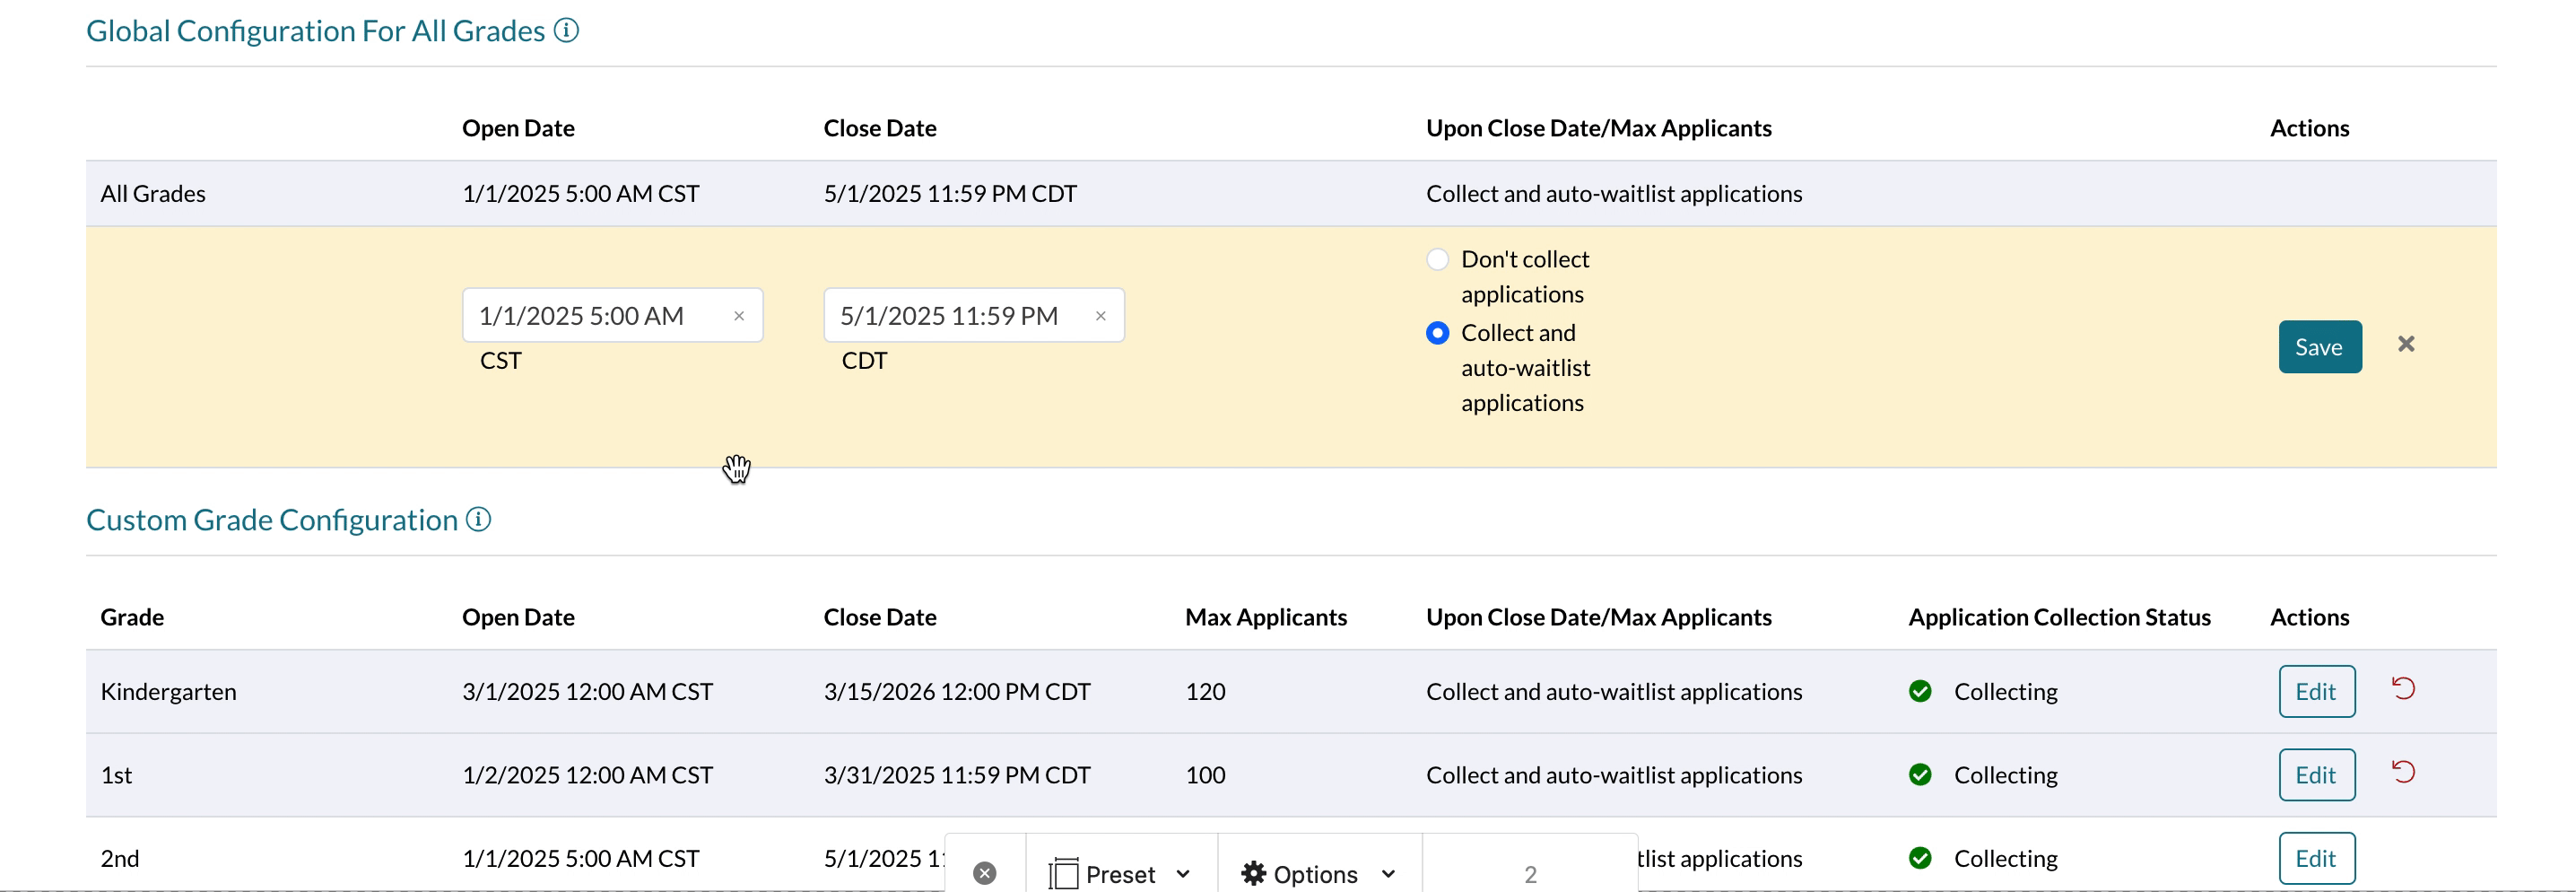
Global Configuration for all grades
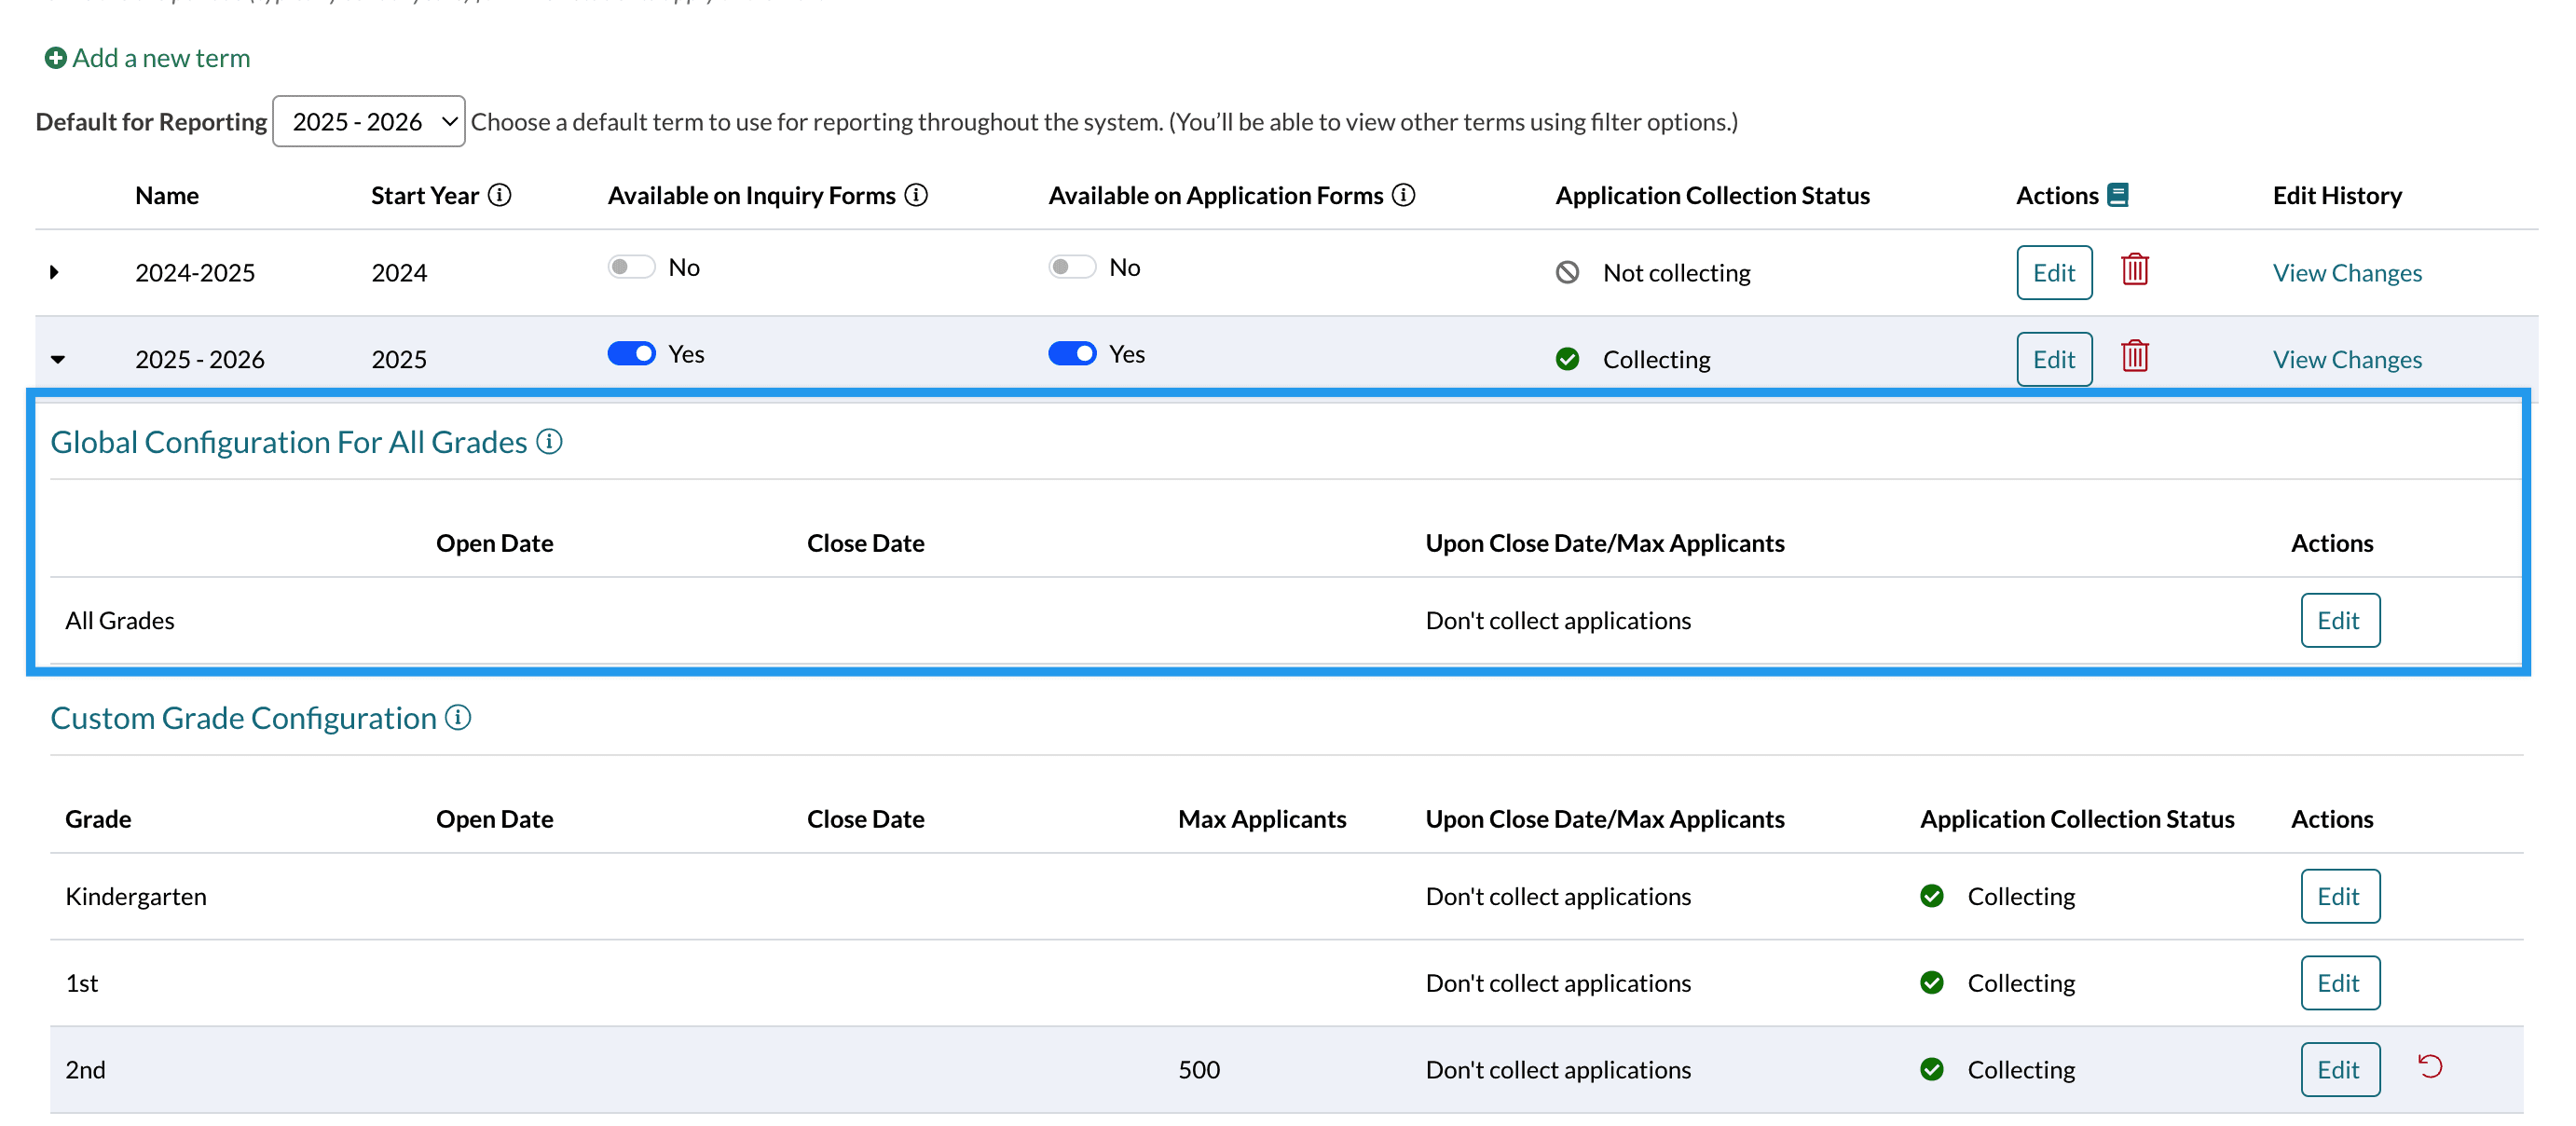
These global settings apply to all grades (except where custom settings are in place.)
Here, you can set a date/time to either close grades within your form (don't collect applications) or to keep them available but automatically waitlist all students who apply to or register for the grade(collect and auto-waitlist applications.)
Click Edit in the Actions column for this section to open up the global settings.
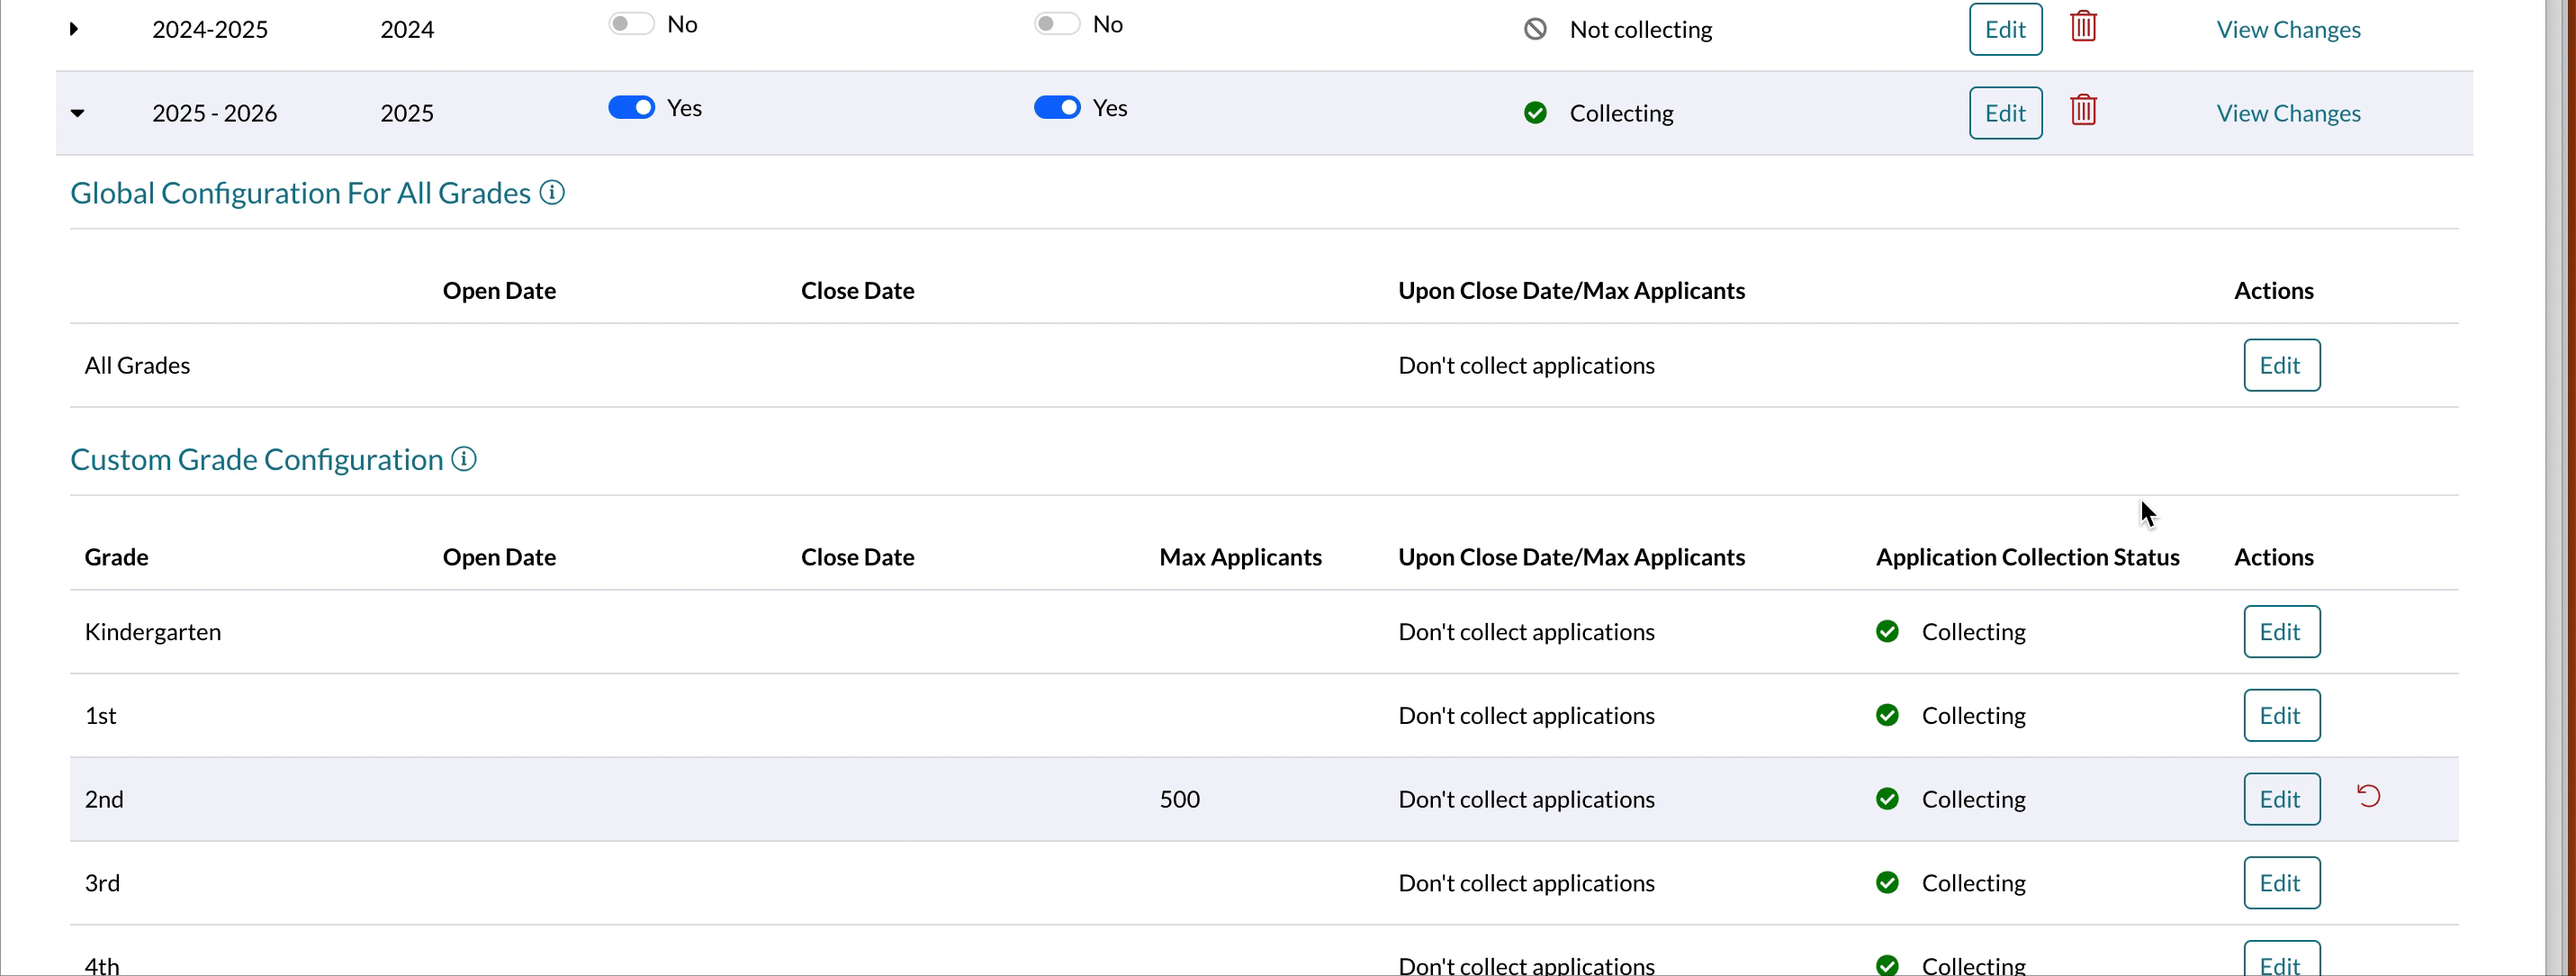
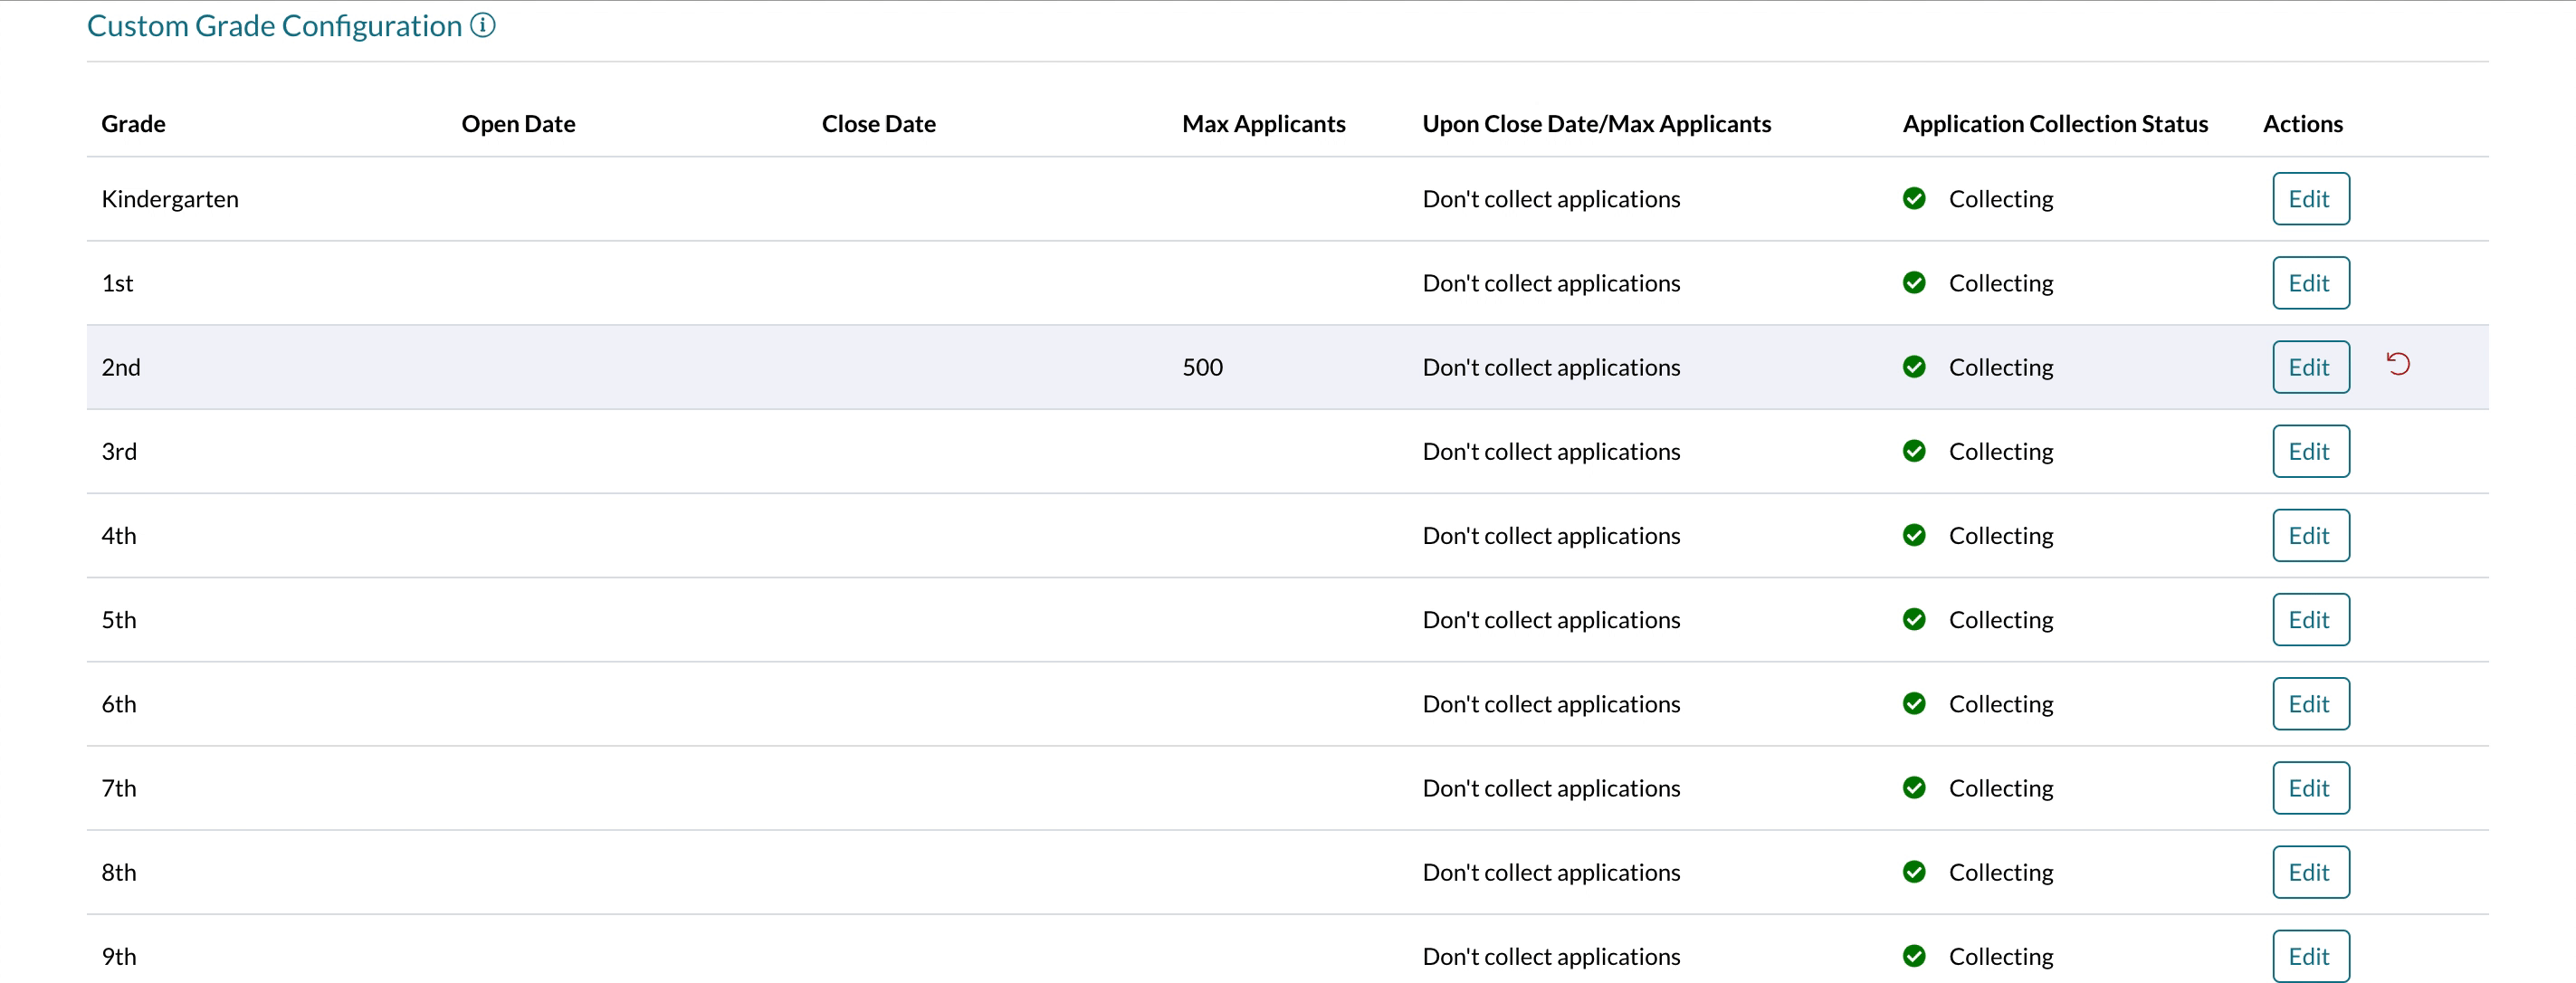
Custom Grade Configuration
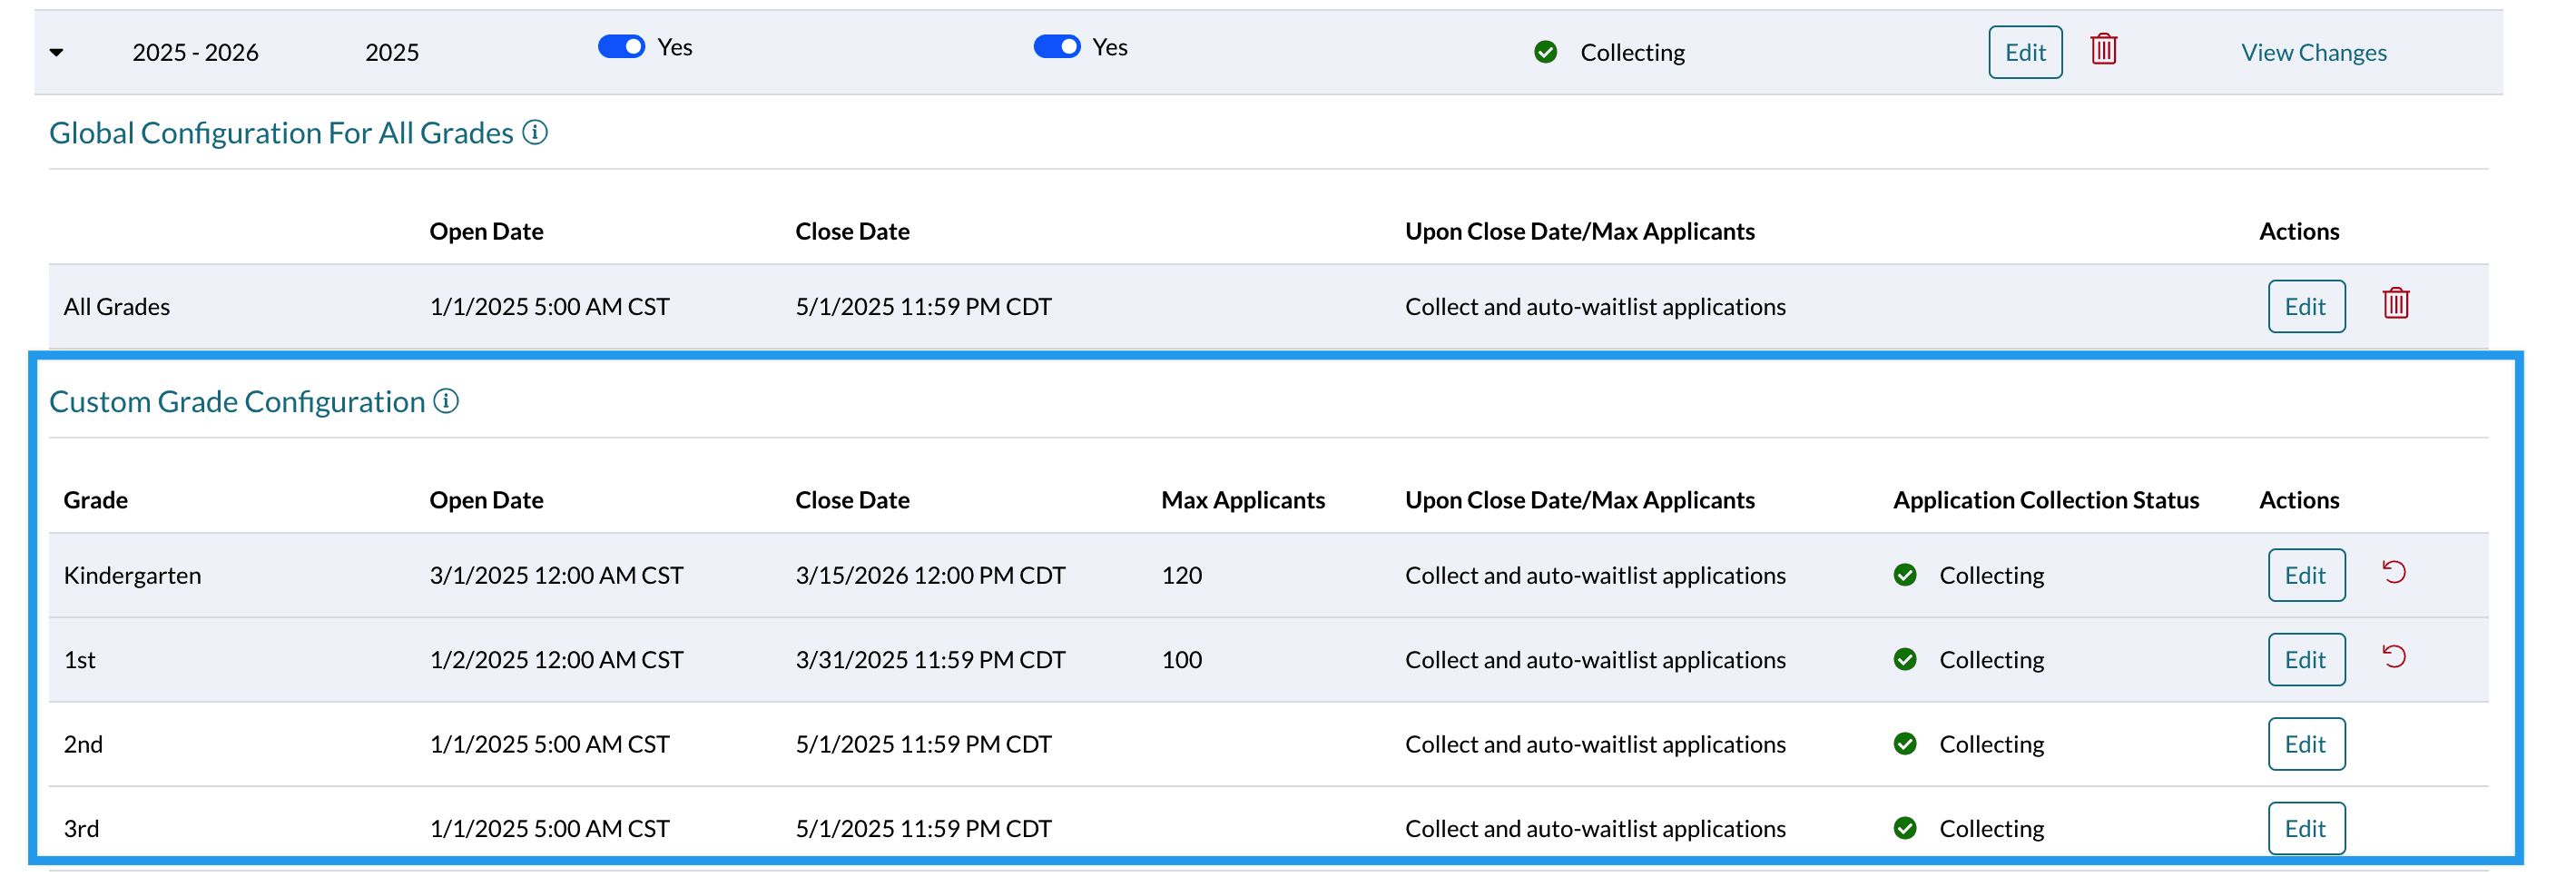
The Custom Grade Configurations section allows you to auto-waitlist or close individual grades within your application or registration form.
Click Edit in the Actions column on a specific grade to adjust the custom settings for that grade.
Which settings take precedence
- Global vs Custom: Custom settings take precedence over the Global settings. That means that if you have a custom setting on any of your grades for a specific term, it will apply even if the global settings are also in play.
- Open/Close Date vs Max Applications: Open/close date takes priority over max applicants. If you have set up both a close date and also a max applicant value for a grade, the date will trigger your selected behavior even if the max amount of applicants has not yet been reached.
Setting Automatic Open/Close Dates for Grades
In the global or custom configuration sections, you can use the Open Date and Close Date options to set the timeframe in which the system will apply the following options:
- Don't collect applications: Turns off access for families to apply to or register for grade(s) in a specific term. (i.e., when the family opens the dropdown on the form that asks which grade the student is applying to or registering for, the grade will not be visible.)
- Collect and auto-waitlist applications: Leaves the grade open as an option within your form, but waitlists all students who select it.
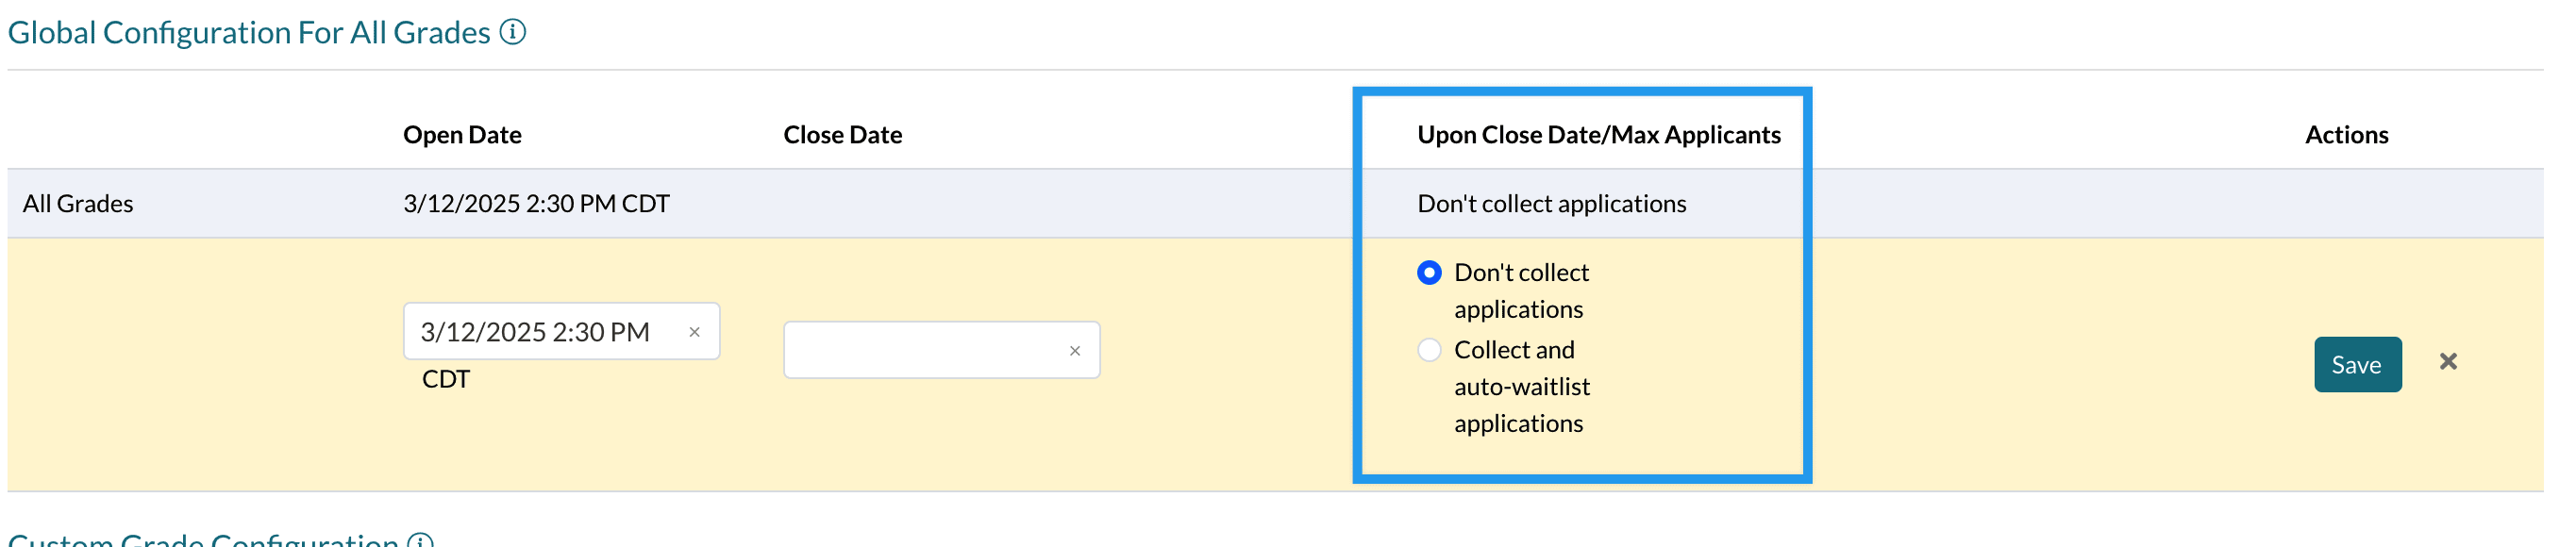
How to set open/close dates on either the global or custom grade level:
- Set a Date and Time to trigger grade actions. All dates/times reflect your school’s time zone.
- To close grades, you must set a Close Date for the system to trigger the action.
- Setting an Open Date is optional, but if you do not set a Close Date, your setting will not take effect.
- Select one of the actions: Don't collect applications OR Collect and auto-waitlist applications.
- Select Save.
Important notes
- You must toggle "Available on Other Forms" to Yes when setting an Open Date. If the term is not available on the Application Form when the Open Date passes, the grades will not be visible on the form until the term is made available.
- You must set a Close Date when selecting to close or waitlist grades. If you do not set a Close Date, the action you have selected will not work.
- All dates/times on this page are displayed in your school's specific time zone.
Important to note
This setting does not prevent families from accessing your application or registration form. It only removes the grade(s) as an option within the form. To learn more about your options for application/registration access, please refer to this article: Control Parent Access to Admissions & Enrollment in the Parent Portal.
Setting a Maximum number of Applicants for a Grade
In the custom configuration section, you can enter the maximum number of applicants per grade and select an action to take place once that number is reached.
- Don't collect applications: Turns off access for families to apply to or register for grade(s) in a specific term. (i.e., when the family opens the dropdown on the form that asks which grade the student is applying to or registering for, the grade will not be visible.)
- Collect and auto-waitlist applications: Leaves the grade open as an option within your form, but waitlists all students who select it.
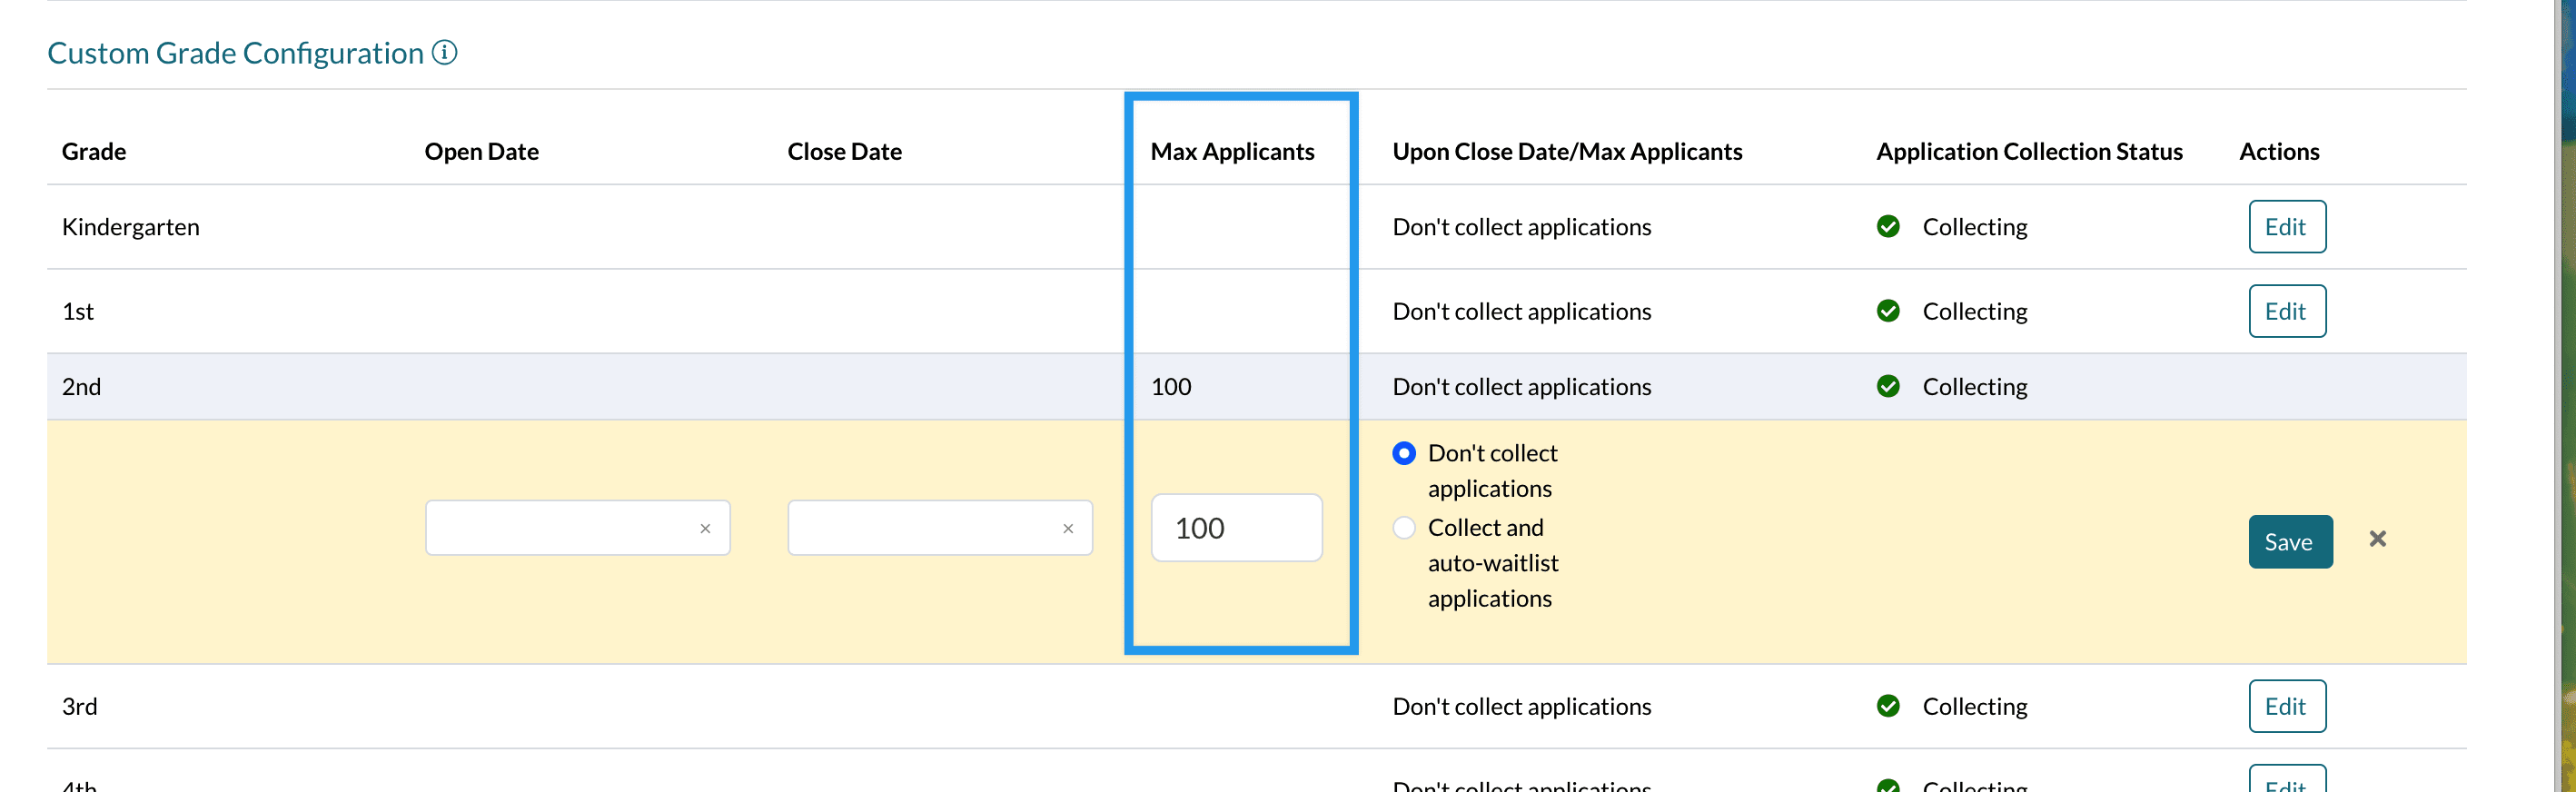
How to set a maximum number of applicants for a specific grade
-
Enter a number into the Max Applicant column.
- You must enter a number in this box for the system to trigger the action.
- Select one of the actions: Don't collect applications OR Collect and auto-waitlist applications.
- Select Save.
Please note
- You must set a number in the Max Applicants column for the system to trigger your selected action. If you do not set a number in the Max Applicants column, your setting will not work.
- This can only be set on the custom (individual grade) level and not the global level.
- It is possible to set both a maximum number of applicants and a close date. When both are in play, the date takes precedence.
Configuration Options
Do not collect Applications
When the criteria is met, this removes the grade as an option from the dropdown in which families select which grade they are applying to/registering for.
Please note:
- This configuration is set up on a term-by-term basis, which means if you have it set to be "turned off" in one term, a family may still be able to select that disabled grade in another term as long as it's still available there.
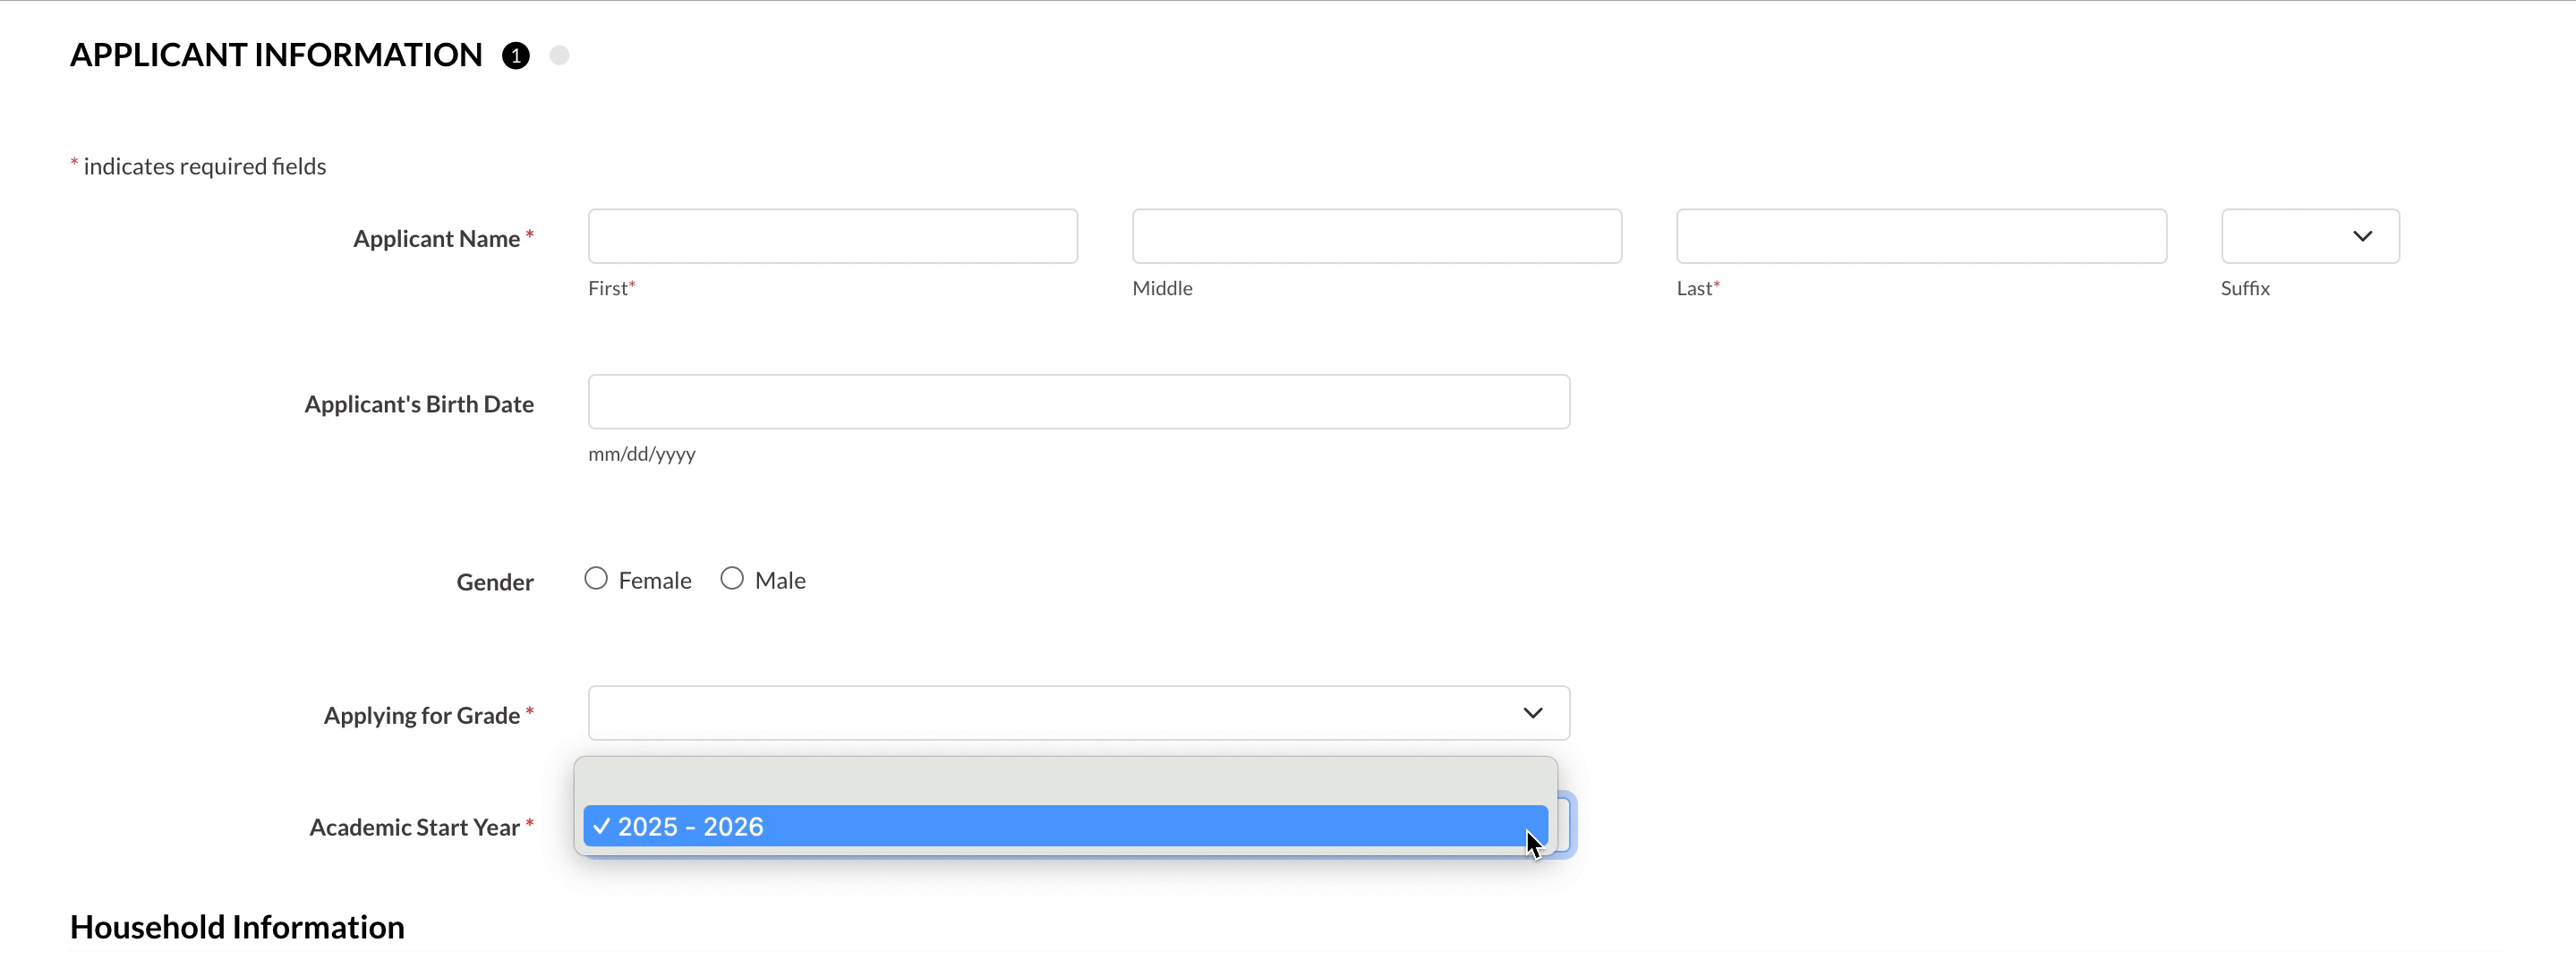
Example of what the parent sees when you've set up the "Do not collect applications" option and the parent is applying outside of the date/time window or the maximum number of applications has been reached. Please note: In this example, no grades are appearing in the grades dropdown because the global setting was used to turn off all grades as options immediately when the close date and time were reached.
Collect and auto-waitlist applications
When you select this option, families will still see all grades listed in the dropdown, in which they select which grade they are applying to or registering for (unless you have a custom grade configuration set up to close one of them.)
On your end, once the form is imported into your site, the student will automatically be given the status of Waitlisted and they will appear in your Waitlist workflow page for the corresponding grade and term. Read more about waitlisting here: Auto-Waitlist.
Best Practices when adjusting Global and Custom Grade Configuration
Be sure to consider how this setting affects the parent experience.
- If you use the Global settings to turn off all grades in a term, you may wish to completely turn off the ability for parents to apply. You can learn about those settings within this article: Control Parent Access to Admissions & Enrollment in the Parent Portal
- Another option to consider is updating your application form with a custom note, which you can have appear right above the area where you ask families to select a grade and apply year. This could be a good way to signal to families that the grade is not available and to let them know when it might be open again.
- When making any adjustments to your forms or turning off application access completely, be sure to set reminders to go back in and remove notes or open up access when the right time comes.
Data Management
The Data Management tool lets you manage which checklist item data and/or review data you would like to permanently delete for a selected term (school year).
This is useful for schools that want to purge their system of certain forms and uploaded documents year-over-year, or for schools that want to clear their review data from prior years for re-applicants.
Data Management Column visibility
The Data Management column on the Terms setup page is only visible to System Admins. This column will not display for Admins, Users, or Limited Users.
To use the Data Management tool, follow these steps:
1. Click on the red trashcan icon next to the term from which you want to delete data.

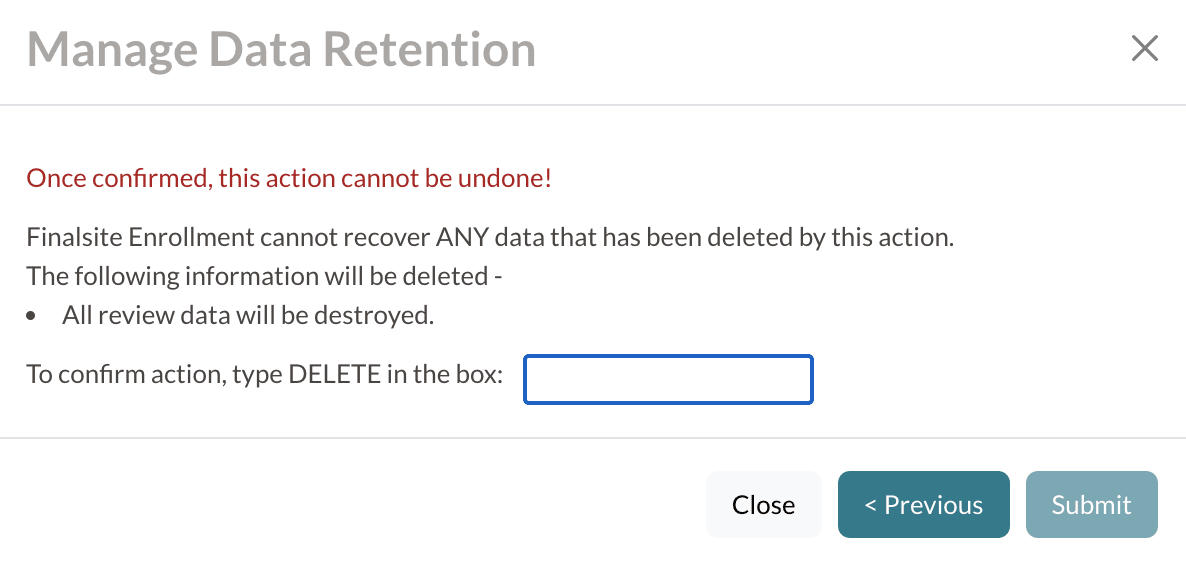
2. The Manage Data Retention window will appear. Check off the boxes for all items you wish to permanently delete. Deleted Data is not recoverable.
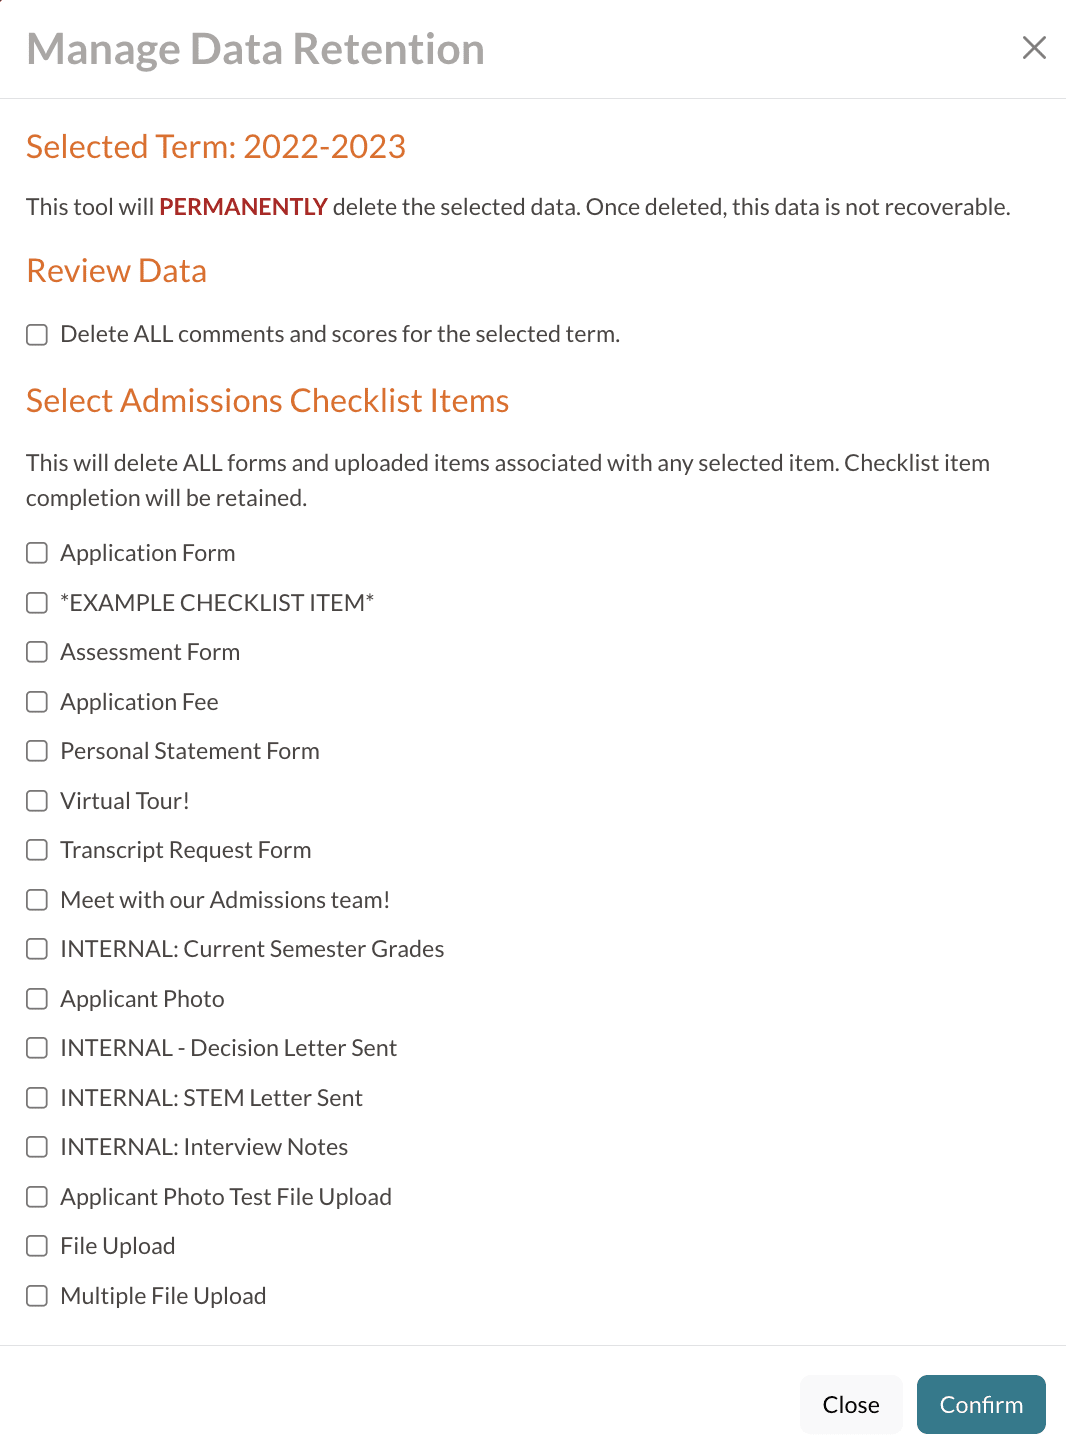
3. Click the Confirm button at the bottom.
4. To complete the process, you will be asked to confirm that you understand this data will be permanently deleted and cannot be recovered. Type the word "DELETE" into the box, and then click on the Submit button (which will only become available once the word is typed) to confirm the action.
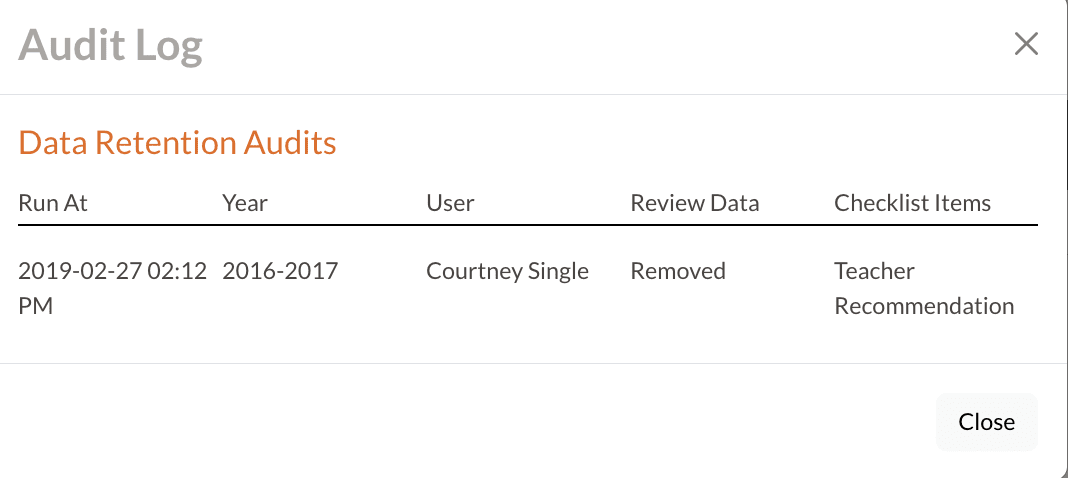
Data Management Audit History
To see an audit history of all deleted data, click on the book icon next to the Data Management column header.
In the audit log, you can view a history of all times the data management tool has been used, including when it was run, the term, the name of the user that completed the action, whether review data was removed or not, and which checklist items were deleted.
Archive Terms
Terms can be archived on your Terms page, under Settings > General > Terms, by clicking the button under the Archive column. If you archive a term that is visible on your inquiry and application forms, it will be removed from those forms.
Important Notes
When a term is archived, it will be removed from forms and most filter drop-down menus throughout the site, including your Dashboard and Searches.
The exceptions to this include:
-
Saved Searches (Search & Reports > Saved Searches):
- If a Saved Search is filtered by an archived term, all active terms and that specific archived term will show in the term-picker drop-down menu.
- If the search is updated and saved with a new term, the archived term will disappear and will not be available for future updates.
- Admissions Report (Search & Reports > Admissions Reports): This report will always show the last five terms at the top of each table, even if one or more of those terms have been archived.
- My Reviews (Admissions > My Reviews): The term-picker on the My Reviews page will show the terms that have been set up for review on your Reviews page, under Settings > General > Review.
- Inquiry, Admissions, & Enrollment Checklists (Settings > Checklists > Inquiry/Admission/Enrollment): All terms will show in the term-picker drop-down menu at the top of each Checklists page.
For schools that use our Billing Module, we do not recommend archiving terms with active balances, as the archived terms will be removed from reports with term-picker drop-down menus, such as the Students Report and Revenue Recognition Report.
Archived Terms will be shown in a table below Active Terms, and can be restored at any time by clicking the icon under the Restore column.
Comments
0 comments
Article is closed for comments.