Overview
Images and video are great tools for branding your communications and Parent Portal experience. They can also help engage applying or enrolling families with your school. In this article, you will learn about which templates within Finalsite Enrollment support images and/or videos, as well as how to add this content using the template editor.
In this Article
How-To: Add Images to Templates
Images can be added to emails, letters, and Parent Portal Content pages. They are not currently supported on labels or text messages. To get started, locate the template you want to add an image to and then click on the Edit button next to it.
There are two ways you can add an image within the template editor:
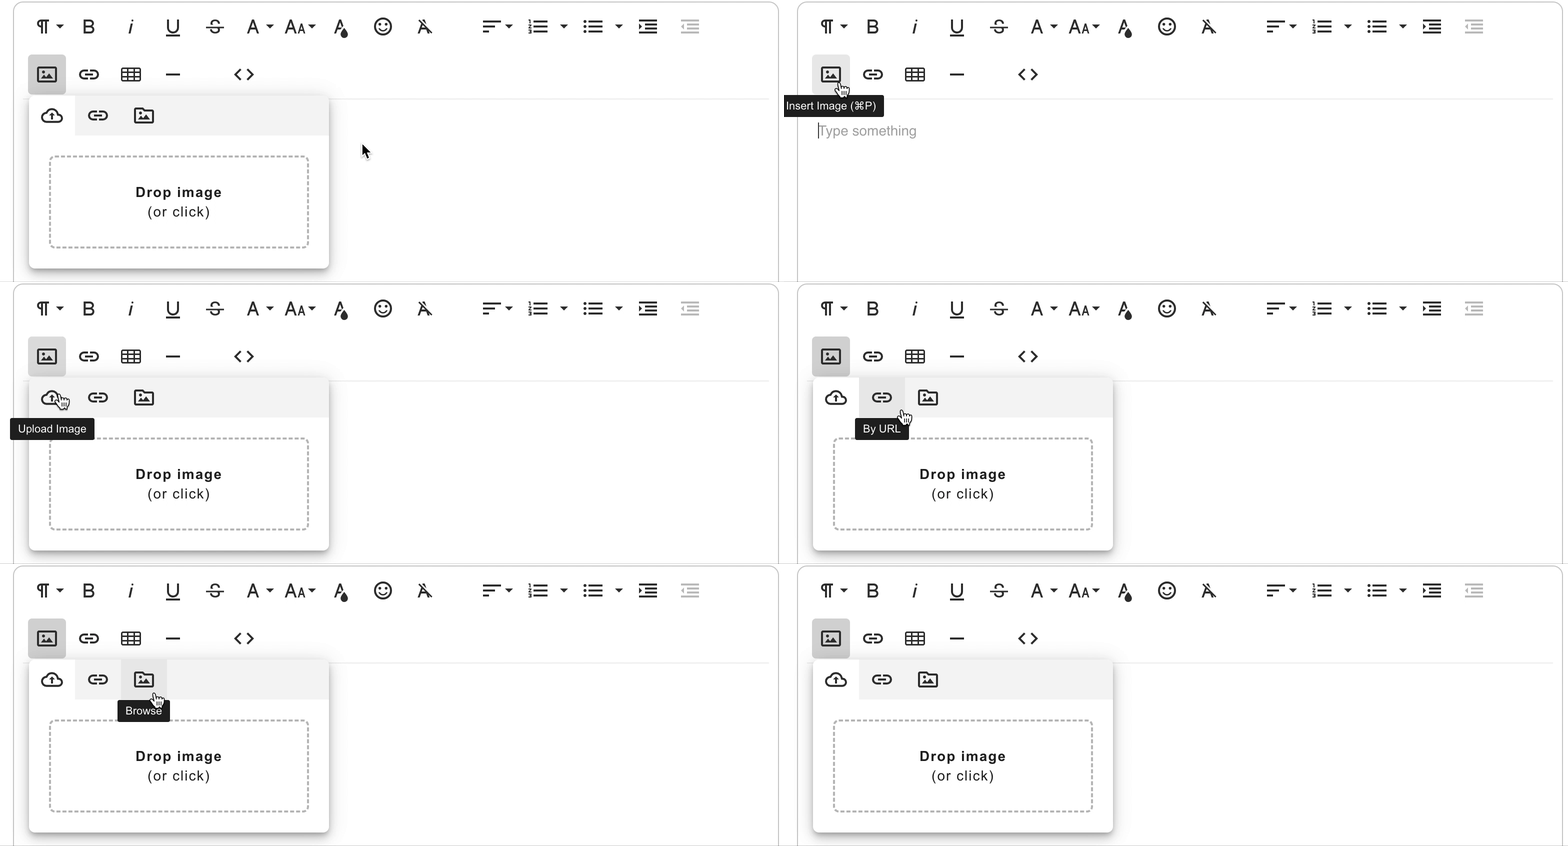
1. Add an image to a template directly by clicking on the Insert Image button (picture frame icon). You can then choose to upload an image file, enter a URL to an image file, or choose an existing image file that you previously uploaded to Finalsite Enrollment.
2. Drag and drop an image into the body of the template. This will automatically add the image to your image library and file manager so that you can use it again for future communications.
Once you have inserted the image into your template, you can customize it further. Click on your inserted image to see the additional options.
-
Alignment: Click on Aligns the image left, center, or right
-
Delete: Click here to remove the image from your template. You can also select the image then hit the delete/backspace key to remove it.
-
Insert Link: Click here to add a hyperlink to your image so that people are taken to a specific URL when the image is clicked. You also have the option to have the link open in a new tab when the image is clicked.
-
Display: Click here to see your display options. You can choose to have the image display inline with your text, or you can break text and have the image embedded within the existing text.
-
Style: Click here to change the style of your image. You can add a rounded or bordered style to your images. This is multi-select, so you can add both options if you like. To remove one or both of these effects, click it again in the list.
-
Alternate Text: Click here to set alternate text to be used if the image file cannot be loaded and/or for screen readers.
-
Change Size: Click here to change the width and height of the image in pixel size. Read on below for more information on sizing your images.
You are able to resize the image by dragging it from any of the corners. However, we recommend pre-sizing any images before uploading them in order to ensure consistency across all of your templates and in how the template is displayed for different users. See below for information on recommended image dimensions.
Recommended Image Sizes
We recommend pre-formatting your images to 600px (length) x 100px (height) before loading them into the template so that you will not need to make adjustments each time you select the image for a new template. This will guarantee consistency in your templates across users since the image will always be ready as-is. The max height we suggest is 150px.
If you insert an image that is too wide when viewed in an email or on a landing page, you can click on Change Size and input 100% into the Width box. This will adjust the image's width to 100% of the page, instead of the fixed pixels of the original image.
How-To: Add Videos to Templates
Videos can be added to the following Parent Portal Content pages (within Settings > Portal > Parent Portal Content) using an embed link:
-
Inquiry Thank You Page
-
Application Thank You Page
-
Contract Thank You Page (if enabled within Communication Setup)
-
Contact Communication Area
-
Contact Page Sidebar
-
Portal Widget
-
Summary Page Sidebar
To enter your embed link, switch to Code View (<> button) on the template editor and then paste the code. You will need to switch back out of code view before saving by clicking Preview Changes or the Code View button. For schools using Vidigami, click here to learn how you can add a custom picture slideshow to a student's checklist.
* Video in Email *
Please note: Most email clients do not support embedded video via the JavaScript code they provide. It is also not recommended due to the file size. Emails over 1 MB in size are often caught as spam.
If you want to email out a video, it is recommended to share a link to a hosted location like Vimeo or YouTube instead. You can also upload files to the Finalsite Enrollment File Manager and share the link to it with families.
You can also take a screenshot from your video and add a hyperlink to it, so that the parent/student receiving the email can click the image and be directed straight to the video. Click here to learn more!
To learn more about media limitations in email, please visit this help article.


Comments
0 comments
Article is closed for comments.