
The Parent Portal Content page is where you manage the web templates that families see: thank-you pages, fee instructions, sidebars, terminology, and analytics. This article walks through every template, the enrollment/admissions toggles below them, terminology customization, and the GA4 / GTM / Termly tracking fields.
💡Quick Answers
- Where is the Parent Portal Content page? Settings > Portal > Parent Portal Content. Only System Admins and Admins can access it.
- What can I manage from the Parent Portal Content page? Web templates (thank-you pages, payment instructions, sidebars, login description, etc.), the enrollment/admissions parent-access toggles, terminology (Apply vs. Register, Enroll vs. Enrol), and analytics tracking codes.
- How do I edit a template? In the alphabetized list, click the Edit button to the right of any template to open it in the Template Editor, where you can use the visual editor or code view.
- Can I personalize templates with merge fields? Yes, on certain templates. See the Merge Fields on Parent Portal Content article for which fields work where.
- How do I turn off parent access to enrollment or admissions? Use the Parent enrollment enabled or Parent admissions application enabled checkboxes at the bottom of the page, then click Save. Parents are not notified automatically, so consider sending them a message.
- Where do I add GA4, GTM, or other tracking codes for the entire Parent Portal? In the Analytics section: paste your code into the GA4 Tracking ID, GTM Container ID, or Custom Script field, then click Save. The Custom Script field only accepts valid JavaScript and is only visible to System Admins.
In this Article
Who has access to this page?
Types: System Admins and Admin
Permissions: Any
Templates
How to Update
All Parent Portal Content pages (aka Web Templates) are managed from within Settings > Portal > Parent Portal Content.
On this page, all templates will be listed alphabetically by the Template Name. You can click the Edit button to the right of any of the templates to view or make changes to them using the Template Editor.
Template Descriptions
In this section, you will find a description of each Parent Portal Content template and where it appears within the Parent Portal.
Use the links below to jump to a specific template/description in the list.
Inquiry/Application Templates:
- Application Fee Check Instructions
- Application Fee Instructions
- Application Thank You
- Inquiry Thank You
Billing Templates:
Enrollment/Contract Templates
Portal Templates:
- Contact Communication Area
- Contact Page Sidebar and Contact Page Sidebar Header
- Login Page Description
- Portal Widget
- Summary Page Sidebar and Summary Page Sidebar Header
Other:
- Custom Fee Check Instructions
- Custom Payment Instructions
- Pay Now Instructions
- Shared Portal Page (only available to those using the Shared Portal)
Pro Tip: Merge fields can be used on certain Parent Portal Content pages for added personalization. Visit the "Merge Fields on Parent Portal Content" article for more information.
Application Fee Check Instructions
These are the instructions that display on the Application Fee payment page when the Check/Cheque option is selected as the payment method (if enabled as an option in your Application Fee Setup). A best practice is to provide instructions on where to mail the check and to whom to make the check out. You may also want to include a statement that you will mark the Application Fee checklist item as complete upon receipt of the check.
Application Fee Instructions
These are the general instructions that display on the Application payment page before a payment method is selected from the drop-down menu. A best practice is to notify families of any additional fees for payment by credit card, as well as the type of credit cards accepted. You can also direct them back to the main Parent Portal page to access the student checklist.
Be sure to clearly communicate any associated fees (like convenience fees) in this section. For schools that utilize our Payments product, we have created a series of merge tokens to specifically pull in your convenience fees. Read more about them in the "Convenience Fee Merge Tokens" article.
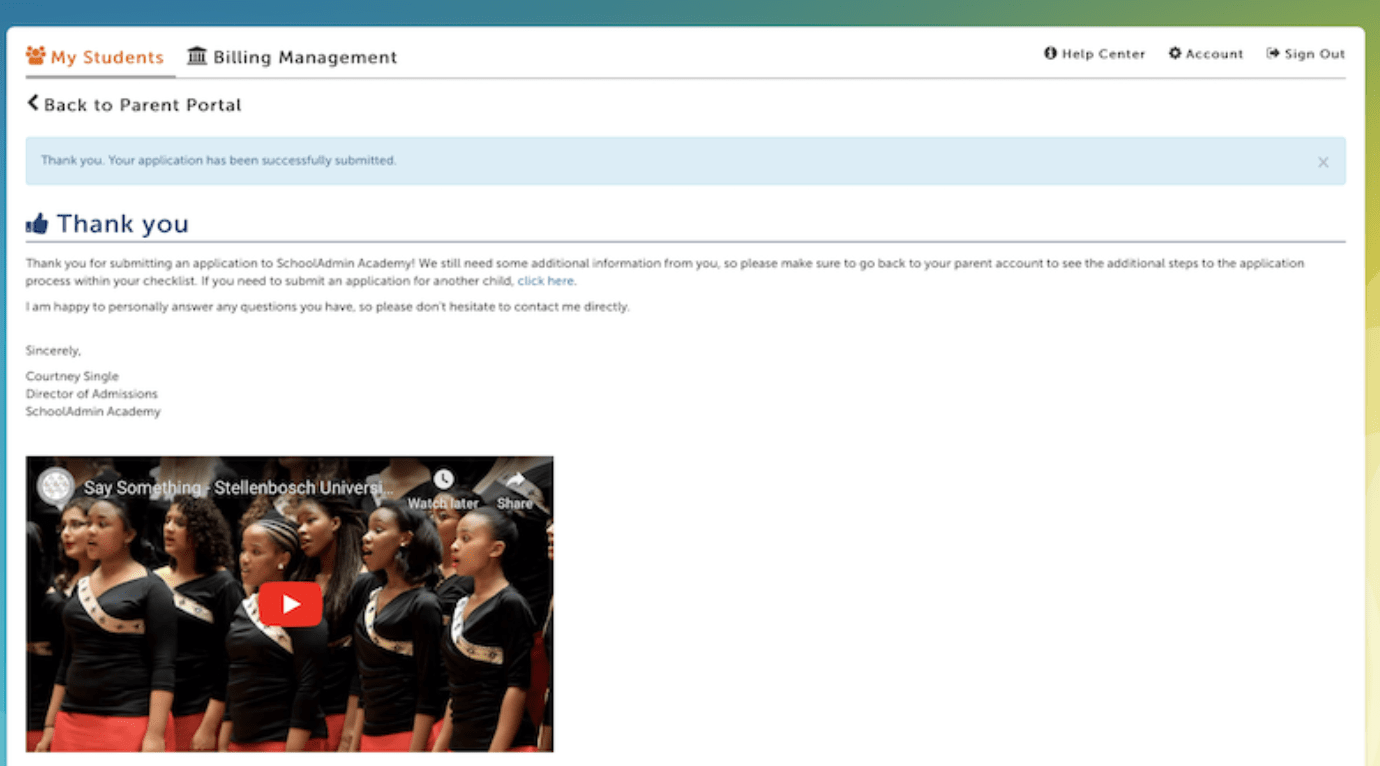
Application Thank You
This is the thank you page that displays after the Application Form is submitted.
Best Practices:
- Direct families back to the Parent Portal to complete the student's admissions checklist.
- Include links to your website, social media pages, blog subscription, etc.
- Add images or embed a video. Copy the embed code from the video you wish to add, and then paste it into the code view of the template.
- If you would like to use merge fields for personalization, the only one that will pull data is:{{contact.preferred_name_or_first}}, which will pull the student's preferred name or first name if there is no preferred name. Parent name merge fields will not work since the form may not be imported automatically due to a potential duplicate contact from an inquiry record.
Autopay Terms And Conditions
For schools using the Finalsite Enrollment Billing Module, this is the information that displays to a parent when enrolling in Autopay.
- Information on how a charge is defined
- How to update or terminate AutoPay information
- Liability waiver
- Information about convenience fees attached to Credit Card and Electronic Check payments
- Any other service terms
Pro tip: If you'd like to include information about Convenience Fees here, you can utilize one of the Convenience fee merge tokens.
The GIF below shows an example of accessing Autopay terms and conditions via the link that appears under the place where parents update their payment method. This link to the terms and conditions page also appears whenever they are on the make a payment page in their Billing Management tab.
Billing Management Widget
For schools using the Finalsite Enrollment Billing Module, this is the information that appears above the billing account and ledger within the Billing Management tab of the Parent Portal.
Best Practices:
- Include information on how to contact your Business/Finance Office or whoever handles the tuition and billing questions for your school.
- Provide instructions on how to enroll in AutoPay.
- Provide instructions on how to return to the student checklist or contract.
- Notify families about any convenience fees that you charge for certain payment methods.
Contact Communication Area
This is the area that displays above the student checklist. The information displayed in this area can be dynamic using liquid logic statements/rules. Submit a request to the Support Team for help with this!
Best Practices:
- Include deadlines and/or important dates
- Include links to a viewbook, student handbook, school calendar, etc.
Important Note about Display Customization
By default, anything added to this template will be visible to all contacts in an active workflow (i.e., both Admissions and Enrollment families). To customize the information for different sets of families, please work with our best-in-class Support Team so they can set up liquid logic statements/rules for dynamic displays. Some examples include admissions vs. enrollment, new vs. returning families, international vs. domestic, day vs. boarding, etc. See below for some examples.
Example for Admissions Statuses Only:
Example for Enrollment Statuses Only:
Contact Page Sidebar
This is the fully customizable sidebar that appears when viewing a student's checklist in the Parent Portal. By default, the template includes the contact information you have entered within Settings > General > Contact Information, but it can be updated to whatever you like.

Best Practices:
- List the key admissions, enrollment, and other contacts that families might need to reach during the process. You can pull in the information from the Contact Information setup page using merge tokens, or you can simply type in custom information.
- Get families excited about your school by displaying engaging images or videos from school events, clubs, and more.
- Be creative! You can use Liquid logic within this template to show different content based on the type of student. Change it up for upper vs. lower school, international vs. domestic, or even based on student interests. Submit a request to our Support Team for help with setup.
Contact Page Sidebar Header
This is the header that appears above the information you entered in the Contact Page Sidebar. The default is "Contact [Your School Name]" but this can be customized as you like.
Contract Thank You
This is the thank you page that displays after the Contract Form is submitted.
Best Practices:
- This template is turned off by default so that the parent/guardian is directed back to the Enrollment Checklist once the contract has been submitted. If you’d like to turn this feature on to display the thank you page, you can navigate to Settings > Communication > Communication Setup, then check the box for Contract Thank You Page and hit Save.
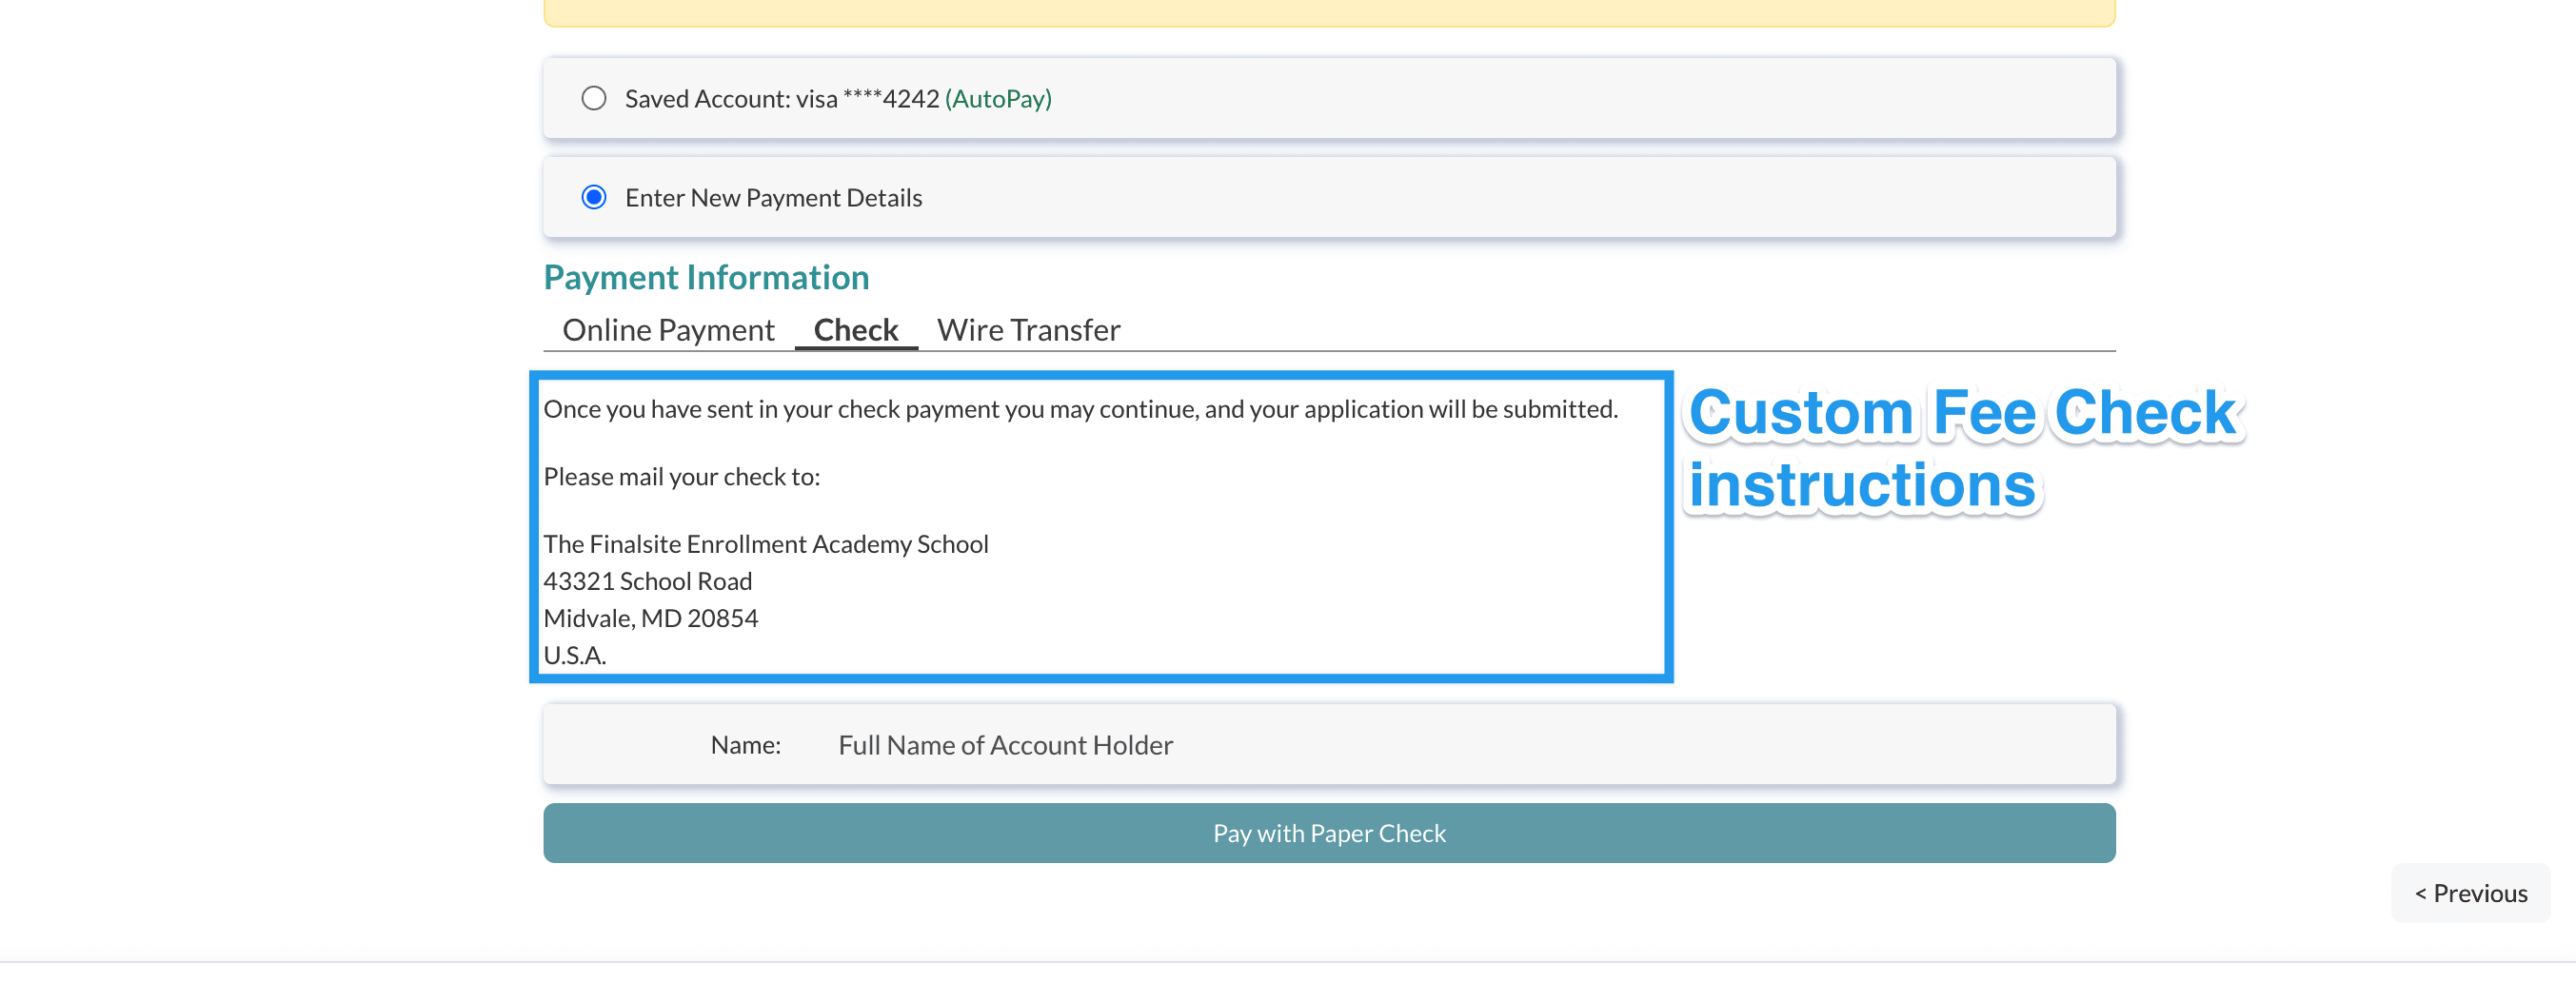
Custom Fee Check Instructions
These instructions can appear on your Custom Forms that have fees associated with them. The messaging appears when the parent selects Check as their payment method. Please note that you'll have to have "Check" enabled as a payment option for the fee associated with the form in order for the option to even appear in the payment area of the custom form.
- If you do not offer a paper check as an option, you can leave this template blank.
- If you do offer a paper check option, include information on who the check should be payable to and the mailing address. You may also want to include a statement that you will mark the associated fee checklist item as complete upon receipt of the check.
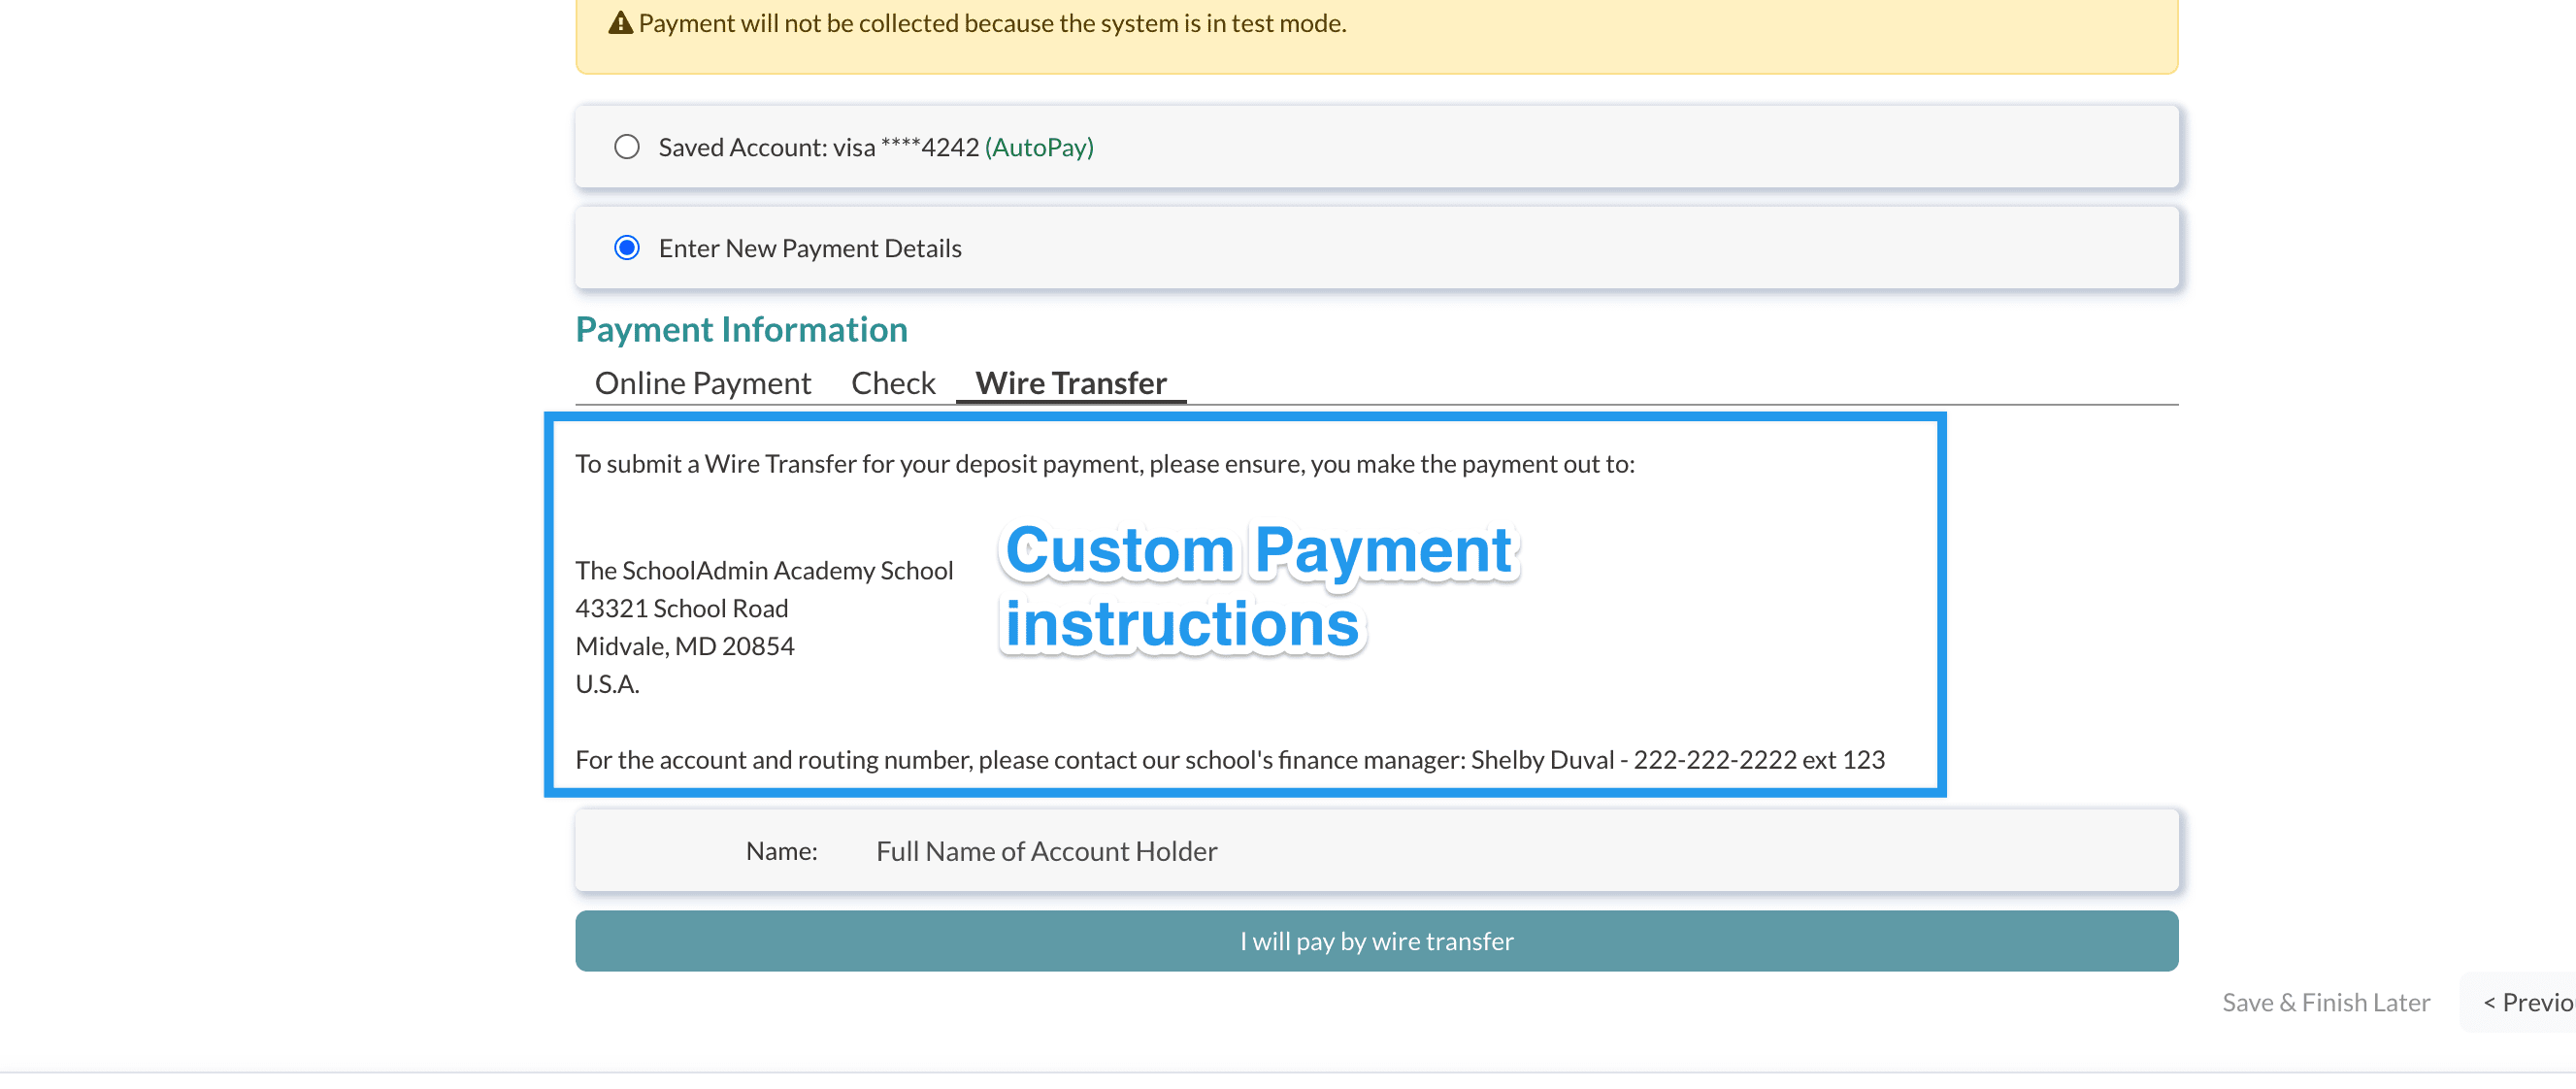
Custom Payment Instructions
These instructions can appear in any form (Application, Contract, and Custom Forms) as long as you have the Custom Payment option configured for that form as a payment option. The language appears when the parent selects the custom payment option as their payment method. Please note: You can customize the name of your custom payment option on the Payment Setup page, as seen in the example below, where the custom option is titled "Wire Transfer."
- If you do not have a custom payment method set up, you can leave this template blank.
- If you do offer a custom payment method option, include detailed instructions on submitting the payment. You may also want to include a statement that you will mark the associated fee checklist item as complete upon receipt of the payment.
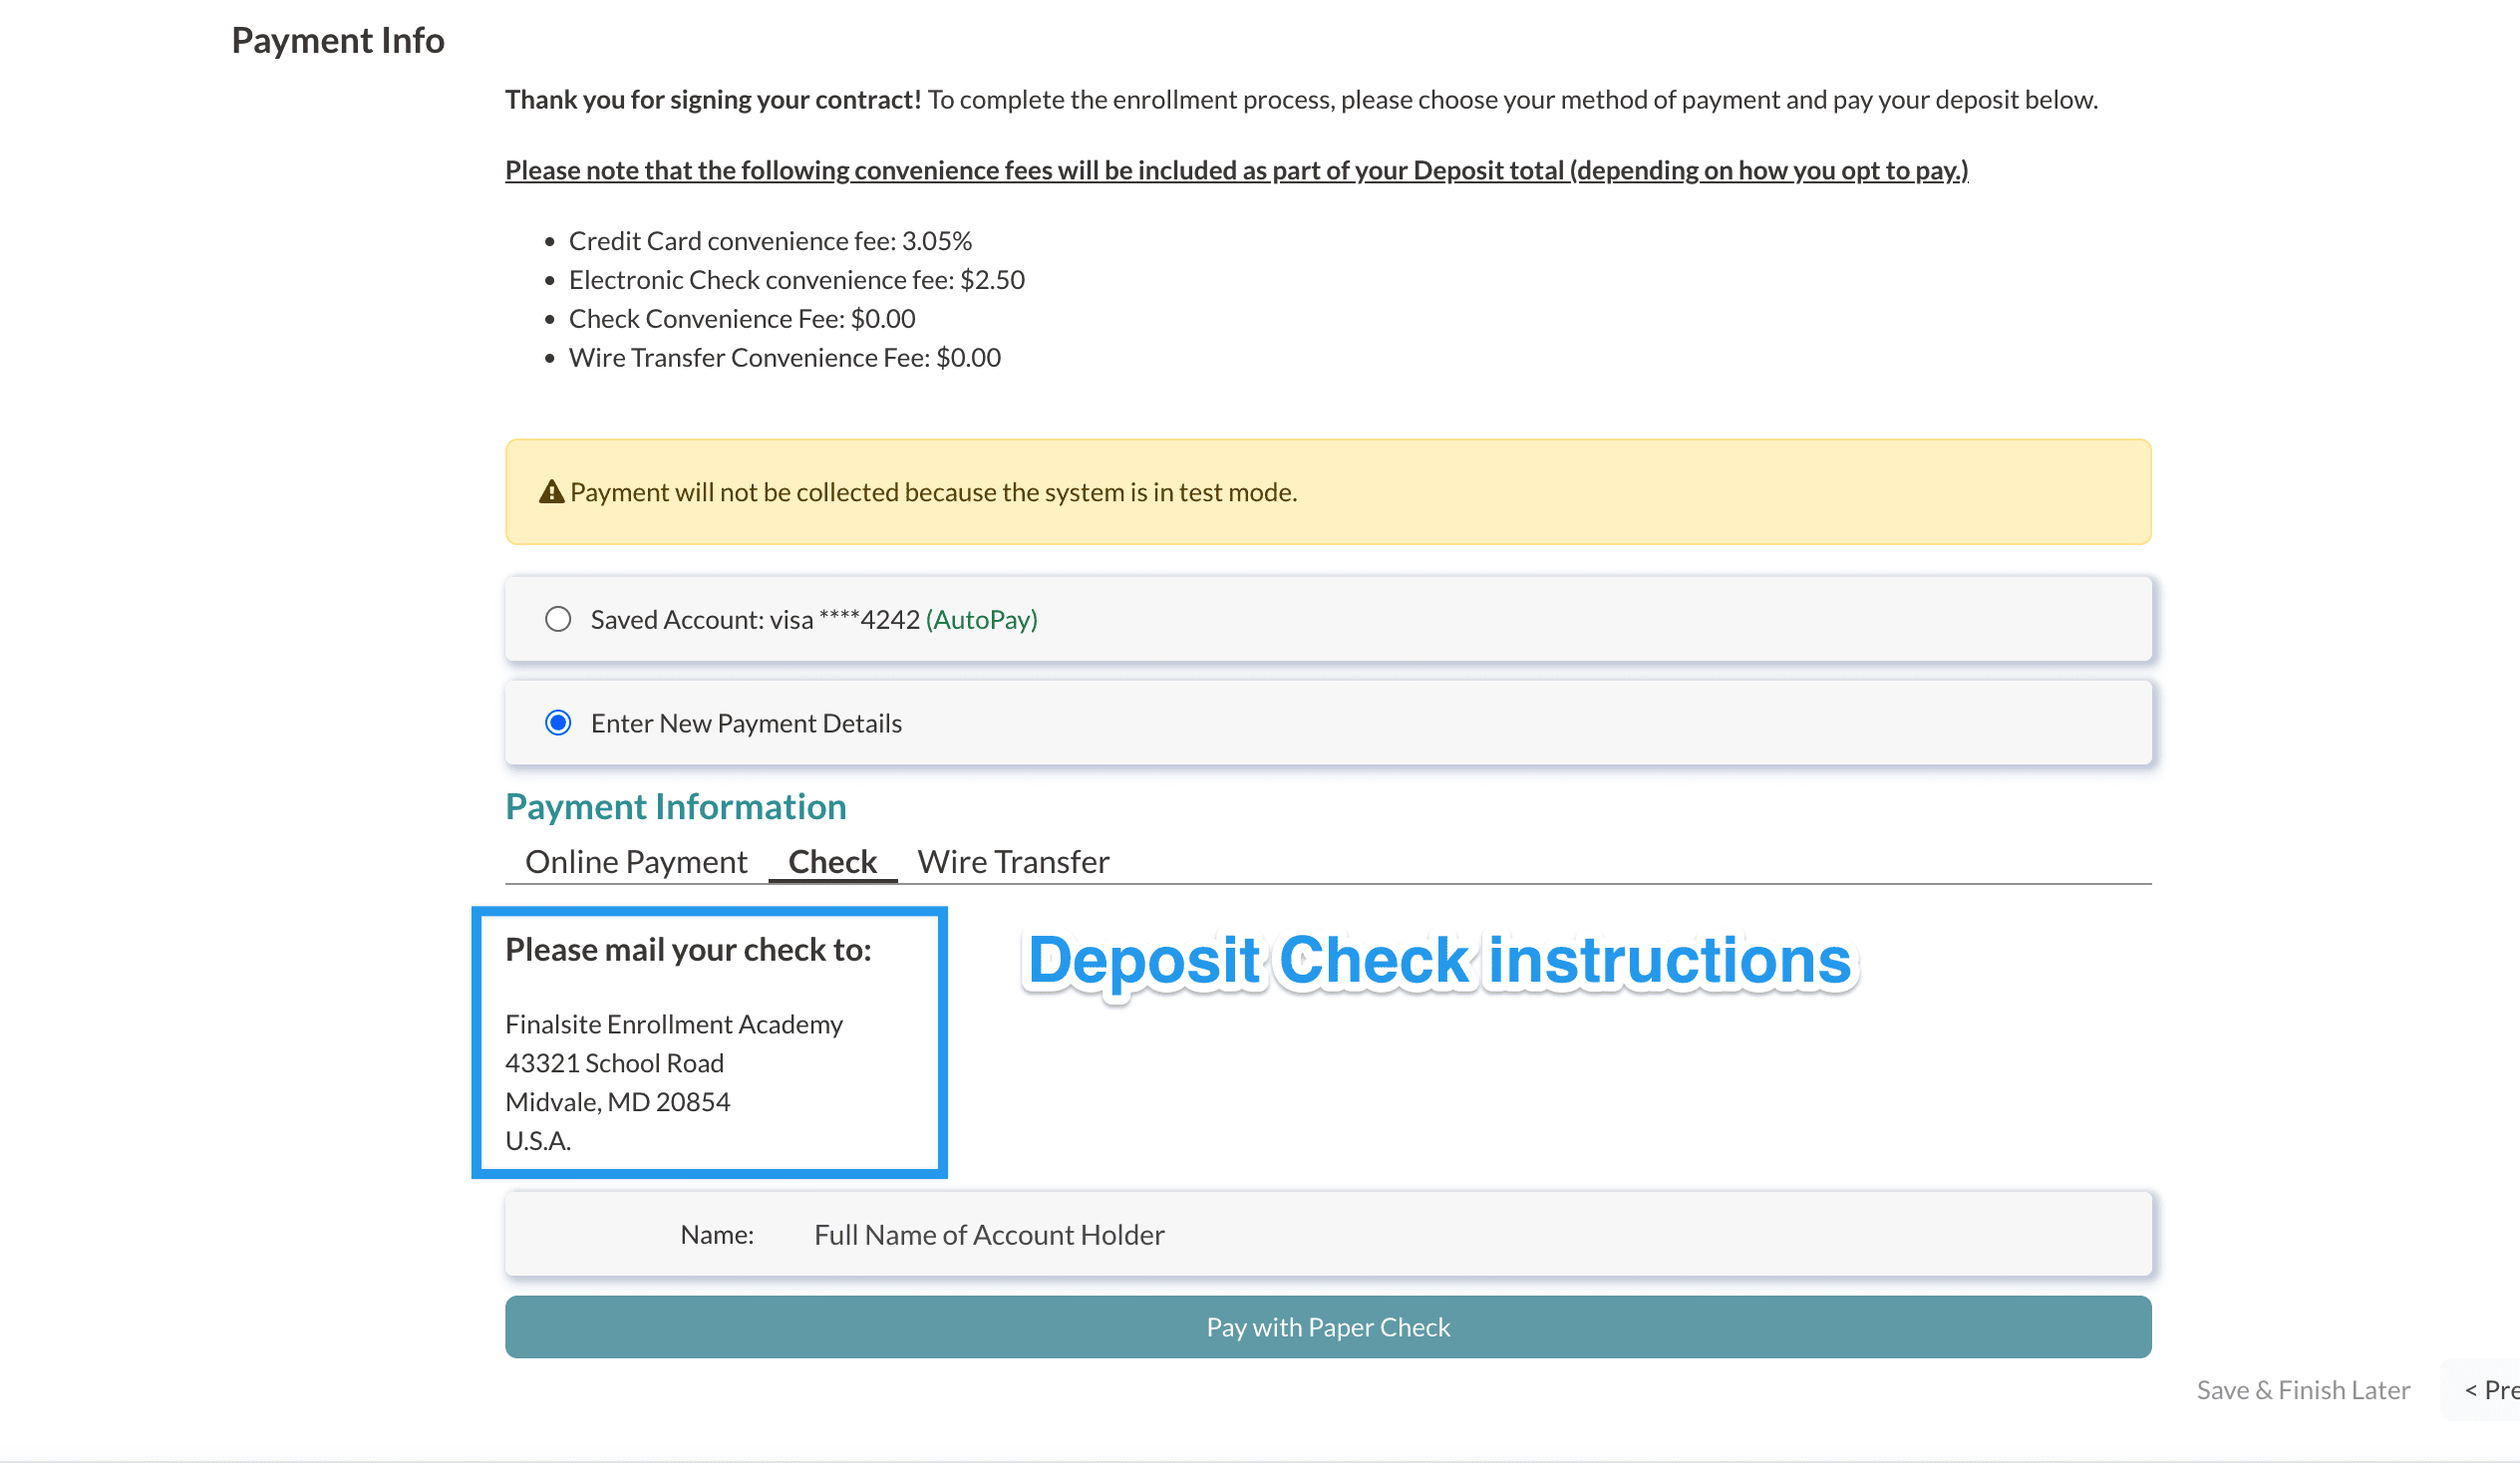
Deposit Check Instructions
These are the instructions that display on the payment page for the contract deposit when a Check option is selected, if applicable.
- If you do not offer a paper check as an option, you can leave this template blank.
- If you do offer a paper check option, include information on who the check should be payable to and the mailing address. You may also want to include a statement that you will mark the Deposit checklist item as complete upon receipt of the check. See the screenshot below for an example.
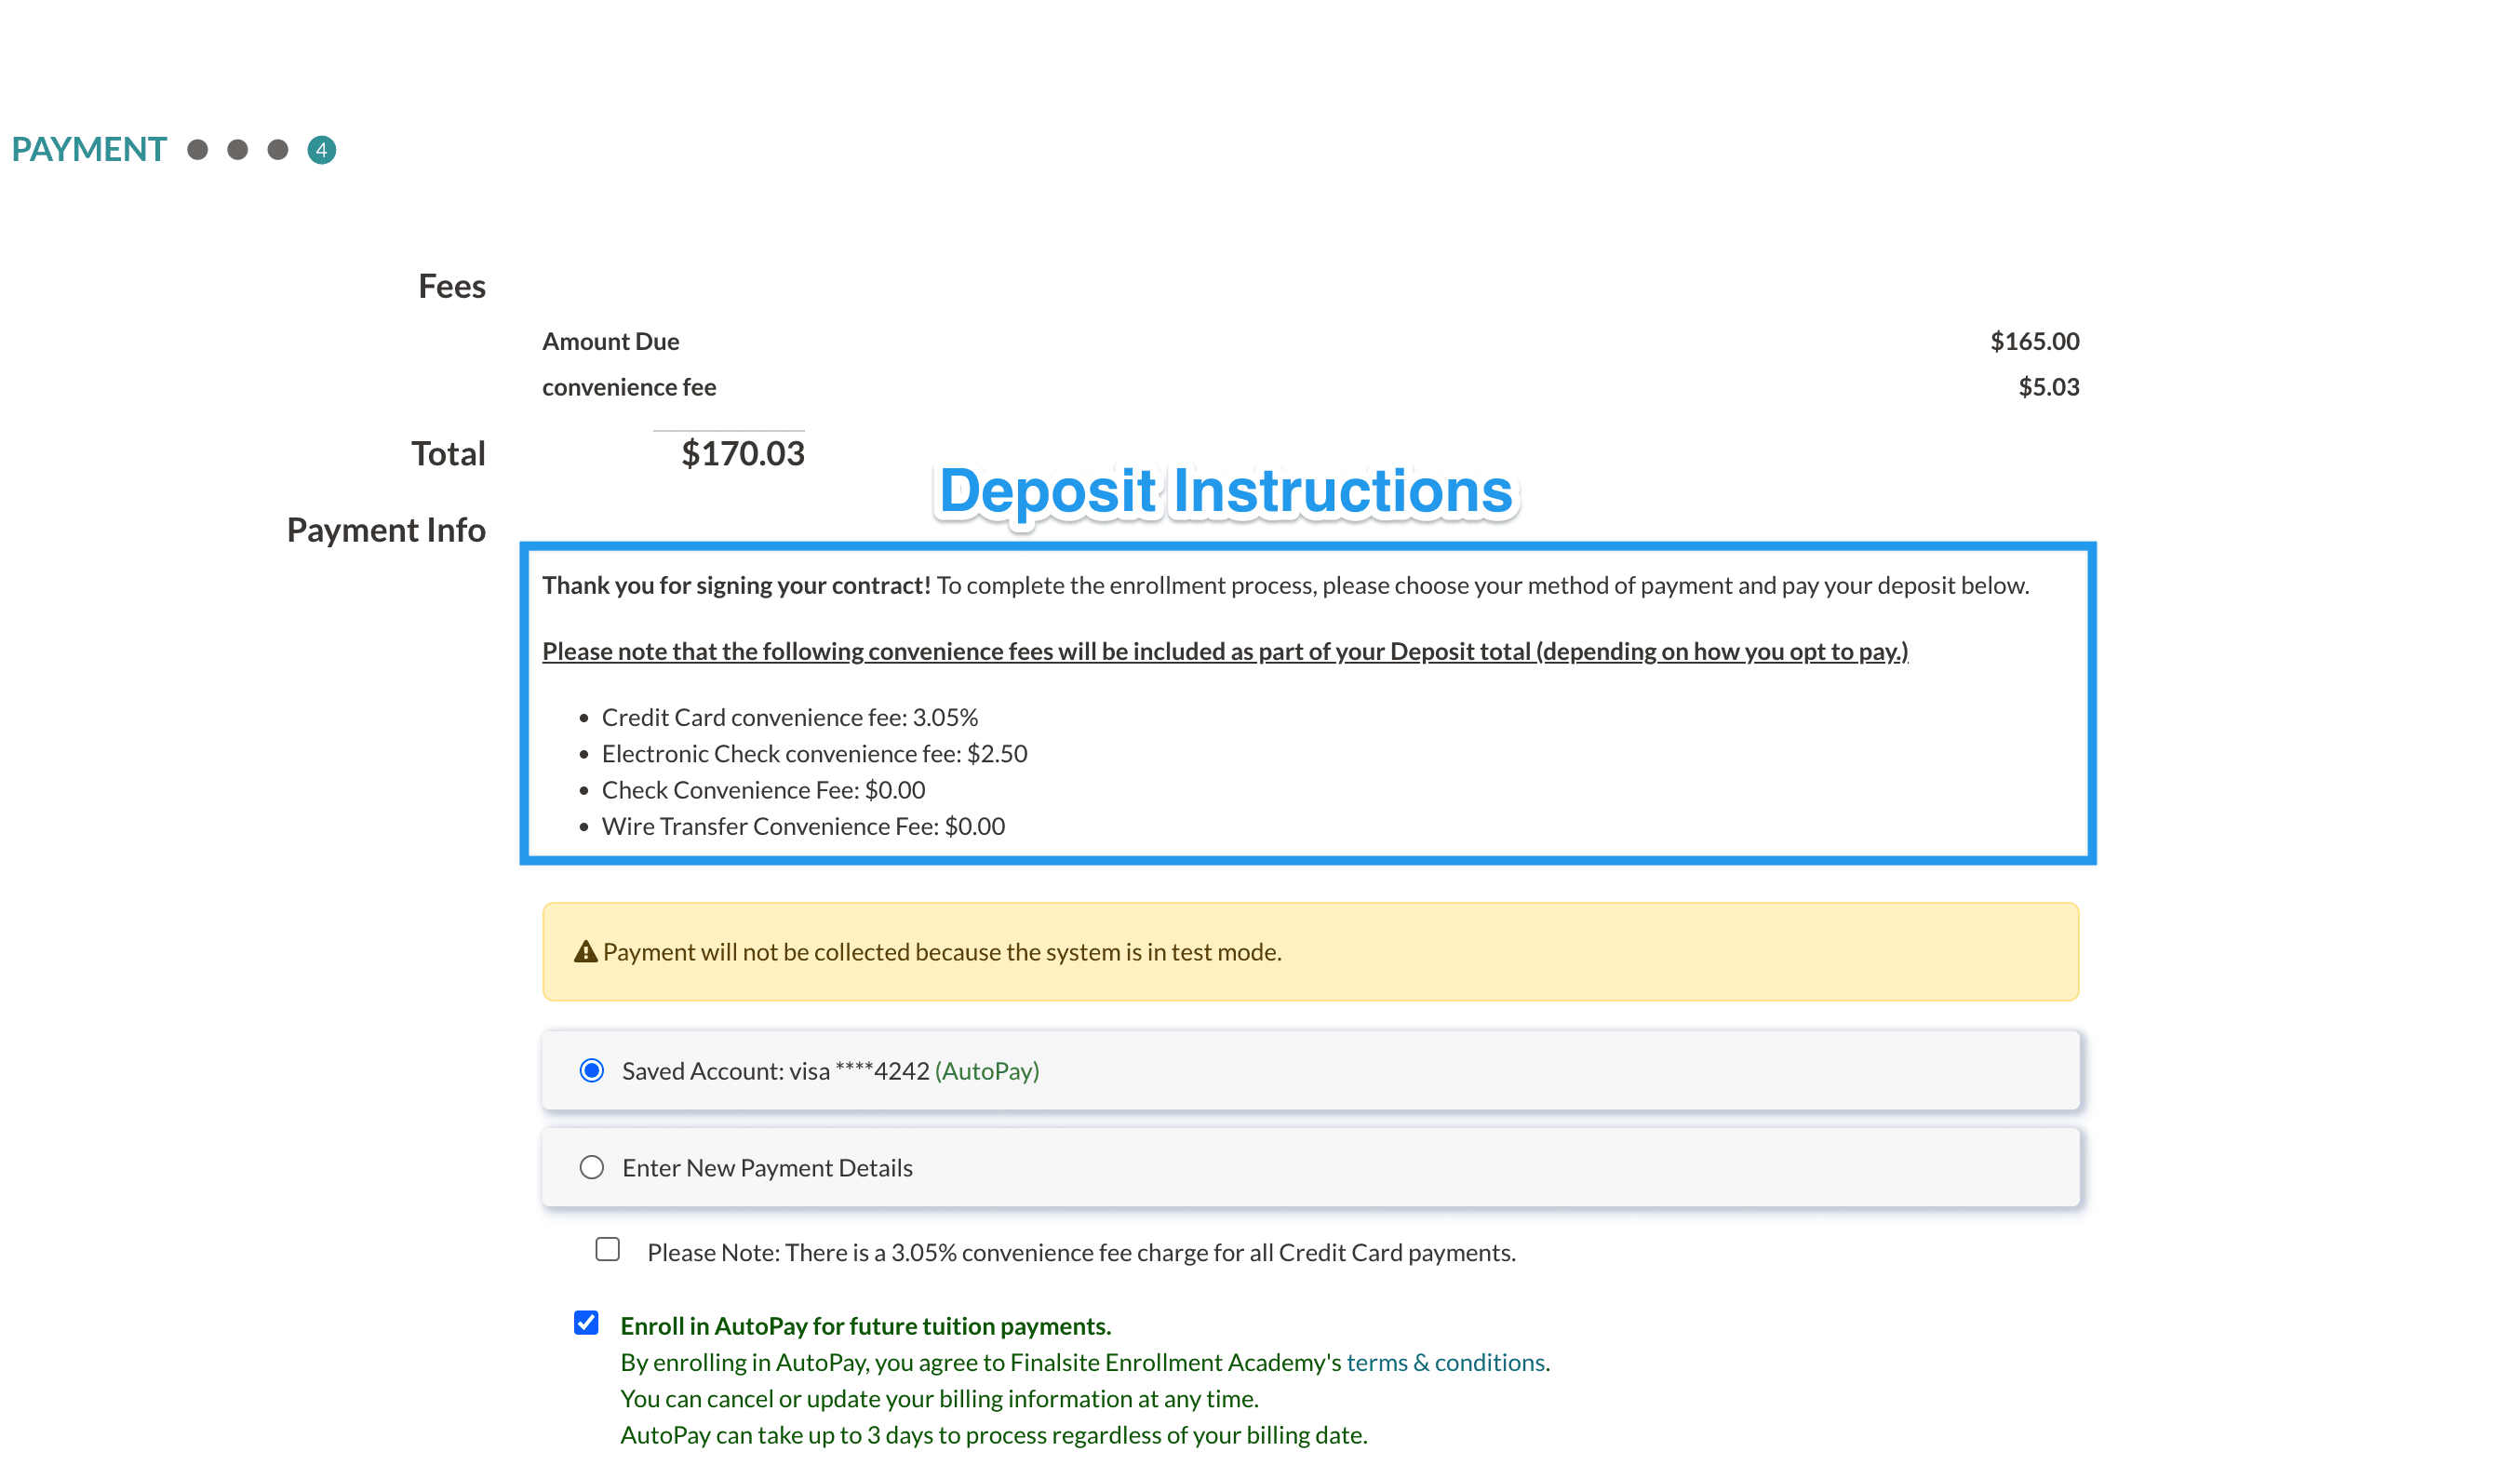
Deposit Instructions
These are the general instructions that display on the contract deposit payment page before a payment method is selected from the drop-down menu.
As a best practice, be sure to clearly communicate any associated fees (like convenience fees) in this section. For schools that utilize our Payments product, we have created a series of merge tokens to specifically pull in your convenience fees. Read more about them in the "Convenience Fee Merge Tokens" article.
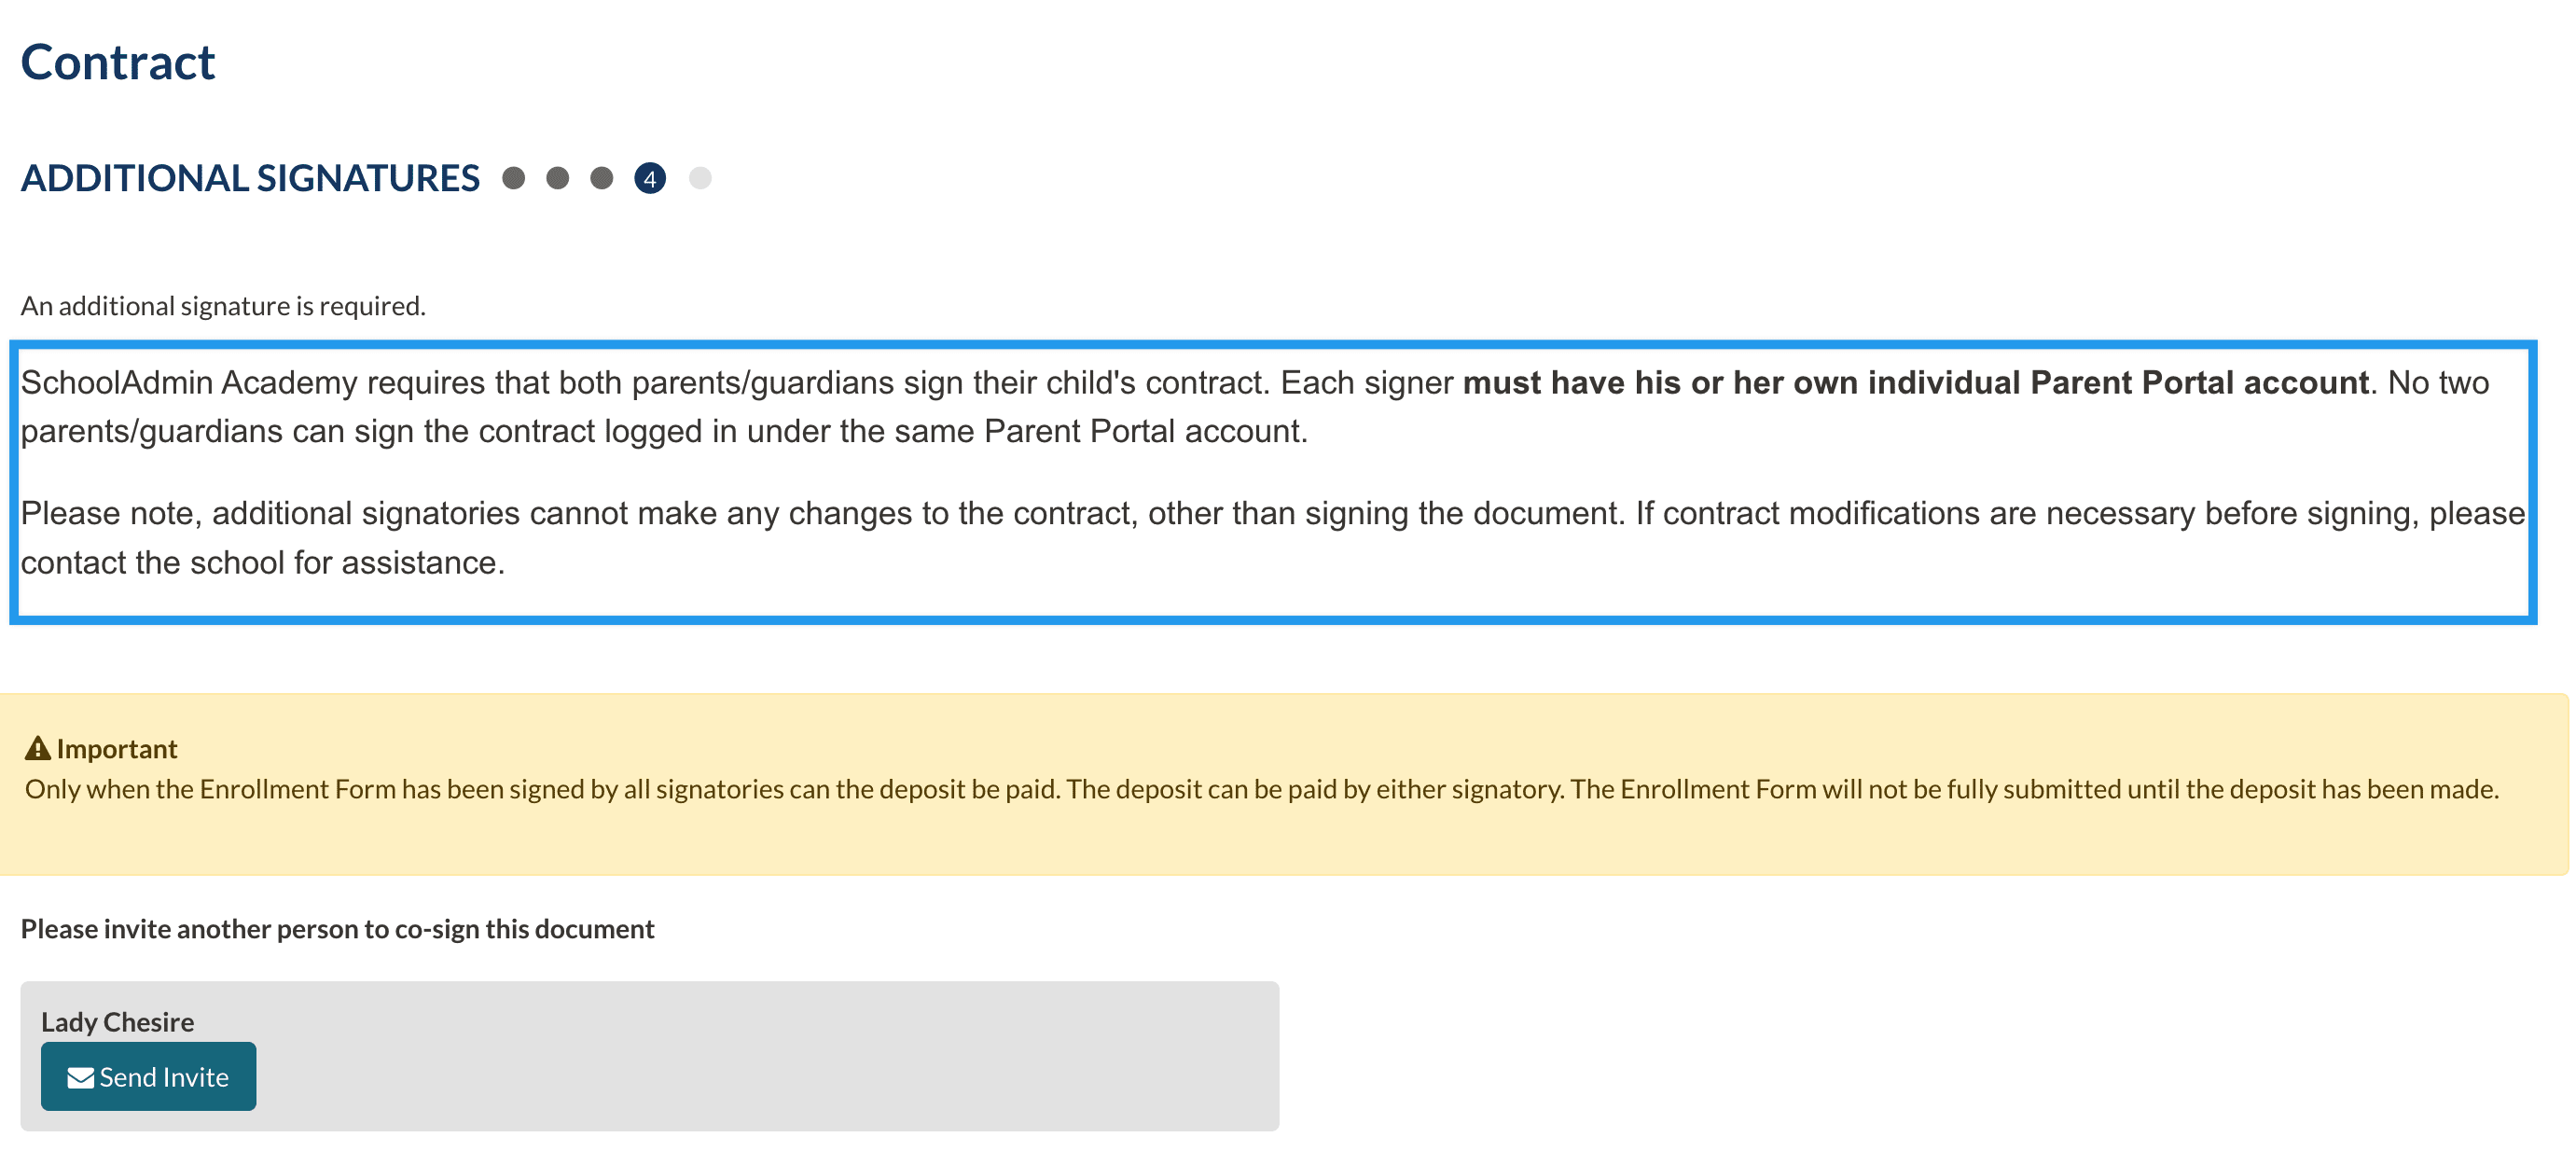
Dual Signature Instructions
The dual signature instructions will only display if your school is using the Dual Signature feature on the contract.
- Once the first parent signs the contract, they are automatically redirected to a page where they can invite a second signer. The instructions are displayed on this page above the invite button.
- If the parent leaves the page and returns later to the checklist, they will still see these instructions when selecting the 'Invite another signer' button.
Inquiry Thank You
This is the thank you page that displays after the Inquiry Form is submitted. You can use this page, as well as the automated Inquiry Thank You Email, to increase your conversions by showcasing your value proposition.
Best Practices:
- Thank the family for their interest!
- Invite families to fill out an Inquiry Form for another student with a direct link to the form, or provide a link to the Parent Portal with instructions on how to start an application.
- Let families know you'll be reaching out and any additional steps in the process.
- Provide links to different social media pages and/or important pages on your website.
- Invite families to view or subscribe to your blog or newsletter via provided links.
- Include testimonials or fun images/videos that are compelling about your school's mission and community.
- Mention upcoming events and link to a calendar on your website or public calendars that you have set up in Finalsite Enrollment.
- Embed a video by copying the embed code from the video you wish to add, and then paste it into the code view of the template.
- You do not need to insert your school banner/logo as this is already displayed at the top of the page.
Login Page Description
This is the welcome message displayed at the top of the page in the Parent Portal before the parent/student logs into their account.
- Make it warm and friendly.
- Include information on why parents are creating an account and what they can manage in the Parent Portal.
- Include contact information. If someone has trouble logging in, they know who to contact without needing to look for a phone number on your website. The contact information in the Parent Portal isn't displayed until after they've successfully logged in.
- Include information for first time users to check their email address before creating their account to ensure they don't mistype it upon account creation. Remember, first-time users who manually create an account (rather than creating an account through SSO) will receive a verification email and must verify their account within 24 hours.
Pay Now Instructions
These are the instructions that display if a parent uses the "Pay Now" button on a form fee or a deposit checklist item. Learn more about form payments in the article "Making Form Payments in Finalsite Enrollment."
Portal Widget
This is the messaging that displays above the student list after someone has logged into their account, but before they have clicked into a specific student in the Parent Portal.
Best Practices:
- Make it warm and friendly.
- If your admissions season is only open for a defined period of time, you can let parents know when applications will be accepted and available online.
- Link to the Parent Portal Online Help Center in the upper right, as noted by the 'Help' icon, which answers a list of FAQs that parents can use throughout the process. You can drive traffic to this page in this template so that parents can help during off-hours when they're working on forms and checklist items in the evening. An example is provided in the image above.
Summary Page Sidebar
This is the fully customizable sidebar that appears next to the student list after someone has logged into their account, but before they have clicked into a specific student in the Parent Portal. By default, the template includes the contact information you have entered within Settings > General > Contact Information, but it can be updated to whatever you like.
Best Practices:
- List the key admissions, enrollment, and other contacts that families might need to reach during the process. You can pull in the information from the Contact Information setup page using merge tokens, or you can simply type in custom information.
- Get families excited about your school by displaying engaging images or videos from school events, clubs, and more.
Summary Page Header
This is the header that appears above the information you entered in the Summary Page Sidebar. The default is "Contact [Your School Name]" but this can be customized as you like.
Shared Portal Page
Please Note
This template is only available to schools utilizing the Shared Portal option.
The Shared Portal Page template is where you can customize the main content about your school that displays on the Explorer page when your school is selected.
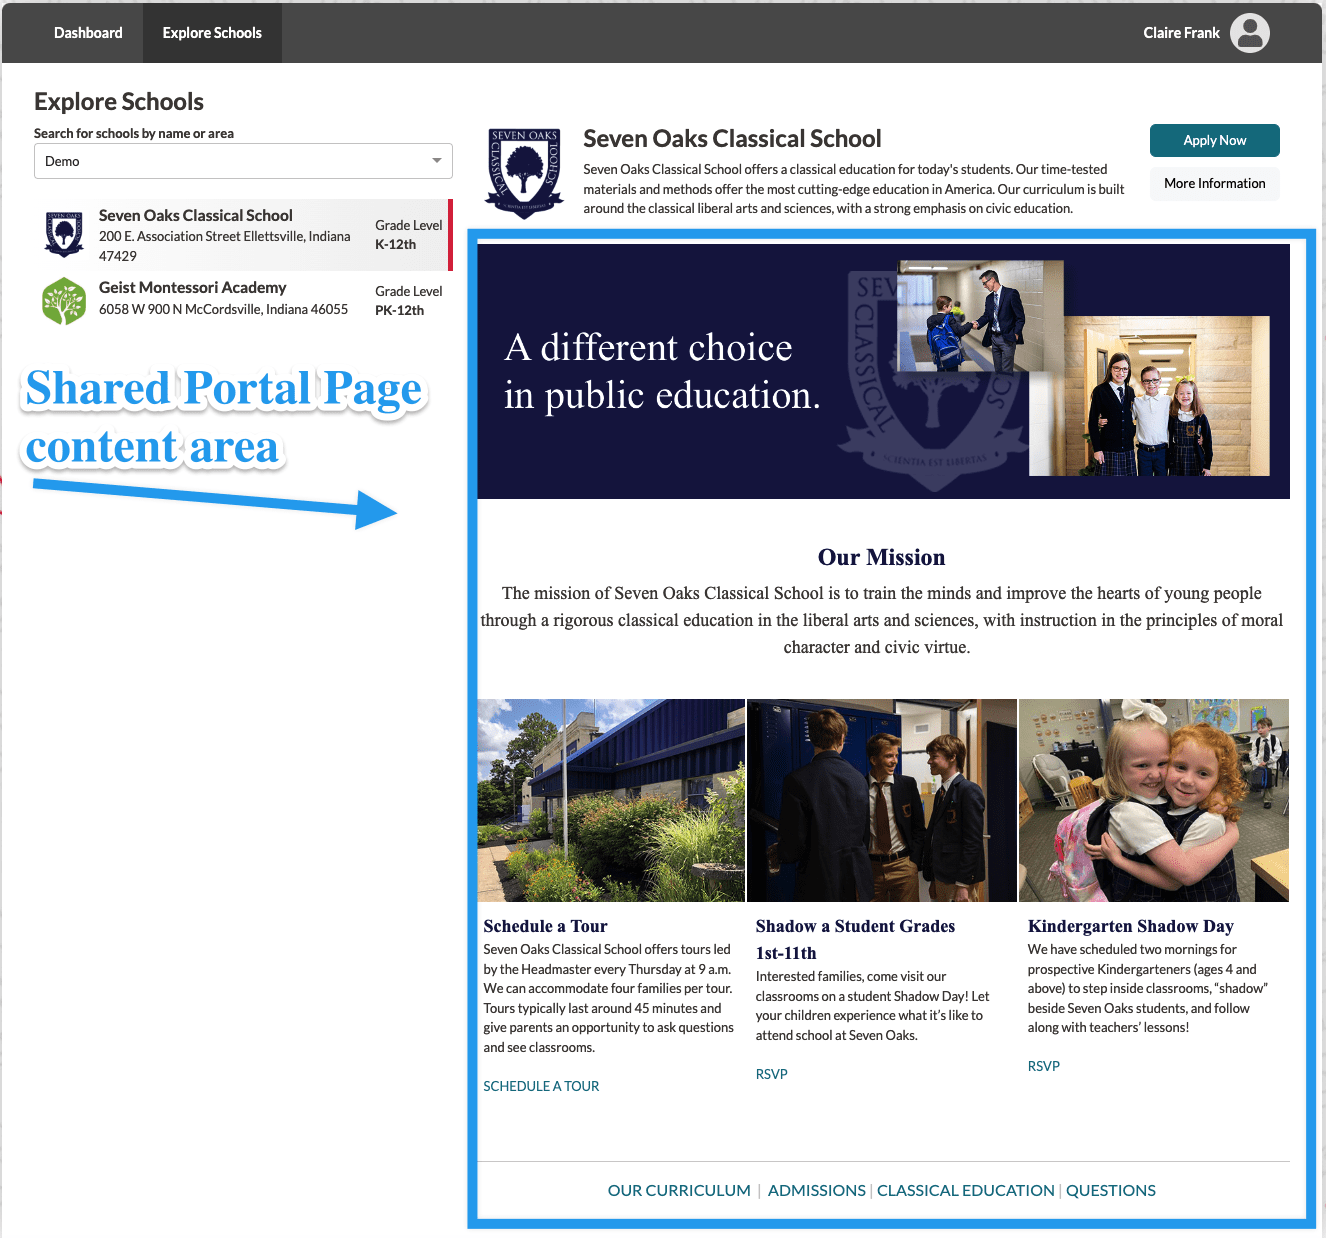
This template has the same functionality as the others in that you can edit the text in a variety of ways, insert images, and embed videos. You can also use the code editor to make more advanced adjustments to the template.
Best practices for making your Finalsite Explore page shine.
- Keep this page up to date.
- Be sure to include important deadlines and details that prospective families should know about.
- Add links for families to register for highlighted events.
- Design your page to stand out.
Admissions and Enrollment Settings
Enable/Disable Enrollment and Admissions Checklists for Parents
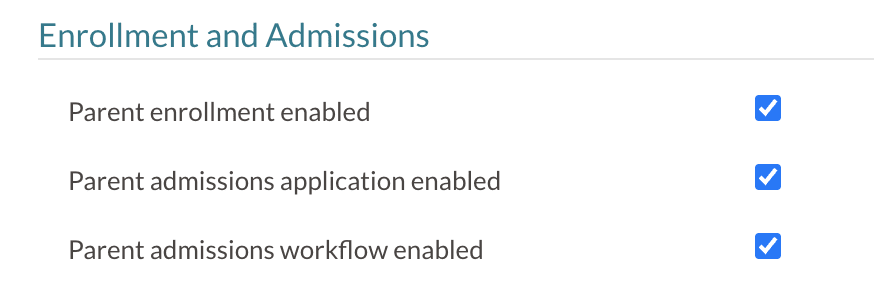
Below the Parent Portal Templates are Enrollment and Admissions Settings. To manage these settings, use the checkbox next to them and make sure to click Save at the bottom after making any changes.
-
Parent enrollment enabled: Turning this off means parents cannot access their enrollment checklist or contract/registration form, which is contained within the checklist. Even if you generate contracts with this turned off, parents will not be able to view anything until you mark the checkbox to enable parent access.
-
Important Notes
- For all schools: Parents are not automatically notified when this setting is turned on or off. If you are opening or closing enrollment, consider sending a notification to inform them of the change.
-
For Billing schools: If parent enrollment is disabled, the Billing Management tab within the Parent Portal is still available. The Billing Management tab cannot be disabled or turned off.
-
Important Notes
-
Parent admissions application enabled: This allows families to submit application forms. This setting does not grant access to the checklist. Unchecking this option turns off the ability for families to submit applications.
-
In the Parent Portal:
- New Users: On their first time logging in, they will only see the Authentication code button and not a button with the option to submit an application.
- Existing Users: When a parent selects the button to submit an application, they will see a message that says "The application is not open at this time."
- In Finalsite Explore: The Apply Now button in Finalsite Explore will no longer appear on your Explore School's page.
- Wherever a URL link to your Application is shared: Parents will be directed to the Parent Portal and will see a message that says "The application is not open at this time."
- Quick Actions Menu: The ability to submit an application manually through the Quick Actions menu will still be available to admins even if the application is disabled for families.
-
In the Parent Portal:
- Parent admissions workflow enabled: The admissions workflow is the application checklist. If you turned the parent admissions application off so that no new families can apply, then it would be a best practice to leave the admissions workflow enabled (turned on) so that families that did submit an application form can still access their checklist and complete it.
Click Save to apply your changes.
More Insight
For more insight and examples of these settings in action, please review our Control Parent Access to Admissions & Enrollment in the Parent Portal article.
Admissions and Enrollment Terminology
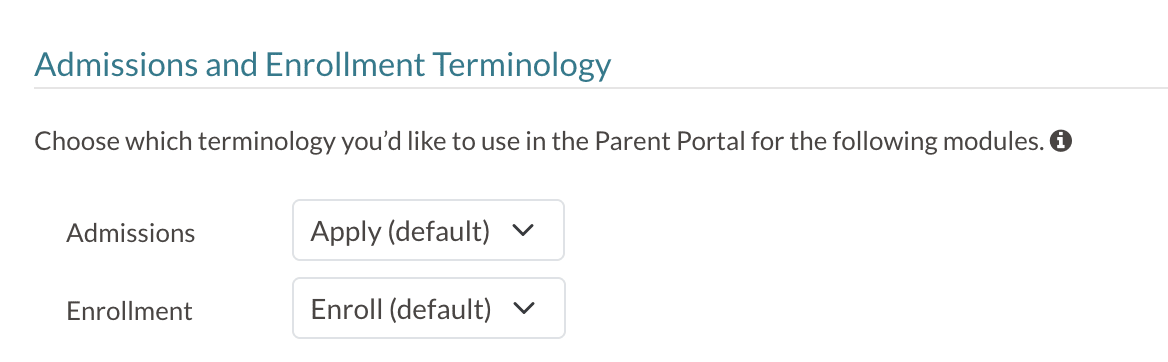
You can customize your school's Parent Portal terminology for Admissions and Enrollment in this section.
- Enrollment options include: Enroll or Enrol or Register
- Admissions options include: Apply or Register
What this affects?
This changes checklist subtext and certain button labels.
What is not affected by this?
It doesn't change thank you pages, certain parent portal templates, or form/checklist names (those are set separately).
Read more specifics about this feature in this article: Customize Admissions & Enrollment Terminology in the Parent Portal
Analytics
⚠️ Important note
The analytics options below are for adding GA4, GTM, and other tracking codes to all Parent Portal pages. To add tracking codes to individual thank you pages and web templates, visit the “Use Custom HTML to add tracking codes/scripts to Parent Portal thank you pages” article for instructions.
Termly Account
Finalsite Enrollment utilizes Termly for cookie consent management. Consent is usually achieved via an automatic pop-up that appears on a webpage, informing users of how their personal information will or will not be saved and used on that site. Users can click through a consent confirmation to indicate their tracking preferences while using the site.
Termly allows you to add a cookie consent banner to your Parent Portal, which is strongly recommended for schools that wish to use Google Analytics 4 to track user journeys in Finalsite Enrollment.
In the Termly account field, you can add the Website UUID that is provided when you sent up your consent tracking. Please refer to our article, Adding a Cookie Consent Banner (Termly), for step by step guidance on setting up an account.
Google Analytics 4 (GA4) Tracking ID
Use the Google Analytics 4 (GA4) Tracking ID field to add a GA4 tracking code to follow user journeys in Finalsite Enrollment.
Simply copy and paste your code from Google into the Google Analytics 4 (GA4) Tracking ID box and click Save at the bottom of the page.
To learn more about this feature, check out our Google Analytics: GA4 Tracking article.
To learn more about Analytics and tracking, check out some of these great resources from Google:
- [GA4] Find your Google tag ID
- [GA4] Introducing the next generation of Analytics, Google Analytics 4
- [GA4] Set up Analytics for a website and/or app
Google Tag Manager (GTM) Container ID
Use the Google Tag Manager (GTM) Container ID field to add a GTM tracking code to follow user journeys in Finalsite Enrollment.
Simply copy and paste your code from Google into the Google Tag Manager (GTM) Container ID box and click Save at the bottom of the page.
To learn more about Google Tag Manager, check out some of these great resources from Google:
Custom Script
Use this field to embed tracking codes, such as Facebook Pixel or other analytics tools, within the Parent Portal. This can help monitor user activity, including logins, form submissions, and other interactions.
Important Notes
- Centralized tracking: You no longer need to add tracking codes directly to individual forms or Parent Portal Content landing pages. Adding your code to the Custom Script field will automatically apply it across all forms and landing pages.
- Script format: Only valid JavaScript is supported.
- Permissions: This section is only visible to users with System Admin access.
- Save your changes: Be sure to click Save after adding or updating your script.
Comments
0 comments
Article is closed for comments.