Overview
Once you have created a calendar, you can access additional settings in the Calendar Settings menu by selecting Edit Settings.
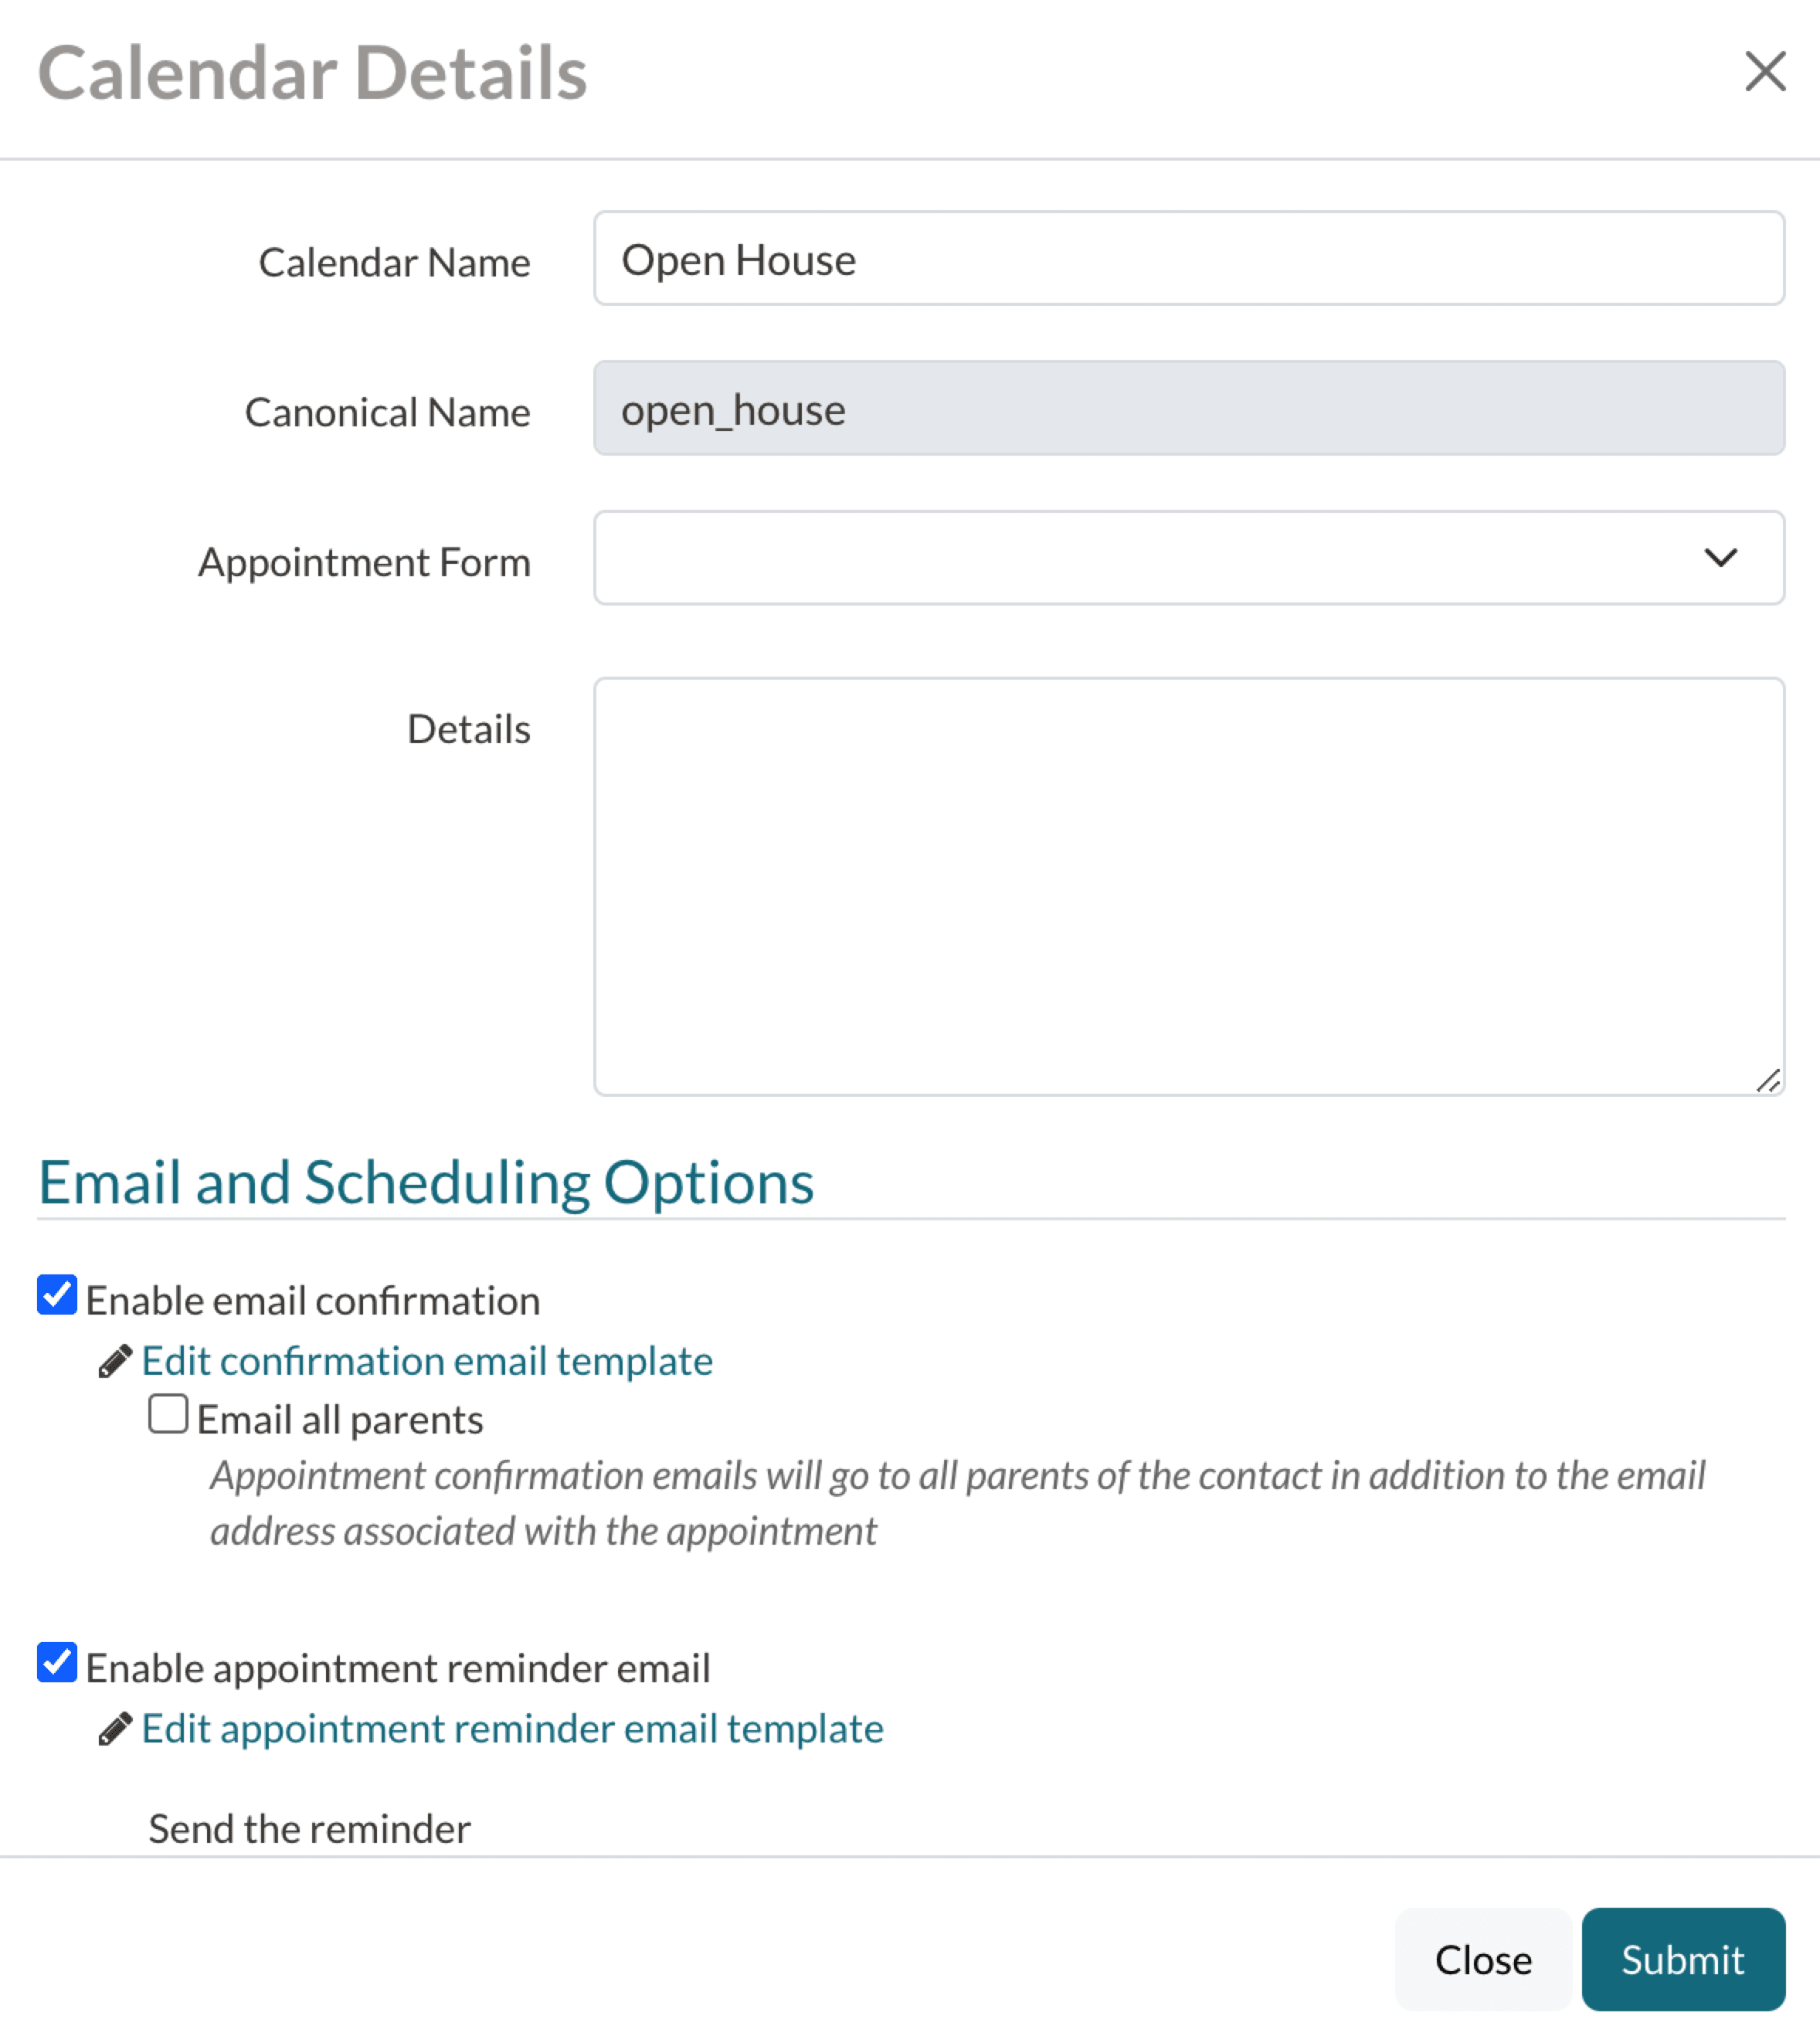
Selecting Edit Settings opens the Calendar Details pop-up.
Within this pop-up, you'll have access to several configuration options for the selected calendar, such as adding an appointment form, editing appointment-related information emails, selecting ICS file preferences, and calendar access options.
Important Reminder
One of the options in the edit pop-up is the ability to share a public calendar link with families.
Don't use Public Links when sharing events with families who are already in the admissions/enrollment workflow.
Public calendar links create a new inquiry each time a family signs up for an appointment though one which could create some issues with duplicates or statuses when the appointment is booked.
Instead, for students already in the admissions/enrollment workflow, add the calendar to the checklist and direct families to sign up for the event through the checklist.
In this article
Calendar Settings
Once you have selected Calendar Settings > Edit Settings on your desired calendar, the Calendar Details window will pop up. This window contains basic information about the calendar, as well as several configuration options, as described below.
Basic Information & Setup
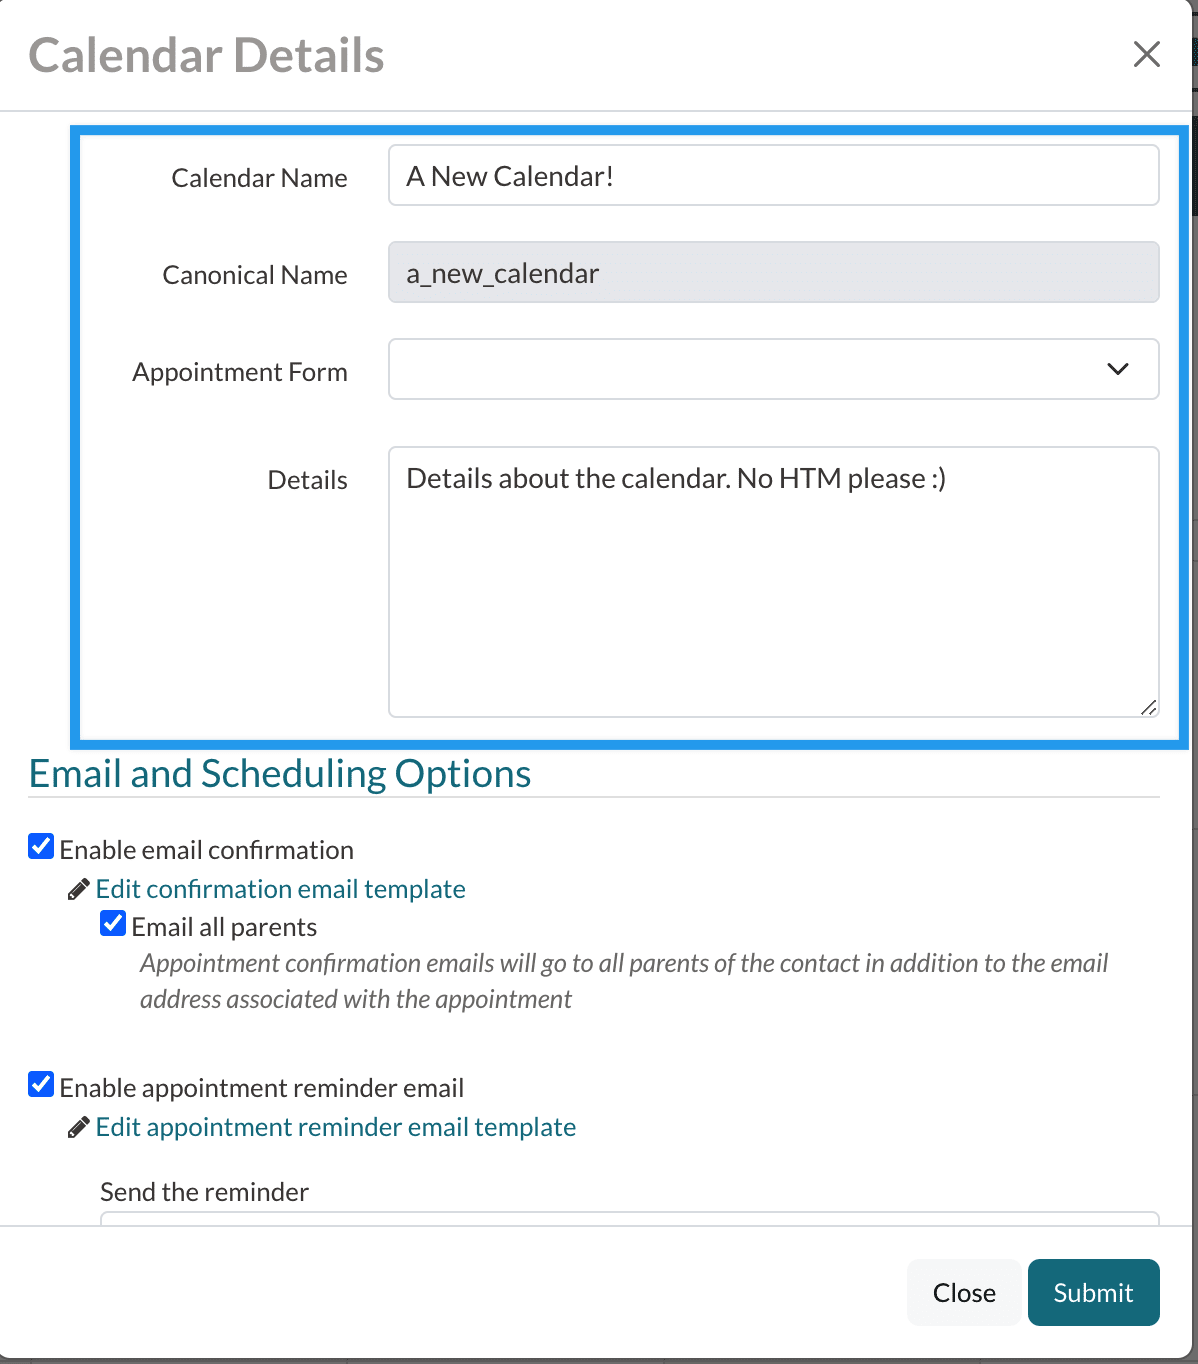
In the top section of the Calendar Details window, you'll see some basic information about how your calendar is set up and will appear to families.
-
Calendar Name: The display name for your calendar. This is the name that will appear when you're selecting a calendar to use on the checklist or a form. It is also what will populate when using the #{{calendar.title}} merge token in the selected calendar's appointment confirmation, reminder, and cancellation emails.
-
Canonical Name: The internal name for your calendar in the system, used in searches and other back-end functions. This should be similar to your calendar name and can only contain characters 0-9, a-z, A-Z, or underscores for spaces. The canonical name is automatically generated when you create a new calendar and cannot be changed once set.
-
Appointment Form: Optionally select a pre-created custom appointment form to collect additional information from families at the time of event registration, outside of the default information that is collected. Please note that your custom appointment form content will only be shown for students registering through the checklist or a public calendar link, not registering directly on a form (e.g. the inquiry). If you don't want to use a custom appointment form, leave this blank.
-
Details: This is where you’ll provide a description of the calendar event and any key information you want the registering family to know. These details are parent-facing and appear above the calendar. Please note that HTML and Liquid formatting cannot be used in the calendar details at this time.
Email & Scheduling Options
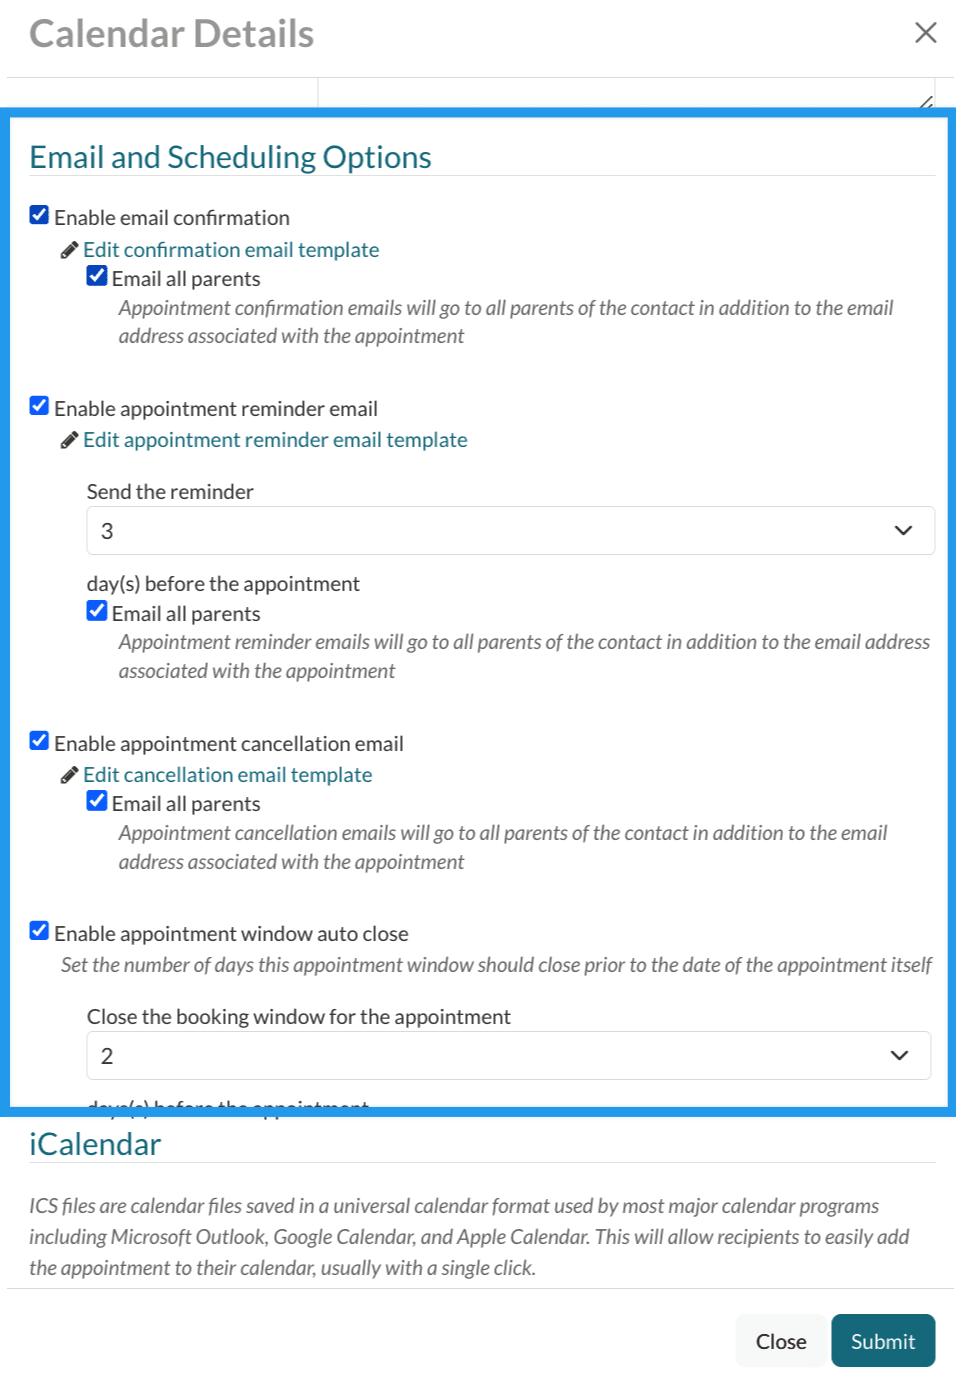
Below the basic information in the Calendar Details window, you'll see the Email and Scheduling Options. This is where you can edit the content and configuration for the appointment confirmation, reminder, and cancellation emails, as well as set the booking window auto-close settings for the calendar.
These are the communications that go out to parents. You can also set up a notification email to come to you when a booking is made within any of your calendars. Learn how to set that up in our User Notifications article.
-
Email All Parents: For each appointment email type (i.e. confirmation, reminder, and cancellation), you have the option to check the box to email all parents. This means that the selected email will send to all parents related to the contact, instead of just to the contact/email associated with the appointment (which is the default setting).
-
Enable Email Confirmation: Check this box to enable the confirmation email, which sends when a contact first registers for an appointment slot on the calendar. You can view and edit the content of this email by clicking on the 'Edit confirmation email template' link below this checkbox.
-
Enable Appointment Reminder Email: Check this box to enable the reminder email, which sends a set number of days before the booked appointment on the calendar takes place (see next bullet point). You can view and edit the content of this email by clicking on the 'Edit appointment reminder email template' link below this checkbox. Reminder emails are sent around 4am Central.
-
Send Reminder X Day(s) Before Appointment: You can use the drop-down menu to select how many days before a booked appointment the reminder email will send (if enabled). The minimum is one (1) and the maximum is fourteen (14). Please note: Receipt of the reminder email will depend upon when the appointment was booked.
-
Enable Appointment Cancellation Email: Check this box to enable the cancellation email, which sends when a booked appointment on the calendar is canceled, either by the family or by an admin. You can view and edit the content of this email by clicking on the 'Edit cancellation email template' link below this checkbox.
Good to know
Learn more about Calendar emails in our Calendar & Appointment Emails article.
-
Enable Appointment Window Auto Close: Check this box to enable the appointment booking window to auto-close, based on the number of days selected (see next bullet point). When enabled, this setting applies only to parents and students. Admins will still be able to view and book appointments for any date.
-
Close Booking Window for Appointment X Day(s) Before Appointment: You can use the drop-down menu to select how many days before an appointment slot the ability to book will close (if the appointment window auto-close option is enabled). This is a useful setting to avoid same-day event registrations and make sure that you have enough time to prepare for any students who are going to attend your events. Please note: Auto-close happens at 11:59 PM on the day selected. This means that if your auto-close is set to 1 day before, a student could still register for an event the evening before it happens. For this reason, we recommend setting your auto-close to two days before at a minimum.
iCalendar
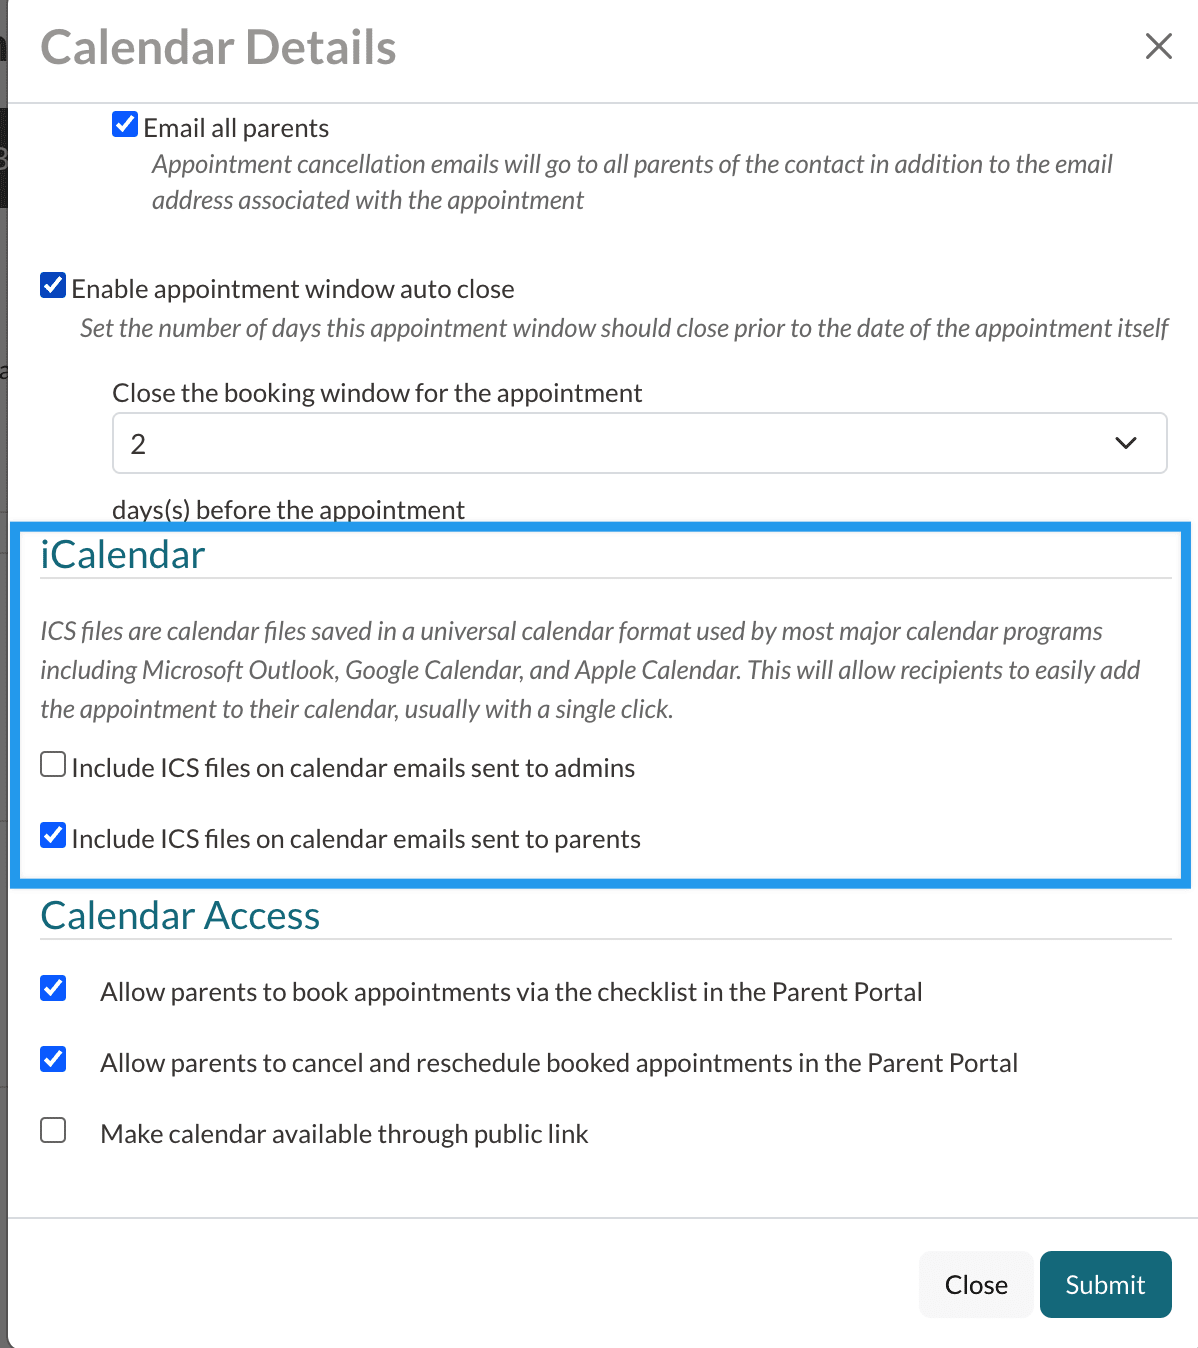
Scrolling further down in the Calendar Details window, you'll see the iCalendar options. These settings allow you to optionally include ICS files on sent calendar emails to provide admins and/or parents with an easy way to add the appointment to their calendar. An ICS file is a calendar file that is saved in a universal calendar format and supported by most major calendar programs (e.g. Outlook, Google Calendar, Apple Calendar.)
-
Include ICS Files on Calendar Emails Sent to Admins: Adds ICS files for calendar events on the notification emails sent to admins.
-
Include ICS Files on Calendar Emails Sent to Parents: Adds ICS files for calendar events on the calendar emails sent to parents.
Both of the above settings are enabled by default on your Finalsite Enrollment calendars. Below is an example of what a received calendar email with an ICS file attached looks like in Gmail. Please note that appearance may vary in other email clients.
To learn more about the 'Sync with an outside calendar' option in the Calendar Settings menu, click here.
Calendar Access
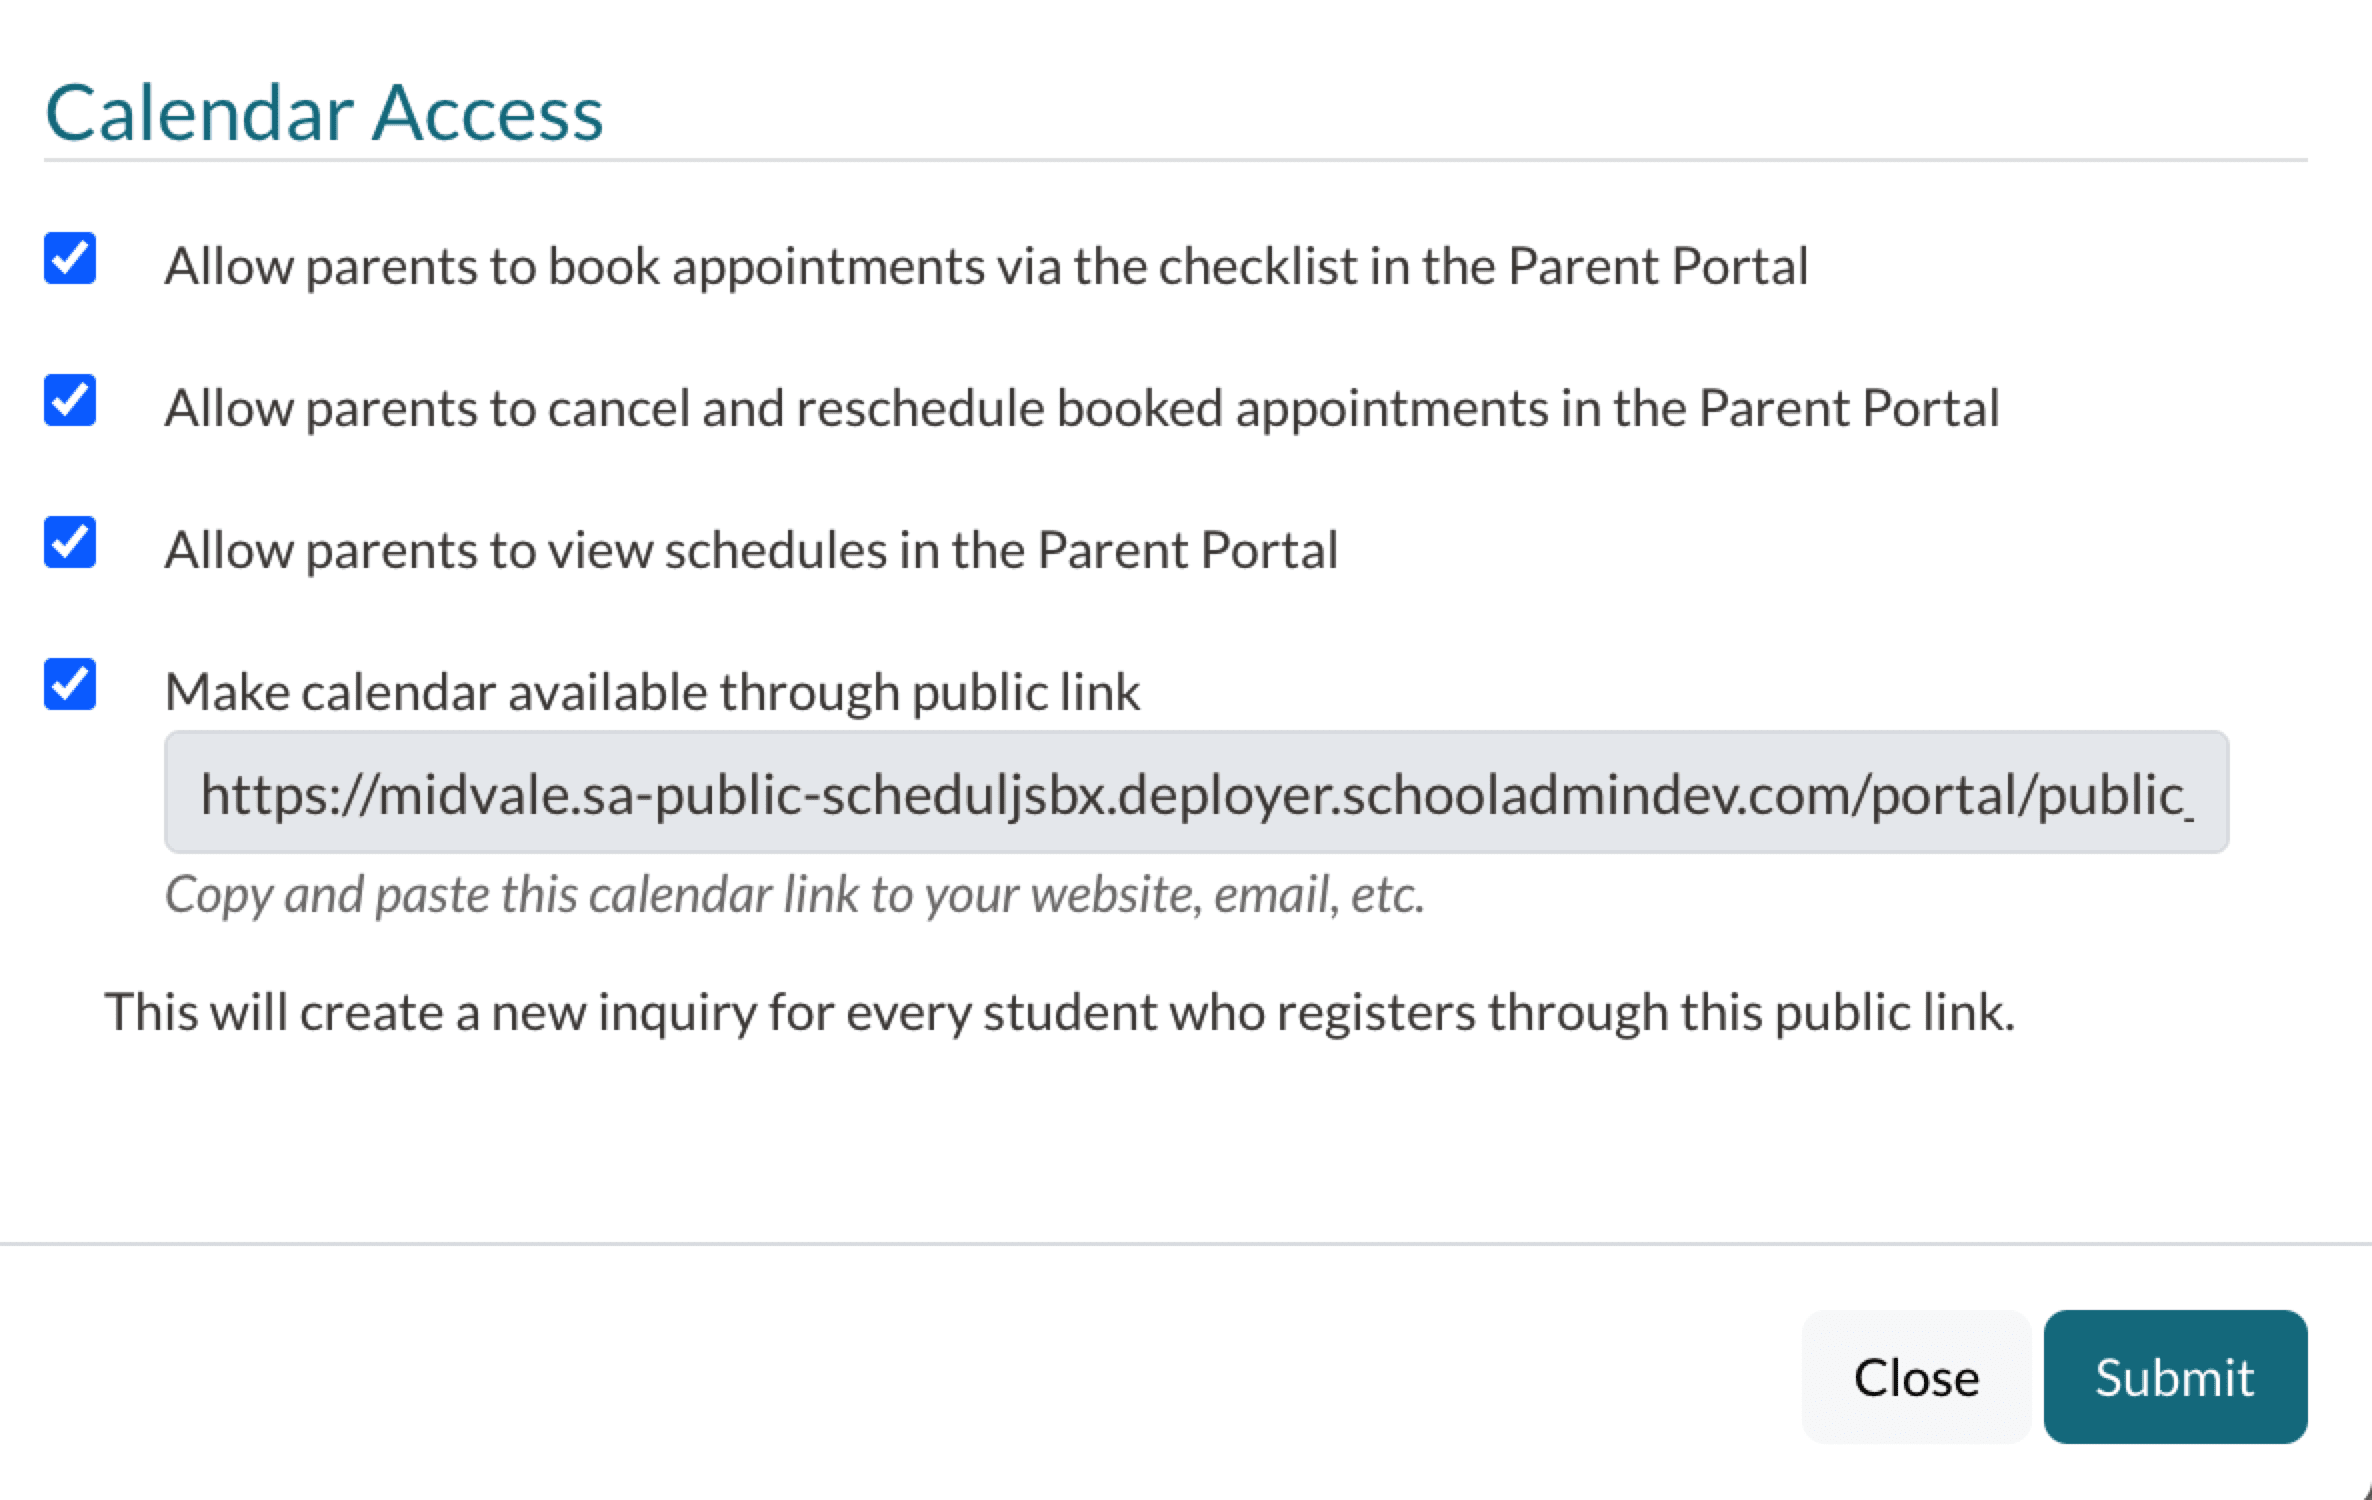
In the last section of the pop-up, you'll see the Calendar Access options. This is where you can specify whether families can book and/or cancel/reschedule appointments on the calendar from the Parent Portal, and whether the calendar will be available through a public link or not.
-
Allow Parents to Book Appointments via the Checklist: Check this box to allow parents/students to book their appointments on the calendar using the checklist in the Parent Portal. Please note that the calendar must be linked to a checklist item for families to be able to book an appointment from the Parent Portal.
-
Allow Parents to Cancel and Reschedule Booked Appointments: Check this box to allow parents/students to cancel or reschedule any booked appointments using the checklist in the Parent Portal. Please note that admins will not receive a notification for rescheduled appointments.
- Allow parents to view schedules in the Parent Portal: Check this box to display the color and title of each calendar schedule on the parent end. Read more about the parent experience in our Creating & Using User Schedules article.
-
Make Calendar Available Through Public Link: Check this box to make the calendar available through a public link, so that families can register for appointments on the calendar without submitting a form or logging into the Parent Portal. When enabled, you will see the public link appear, and you can copy/paste it to your website, social media, email, etc. as needed. When a student registers through a public calendar link, they are created in the system as an inquiry. To learn more about public calendar links, click here.
Good to remember: Don't use public links for students that already have a checklist.
So...why shouldn't I use public links for students who have a checklist?
Public links create an inquiry form every time they are used to sign up for an event.
If a student with an Admissions checklist fills out an event sign-up from a public link, it creates an inquiry for them and, therefore, can result in duplicate records and mixed-up statuses! And anyway, for all students who have already applied, you can just have them sign up for events through their checklist.
Remember to click Submit to save any changes on the Calendar Details window!


Comments
0 comments
Please sign in to leave a comment.