Overview
The Enrollment Refresh Tracker is a tool to guide you through the necessary steps needed to prepare for student enrollment each year. The tracker is located within Settings > General > Enrollment Refresh Process in your Finalsite Enrollment site.
IMPORTANT: Before you begin enrollment, please set up and activate your upcoming Enrollment term within Settings - Fields & Data - Enrollment Setup.
How-To: Use the Enrollment Refresh Tracker
Getting Started
On the Enrollment Refresh Process page (Settings > General > Enrollment Refresh Process), you can start by setting the dates that you’d like to send your enrollment contracts out for your Returning and New Students within the 'Contract Dates' section.
These dates are for your reference only and do not affect anything else in the system.
To store the contract dates, click on the Save button at the bottom of the page.
To the right of the contract dates section is a link to sign up for additional training and office hours. You can also click here to learn more.
Enrollment Refresh Items
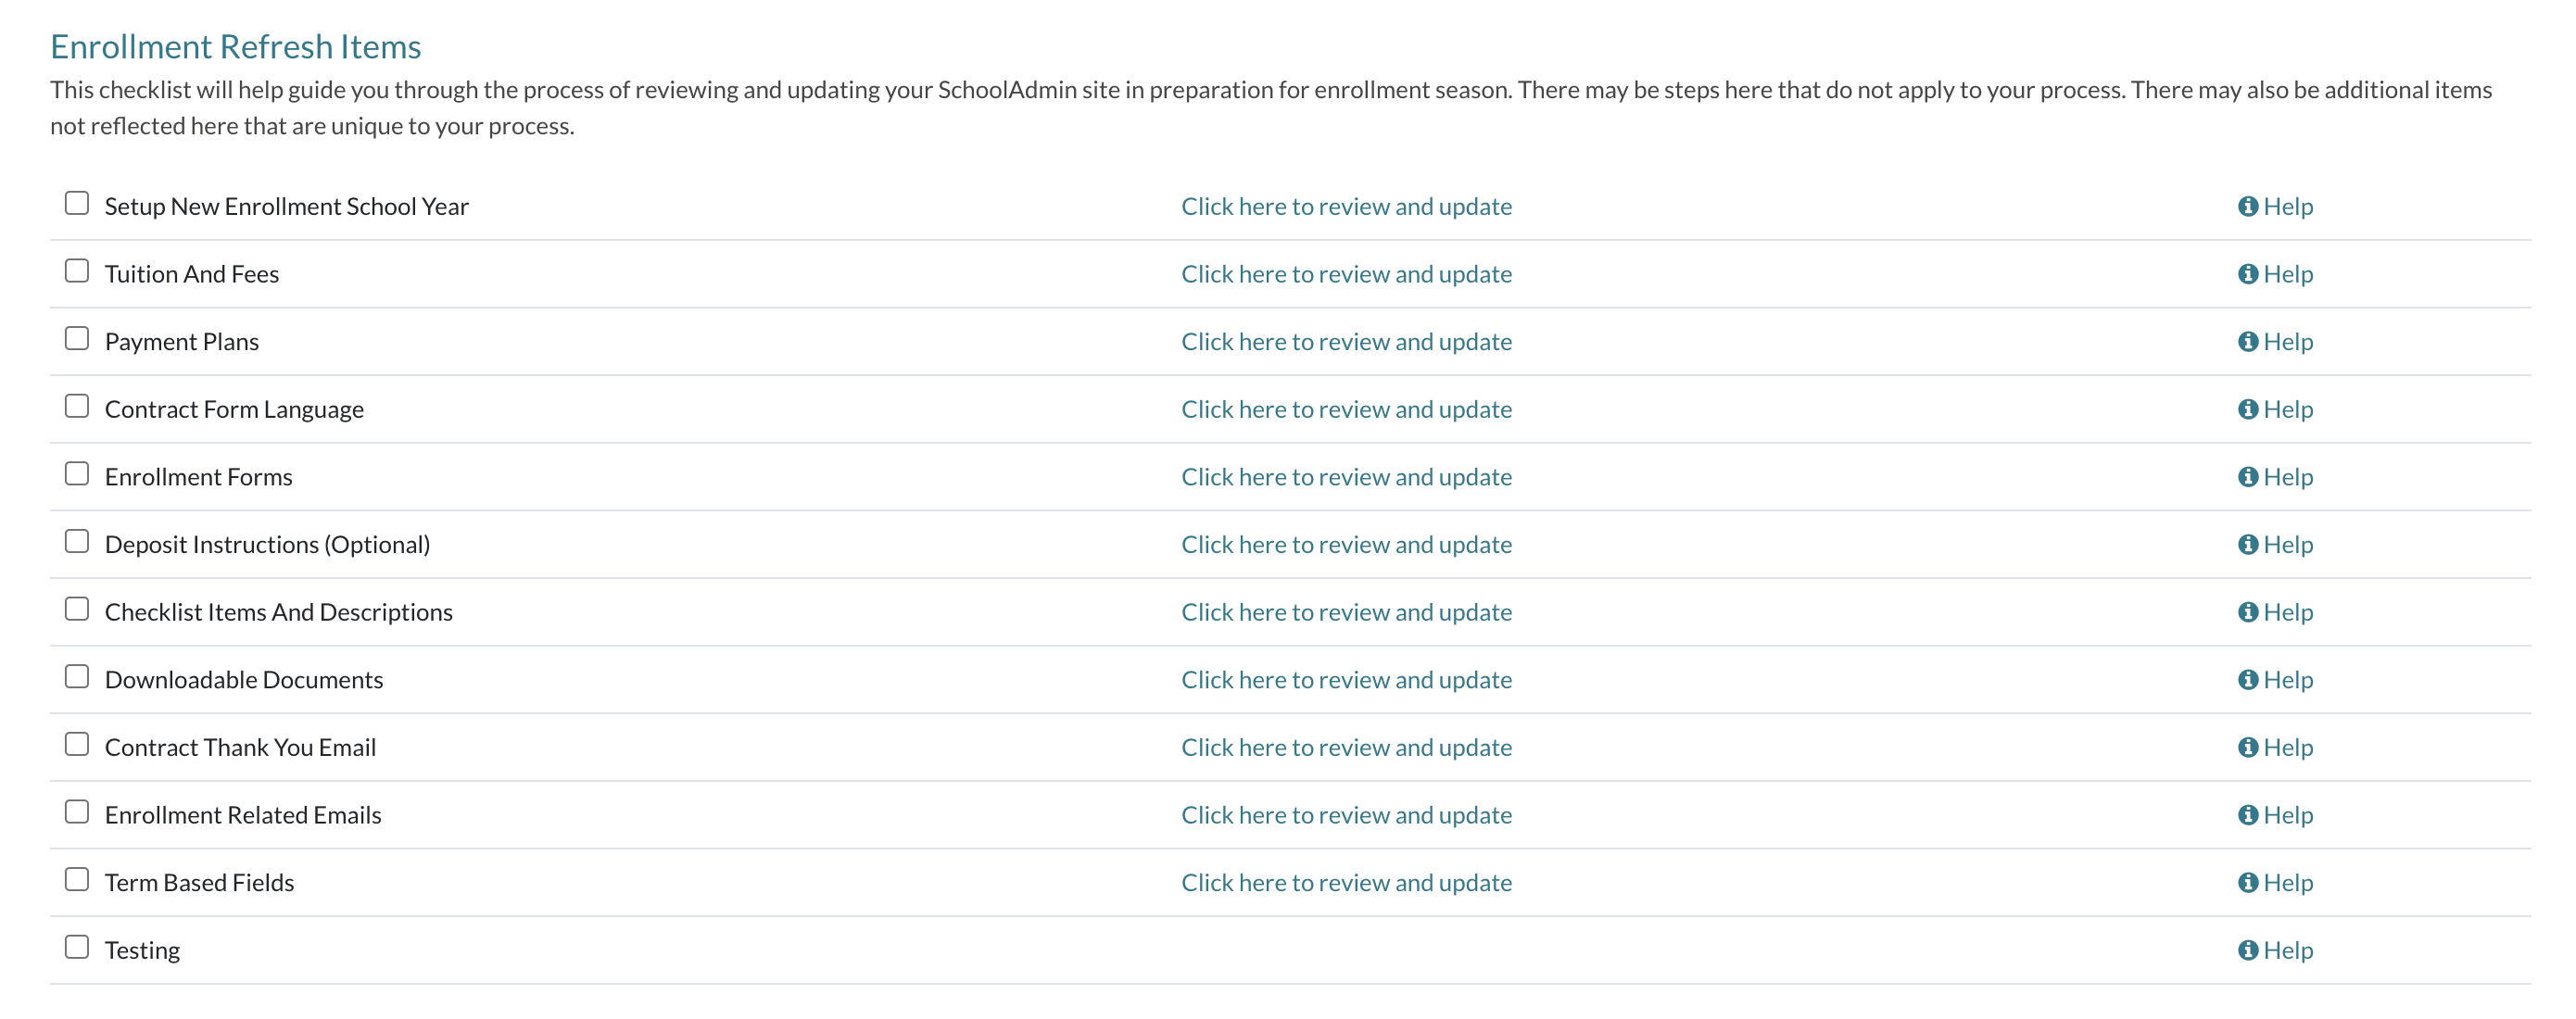
Next on the page is your Enrollment Refresh Checklist. This is a list of items that you need to review for the upcoming enrollment year to make sure all of your data is up to date.
- As you complete items on the list, mark the checkbox along the left side.
- Click on the review and update link for any of the items and you will be redirected to the referenced content on your Finalsite Enrollment site.
- If you need help understanding any of the pages or items, click on the help link on the right to access a help article about them.
- To save your progress on completed items, make sure you hit the blue Save button at the bottom of the page.
The enrollment refresh items include:
-
Setup New Enrollment School Year: Activate the new school year (term) within the Enrollment Setup page. Within that page, you will also have the option to:
- edit the parent-facing name of your Contract and/or Deposit
- enable contact photos on contracts
- enable the countersign feature
- enable the continuous enrollment feature
-
Tuition and Fees: Review and update your tuition amounts, required and optional fees, payment plans, etc. You can also review what amounts you'd like to include to be paid with the deposit (i.e. which fees should be paid immediately at the time of contract signing).
- Payment Plans: Review and update your payment plans. Check that the plans you want to provide as options are set to active. Make sure the parent explanation text is up to date. Confirm that any fees you need to have attached to payment plans are set up and attached to the correct plan(s).
-
Contract Form Language: Review and update any language/wording on the Contract Form.
-
Enrollment Forms: Review and update any wording on your custom enrollment forms, for example, the intent to enroll form, field trip permission form, etc.
-
Deposit Instructions (optional): Review and update the custom instructions that will appear on the deposit payment page for parents.
-
Checklist Items and Descriptions: Review your required, optional, and internal-only checklist items and any show/hide rules associated with them. Also, review the parent-facing description text for any required and optional items.
-
Downloadable Documents: Review any documents that are linked within checklist item descriptions, custom email templates, parent portal content pages, etc., and make sure they are current and up-to-date for the new school year. You can replace an existing file with a new version within Settings - General - File Management.
-
Contract Thank You Email: Update the automatic thank you email that gets sent once contracts have been fully submitted.
-
Please note: When enabled, Contract Thank You emails are only sent automatically if they are enabled within the Communication Setup Page (Settings > Communication > Communication Setup) and if the contract submission is performed by the parent. Bulk contract submissions by an admin or contracts subjected to countersign will not trigger the system Contract Thank You Email.
- If you are using the countersign or bulk submission feature and would like to learn how to set up an automatic communication plan to trigger a Thank You email post-contract completion, please refer to this article within the How-To Set Up an Automatic Contract Thank You Email section.
-
-
Enrollment-related Related Emails: Review and update all other emails sent during the enrollment process, such as emails sent when contracts are available, checklist completion reminders, etc.
-
Term-Based Fields: Review any fields you have that are term-based and may need to be updated for the new enrollment year.
-
Testing: Set up a test student or use an existing one to make sure everything is looking and working as expected. Some things to test include previewing all tuition and fees for different contract rules (such as grade level criteria, etc) via the contact record before contract generation.
Next, you can test the parent view of the checklist using the impersonate action to confirm rule-based checklist items and parent explanation text are displaying properly. If anything isn't working as expected and you're not sure how to fix it, contact our Support Team so we can help!
Enrollment Process
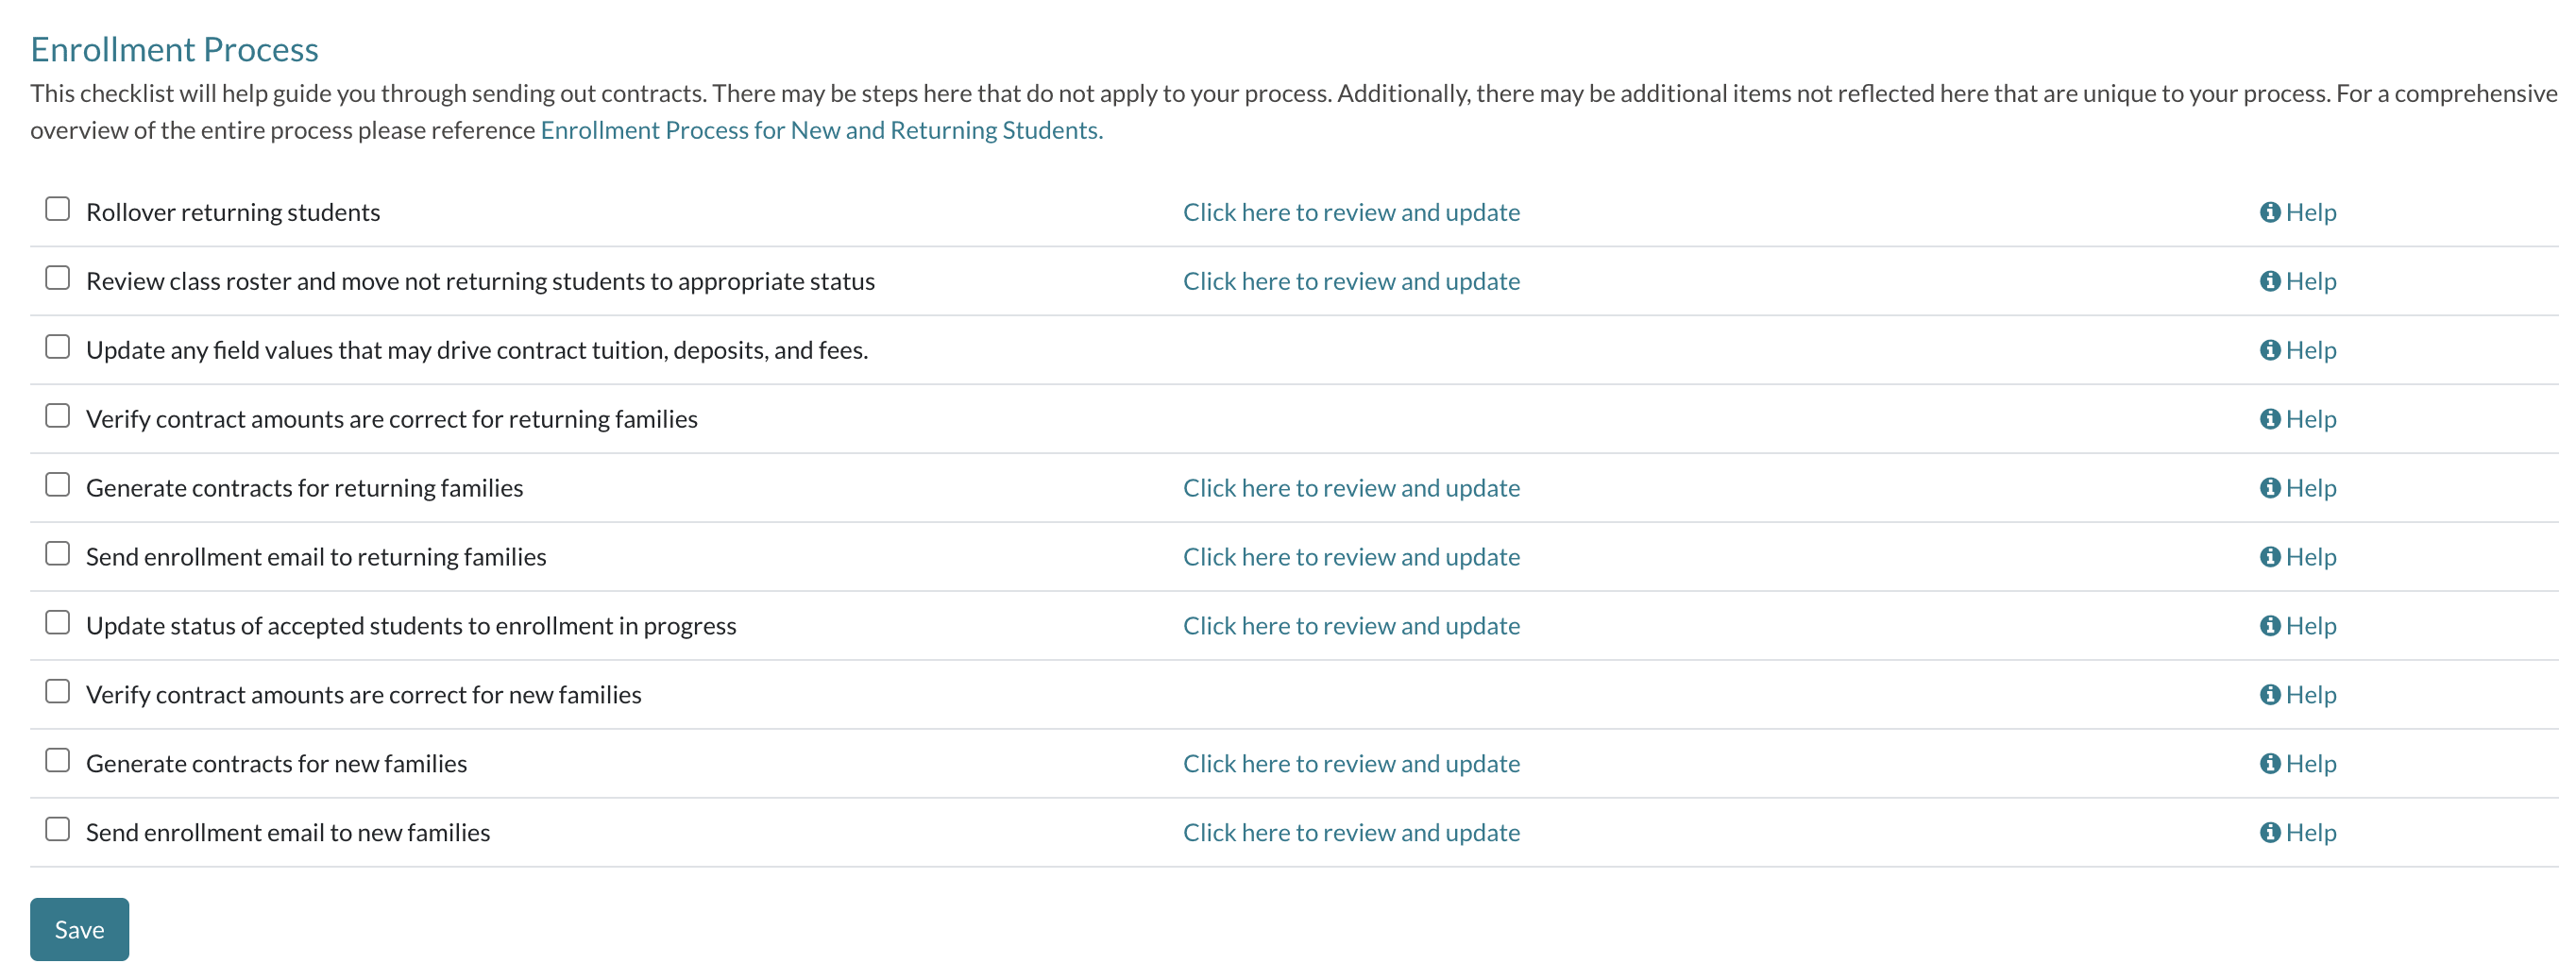
Now that everything has been reviewed and updated, you can begin the Enrollment Process for your returning students and your new students.
- Follow the steps in order and mark the checkbox along the left as you complete each item.
- If you need help, click on the help link on the right to access a help article about the item.
- To save your progress on completed items, make sure you hit the Save button at the bottom of the page.
Please note: Before you complete the enrollment process steps, you should create and activate the new enrollment year. Click here to learn how.
-
Rollover Returning Students: Using the rollover action, you'll roll over all returning students except the ones marked as mid-year withdrawal.
-
Students who are not returning for the following year will still need to be rolled over. After rolling them over, you will set their status to 'Not Enrolling' (see next step below).
-
-
Review Class Roster and Move Not Returning Students to the Appropriate Status: For any students who are not returning for the new year, you still need to roll them over so that they remain active for the prior year. Once they've been rolled over to the new year, you will then set them to an inactive status of 'Not Enrolling.'
-
Update any field values that may drive contract tuition, deposits, and fees: See the Contract Fees page to determine which fields drive your fees. You can update fields directly on the student record, in bulk with a search, or with an update import. You'll want to add/update values to any field that you need to either trigger a fee for a student or add an amount in them (ex. scholarship amounts).
-
Reminder, term-based fields clear out with rollover and non-term-based fields do not clear out (they keep the same data year over year unless it's manually cleared out).
-
Some examples of non-term-based fields include custom tuition assistance and scholarship fields, academic or athletic fees, transportation fees, etc.
-
Term-based fields will be cleared for the new term so you can enter new values, as applicable.
-
-
Verify contract amounts are correct for returning families: Before you generate contracts for your new or returning students, a best practice is to preview them to make sure that all contract fees (e.g. tuition, fees, and discounts), custom scholarships, payment plans, and other contract content is populating as expecting.
-
Generate Contracts for returning families: Generate contracts in bulk for your returning families and review the tuition and fees.
-
Send enrollment email to returning families: Send out the enrollment email to your returning families.
- This email should include clear instructions for creating/logging into an existing parent portal account, merge fields for authentication codes, and any additional instructions required for your school's process.
- If you have dual signatures on contracts. Make sure you inform families that they must create two different parent portal accounts with two different email addresses in order to sign. Click here for more information.
-
Update status of accepted students to enrollment in progress: Once you move Accepted students over to Enrollment, the enrollment checklist will become visible to the family in the Parent Portal, as long as parent enrollment is enabled, but they will not have access to the contract until you generate it.
-
Verify contract amounts are correct for new families: Same as above ('Verify contract amounts are correct for returning families') but for your new families.
-
Generate contracts for new families: Generate contracts in bulk for your new families and review the tuition and fees.
-
Send enrollment email to new families: Same as above ('Send enrollment email to returning families') but for your new families.


Comments
0 comments
Article is closed for comments.